Xpro Social Chat Widget for Elementor
Providing instant communication is one of the easiest ways to build trust with your website visitors. Instead of waiting for customers to fill out lengthy contact forms or search for your contact information, a floating chat widget allows them to reach you with just a single click. Xpro Elementor addon comes with the best social chat widget.
Before we jump into the how-to section, let’s first understand what a Social Chat Widget is and why it has become an essential feature for modern websites.
A Social Chat Widget is a floating communication tool that allows visitors to connect with your business through their preferred messaging platform instantly. Instead of searching for your contact details or filling out lengthy forms, users can start a conversation with a single click using platforms like WhatsApp, Facebook Messenger, Telegram, Email, Phone, and more.
To better understand its value, let’s look at a real-world example of how a Social Chat Widget can improve customer engagement.
For example:
Imagine you own an online clothing store. A customer wants to know whether a product is available in another size before making a purchase. Instead of filling out a contact form and waiting several hours for a response, they can simply click the WhatsApp button and receive an instant reply. This quick interaction builds confidence and significantly increases the chances of completing the sale.
Throughout the rest of this guide, we’ll show you how to configure the Xpro Social Chat Widget, add multiple chat platforms, customize its appearance, and create a seamless communication experience that helps engage visitors and generate more leads.
How to Install Elementor Social Chat Widget
Requirements
Before you start using the Xpro Social Chat Widget, make sure the following requirements are met:
- WordPress is installed and running.
- Elementor plugin is installed and activated.
- The free Xpro Elementor Addons plugin is installed and activated.
- The Social Chat Widget is enabled from the Xpro Dashboard.
If you’ve already installed Xpro Elementor Addons, simply verify that the Social Chat Widget is enabled before editing your page with Elementor.
How to Enable Xpro Social Chat Widget
Before adding the widget to your page, you’ll first need to enable it from the Xpro Addons Dashboard.
Step 1
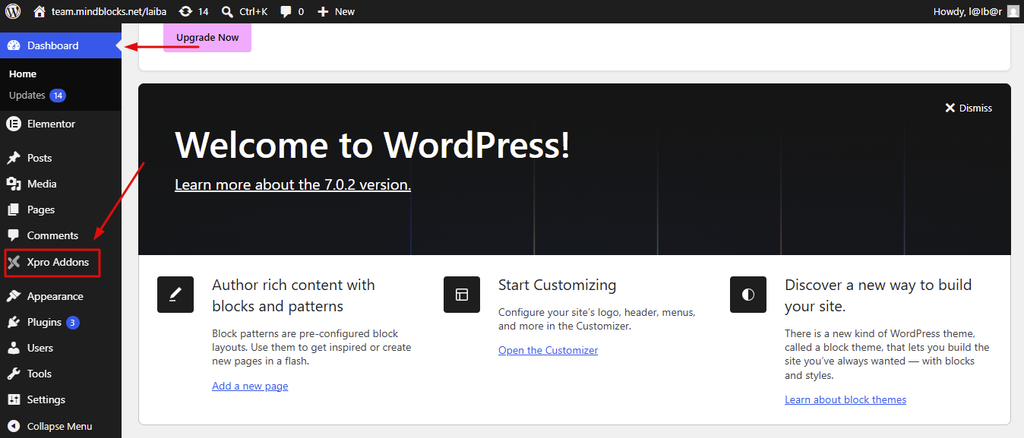
From your WordPress Dashboard, navigate to:
Xpro Addons → Dashboard
Here you’ll find all available Xpro widgets and extensions.
Step 2
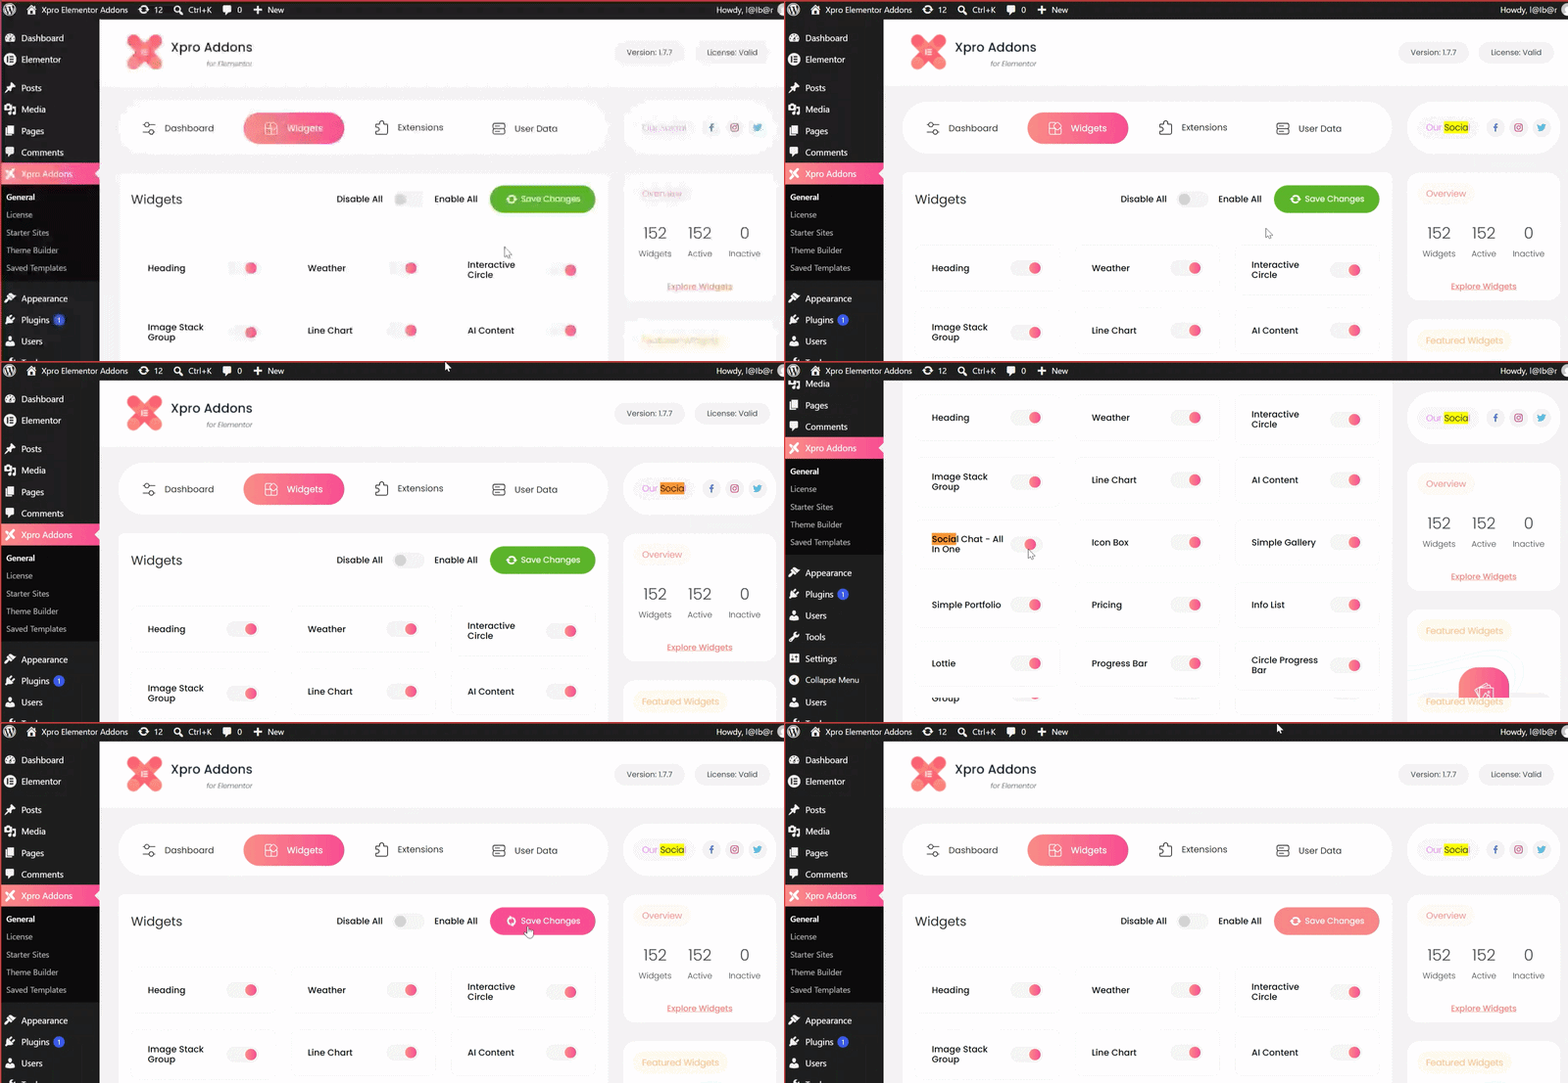
- Open the Widgets tab.
- Locate the Social Chat Widget from the widget list.
- Simply toggle the switch to enable the widget.
- Once enabled, the Social Chat Widget will become available inside the Elementor editor.
How to Add Xpro Social Chat Widget in Elementor
After enabling the widget, you can easily add it to any page or template using Elementor.
Step 1
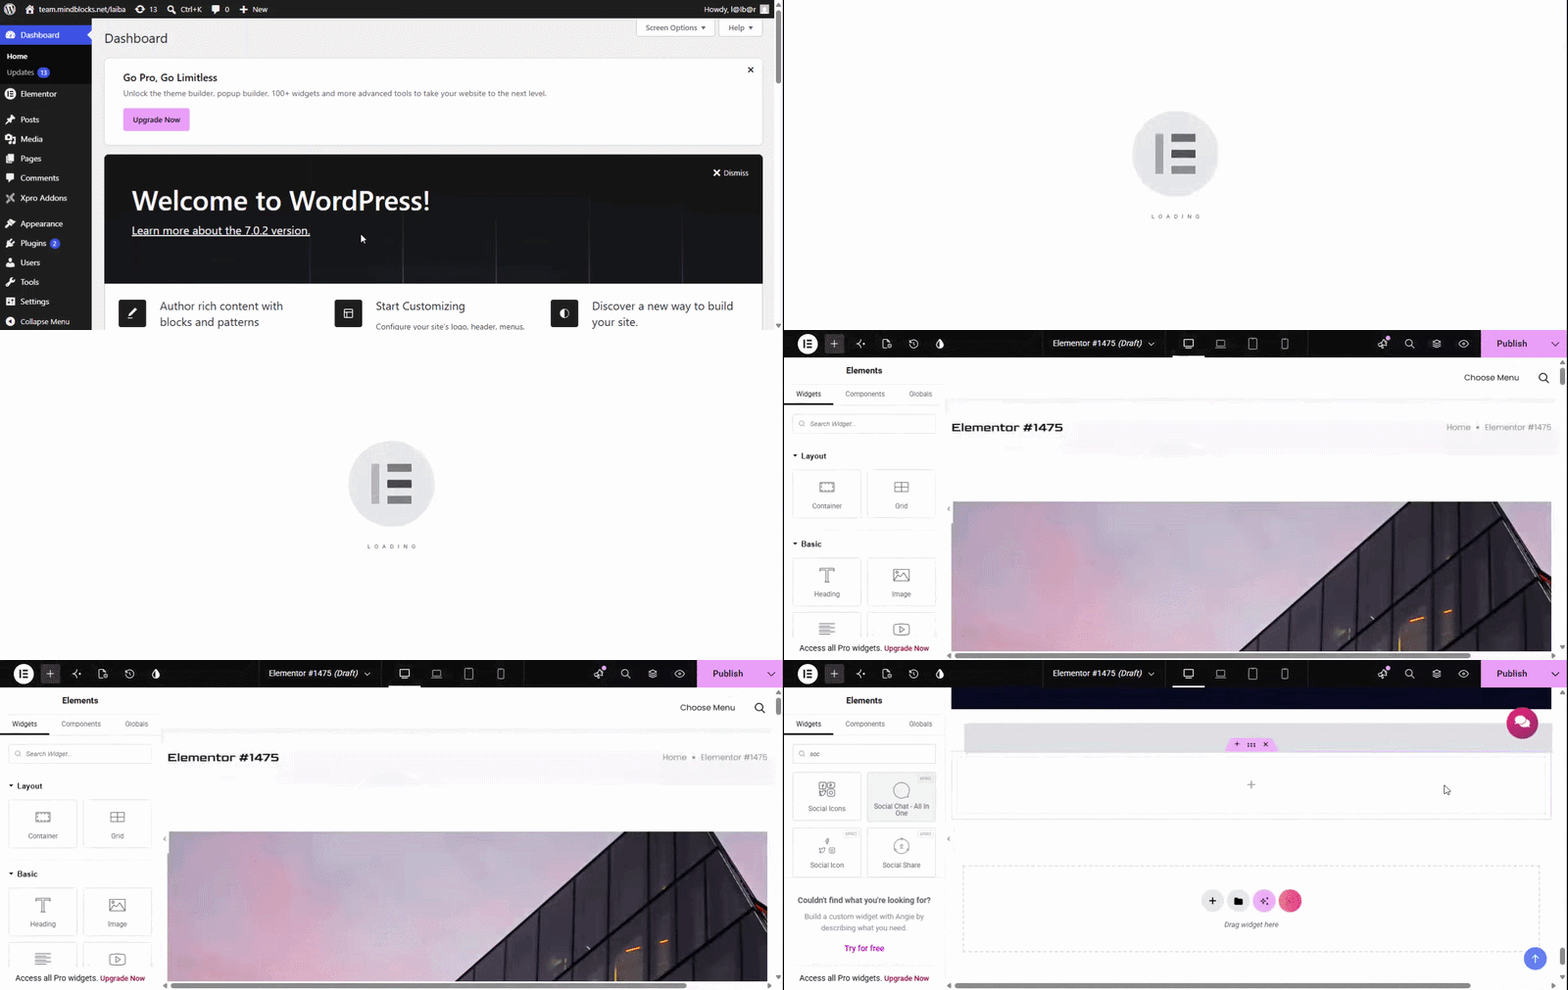
Navigate to the page where you want to display the chat widget.
Click Edit with Elementor.
Step 2
Inside the Elementor editor, search for Social Chat in the widget panel.
Drag and drop the Xpro Social Chat Widget onto your page.
The widget will instantly appear on the canvas with its default configuration.
Step 3
Once added, you can begin customizing every aspect of the widget, including communication platforms, chat agents, floating button appearance, popup layout, welcome messages, positioning, animations, and styling options.
How to Configure Xpro Social Chat Widget
Once you’ve added the Social Chat Widget to your page, it’s time to configure its settings. Xpro provides a wide range of customization options that allow you to control the widget’s appearance, behavior, supported communication channels, and overall user experience.
Simply select the Social Chat Widget in the Elementor editor to access all available settings from the left-side panel. Also, you can explore our list of free Elementor widgets and download our free Elementor addons to create a professional WordPress website.
Chat Channels
One of the most powerful features of the Xpro Social Chat Widget is the ability to add multiple communication platforms inside a single widget.
Instead of displaying several floating buttons, you can organize all your preferred communication methods into one clean popup.
Click Add Item to create a new chat channel.
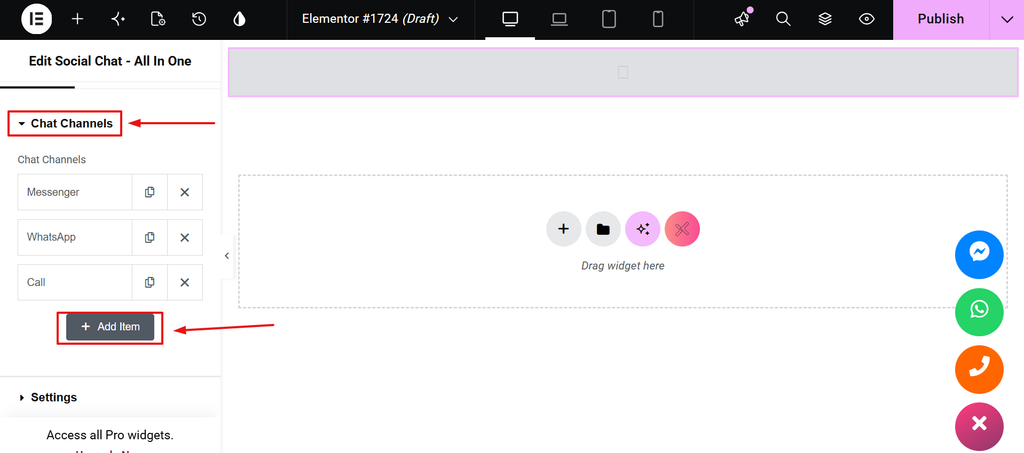
For each chat channel, configure the following settings:
Set Each Platform
Select your preferred communication platform. Depending on your requirements, you can add services such as:
- Facebook Messenger
- Telegram
- Phone
- Discord
- Slack
- Line
- Viber
- Custom URL
General Settings
The General tab contains the primary controls for configuring how the Social Chat Widget appears and behaves on your website.
Widget Position
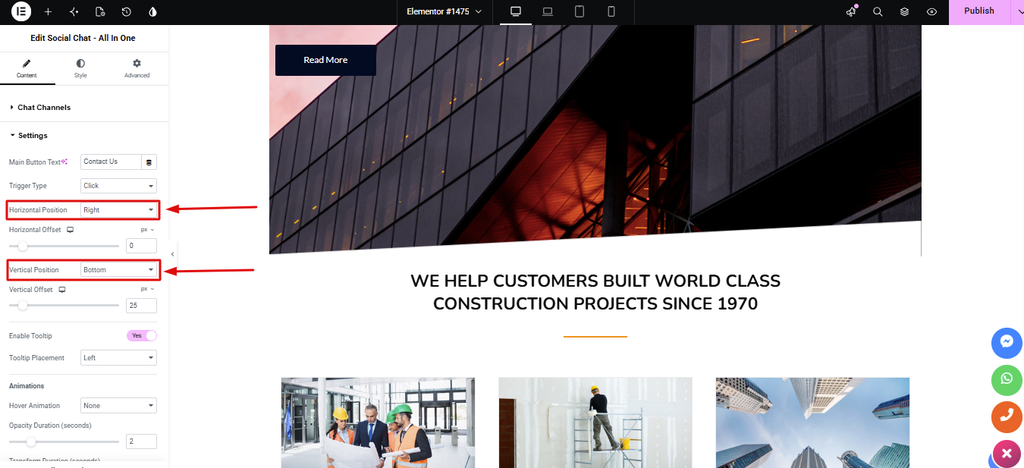
Choose where the floating chat button appears on your website.
You can position the widget on either the left or right side of the screen depending on your website layout and user preference. Most websites place the widget in the bottom-right corner because it is familiar to users and doesn’t interfere with page content.
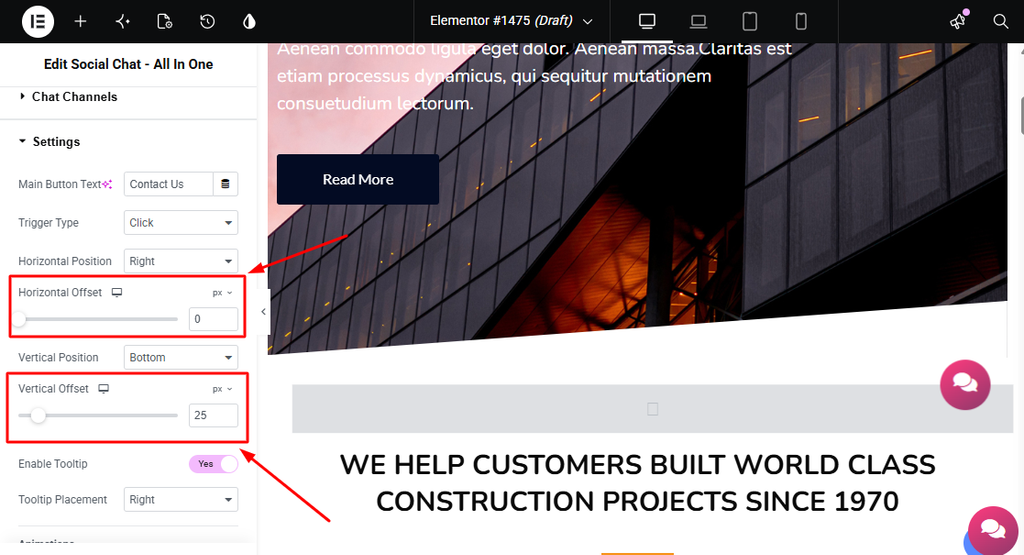
Horizontal & Vertical Offset
Fine-tune the widget’s position by adjusting the horizontal and vertical spacing.
These controls help prevent the widget from overlapping sticky headers, cookie notices, floating buttons, or other interface elements.
Widget Visibility
Decide where the Social Chat Widget should appear. You can display it across your entire website or hide it on specific devices for a better user experience.
For example, if your mobile navigation already includes quick contact buttons, you may choose to hide the floating chat widget on smaller screens.
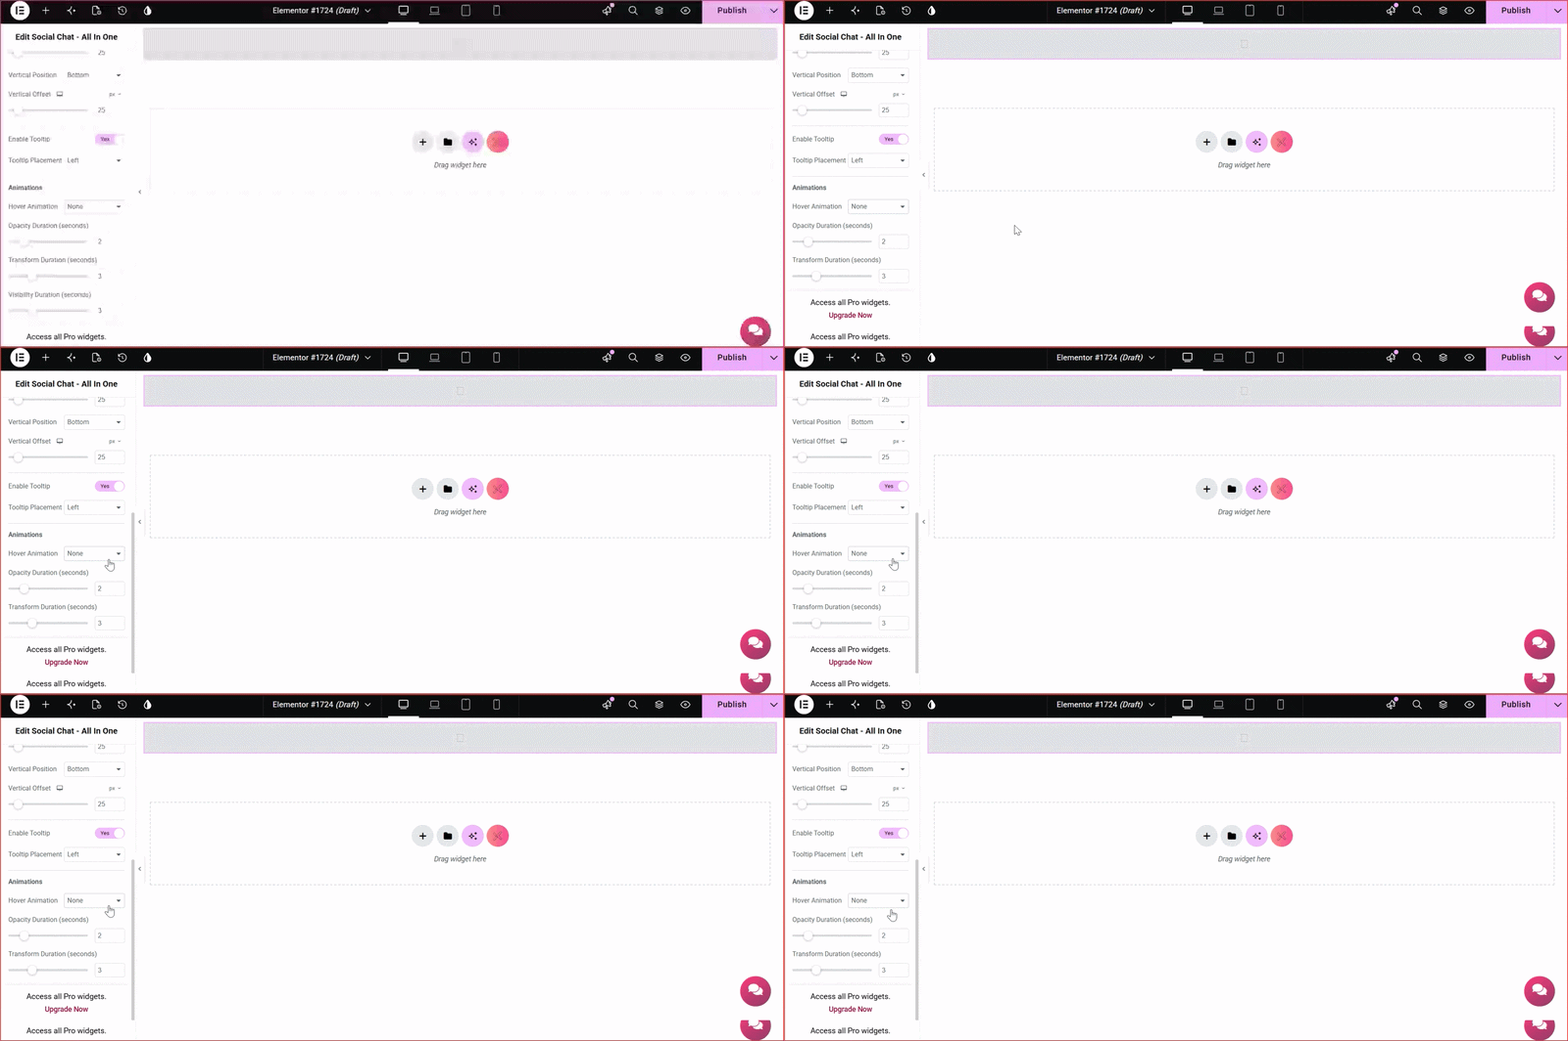
Animation
- Hover Animation: Selects the specific part of the element that responds to hover interaction (currently set to Background).
- Animation Type: Defines the style of visual transition applied on hover (currently set to Radial Out, which creates a circular expanding effect from the center).
- Opacity Duration (seconds): Controls how long it takes for the element’s transparency/fade transition to complete on hover (set to 2 seconds).
- Transform Duration (seconds): Adjusts the speed of any scaling, movement, or rotation effects applied during hover (set to 2 seconds).
- Visibility Duration (seconds): Specifies the total time the animated effect remains visible during or after the hover state (set to 2.6 seconds).
How to Style Your Social Chat Widget in Elementor
A well-designed chat widget not only attracts attention but also complements your website’s branding. The Xpro Social Chat Widget includes comprehensive styling controls that allow you to customize every visual element without writing a single line of code.
To begin styling, select the Social Chat Widget in the Elementor editor and switch to the Style tab.
Main Button
The General section allows you to customize the overall appearance of the chat widget.
Background
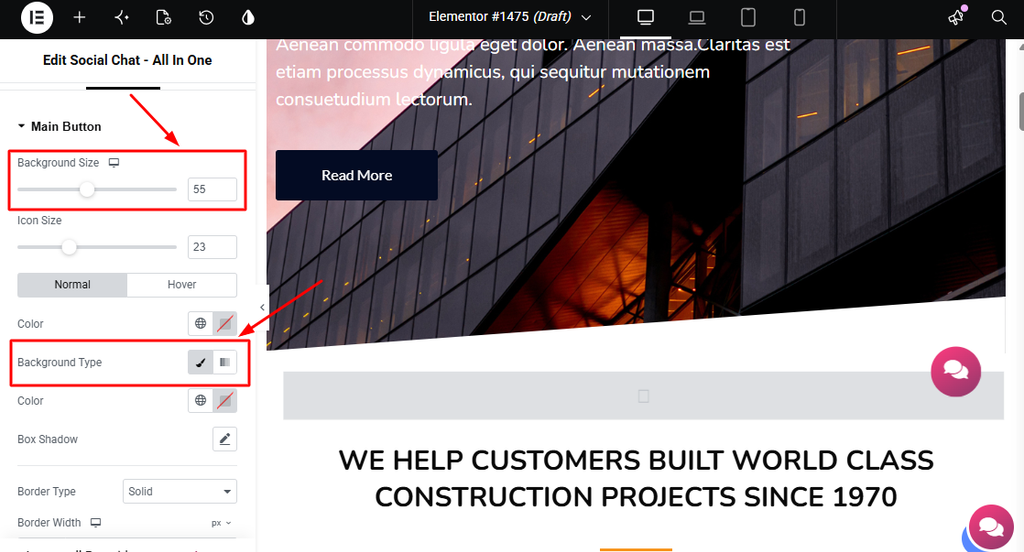
Choose a solid color or gradient background for the popup window.
A clean background helps your chat interface blend naturally with your website.
Border
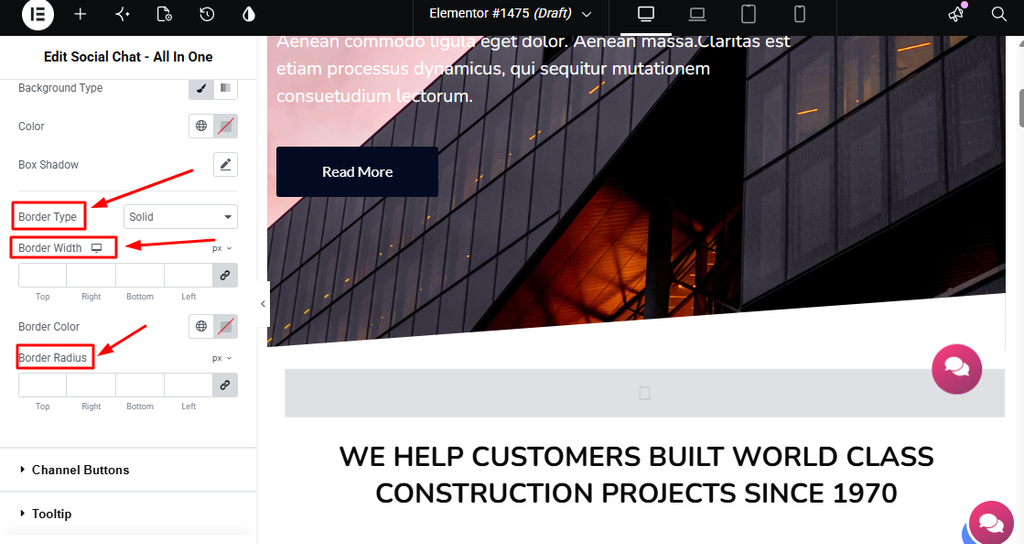
Customize the border width, color, and style to create a clean and modern appearance.
Rounded borders generally provide a more friendly and approachable look.
Border Radius
Adjust the corner radius to create square, rounded, or fully circular elements.
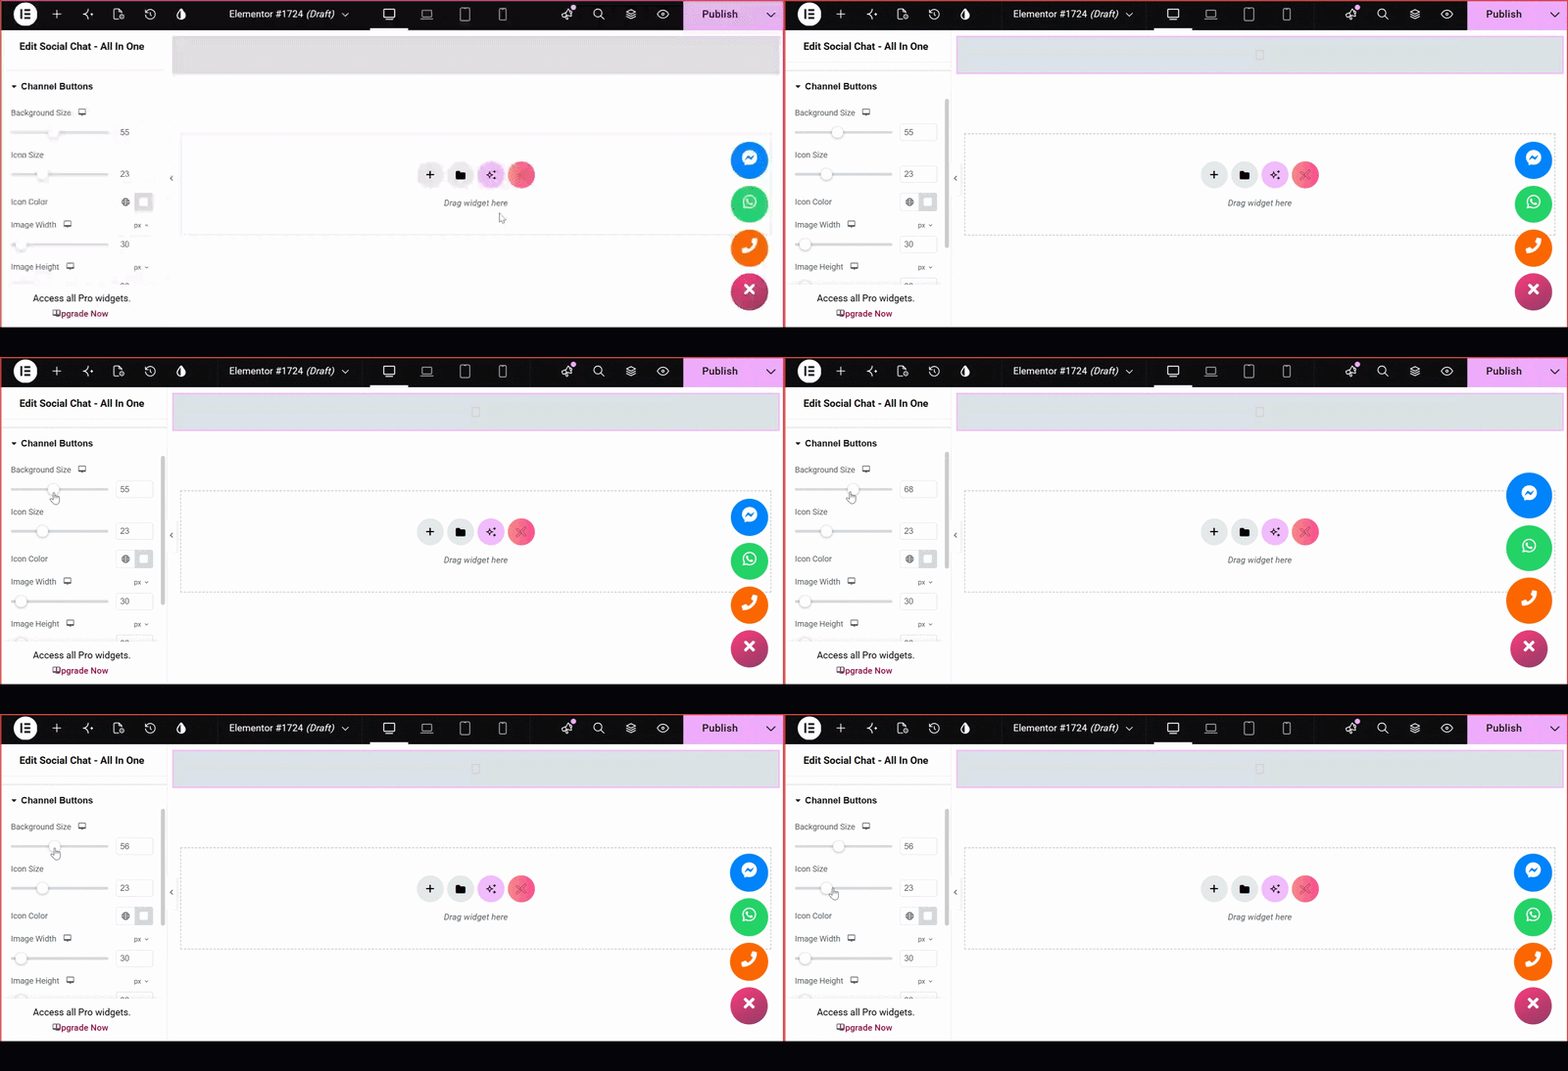
Channel Button settings
- Background Size: Adjusts the outer circular or rectangular background area surrounding the icon using a slider or numeric input field.
- Icon Size: Controls the scale of vector icons displayed inside the button area.
- Icon Color: Sets the color scheme of the icons. Features a toggle between standard icon styling (represented by the globe icon) and custom color selection (represented by the color swatch).
- Image Width: Specifies the horizontal dimension of custom uploaded images, measurable in pixels (px) or other responsive units selected from the drop-down menu.
- Image Height: Specifies the vertical dimension of custom uploaded images, measurable in pixels (px) or other responsive units selected from the drop-down menu.
- Object Fit: Determines how custom images scale and adapt to their container bounds.
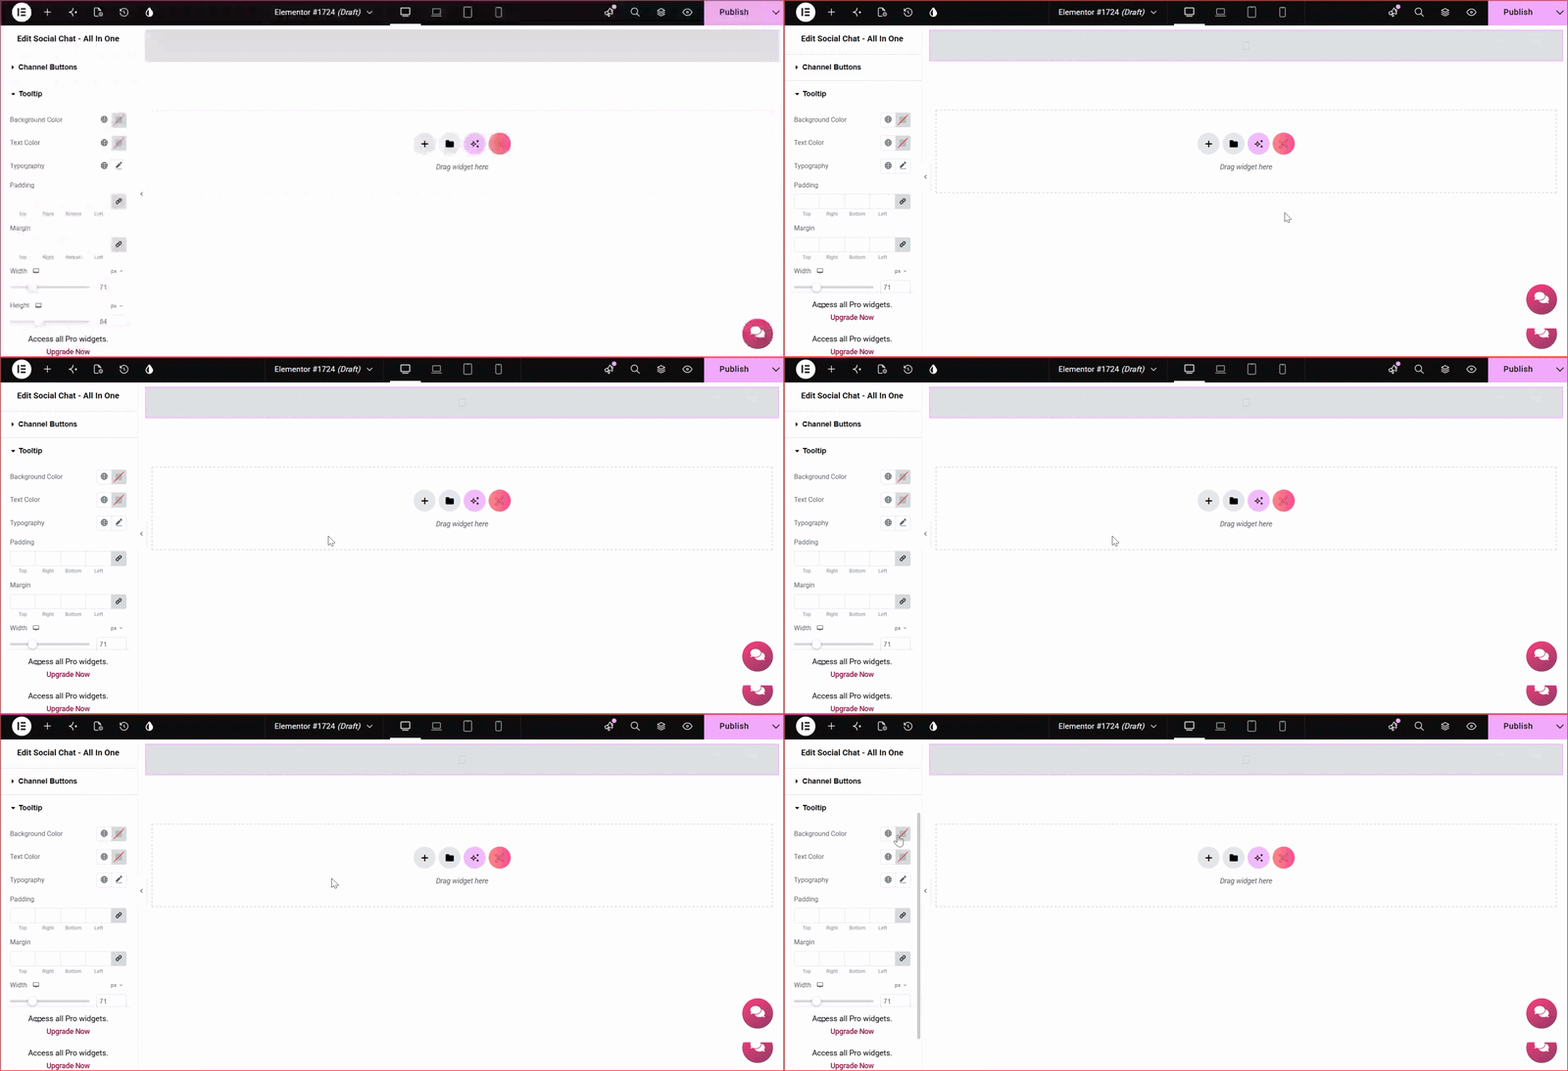
Tootlip
- Background Color: Sets the fill color of the tooltip pop-up box. Clicking the color picker allows you to choose a custom color or pick a global color style.
- Text Color: Controls the color of the text displayed inside the tooltip box.
- Typography: Opens the font customization settings where you can change font family, size, weight, line-height, and letter spacing.
- Padding: Controls the inner spacing between the text and the borders of the tooltip box (Top, Right, Bottom, Left). The link icon on the right keeps values linked together or unlinked for individual sides.
- Margin: Adjusts the outer spacing around the tooltip container, creating distance between the tooltip and adjacent elements. (Currently set to 8px on all sides).
- Width: Sets the overall width dimension of the tooltip box using pixels (px), percentages (%), or viewport width (vw). The desktop icon indicates responsive controls to adjust width per device size.
Agent Card Styling
Each support representative appears as an individual card inside the popup. The Agent Card controls help create a professional support interface.
- Avatar: Customize the profile image by adjusting settings such as Image Size, Border Radius, Border Width, Border Color, and Spacing.
- Name: Modify the typography, font size, weight, and color for the support representative’s name.
- Job Title: Customize the appearance of department names or job titles separately from the main heading.
- Online Status: Choose different colors for online, offline, busy, or away indicators.
These visual indicators help visitors quickly understand agent availability.
Responsive Controls
The Xpro Social Chat Widget is fully responsive and works seamlessly across all screen sizes.
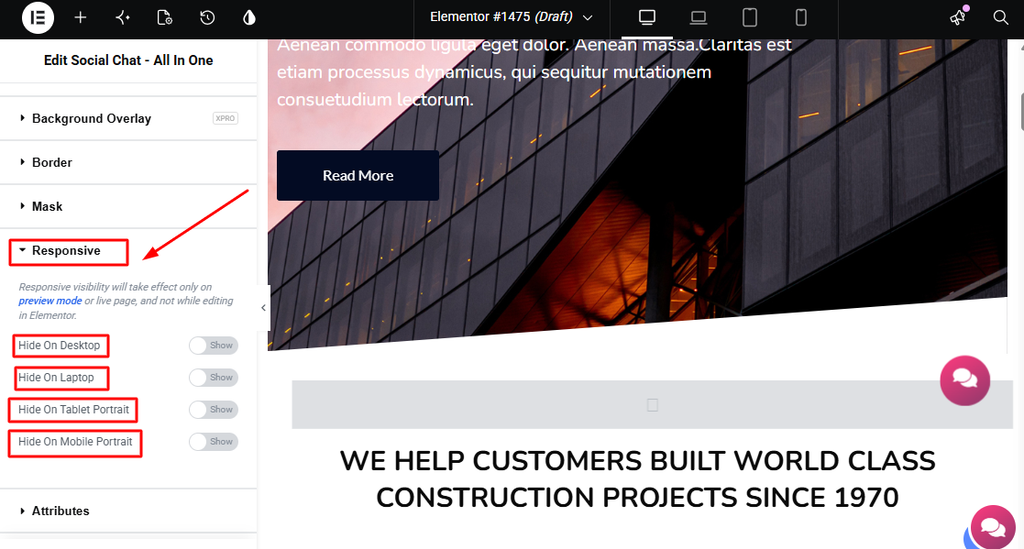
Responsive controls allow you to optimize the widget for different devices.
- Desktop: Customize the widget layout specifically for large screens.
- Tablet: Adjust spacing, offsets, and sizing to provide a better tablet experience.
- Mobile: Optimize the widget for smartphones by reducing button size, spacing, or hiding unnecessary elements. A responsive widget ensures visitors enjoy the same experience regardless of the device they use.
Best Social Chat Widget for Elementor
The Elementor Social Chat Widget makes it easy to connect with your website visitors through their favorite communication platforms. Whether you’re providing customer support, generating sales leads, scheduling appointments, or answering product inquiries, the widget offers a simple and professional solution for real-time communication.
With support for multiple chat platforms, unlimited customization options, responsive controls, and seamless Elementor integration, you can build a communication experience that reflects your brand while improving visitor engagement and customer satisfaction.
From setup to styling, every feature helps you create an accessible, user-friendly, conversion-focused chat experience. Explore the full capabilities of the Xpro Social Chat Widget and transform the way visitors connect with your business.