How to Use Elementor Custom Fields Widget
Xpro Custom Fields for elementor is the perfect choice to add various additional information to the webpage for creating dynamic websites. Xpro Elementor addons come with the best custom fields widget to display data on the front end of your website. You can create custom fields to unlock the power of WordPress as the full content management system. This widget gives the ability to include static data before or after the custom field data/information. Moreover, the custom fields help to prevent data from breaking accidentally.
Before we jump on the how-to section, let’s cover What are WordPress Custom Fields. In technical words, custom fields help you manage and collect additional information about any content on WordPress. Depending on the purpose of your inquiry, the information may vary.
For more illustration of custom fields’ power, let’s look at real examples of how custom fields are used to accomplish tasks.
“If you are creating a website for bike rentals, you may wish to include information such as the hourly rate, the pickup location, the drop location, the pick-up date, and the drop-off date.” You can add custom fields in this situation. So, you can easily enter those additional data in the back-end editor and it automatically displays on the front-end editor.
I’ll continue demonstrating how elementor custom fields work throughout the rest of this post.
How to Install Elementor Custom Fields Widget
Requirement
You need to install and activate the free version of Xpro Elementor Addons. If you already have the plugin installed, just make sure the custom field Widget is ‘Enabled’, so you can find it in the Elementor editor.
To enable a custom field widget, simply follow these steps:
Step 1
Click on the Xpro Addons option available on the WordPress Dashboard Menu.
Step 2
From the Xpro Addons Dashboard, click on the Widgets Tab, find the custom fields widget, and finally, toggle the button to enable it.
How to Create Custom Fields in ACF?
In this post, I will show you how can you create a custom field using the free advanced custom fields plugin at the backend editor. You need to install and activate the Advanced Custom Field (ACF) plugin from wordpress.org.
Step 1: Add a group field for custom fields
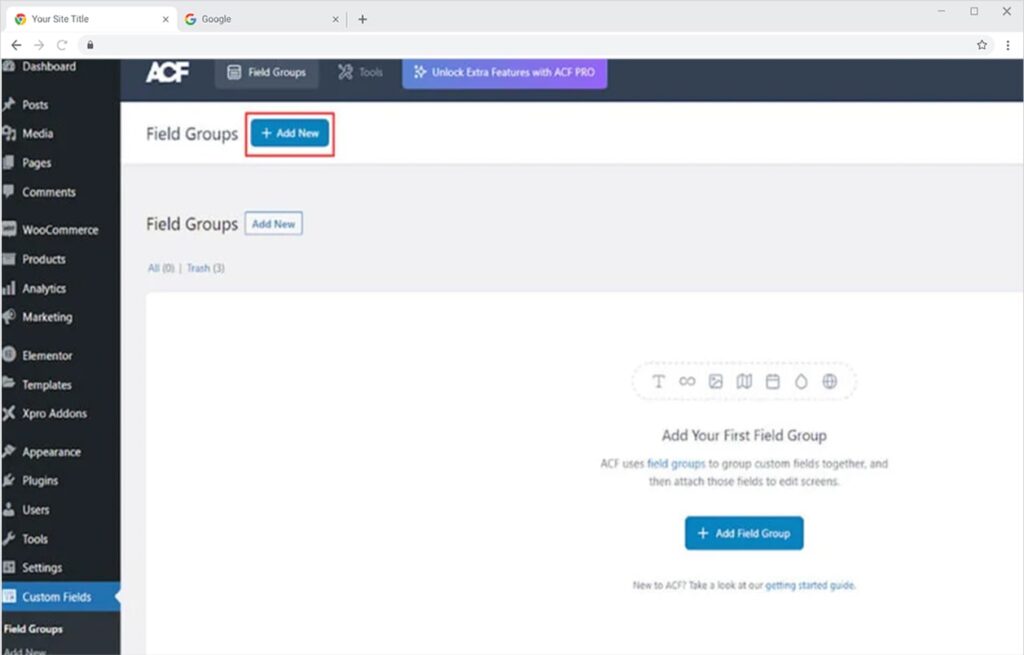
- Then go to the Custom Fields, and click on “Add New” to add the custom field.
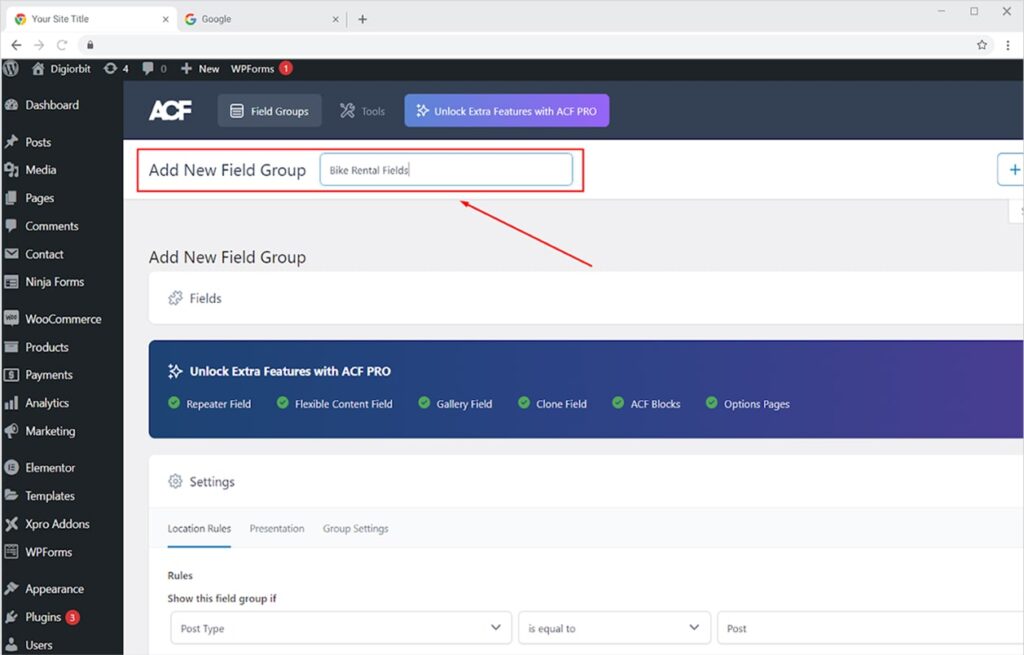
- Here, you can set your ACF field group name where you can make more custom fields that will display together in the backend editor.
Step 2: Set the Custom Fields Location
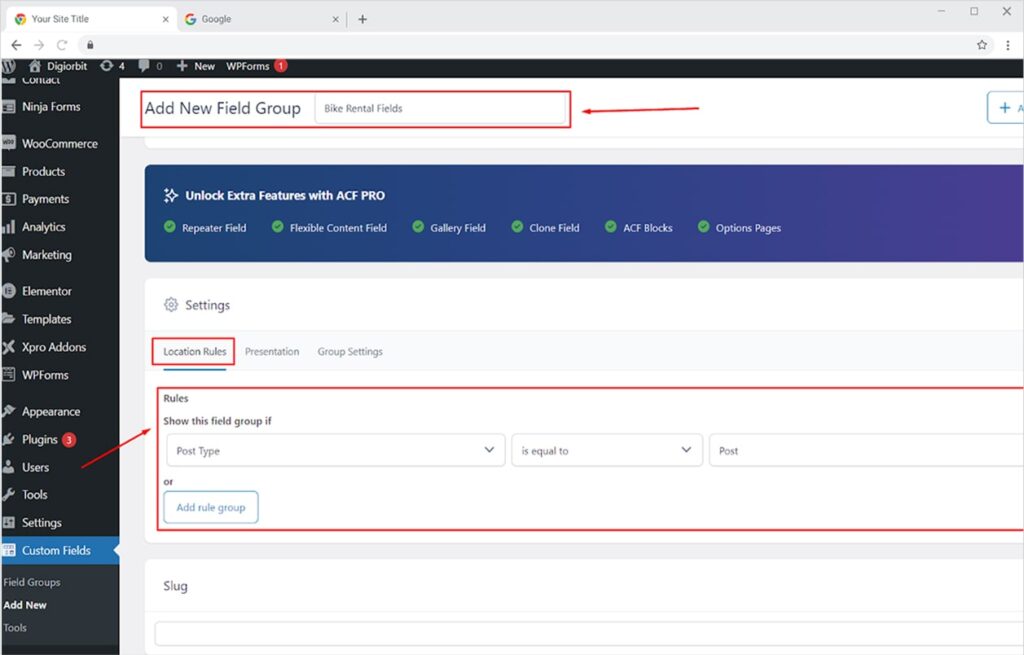
- Now Set your group custom fields location box to set the attachment of a particular post or page where you want to display them.
- Use the location Rules to attach your custom field to desired post or page. For example, if you want to display your custom fields on the post then you can set the location in the way: Post Type > is equal to > Post
Step 3: Create Custom Fields
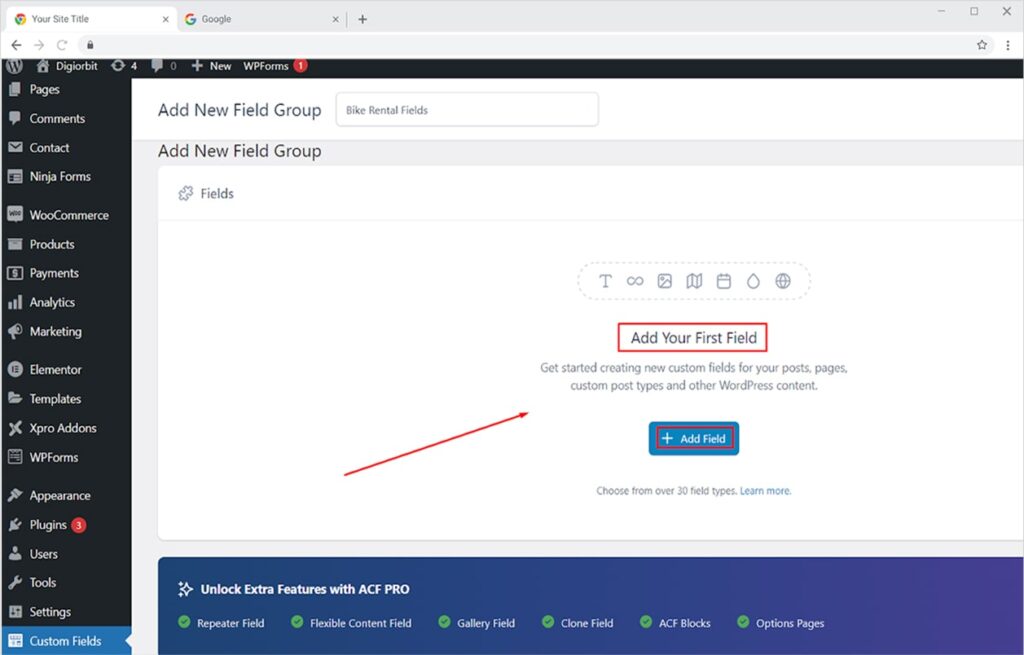
- To create the custom fields, click on the “+Add field” button and start adding your custom fields one by one.
The most important choice for your custom fields is to set:
- Field Label: It is the name of your custom field, that automatically relate to the field name box. This is important when you call it for the front-end editing on your webpage builder.
- Field Type: This is used to collect information in different forms of options such as Text, image, URL, number, etc.
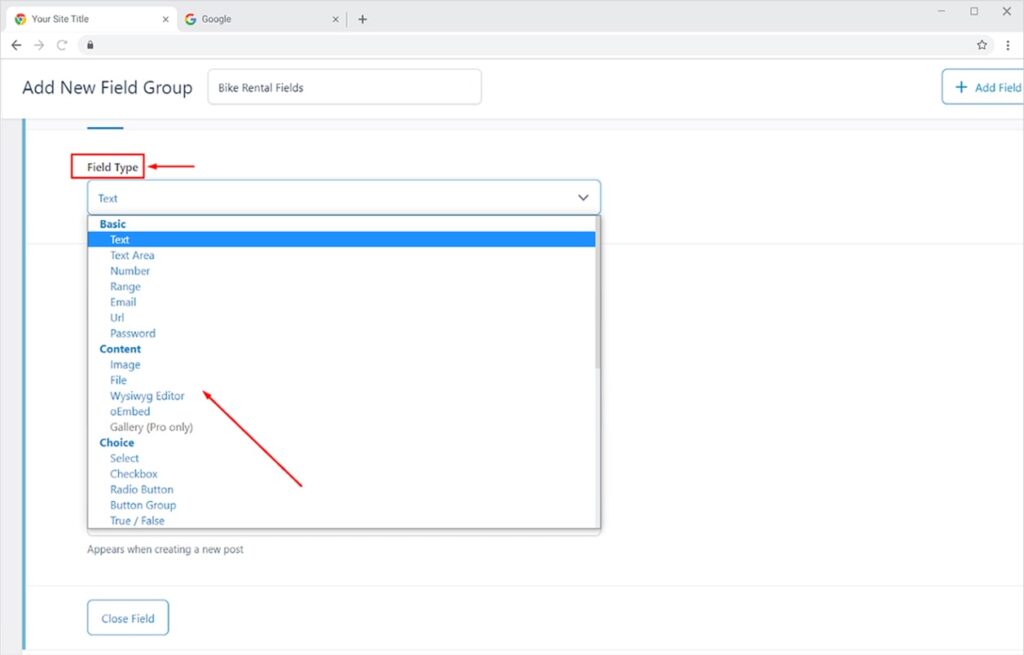
Besides, you will get other settings or controlling options for your custom fields, such as default values, placeholder text, prepend, append, and others. It is fine if you let them empty.
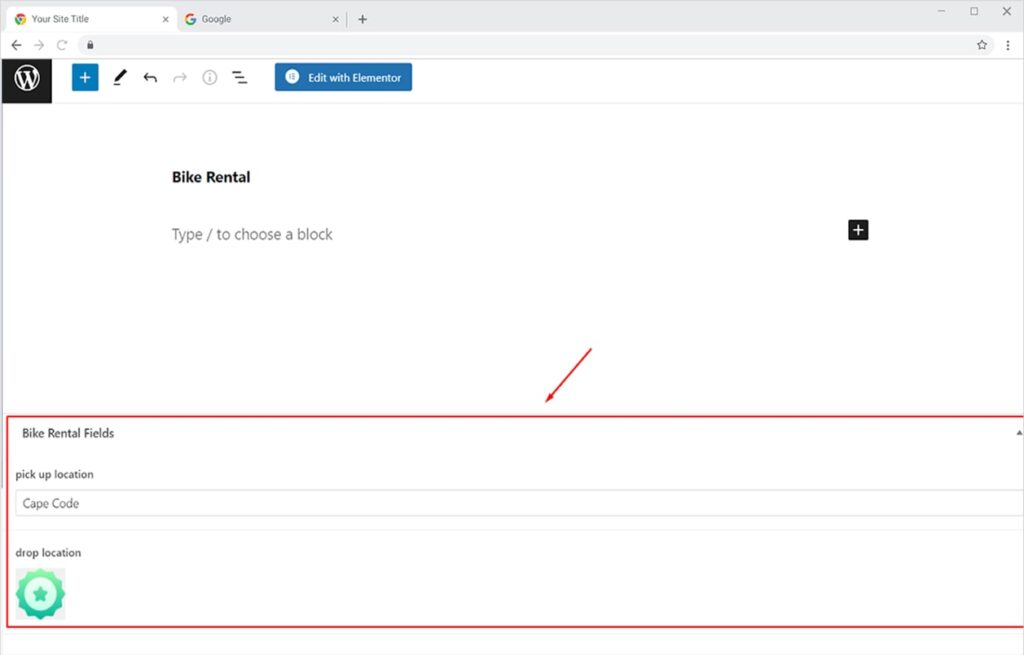
After setting your all custom fields with defined types and locations. Click on the Save Changes. Your Field group will save and appear to all front-end editors where you locate them. I located custom fields to “post” in this tutorial, so those fields appeared in every post.
You can see this below:
Step 4: Publish Your Custom Fields
- Now add your desired content to it, and hit the publish Button.
All is that you created custom fields successfully at the back-end editor. But this is only one piece of the puzzle. Now, the second piece of the puzzle is to display your information from those custom fields on the front-end editor.
When you are talking about front-end editors, there are many methods to work with. But the easiest way is using the Elementor.
How to Add Elementor Custom Fields In WordPress
Custom Fields Widget by Xpro Elementor addons gives the option to utilize the dynamic content feature on your WordPress website. Let’s see how the elementor custom field widget works:
- To get started, open your webpage or template in the elementor editor.
- Drag and drop the custom field widget to your desired section on the webpage. A custom field box will appear in the selected area.
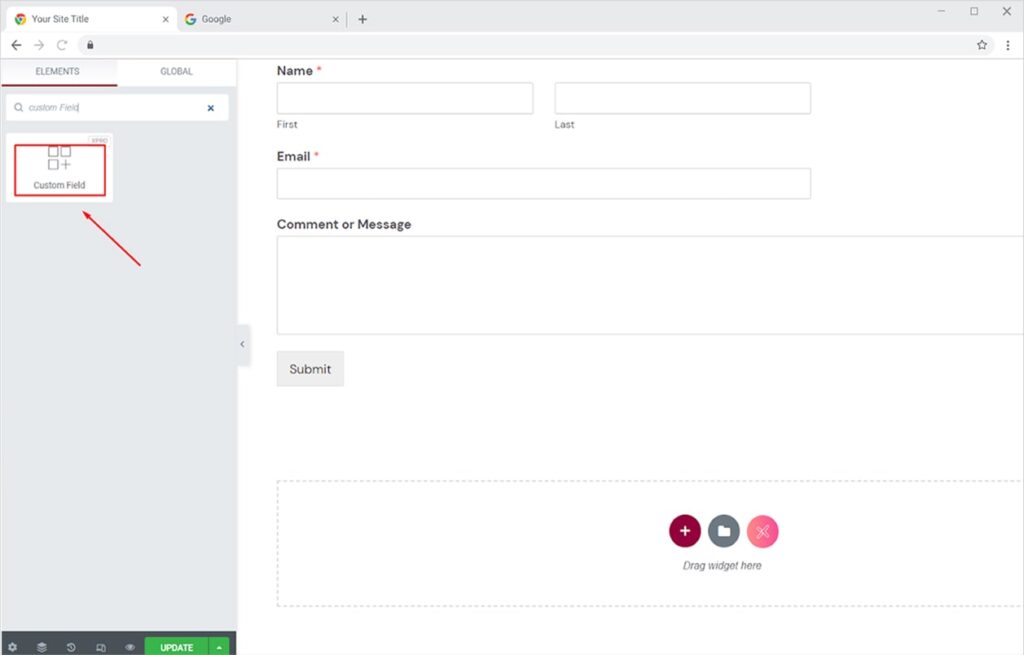
- After drag’n’drop the module, you can customize it with different setting options.
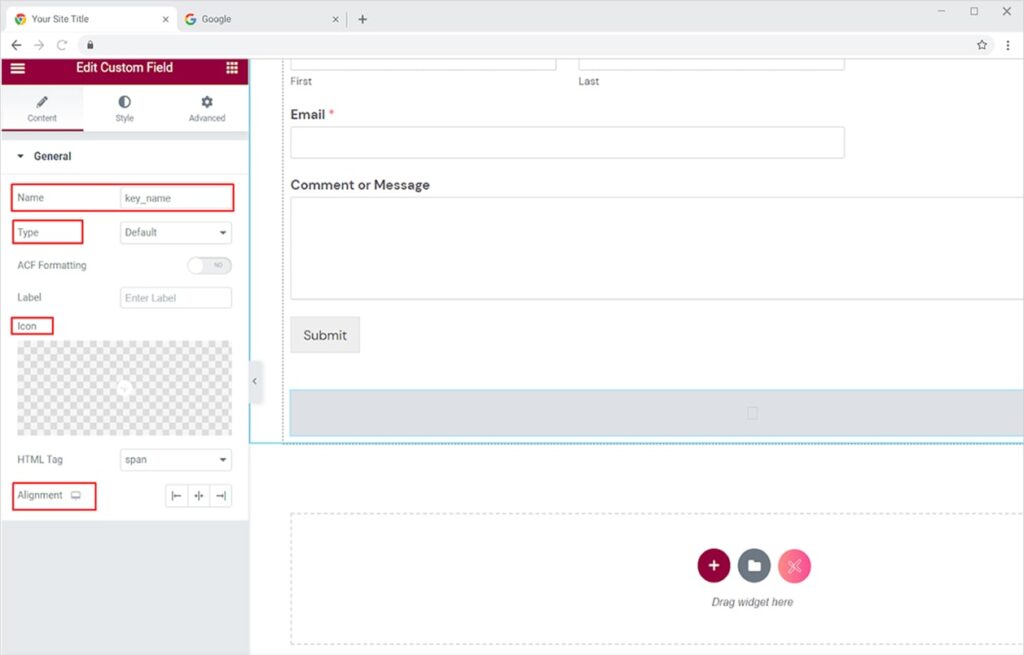
Name: You can enter the name that you set up during custom field making. Like, shown below the “Name column” in Field Group.
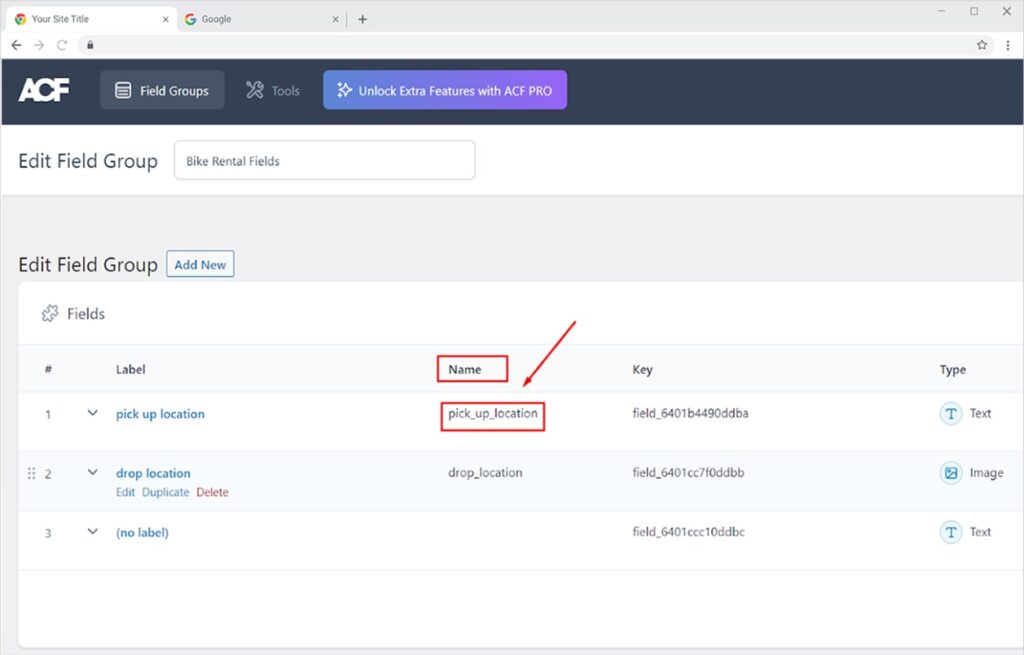
Type: Click on type like “text”, “image”, or “link”, etc as you set up while making the custom fields.
ACF Formatting: You can On/Off the ACF formatting in the custom field widget.
Label: The label is the text that you want to add in the custom field.
Icon: You can add an icon and it will be shown its default position before the label.
HTML Tag: You can define the HTML tags for Label as H1, H2, H3, etc for more emphasis.
Alignment: Set the label alignment as left, center, or right.
One most useful feature of this elementor custom field widget is static content before or after the custom field information.
And that is it. All you can do is now repeat this procedure to use additional information from different custom field types in elementor such as Image, Number, URL, Email, and Others.
Learn here if you are looking to create advanced custom fields dynamic (ACF Dynamic) in Elementor.
How to Style Your Custom Field in Elementor?
Do you want to change the look of the custom field for an individual page? Yes, you can style them differently to look unique on each page with the Xpro Custom FIeld widget. Using our elementor custom fields you can style them with more detail. To style a custom field, you need to follow these steps:
General
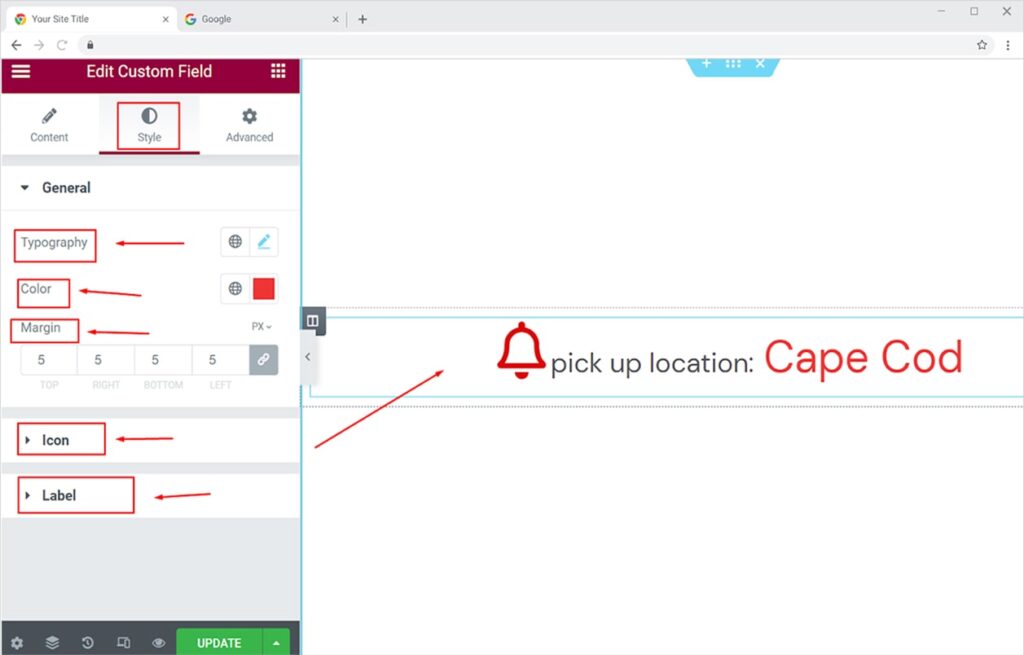
- Click on the style tab to style each component differently.
- Set all the typography options with our standard widget control options in the general tab.
- Set the text color for the repeater field value display.
- You can set the custom margin for your custom field.
Icon
- You can define the size of the icon by scrolling the bar or setting the height number.
- Define the icon margins for top, right, bottom, or left.
- You can set your icon color also.
And that is it. All you can do is now repeat this procedure to style additional information from different custom field types in elementor such as Image, URL, Email, and others.
Best Custom Field Widget For Elementor
This is all from our custom field widget for elementor. To a short recap, if you are looking to create a dynamic website in WordPress, then it is important to understand the custom fields widget power. Xpro custom Field Widget for elementor helps you to store your additional information and display it on the front-end editor with its own custom style.
Displaying and storing information is now simple and easy with the free advanced custom field plugin (ACF plugin). If you want to explore and learn more about dynamic ACF extensions then check our complete guide right now. Also, You can explore our list of free Elementor widgets and download our free Elementor addons to create a professional WordPress website.