How to Use Xpro Video Widget for Elementor?
With the Elementor Video Widget, a developer can add any video to their WordPress site from multiple sources in an appealing manner. The fast video widget embeds any video on your webpage and allows you to add incredible features such as image masking, autoplay, sticky, overlay, and much more.
To construct an eye-catching website, use Xpro premium Elementor widgets. Our video widget is a premium widget that lets you add a mask and sticky the video. Simply add a link to the video and perform further customizations.
How to Install Xpro Video Widget for Elementor
Requirement
You need to install and activate the Pro version of Xpro Elementor Addons. If you already have the plugin installed, just ensure the Video widget is ‘Enabled’ from the Xpro Elementor Addons dashboard. So, you can find it in the Elementor editor.
To enable the widget, simply follow these steps:
Step 1
Click on the Xpro Addons option available on the WordPress Dashboard Menu.
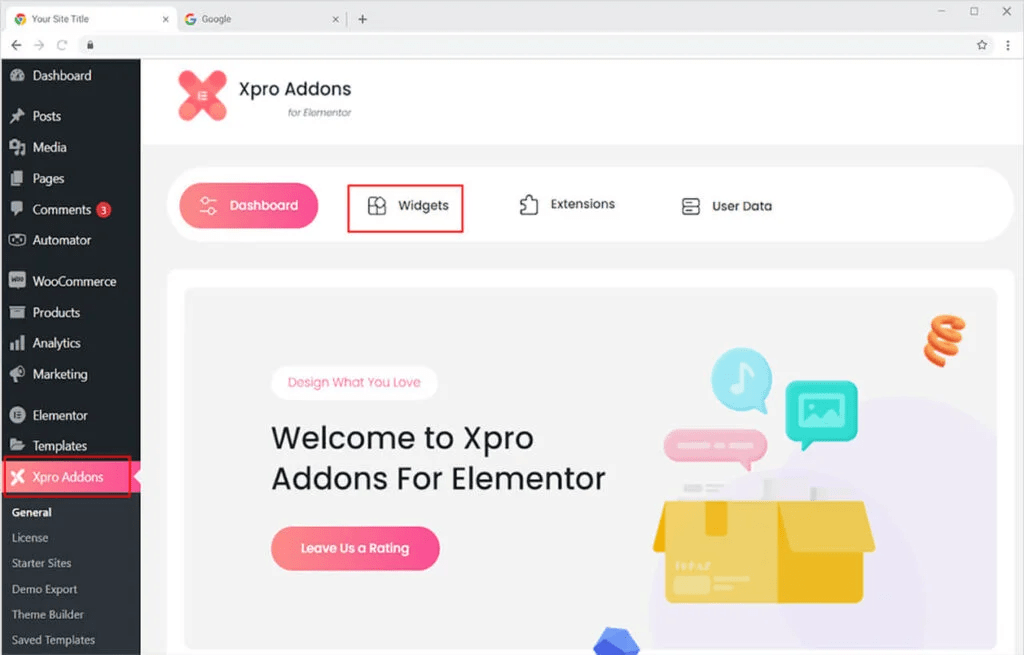
Step 2
Scroll down the Widgets tab of the Xpro Addons Dashboard, to find the “Video Widget”, and then toggle the button ‘ON’ to enable it.
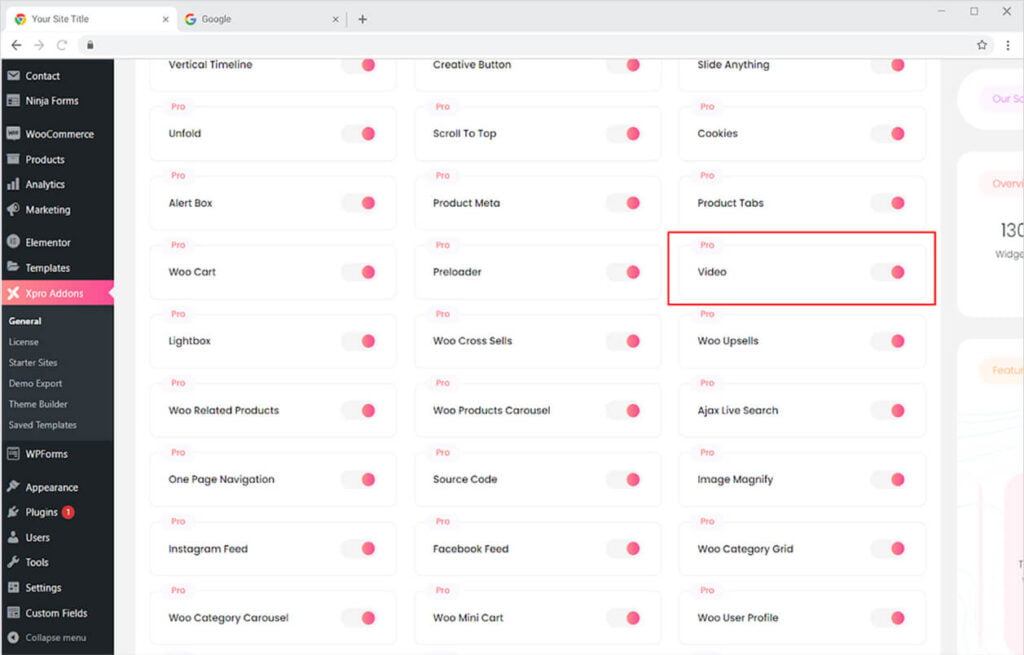
How To Use Video Widget for Elementor
The video widget from Xpro Elementor is extremely simple to use, and you can quickly add and adjust a video display. Insert a video from any URL. To the video, apply a mask and sticky effects. Give a thumbnail to a video that appears before the user clicks to start it.
Let’s go through this great powerful widget and talk about how you can use it.
Step 1
Click on the Xpro Addons-Pro section available in the Elementor Editor.
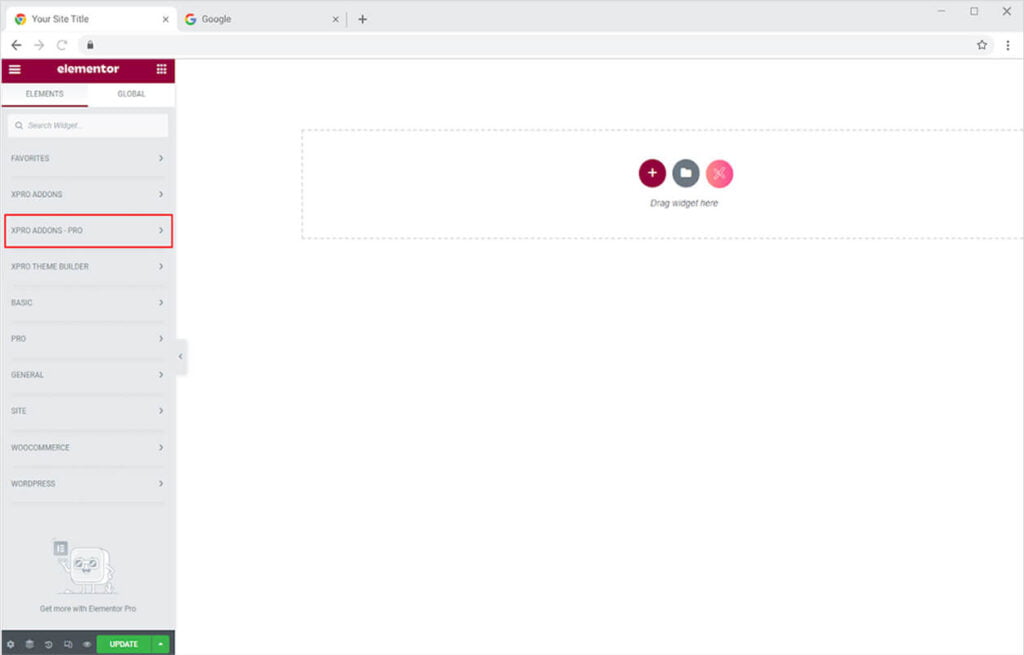
Step 2
Search for Video Widget from the left top search bar and then simply drag the add-on to desired page location and drop.
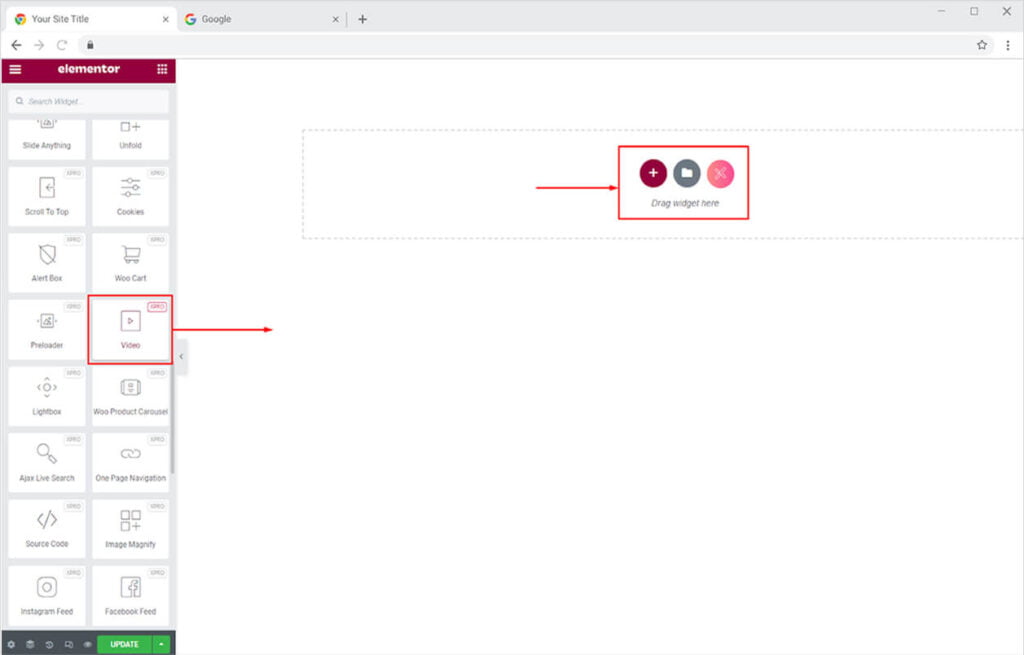
This is the default view of the widget after you select and drop it into the Elementor Page.
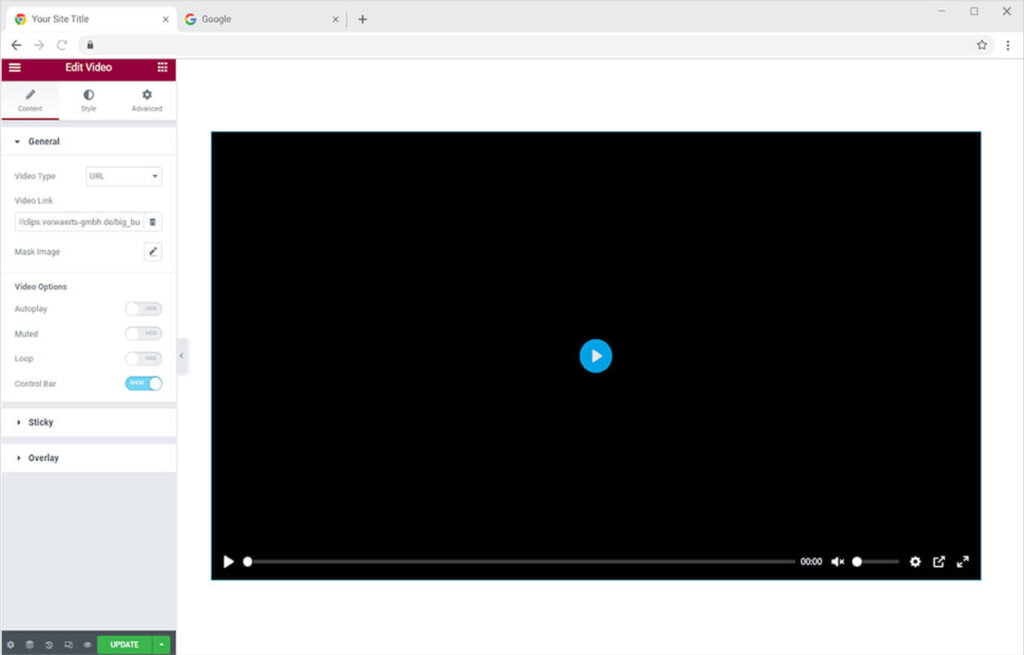
How to Add a Video to the Xpro Video Widget
Select the video type that you want to add to the widget. You can add any URL, Youtube video, Vimeo, or Self Hosted video. Select the type and give a link to the video.
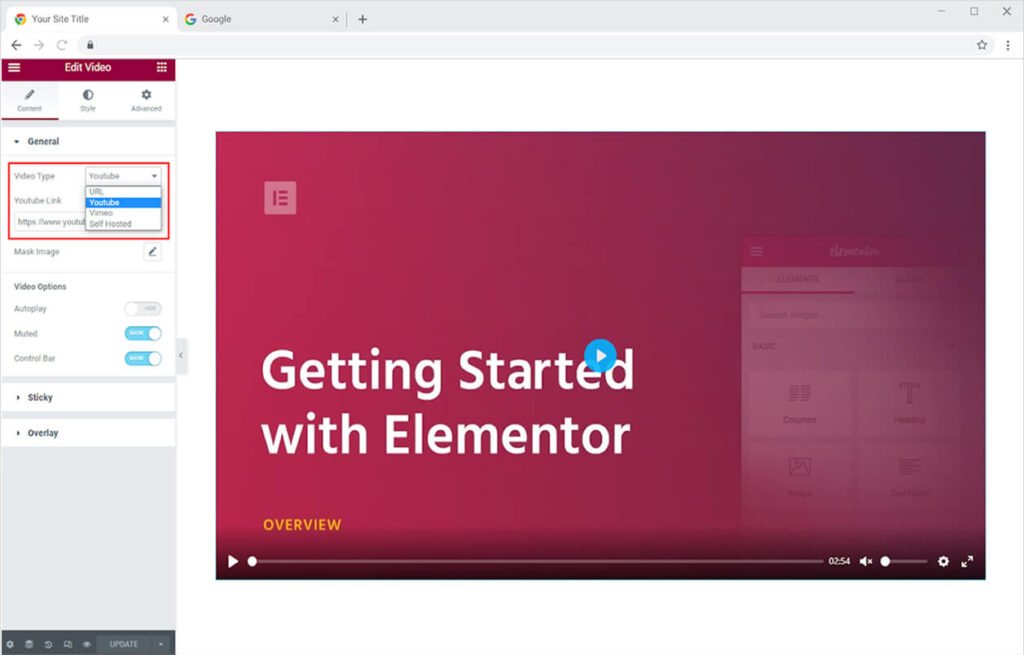
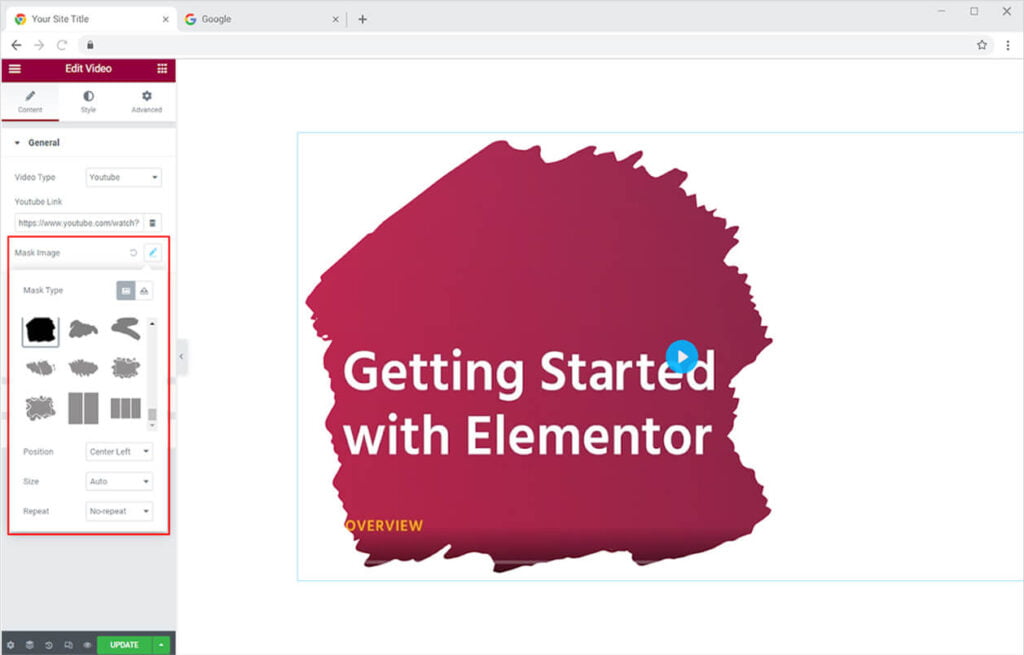
Add a mask from our wonderful collection of masks layout. Select that you believe will look perfect with your display or you may upload a mask from your desktop. After you add a mask, you can customize its size and position.
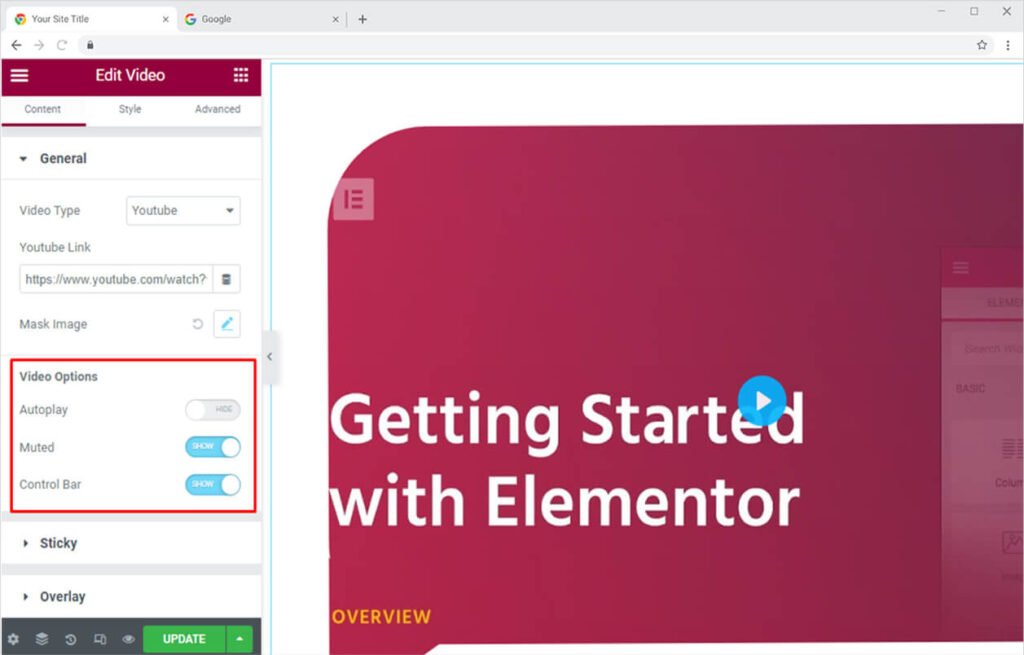
Perform different video settings from the video options. Following are some of the settings that Video Options allow you to perform.
- AutoPlay: Enabling the Autoplay options will start playing the video when the visitor views the view the video display. Visitors do not need to click play to start the video.
- Muted: After you enable this option, the video will produce no sound unless the visitor increases the volume.
- Control Bar: Enabling the Control Bar option will display a bar at the bottom of the video from where the visitor can move forward and backward in the video.
- Loop: Other than Youtube videos, you can set a loop so the video will restart after it is finished.
How to Add Sticky Effect in Xpro Video for Elementor
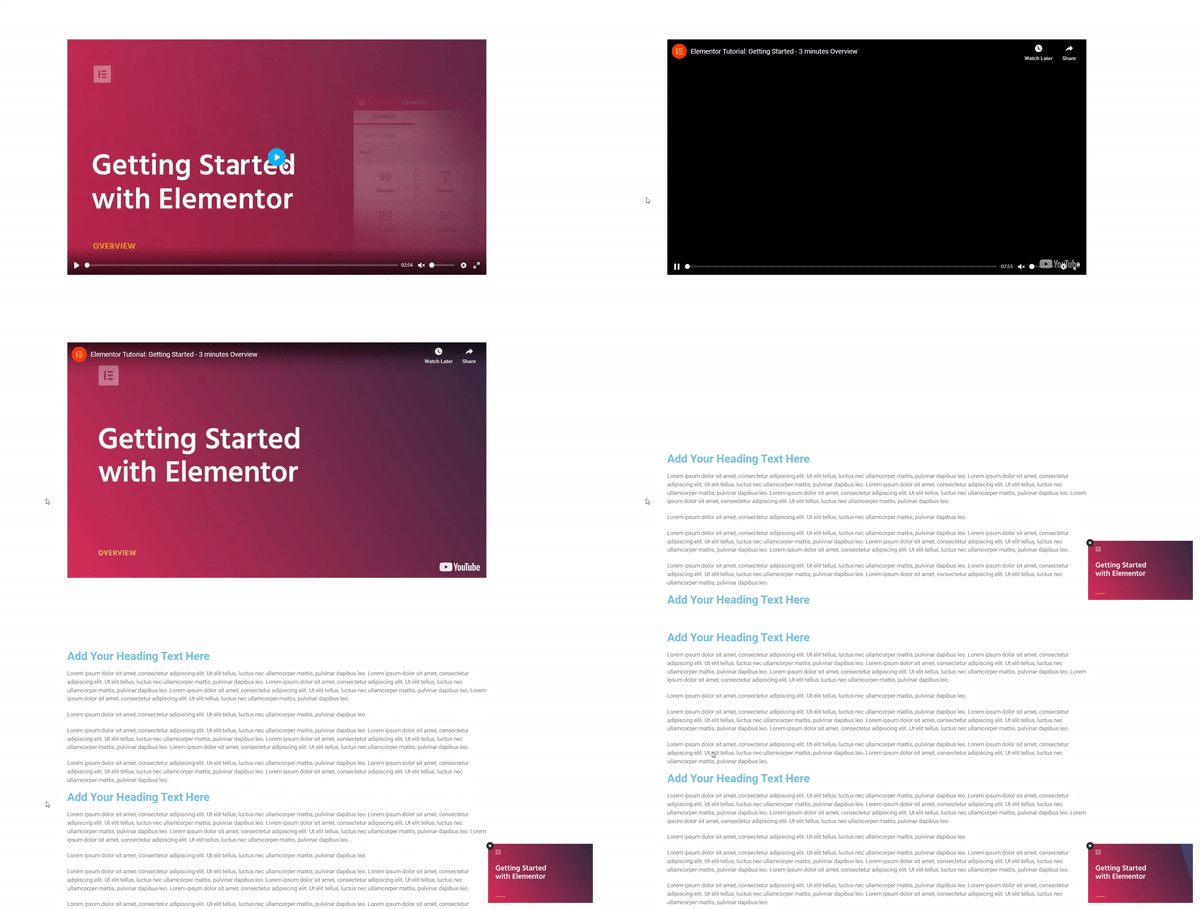
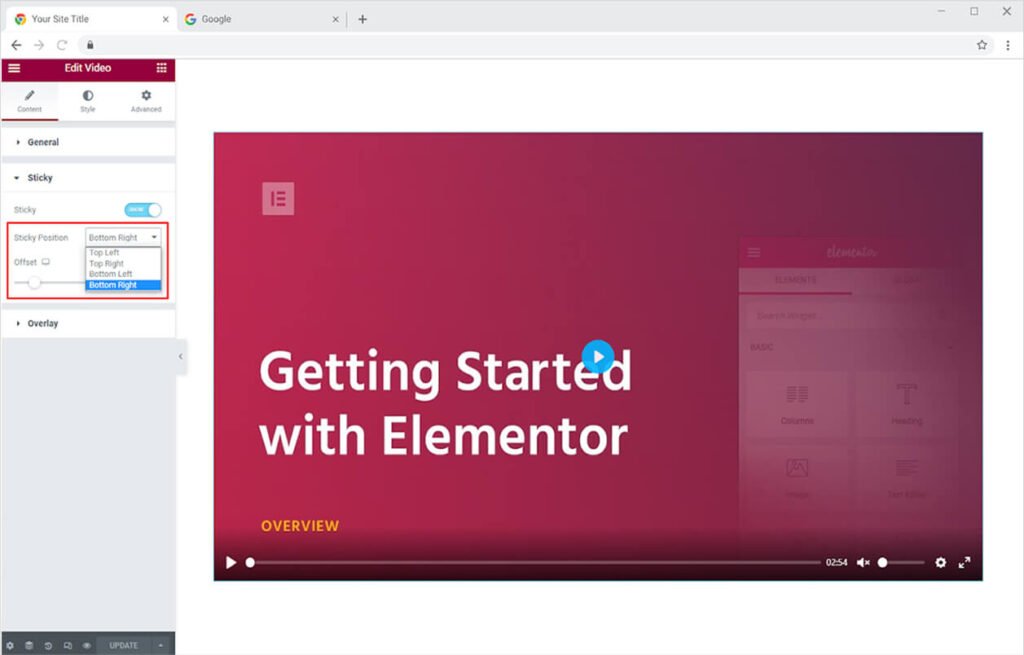
Open the menu for sticky and enable it to show the sticky effect on the webpage. Enabling this option will display a small video box when the user drags down that page. In this way, users can read the below-written content while also watching the video.
Select the position where the sticky box will appear.
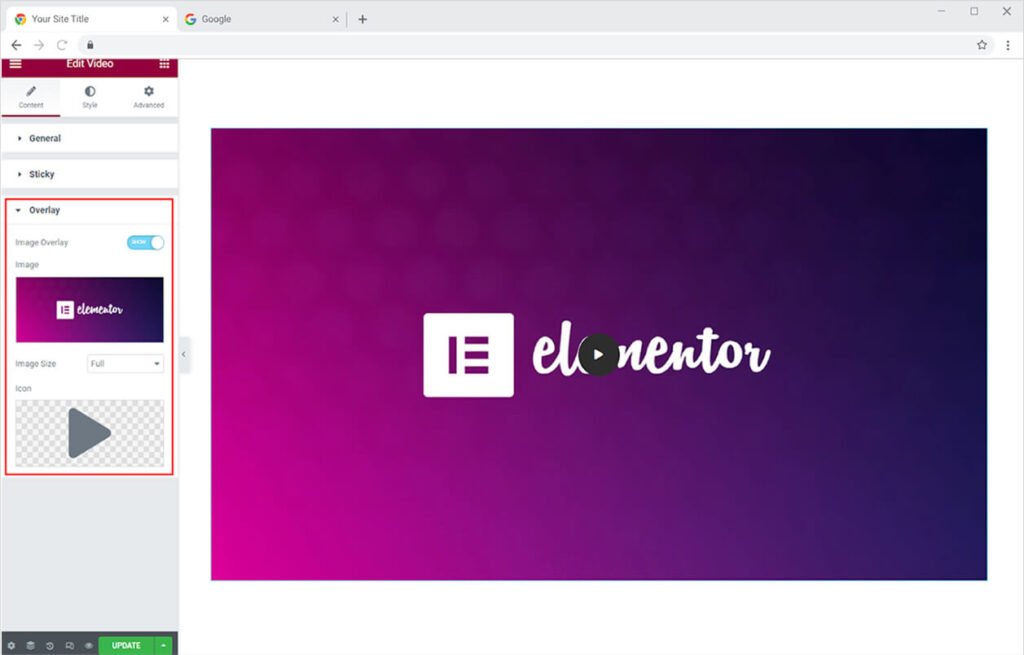
How to Add an Overlay Image to the Xpro Video Widget
If you want to add a thumbnail to display a picture before the visitor clicks, access the overlay menu. To add a picture, enable the overlay image option and upload an image.
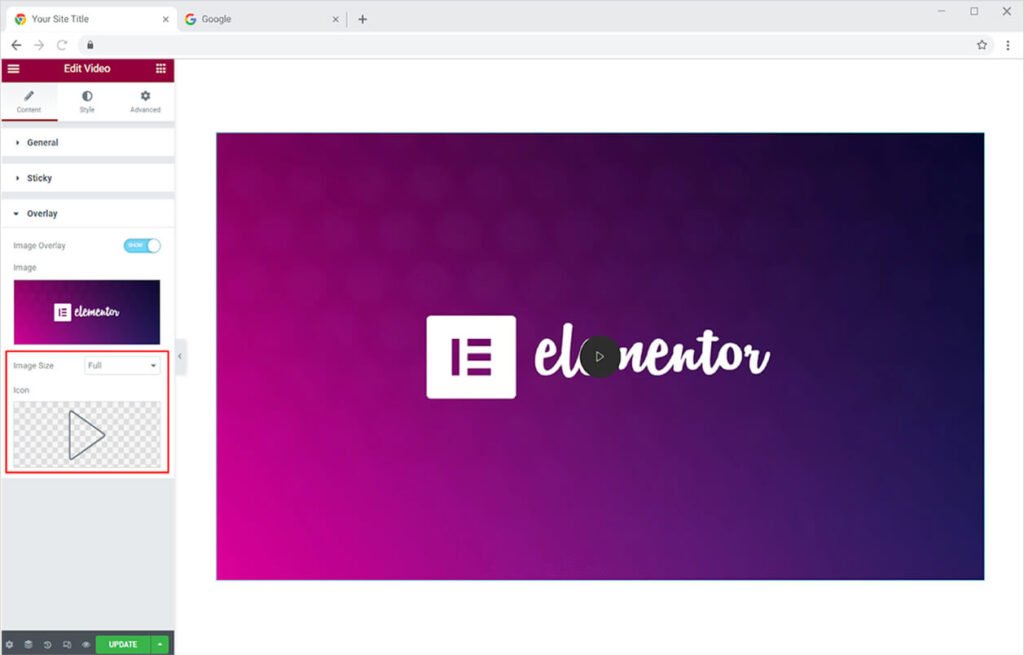
Furthermore, you can change the size of the image to make it look perfect on the display. You can change the icon for the start button. Click on the icon option to change the icon.
How to Style the Xpro Video Widget for Elementor
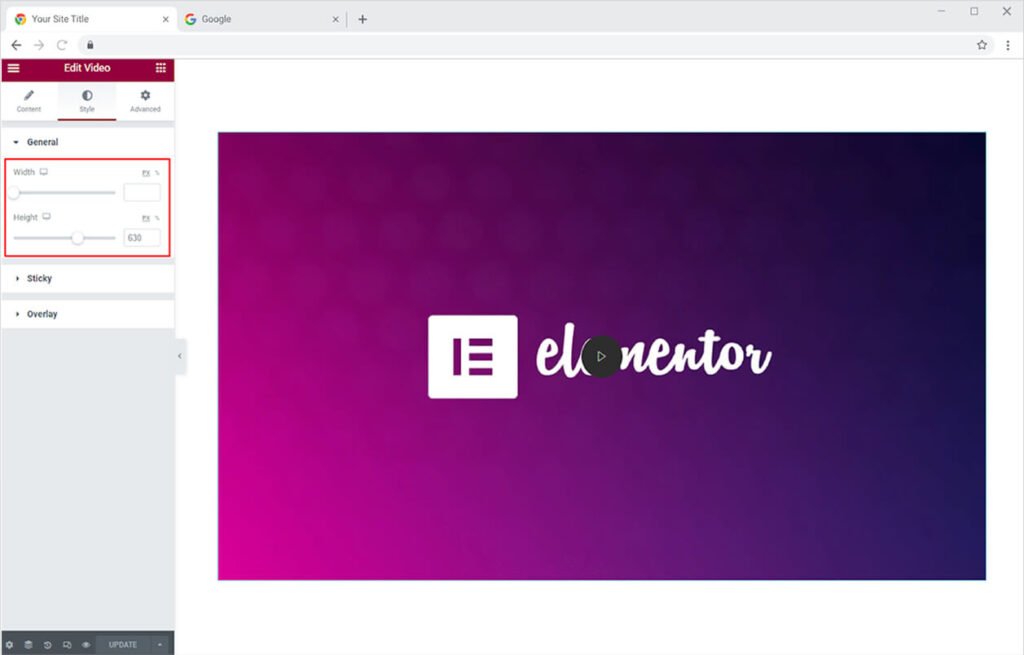
Begin the styling by adjusting the size of the video display. Adjust the size by managing the width and height of the display.
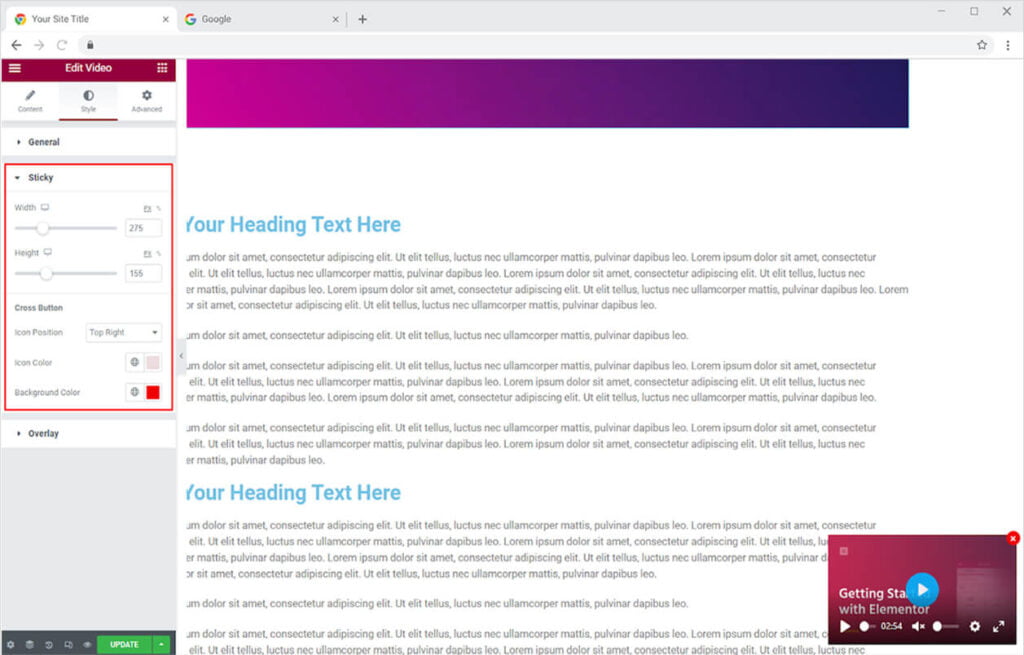
How to Style Sticky Box in Xpro Video Widget
Adjust the size of the sticky box by adjusting the height and width in the option provided. Furthermore, set the position of the close button to the top left or top right. Color the close icon and the background.
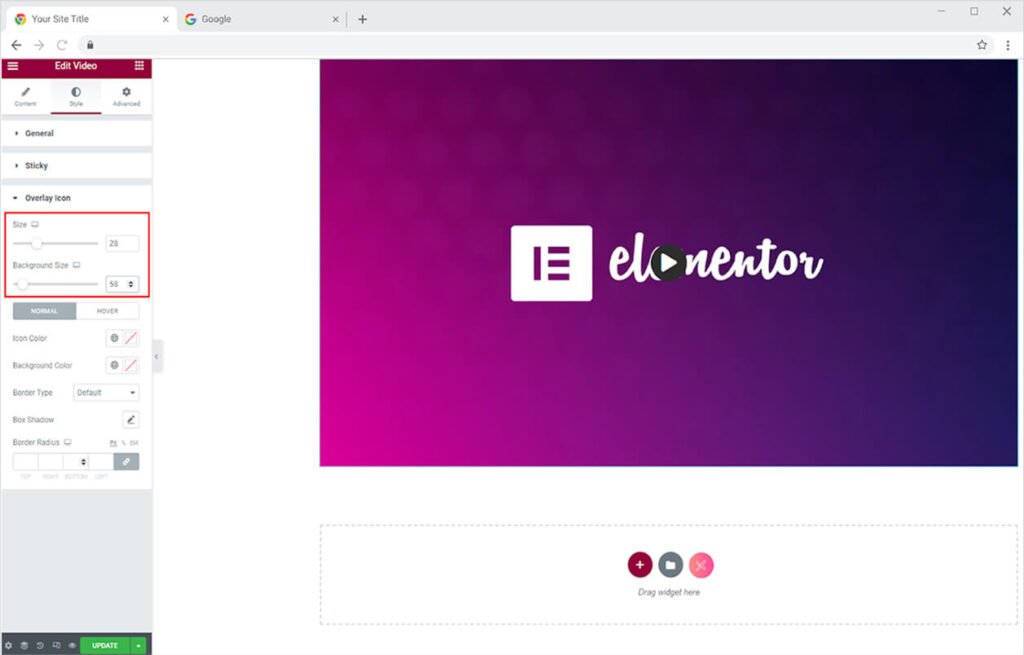
How to Style the Overlay Icon in Xpro Video Widget
Adjust the size of the icon and its background from its specified option. Drag the circle to increase or decrease the icon and background size.
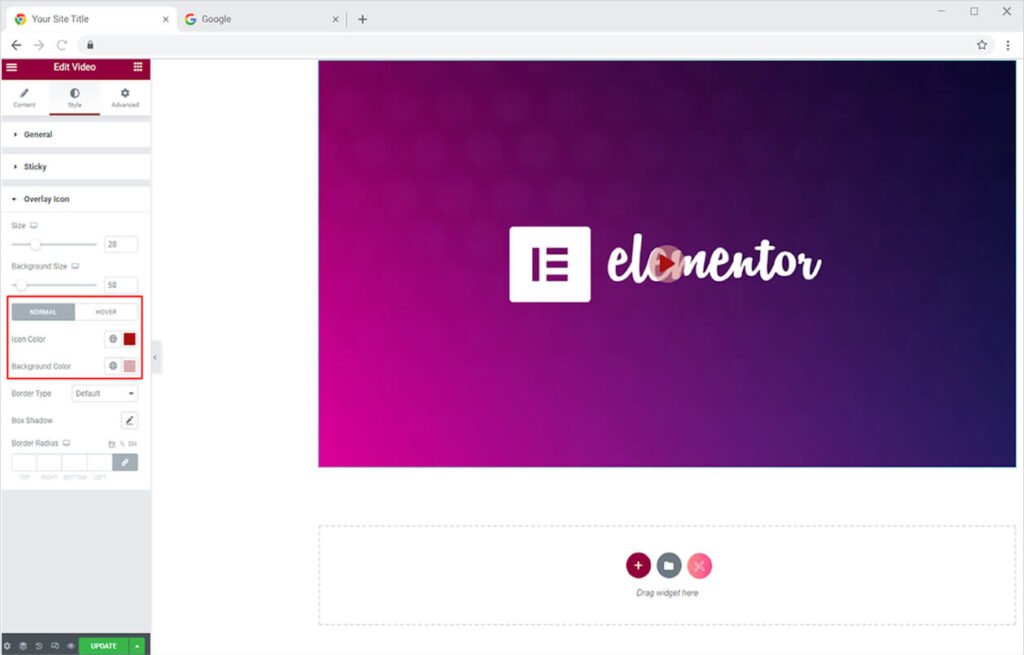
Add color for the icon and background for their normal display and also chose to add color that will display when the user drags the mouse above it.
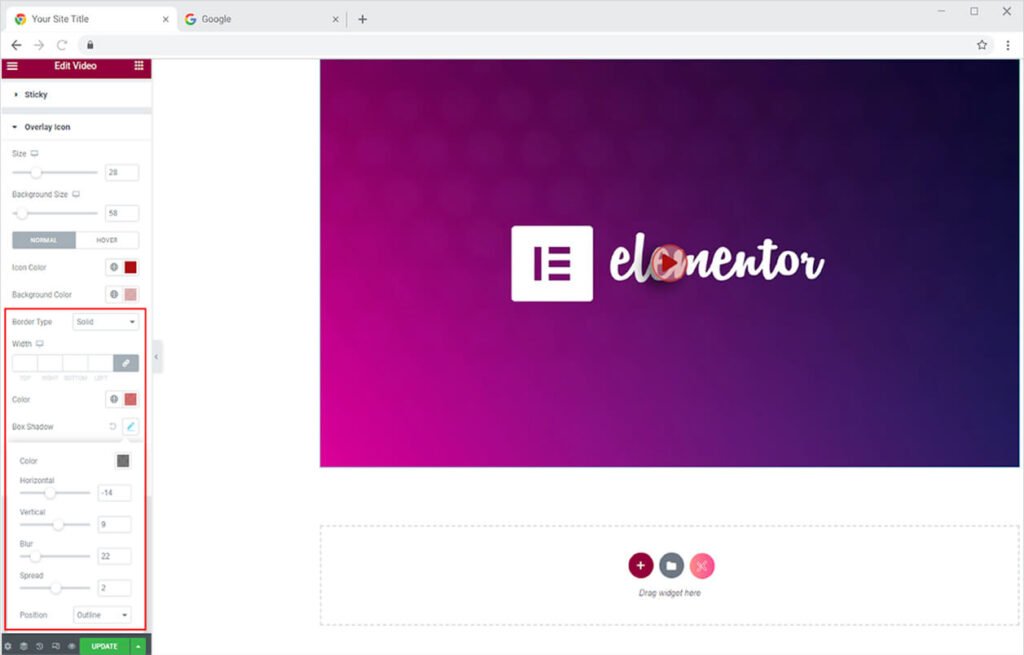
You can also change the border of the icon background to make them more visually appealing. You can choose from five different types of borders.
- None
- Solid
- Double
- Dotted
- Dashed
- Groove
Change the width and radius of the border to match your preferences. You can also change the border color. You can also make a shadow to the icon from the shadow box. Click to open the shadow setting and adjust the appearance and position of the shadow.
Best Video for Elementor
This was all from our Video widget for Elementor. We hope you completely understand the functionality and feature usage of this amazing Xpro Elementor widget. Make full use of this widget to create a beautiful display of video layout and show videos to your visitors. Check out our premium Elementor 360 Product viewer.
Xpro Elementor Addons offer a wide range of widgets, Elementor theme templates, and blocks that help designers develop an attractive site. Check our 50+ free addons for Elementor which are enough to create a professional WordPress website. If you want to explore and add more attractive Elementor widgets then check our complete list of Pro Elementor widgets and download our Pro Elementor addons right now. In case you want to grow your social media audience, you can easily utilize Xpro Social Share Widget to showcase social share icons in the most presentable way.