How to Install Elementor Pricing Matrix Widget
Xpro Pricing Matrix widget for Elementor is a powerful pricing widget that lets you compare plans, add beautiful carousels, and customize pricing packages as you wish. It’s a premium widget that comes with the Pro version of Xpro Elementor Addons. The widget lets you create attractive and detailed pricing tables using 6 pre-defined layout styles. You can add tooltips, loops, navigation controls, badges, and much more. It’s a complete pricing widget made for professional web designers.
There are tons of personalization options like looping your pricing tabs, adding customized badges, or simply enabling/disabling the auto-play on the item’s carousel. Eventually, the widget will enable you to create an attractive pricing table that lets your visitors easily navigate, compare, and explore your packages. Let’s check out all features of this amazing pricing matrix widget and how you can fully utilize it for your website.
Requirements
You need to install and activate the PRO version of Xpro Elementor Addons to use this widget. If you already have the pro version installed, just make sure the Pricing Matrix Widget is ‘Enabled’ from the Xpro Dashboard, so you can easily find it in the Elementor editor.
To enable the widget, simply follow these steps:
Step 1
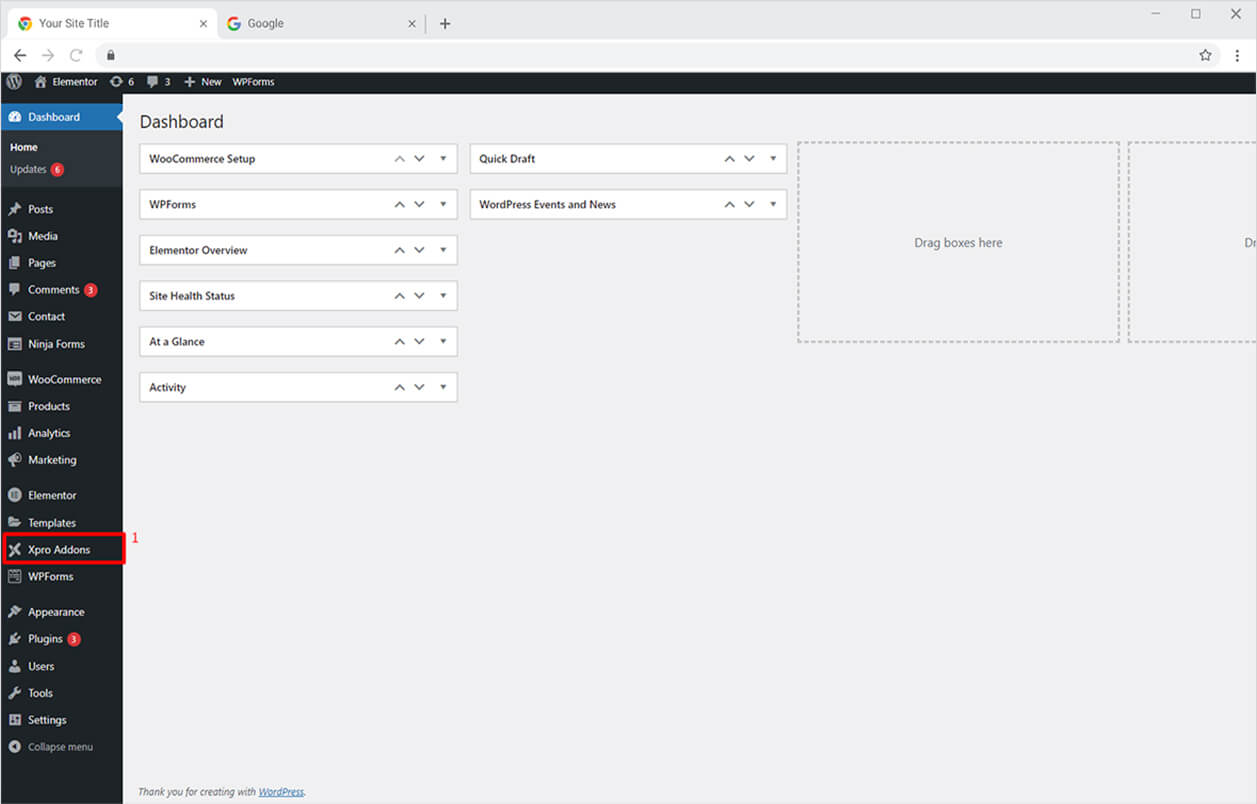
Click on the Xpro Addons section available on the WordPress Dashboard Menu.
Step 2
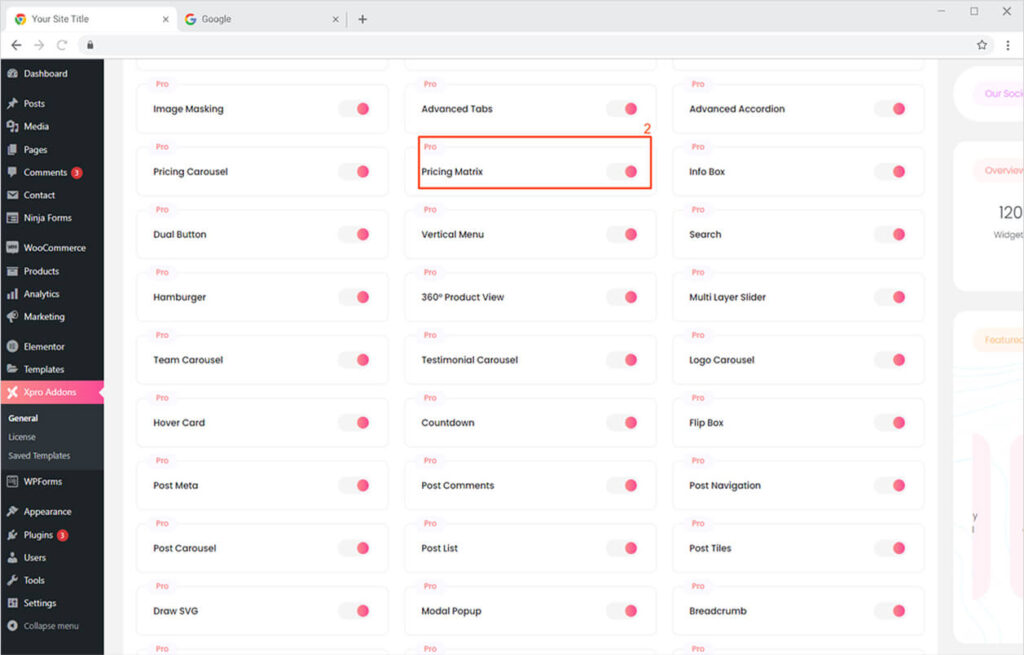
From the Xpro Addons Dashboard, click on the Widgets Tab, find the Pricing Matrix widget, and finally, toggle the button ON to enable it.
How to Use Xpro Pricing Matrix Widget for Elementor
You can easily create a professional pricing table with comparisons, exclusive badges, tooltips, and more. Clean and detailed pricing is the most effective way to let your audience engage with your pricing info and take action. You can add carousels, autoplay, loops, mouse drag options, and much more using the pricing matrix widget for Elementor.
Carousel and comparison allow you to distinguish multiple packages simultaneously thus allowing visitors to make quick buying decisions. Eventually, sort your detailed features lists into attractive price comparison tables for different bundle packs. You can present your packages in multiple categories with detail-oriented information & features. Our widget is feature-rich, fun, and time-saving! Here’s how to use the incredible Elementor Pricing Matrix widget.
Step 1
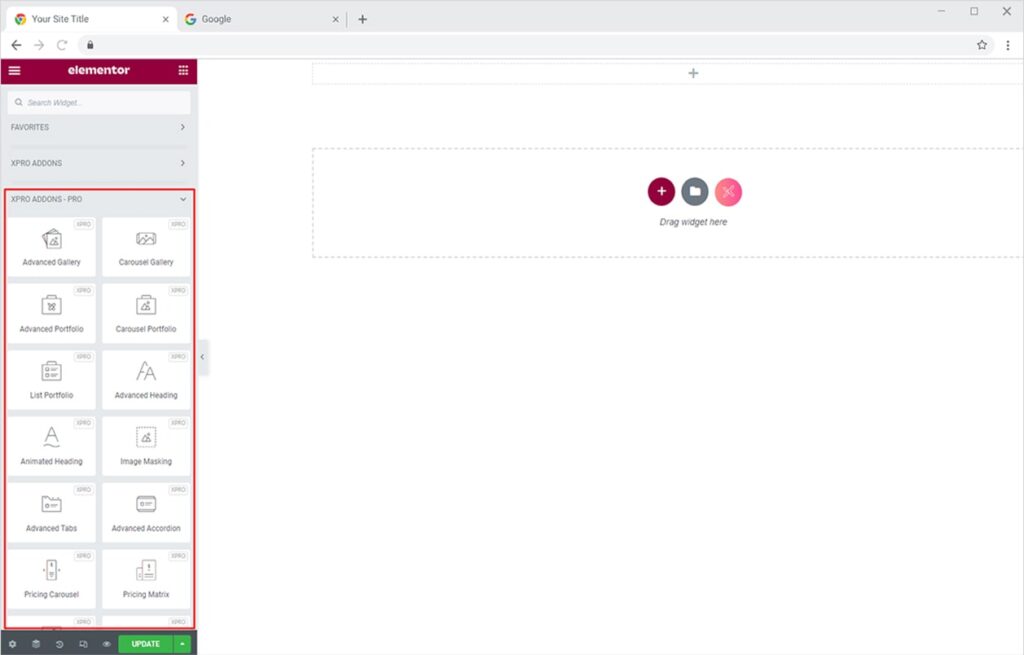
Click on the Xpro Addons – Pro section available in the Elementor Editor and find the Pricing Matrix widget.
Step 2
From the Xpro Addons – Pro section, simply drag’n’drop the Pricing Matrix widget on your desired location/page.
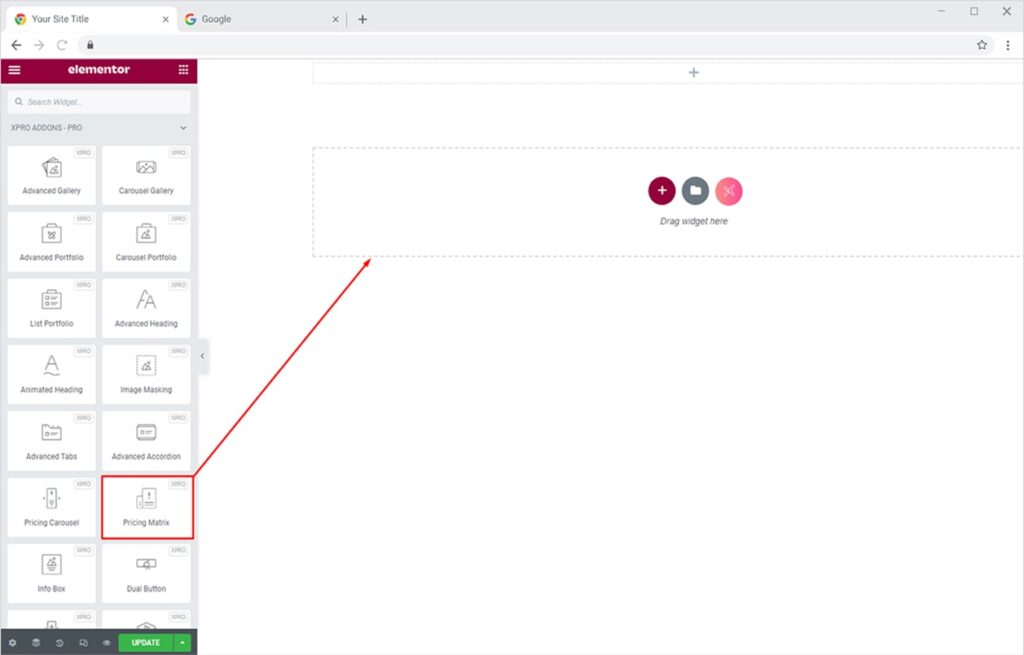
This is the default view of our Xpro Pricing Matrix Widget for Elementor.
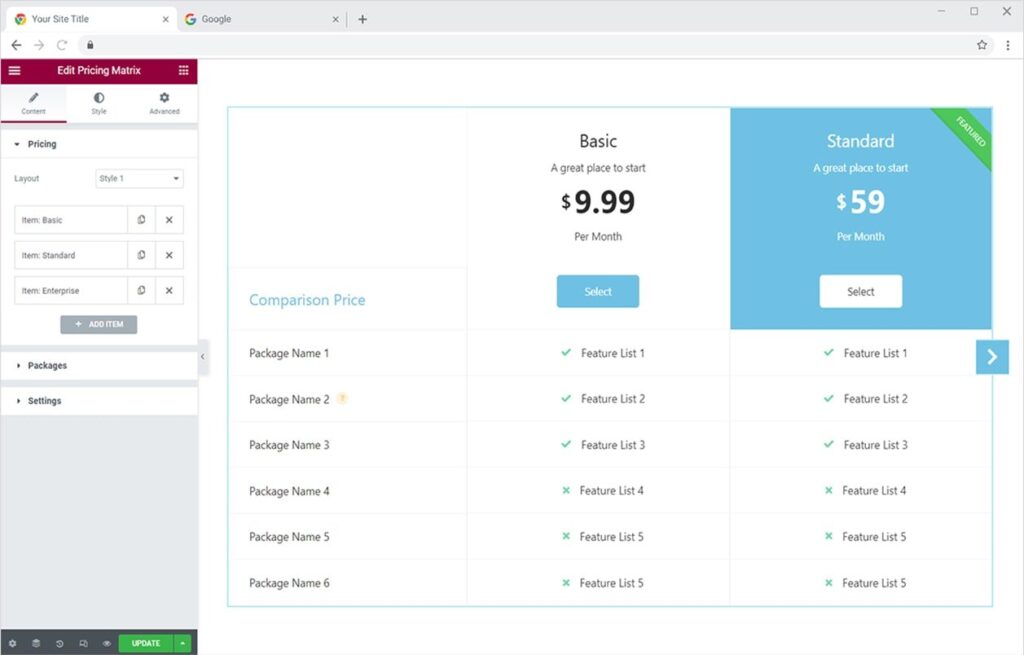
How to Add Content to Xpro Pricing Matrix Widget for Elementor
Click on the Content Tab, here you will see 3 main sections, Pricing, packages, and Settings. First, let’s explore the Pricing section. By default, the layout is set to Style 1. You can change the layout by clicking the dropdown next to it (6 layout styles available). Below the layout option, you will see 3 items (packages basically). These packages are by default, you can edit them or create new ones.
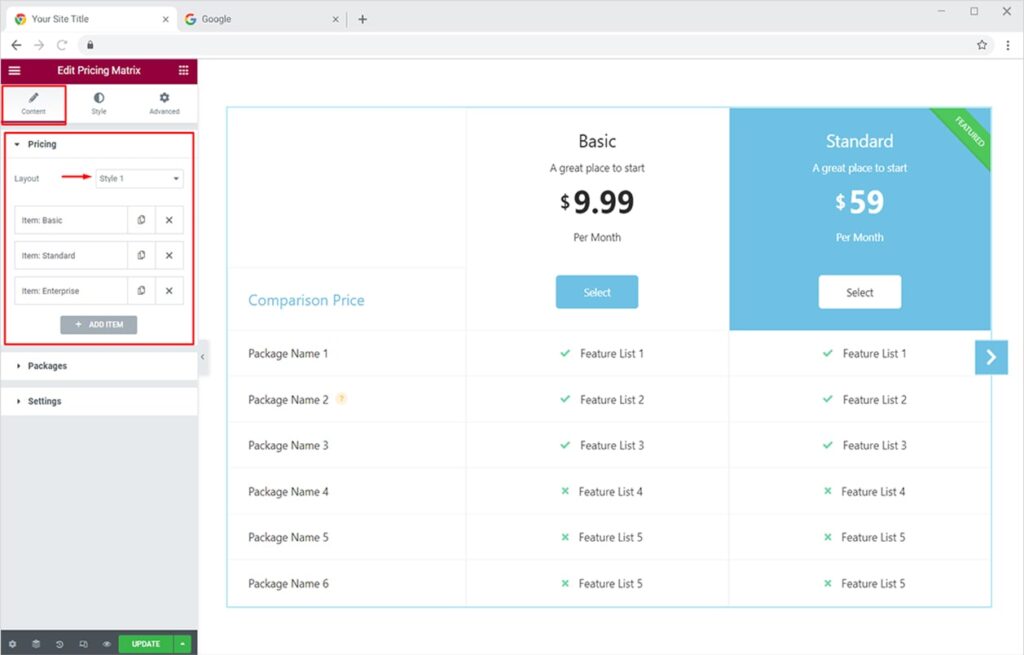
Let’s add values and other features to the item ‘Basic’.
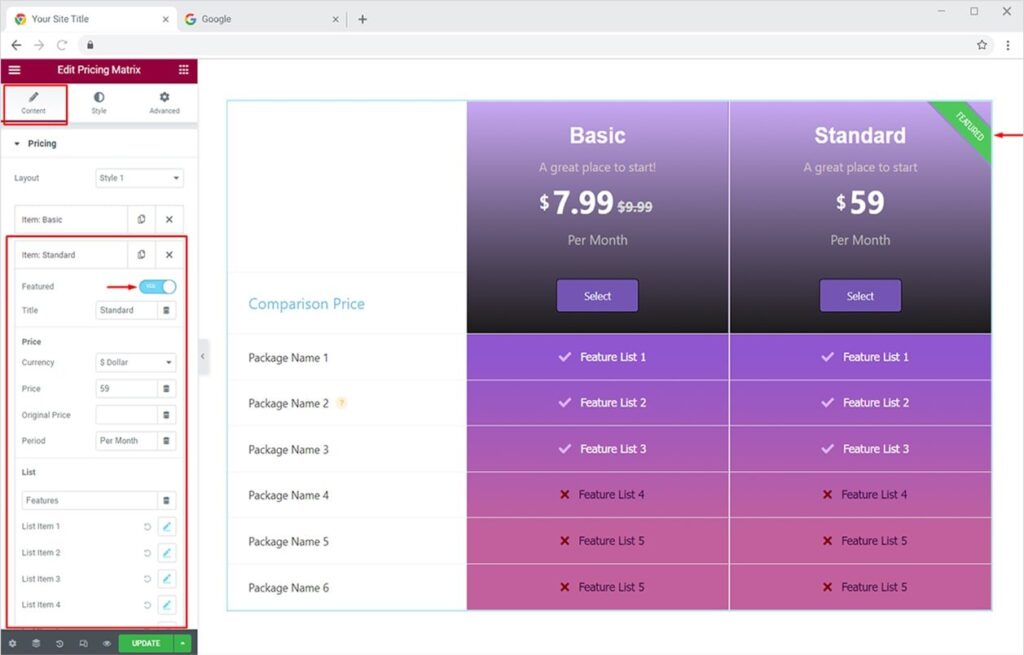
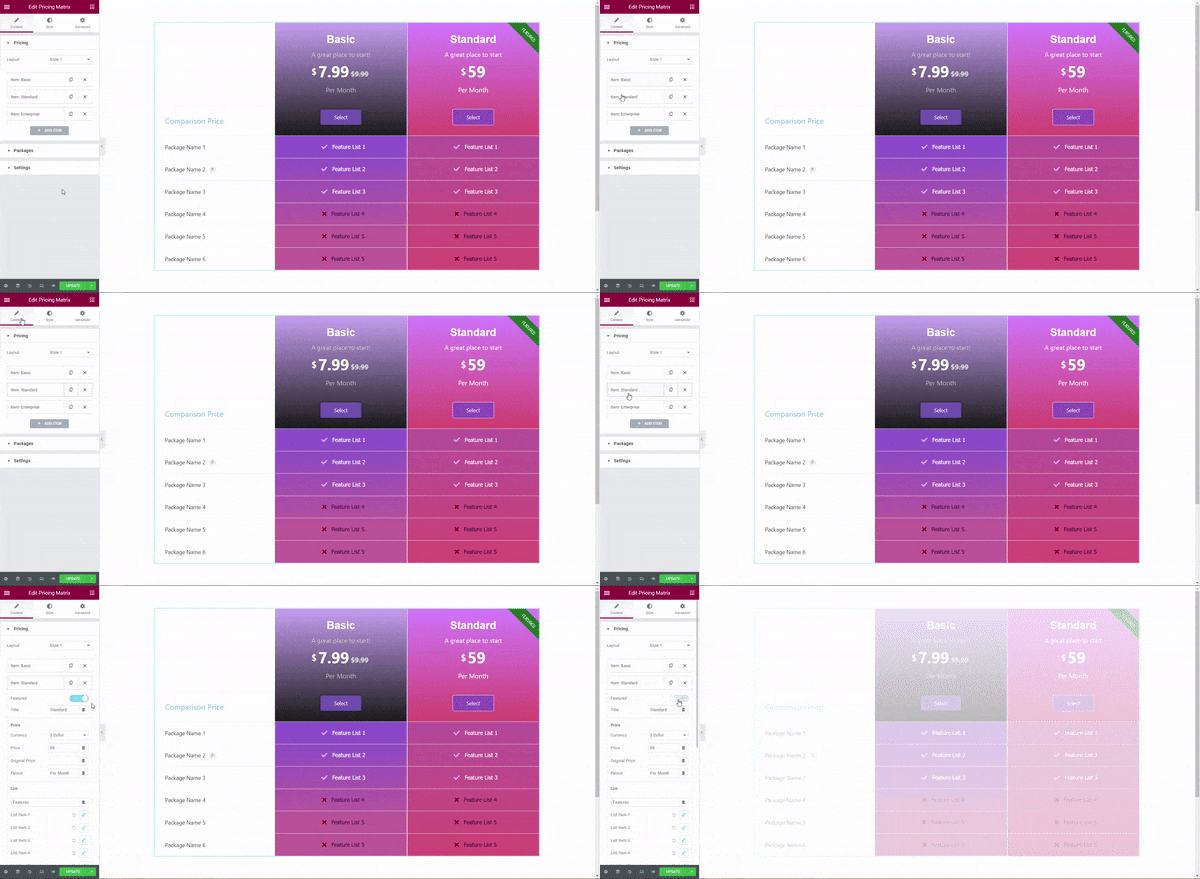
Featured – toggle this button ‘ON’ to make this specific item highlighted and set as a featured package in the pricing table.
Title – you can rename the title of the item from this field.
Price – Here you can set currency (18+ options available), price, original price, and period of the price.
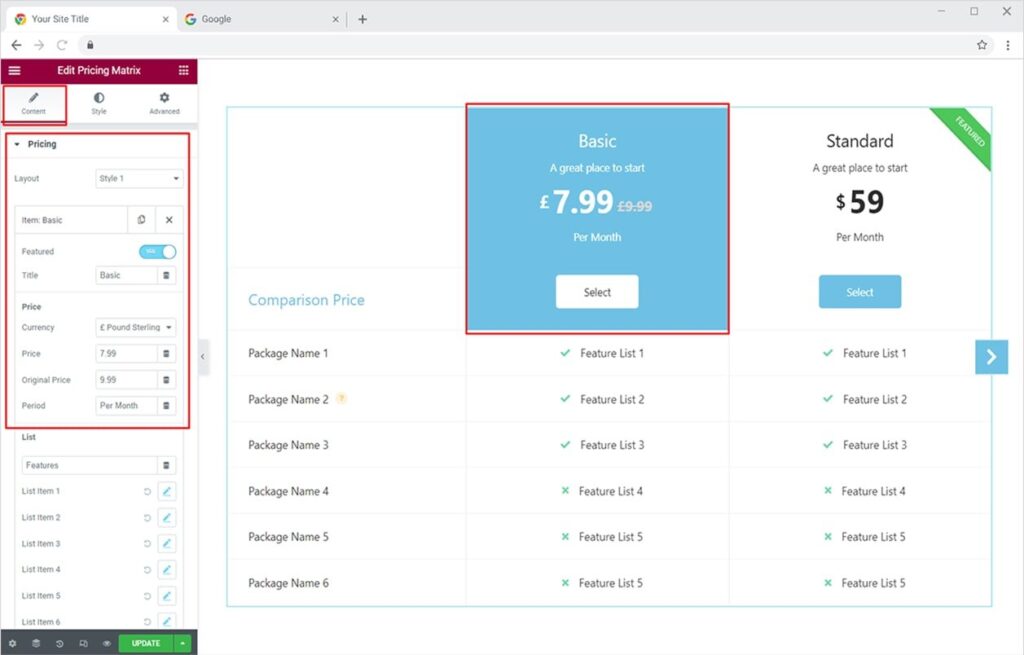
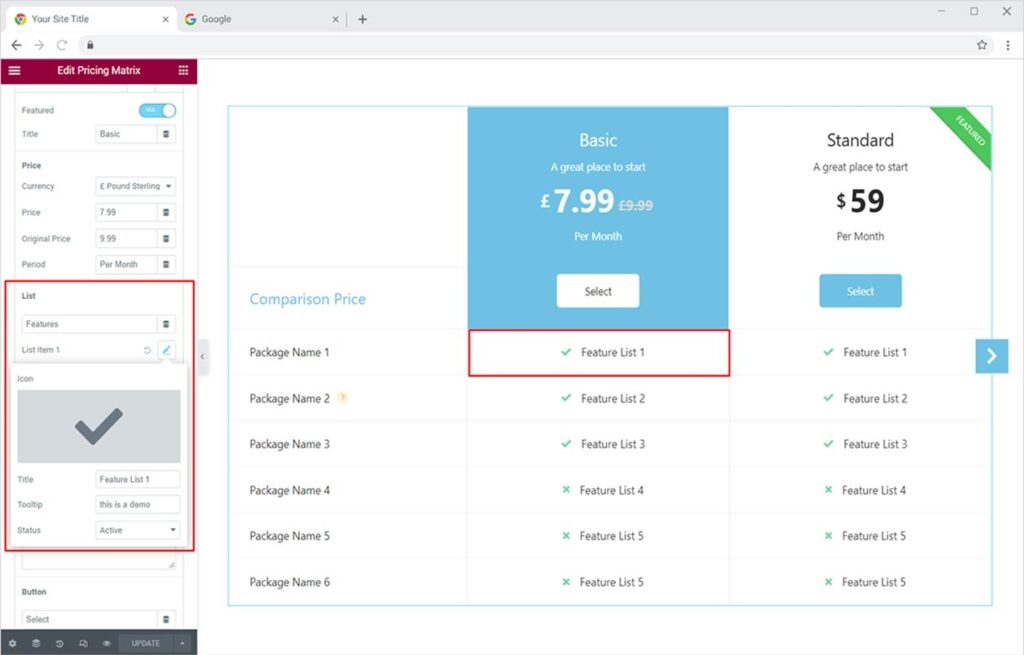
Moving further, below the price option are list items.
List – here you can icon, title, tooltip, and set the status to either active or inactive for a specific list item. You can add up to 6 list items to your pricing, or you can add tooltips and icons to them. The widget also allows you to make your list of items active or inactive.
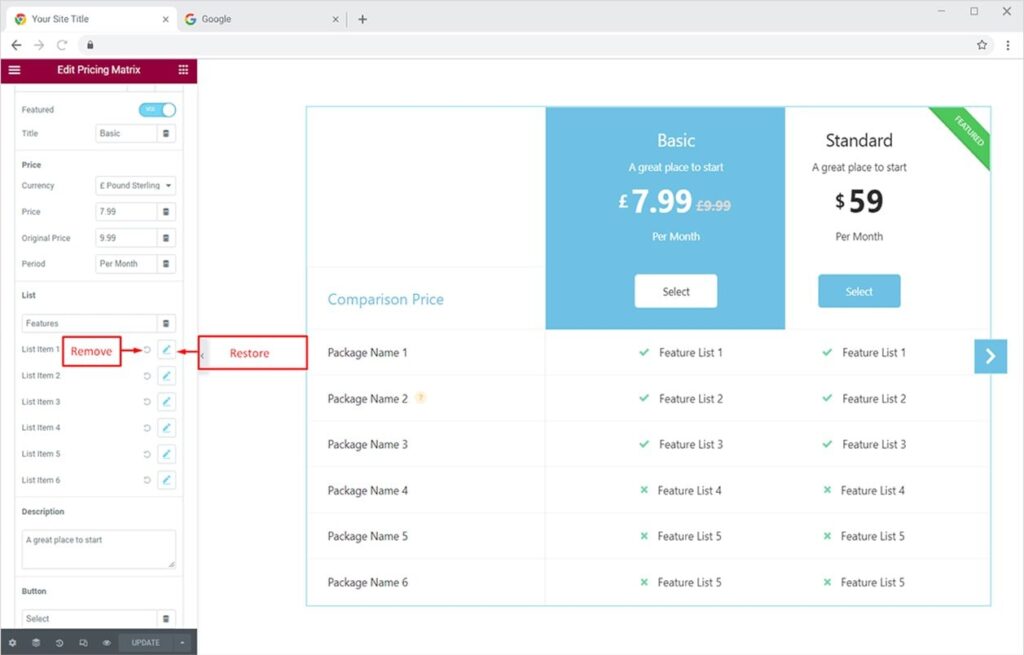
Click on the Reset icon to remove a list item. You can again restore it by clicking the Edit icon.
Below the list of items, you will see multiple creative options for your pricing table. Let’s see how to fully use them.
Description – You can add a short catchy line for the pricing plan.
Button – Add CTA button text.
Link – Here you can redirect the button to the cart or wherever you want.
Badge – Add an interactive badge text to your plan.
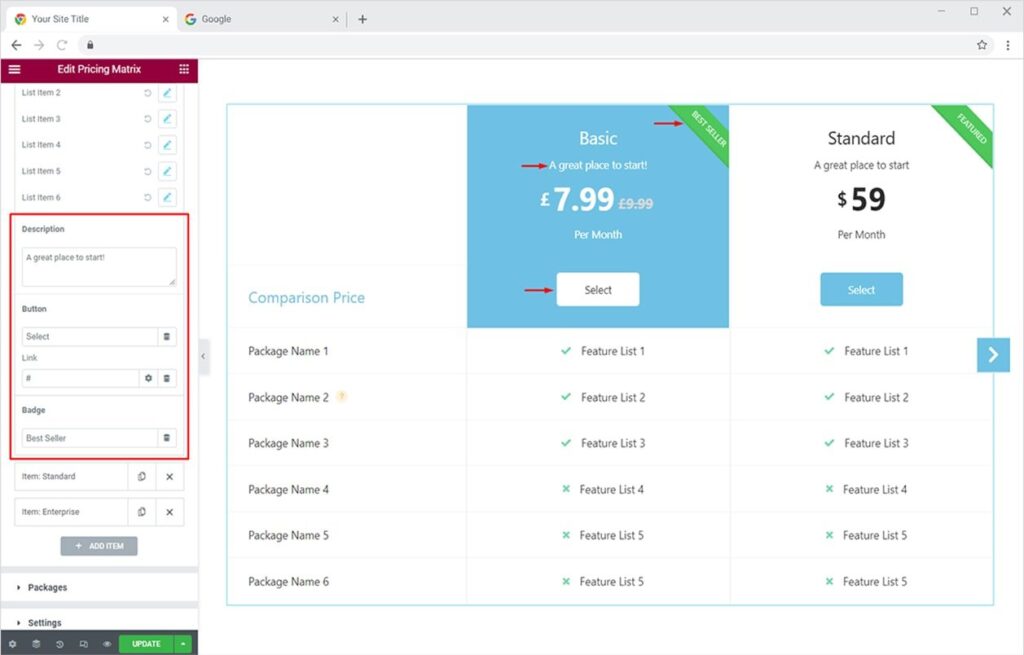
These are all the interactive options you can add to create amazing pricing tables using Xpro Pricing Matrix widget for Elementor. We will further style & design these options from the Style Tab later on.
Similarly, you can edit other plans/items by clicking them. You can add another package or item by clicking the Add Item button.
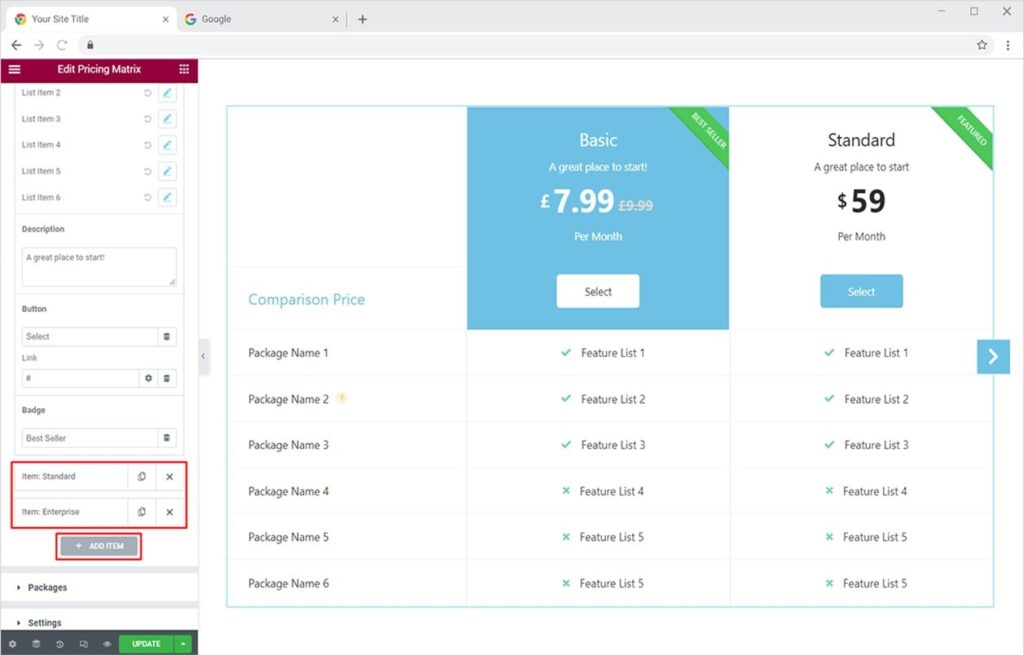
Similarly, you can add content to other default items and can add more items (packages) by clicking the Add Item Option.
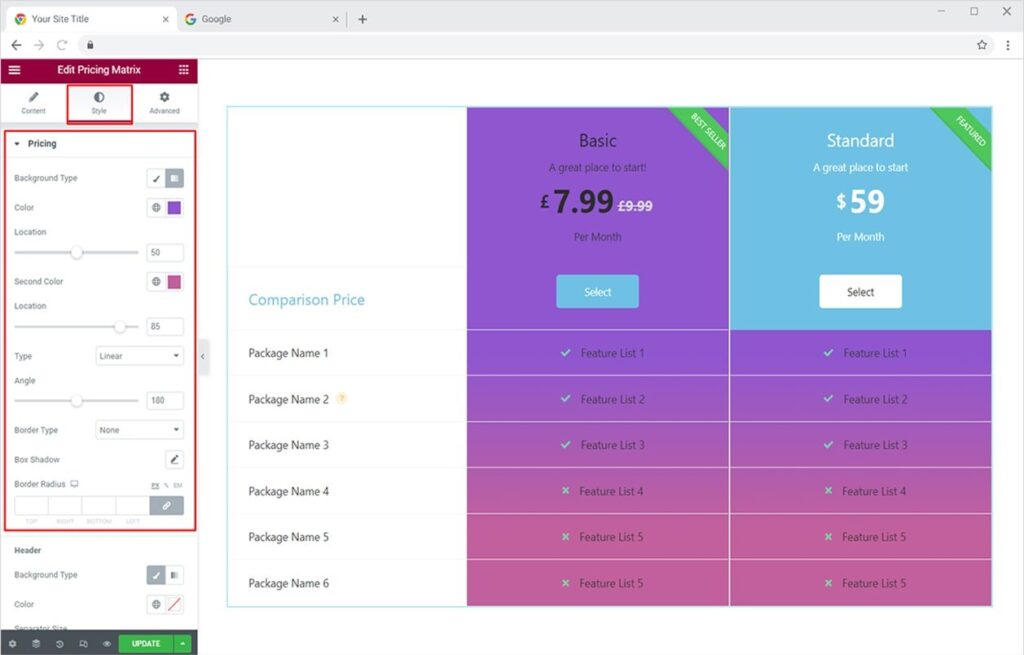
Now let’s design and style these fields via the Style tab. You can style every option you add from the Content Tab. Here we will first style the Pricing section of the table. Remember, you can individually style headers or all plans from the Header option in the Pricing section.
At first, from the General section in the Style Tab, you can style the entire content in the pricing plan in one go. From background type (classic, gradient), color, alignment, box-shadow, background, border, and more.
Useful Links: Best theme builder for Elementor – create custom header, footer, singular, and archive templates for your WordPress websites.
By Xpro Elementor Addons
How to Style Header for Pricing Matrix in Elementor
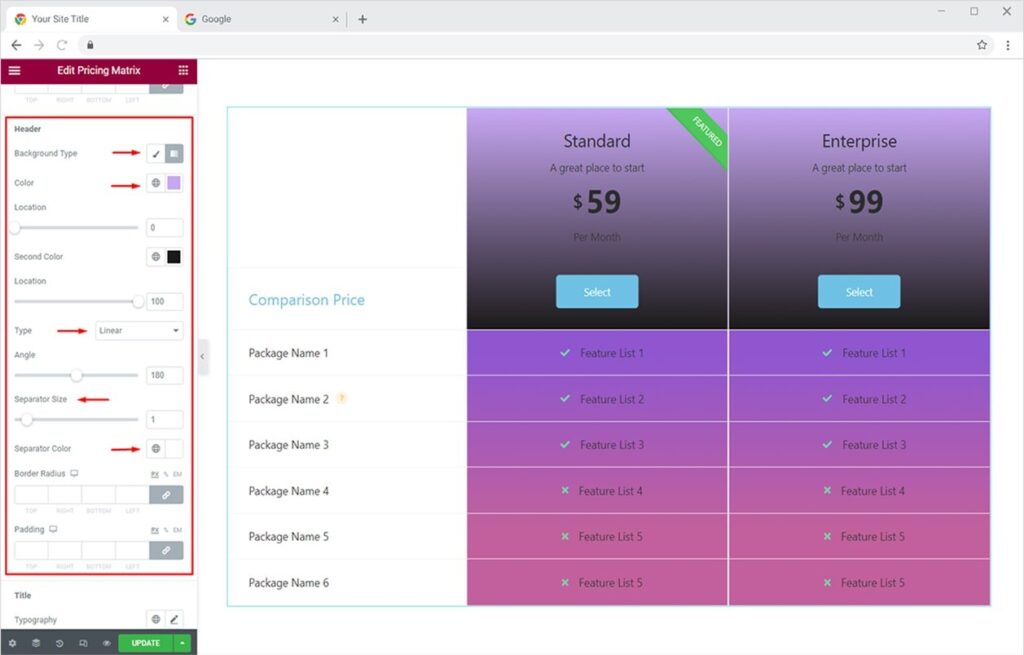
You can style the header of all plans and featured plans from the Header option under the Pricing section in the Style Tab. Firstly, here you can change the background color (set it as solid or gradient) change the size of the separator & set the color. You can also manually set border-radius and padding.
How to Style Title, Description, Period of Pricing Packages using Xpro Pricing Matrix Widget
You can also design and style the title, description, and period of your offered packages. The Title, Description, and Period options are available under the Pricing section in the Style Tab. Here you can change the typography and color of the text as you like. First, let’s style the title and description as the period option is available below the pricing option, so we’ll style it separately.
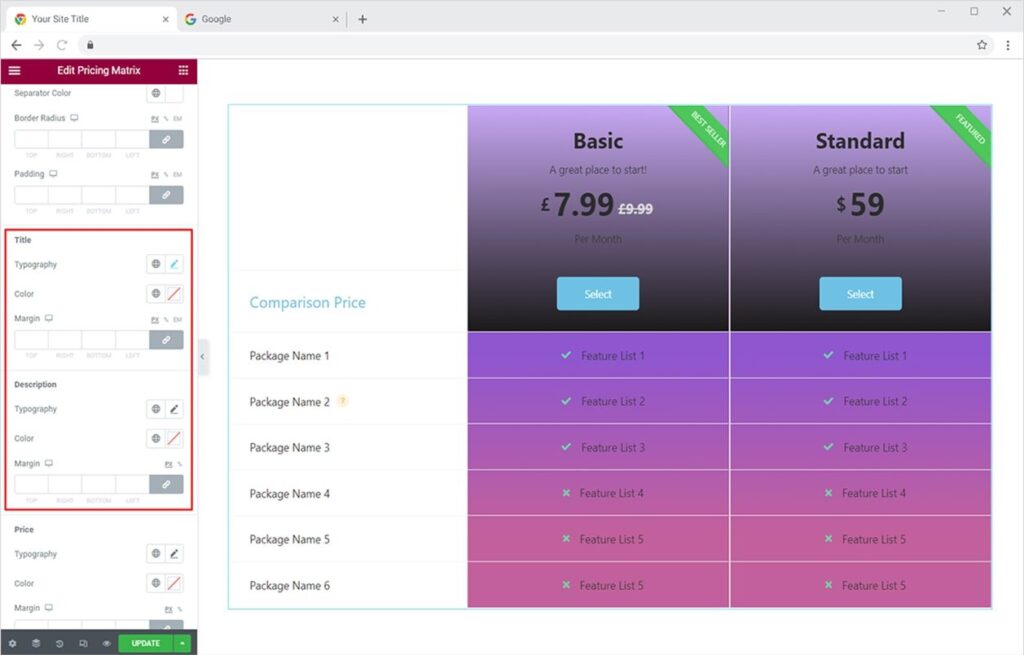
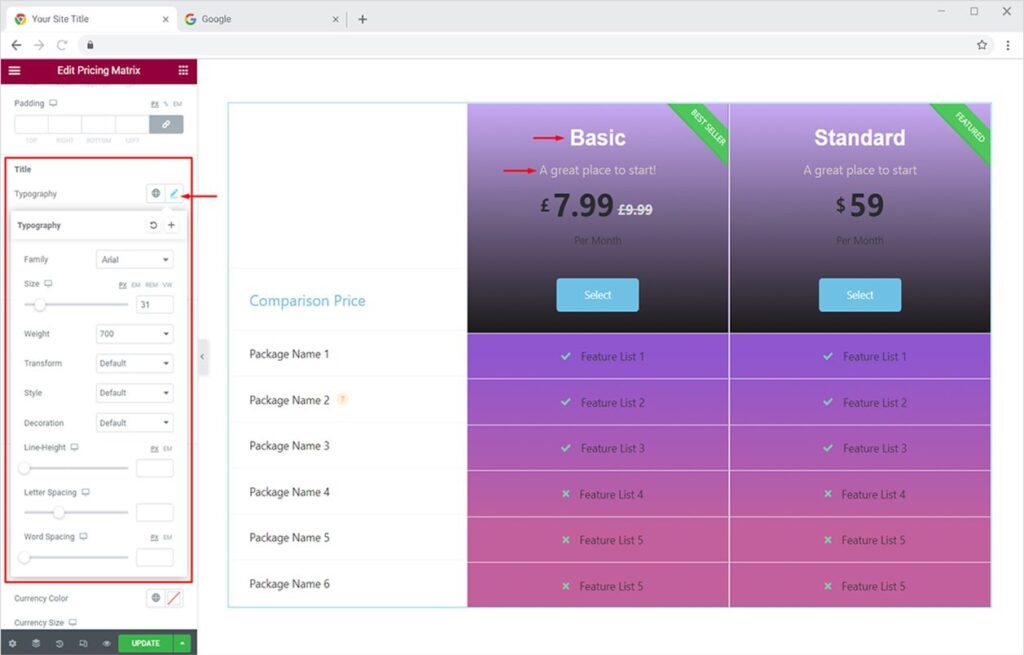
Let’s change the typography for Title and Description. Secondly, we’ll change the color of the description. You can also adjust the margin of the text too.
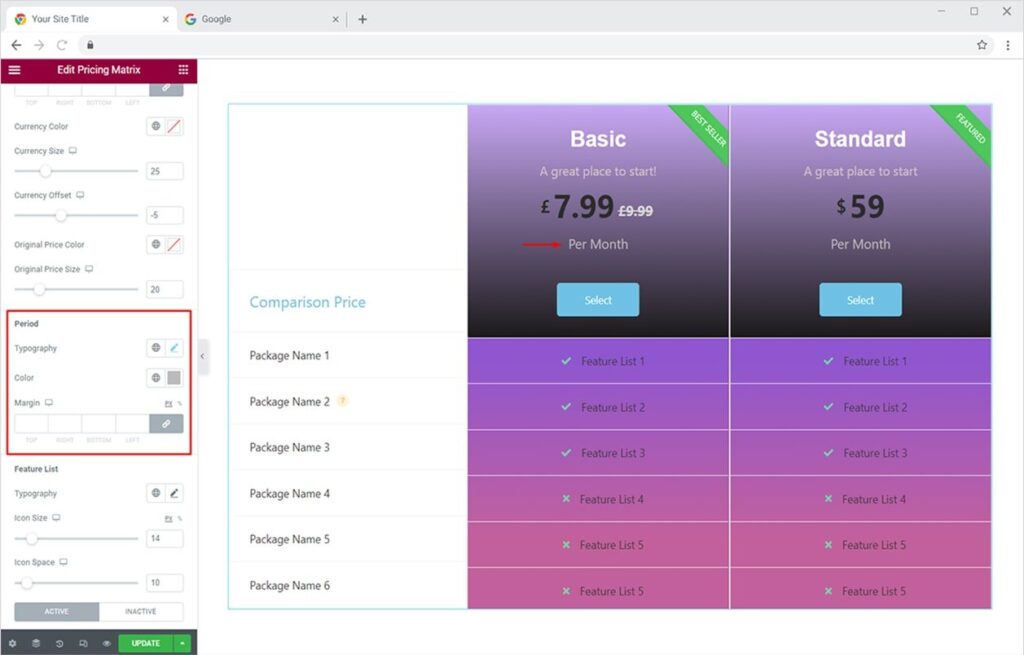
You will find the Period option on scrolling a bit more under the Pricing section. Here you can also set the typography and color of the period valid for your offer.
How to Style Price & Feature List in Xpro Pricing Matrix Widget
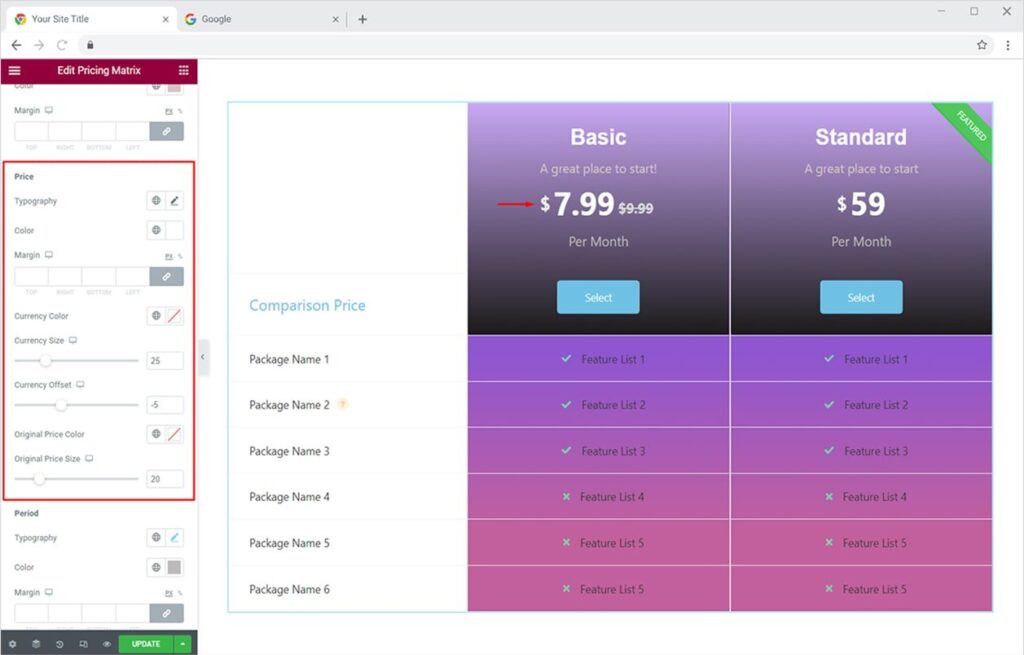
Just above the Period option, you will find the Price option under the Pricing section. Here you can separately style the price, currency color & size, original price size & color, and more.
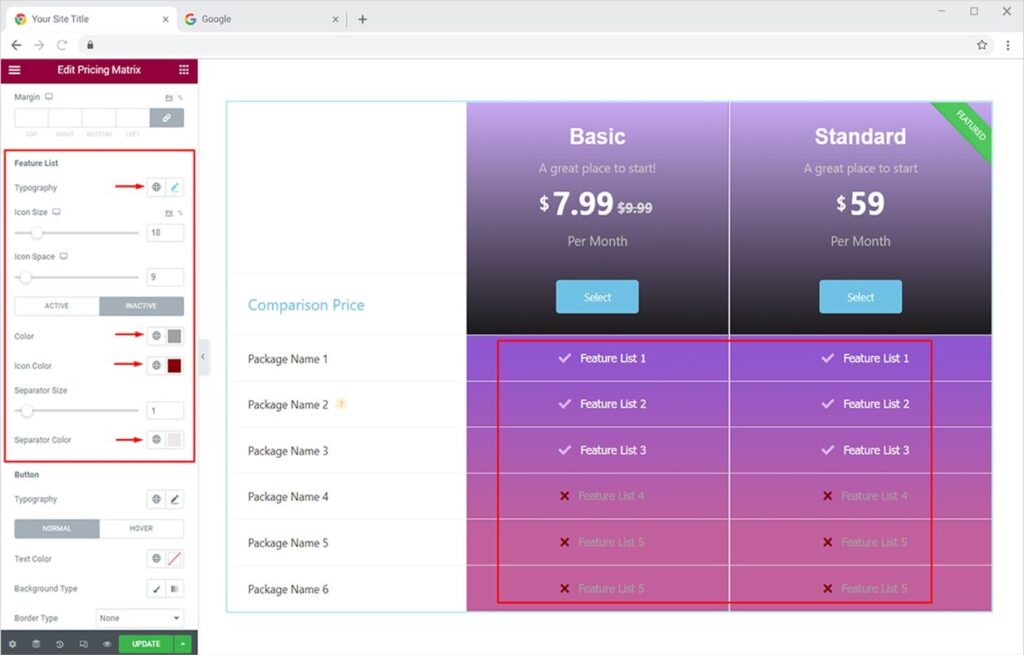
Now by staying in the Pricing section under the Style Tab, we will style & design our list from the Feature List option. Here you can change the typography, resize icons and spaces, and change the color of the active and inactive lists. We can also change the separator color from this option.
How to Style Button & Badge in Xpro Pricing Matrix Widget for Elementor
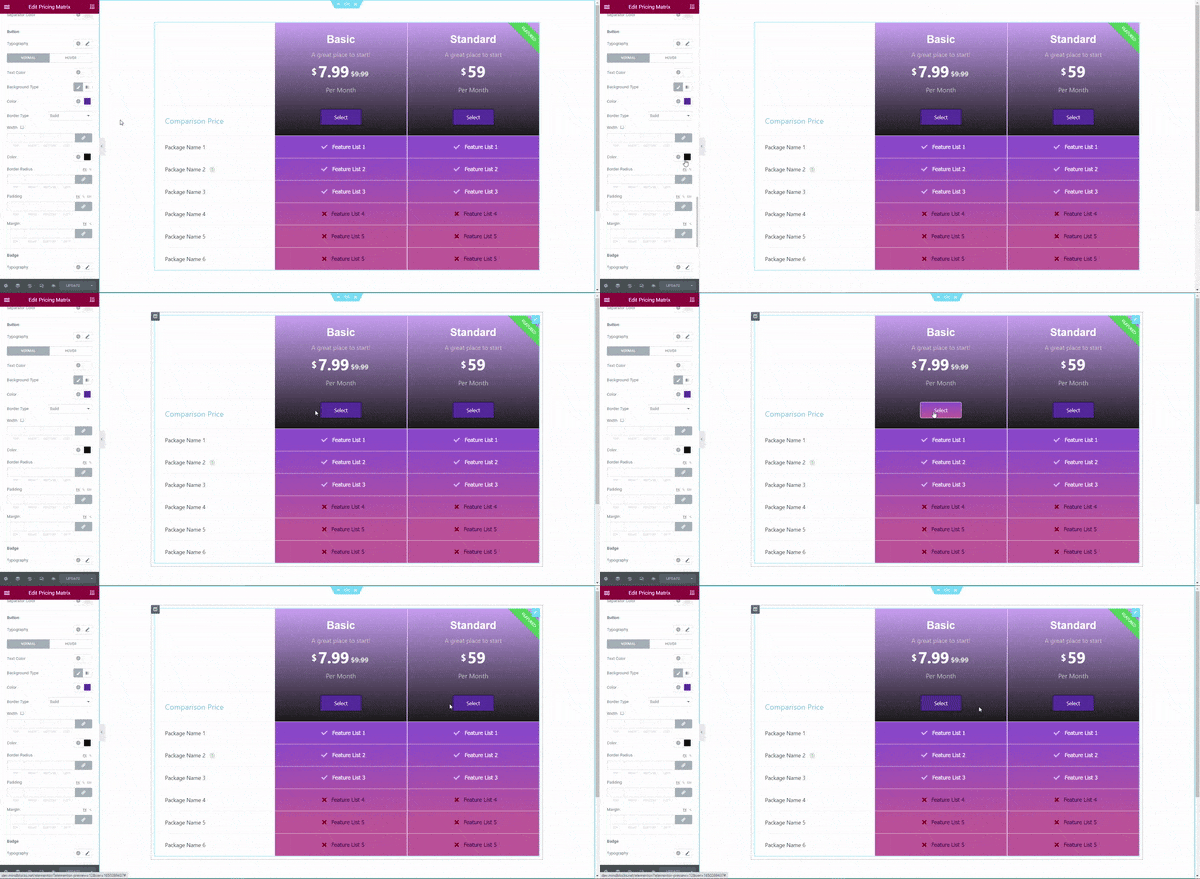
Now let’s style the Button Section of the pricing packages to make the most of our CTAs. Styling the button according to the site’s theme is important, a pleasant button makes users take quick action. Here you can set the typography, color for hover and normal mode, background color (solid or gradient), border, and more.
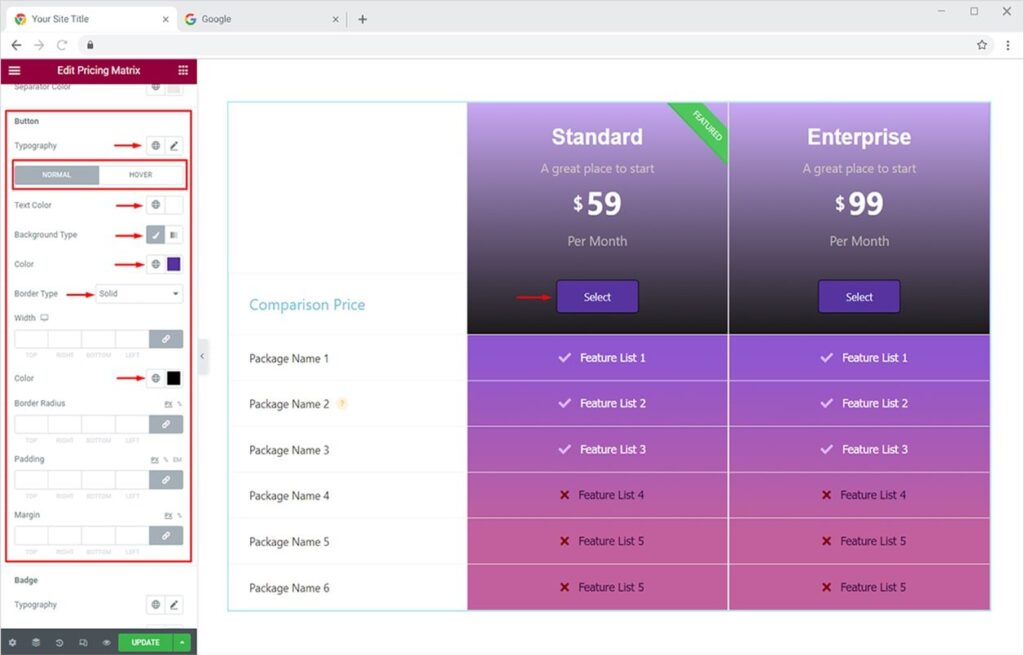
You can style buttons for both Normal and Hover modes to make them more attractive. The end result would look something like this:
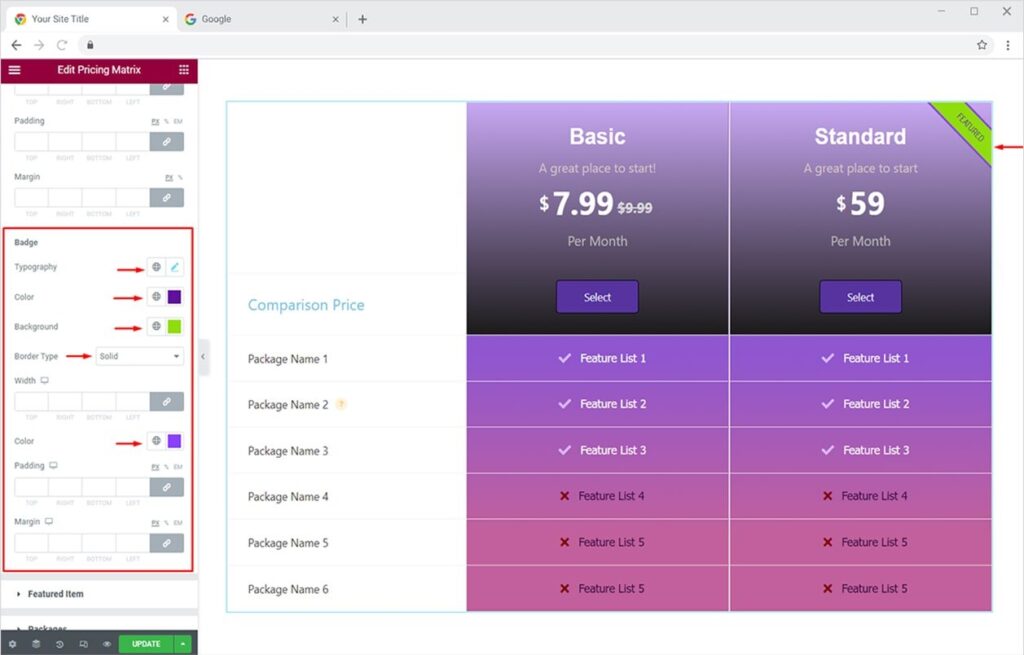
Similarly, you can style the Badge you’ve added to any pricing item. You can change the typography, background & text color, add a border (5 options), and more.
How to Add & Style Featured Item in Xpro Pricing Matrix Widget
Highlighting any of your pricing items as ‘Featured Item’ allows you to design two different styles for your pricing table. To add a featured item head back towards the Pricing section in the Content Tab and click the item you want to make a featured item. From the drop-down menu, slide the featured Button to “Yes”.
Now, you can style your feature item separately. This will help you to highlight your content in a more appealing pattern and you can also make your most important package extra prominent.
Shift towards the Featured Item section in the Style Tab. From here you can style all the content of the featured item just like we did previously for all pricing items. You can style the background, header, title, description, price, feature list, button, and badge from the options listed under the Featured Item section.
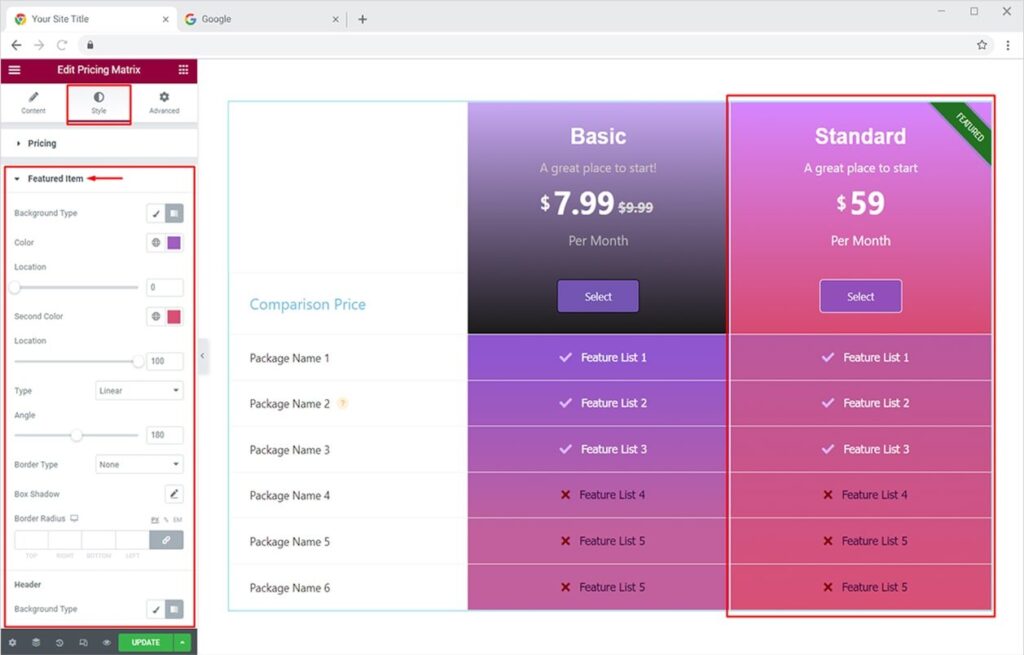
Styling featured pricing item differently makes them more prominent and help users distinguish special offers.
How to Add Loop to Pricing Items of Your Pricing Matrix Widget
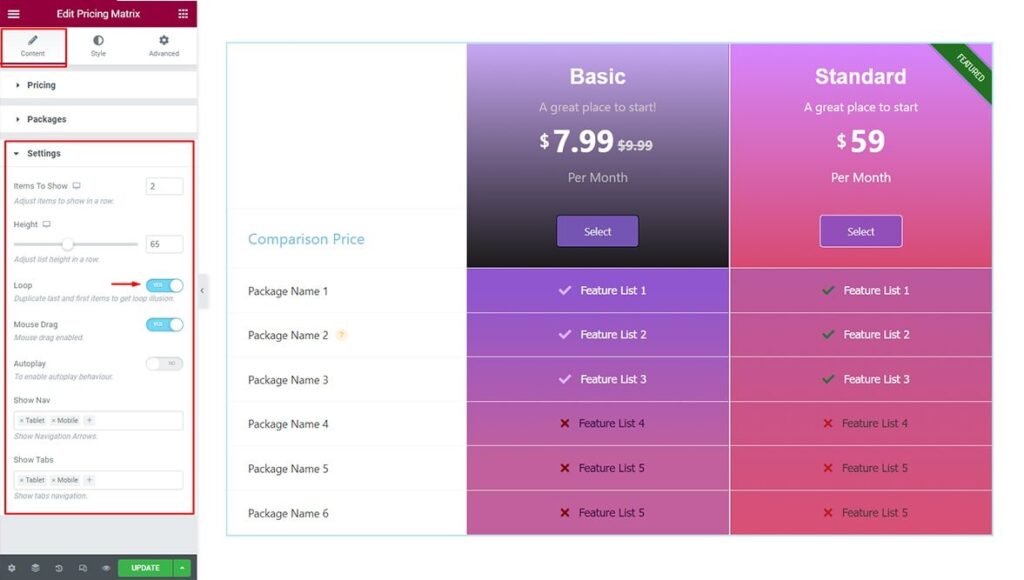
Adding a loop to your pricing table is a creative approach that makes your visitors stick to your plans and make a buying decision. It allows you to represent your content in a never-ending loop. The end is the new beginning for looped pricing items. Eventually, helps you get more interaction from the users.
Simply go to the Content Tab and click on the Settings section. From here, you can toggle the Lazy Load and Loop button to ‘Yes’.
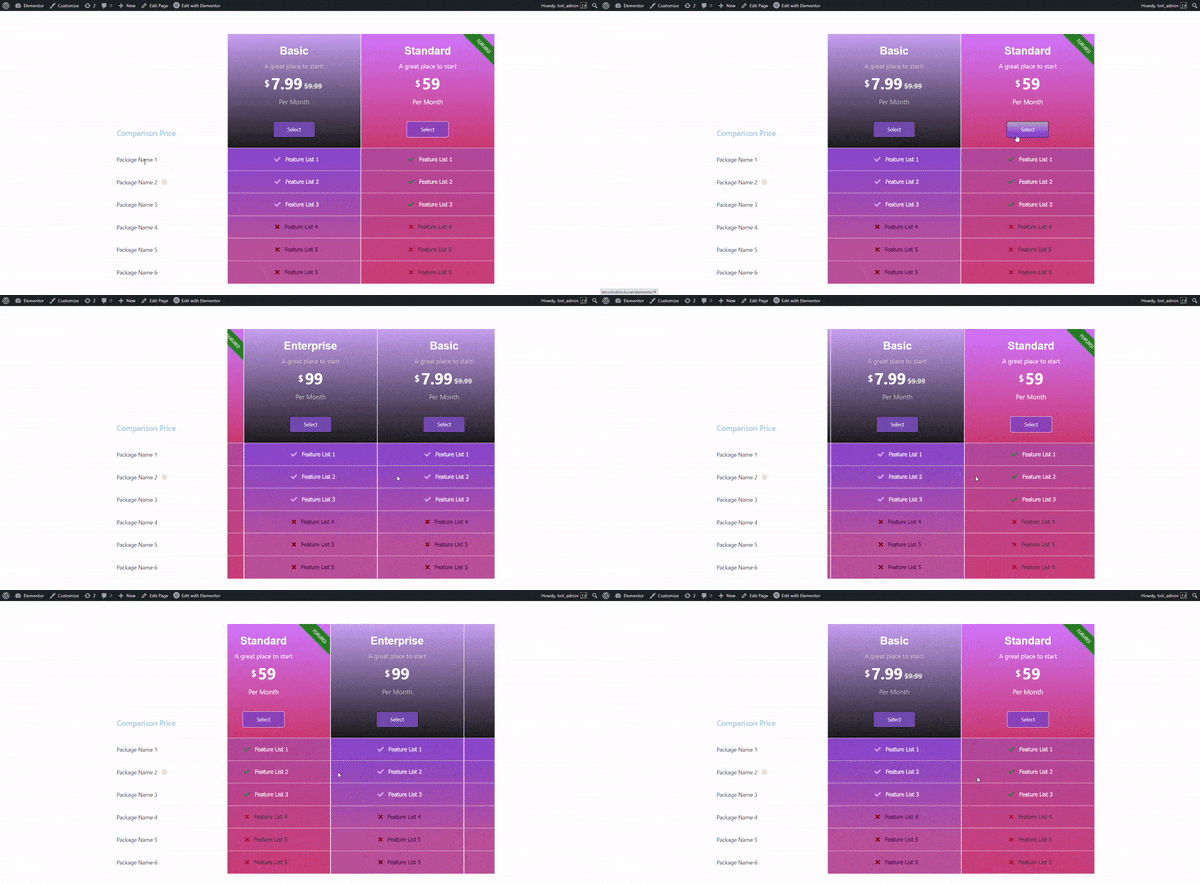
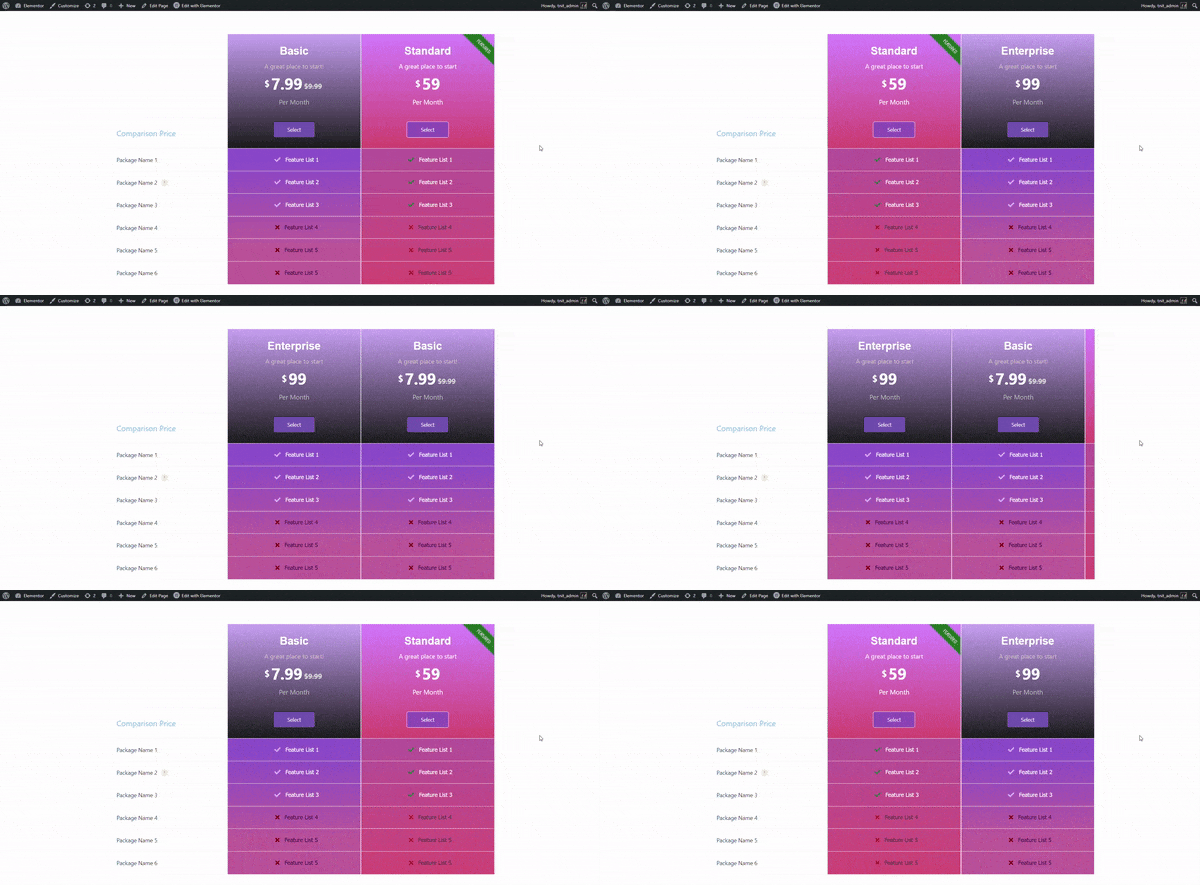
A loop created using the Xpro Pricing Matrix widget will work something like this, just with the mouse drag which is the default enabled feature.
How to Add Autoplay Feature to Your Pricing Matrix in Elementor
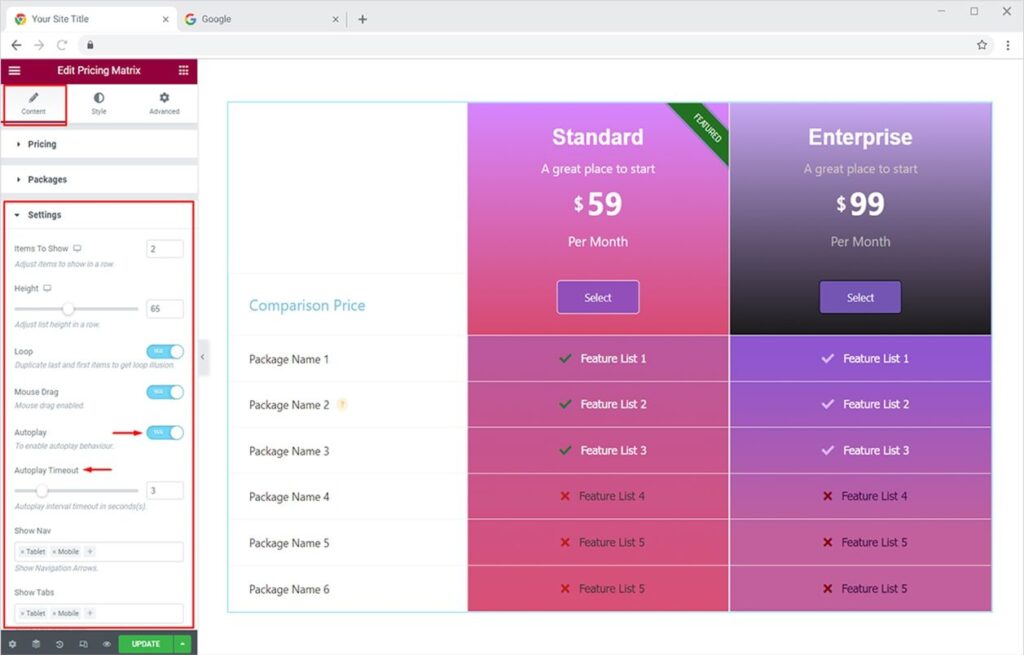
One of the most prominent features of the Xpro Pricing Matrix widget for Elementor is the ‘Autoplay’ option. It allows you to instantly grab the attention of site visitors with this continuous pricing item looped and played together. It’s like showcasing all your portfolio items in one go! Let’s see how to do this.
Go to the Content tab, click on the Settings section and simply toggle the Autoplay option to ‘Yes’. You can also set the autoplay interval timeout.
The final autoplay will look something like this on the live site with Autoplay & Loop options turned on.
How to Add & Style Comparison Package using Xpro Pricing Matrix for Elementor
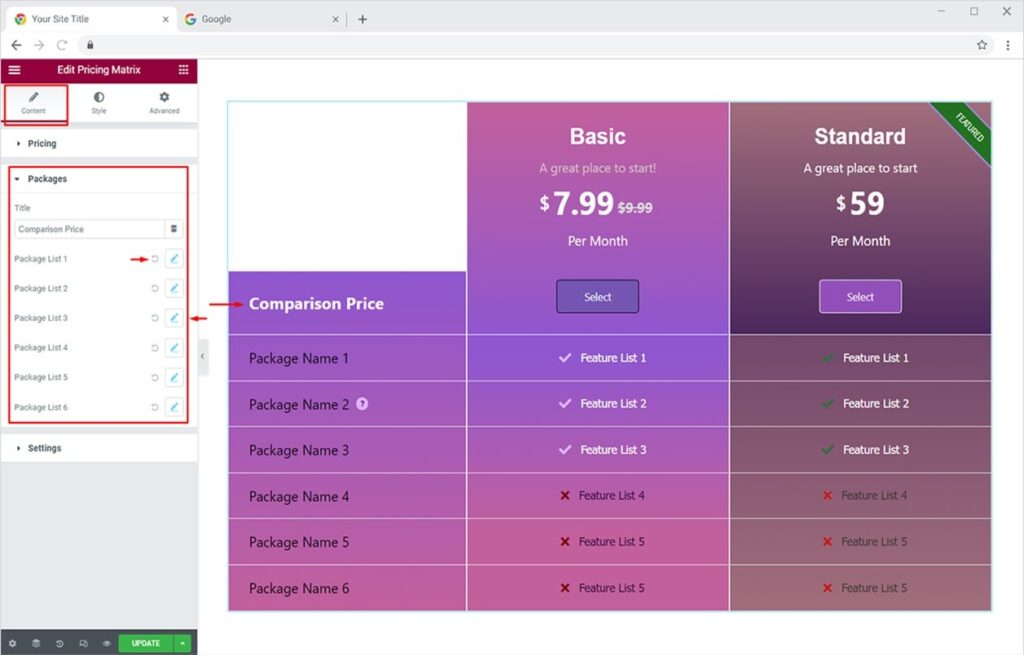
Apart from styling pricing and featured items, you can distinguish the package design too using our premium Pricing Matrix widget for Elementor. You can add comparison items in the package details as per your liking. To do this simply go to the Content Tab and open the Packages section. Here you’ll see multiple list items, remember the maximum number of items you can add is up to 6. Click the edit icon to change the title of the list or add a tooltip on it. You can click on the ‘back to default’ icon to remove an item.
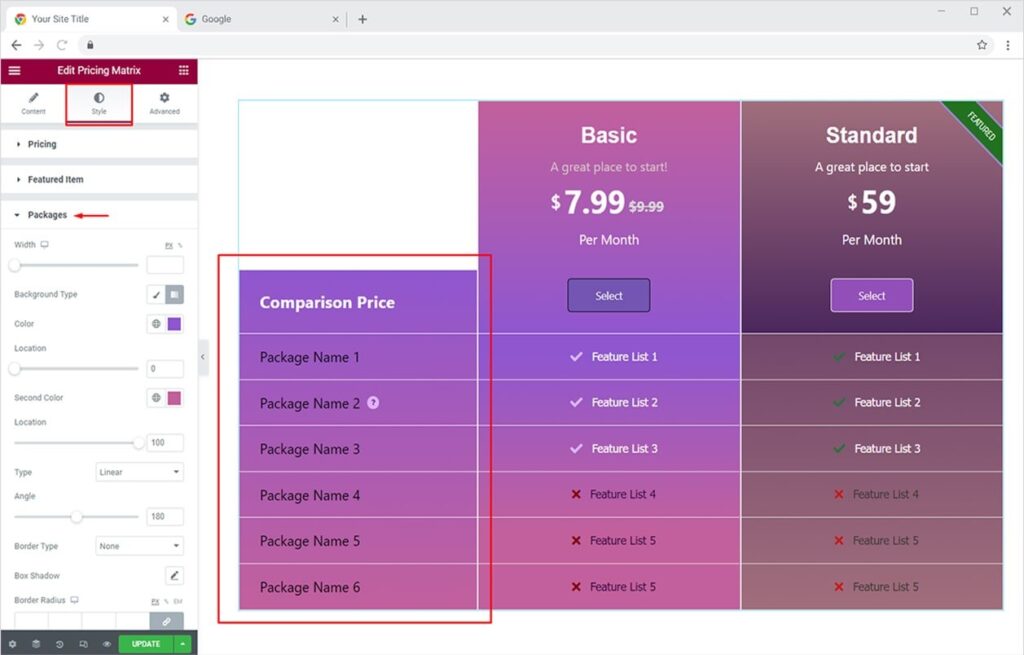
Now from the Style Tab, you can design and change the size, typography, and colors of the title, tooltip, package list, and more. The options are quite the same as for the pricing items and featured items.
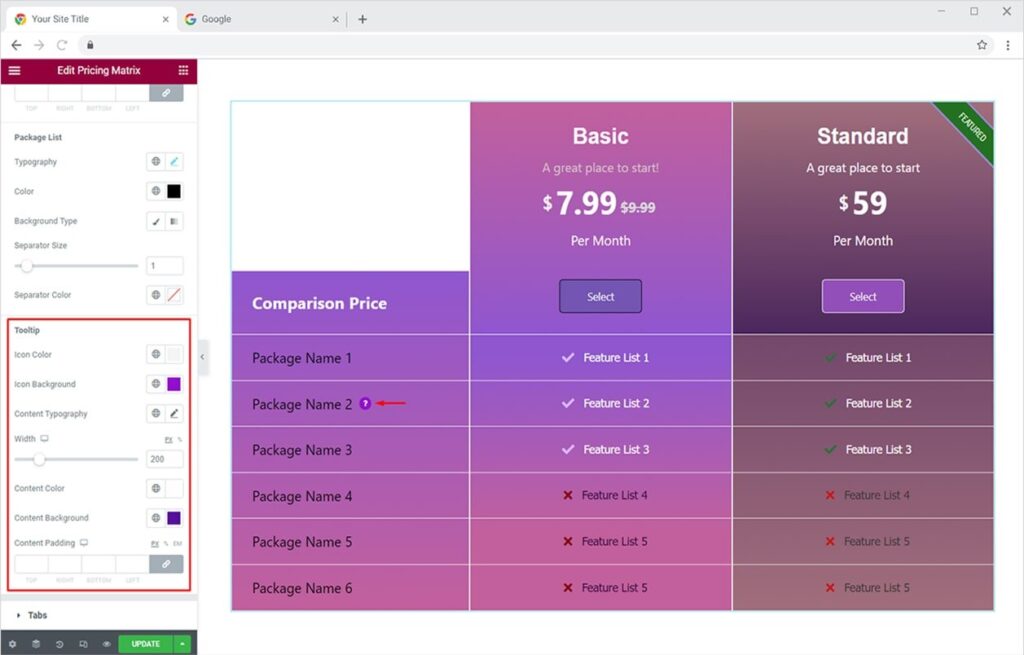
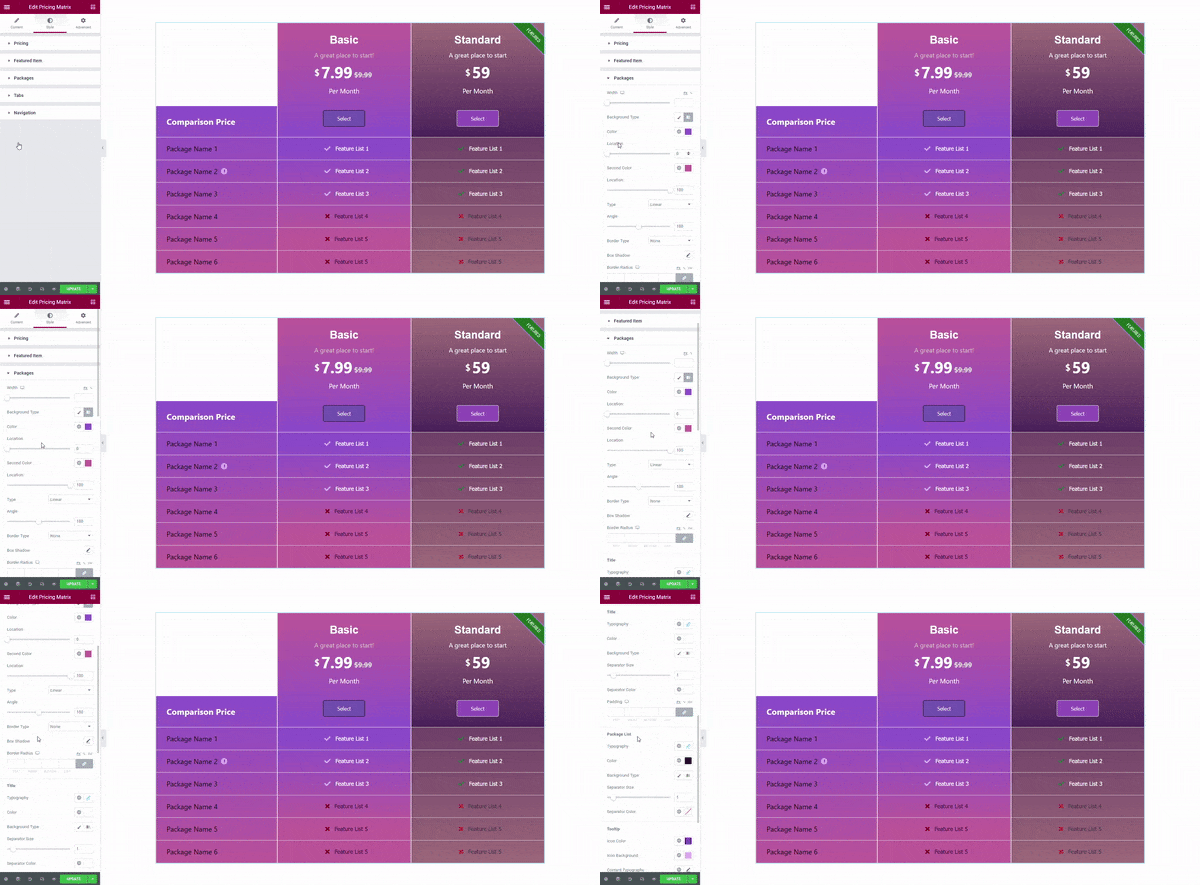
One of the most unique features is the Tooltip option. You can use this option for any package list item to provide more details about the item. Tooltips can be designed as per your liking. You can change the icon color, tooltip background color, the typography of content, the color of text, and the background color of the tooltip detail box.
Here’s a quick demo to style your tooltips.
How to Add & Style Mouse Drag Feature using Pricing Matrix widget in Elementor
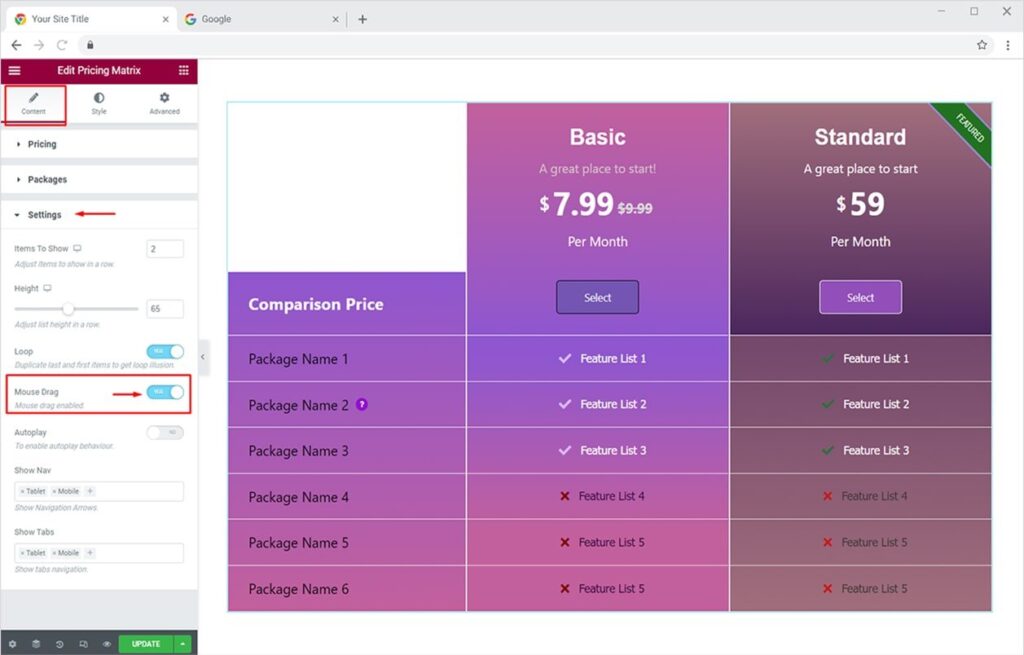
One of the most prominent features of the Xpro Pricing Matrix widget for Elementor is the “Mouse Drag” option. It allows you to instantly give the option to visitors to simply drag and explore all pricing plans. First, let’s turn on the Mouse Drag feature. To do this, simply click on the Content Tab and open the Settings section. Find the Mouse Drag option and toggle the button to Yes to turn it on.
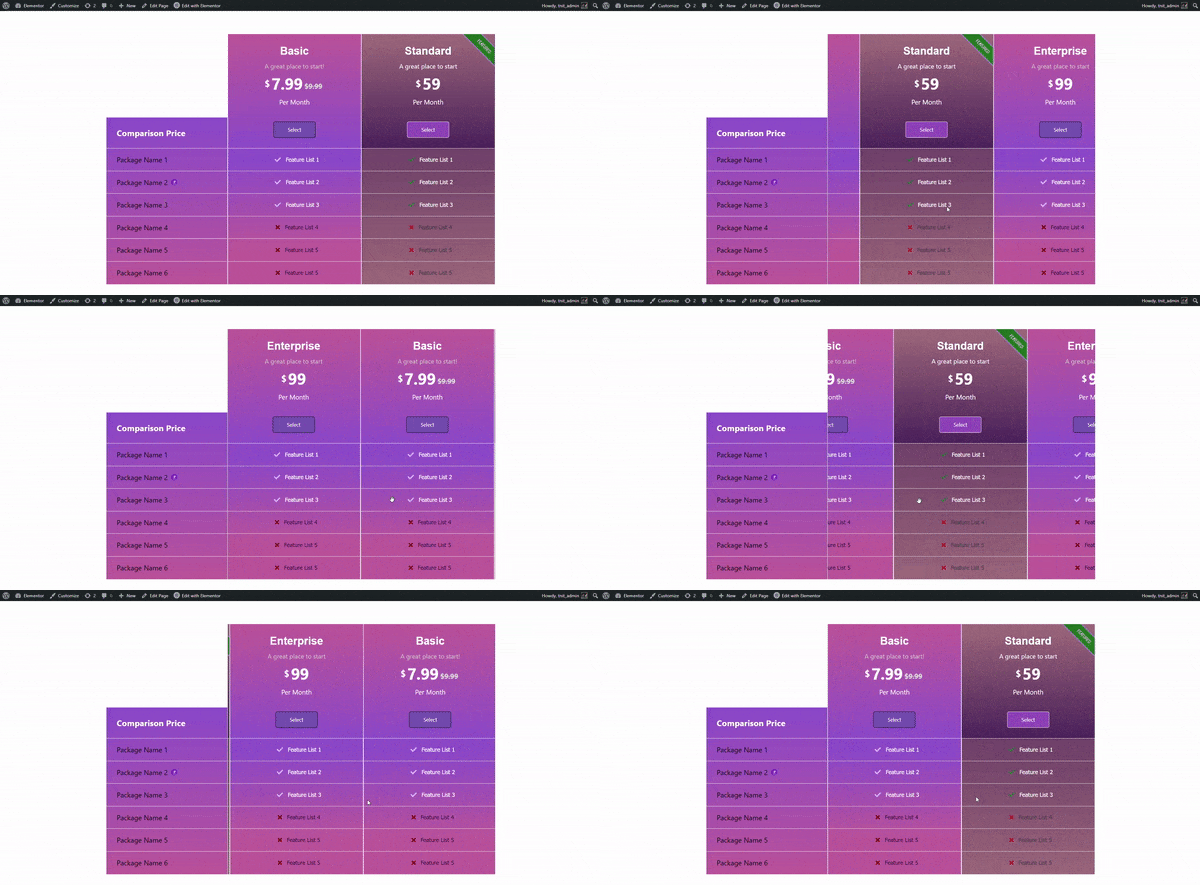
This is how the mouse drag option would work for your site visitors.
How to Add & Style Navigation in Pricing Matrix Widget for Elementor
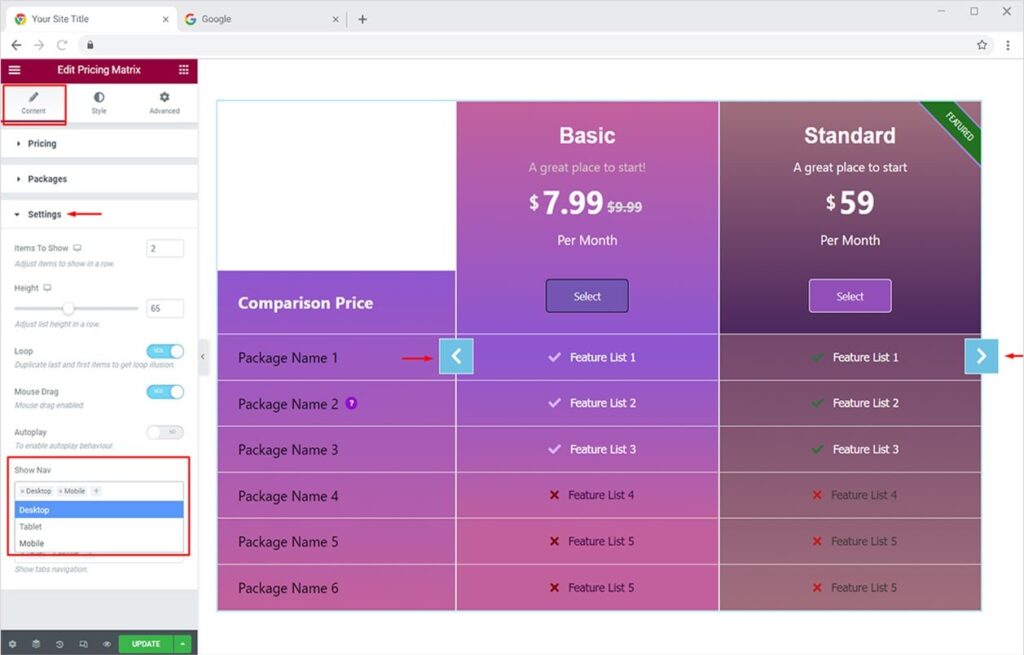
Adding navigation arrows to your pricing matrix will help you to indicate to the users that there are more packages to explore and compare. Now for a better understanding of how these navigation arrows work, let’s first turn them on for different display devices.
Move towards the Settings section in the Content Tab and at the bottom, you will see the ‘Show Nav’ option. Click on the field to choose different devices like Tablet, Mobile, and Desktop. The navigation will on be visible on the devices you choose here.
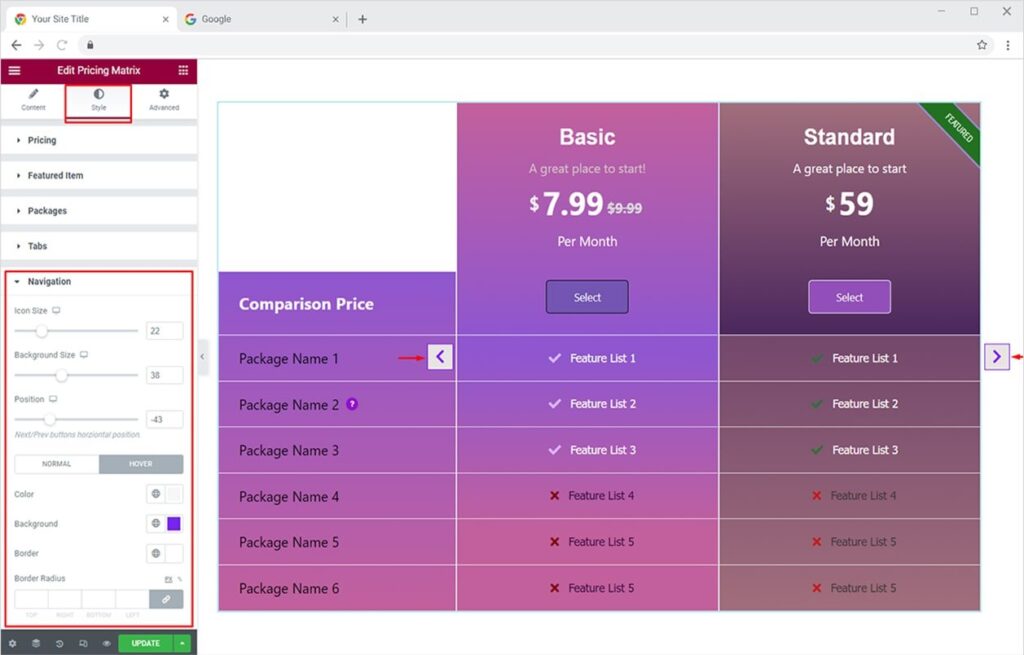
Now let’s style these navigation arrows to give a pleasant experience to your site visitors. Click on the Style Tab and then open the Navigation section. Here, you can change the size of the navigation icon, the size of the background, and the position of these navigation arrows respectively. Moreover, you can use any color combination to style these icons most attractively.
Similarly, you can change the color accent of your navigation arrow on hover mode. Just click on the Hover option and add the colors of your choice to the icon and background.
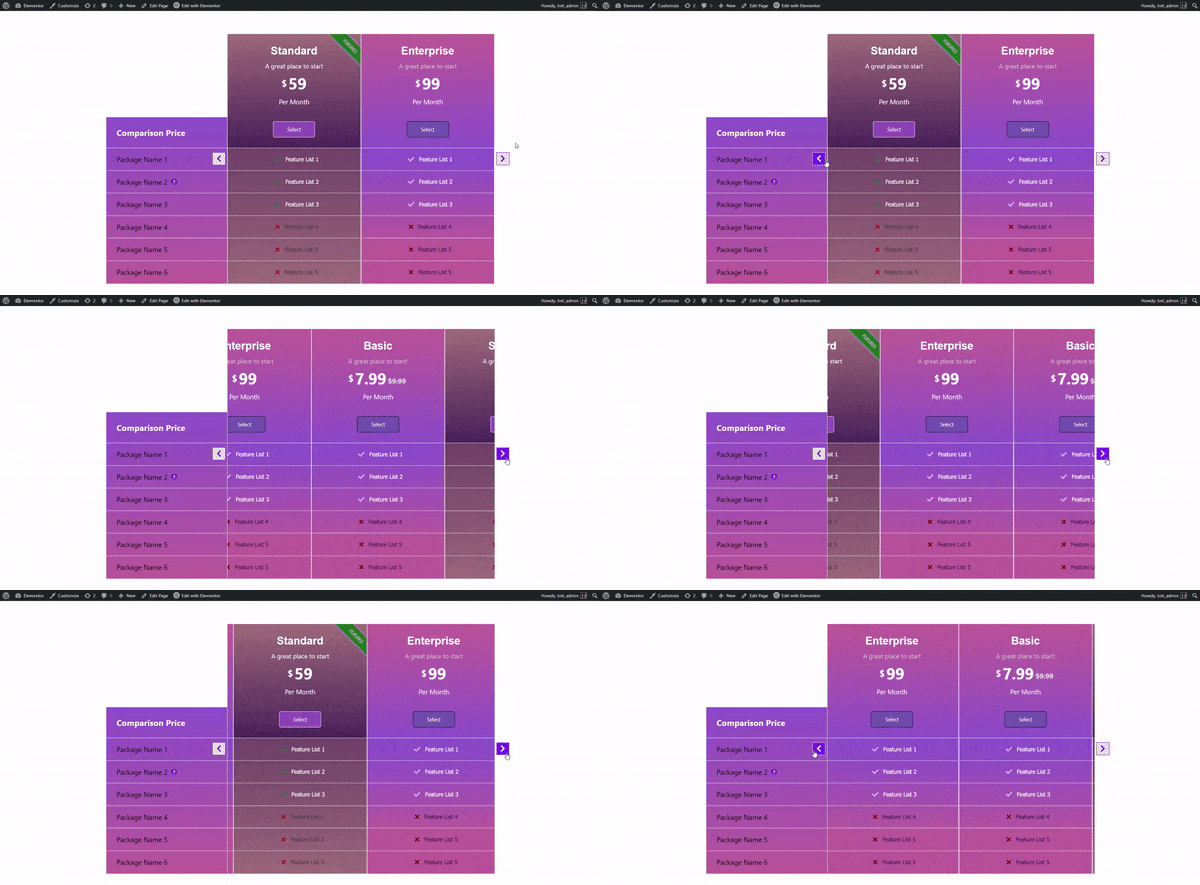
The navigation arrows will give an enticing experience to users like this.
How to Add & Style Tabs Switch in Pricing Matrix Widget for Elementor
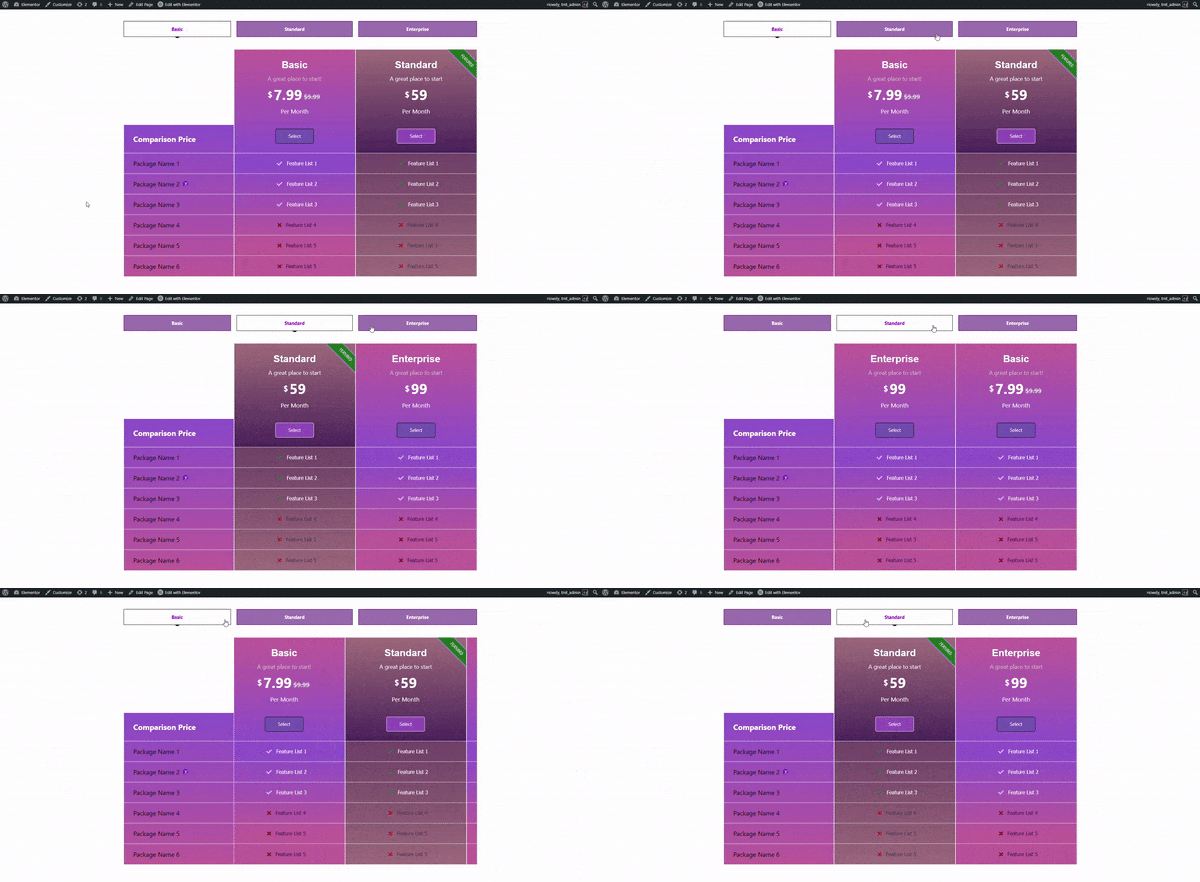
Adding Tabs to your pricing matrix is another great way to let users easily navigate all pricing plans. Now for a better understanding of how these tabs work, let’s first turn them on for different display devices.
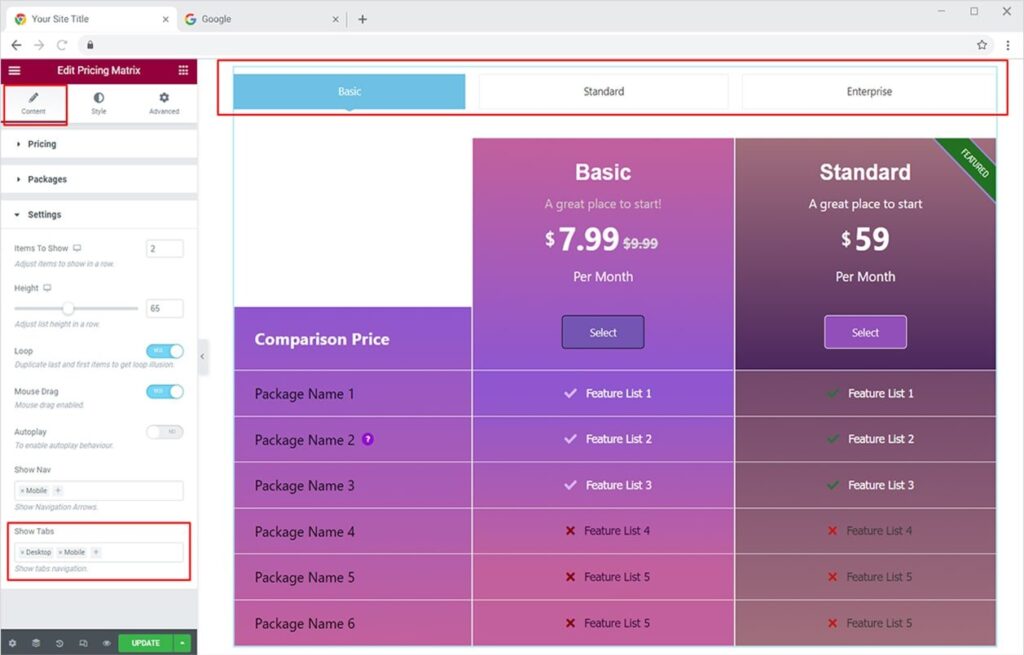
Move towards the Settings section in the Content Tab and at the bottom, you will see the ‘Show Tabs’ option. Click on the field to choose different devices like Tablet, Mobile, and Desktop. The tabs will only appear on the devices you choose here.
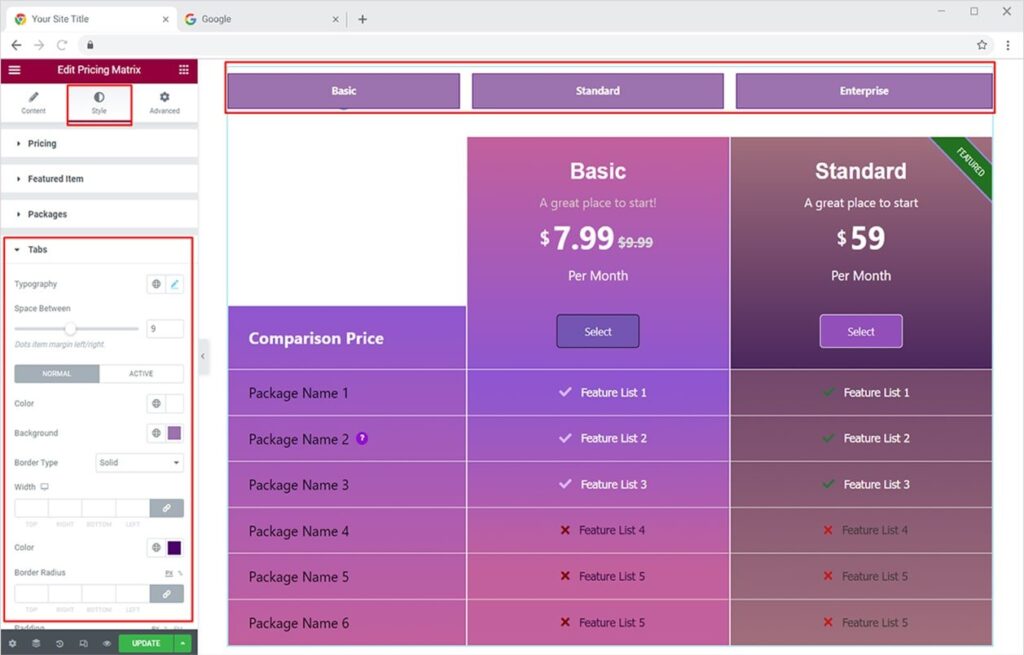
Now let’s fully style the Tabs from the Style Tab. Click on the Tabs option to find amazing editing options for your tab navigation. You can adjust the height, width, and space between your tabs. You can change the typography, background, and text color for tabs in both active and normal modes. You can also choose and add any of the 5 borders and give it a color too.
Let’s see how your edited tabs switch will look on the live website.
Best Pricing Matrix Widget for Elementor
This is all from our pricing matrix widget. I hope now you have a better understanding of how to fully utilize our advanced widget to create awesome carousels, comparison tables, and more with stylish backgrounds. You can also create amazing Carousel Pricing Tables for your WordPress websites. Check our Elementor Carousel Pricing widget for more details. Furthermore, you can create Free pricing tables using our Pricing widget for Elementor. Here’s complete documentation to quickly get you started.
Xpro Elementor is packed with stunning Elementor Addons that include widgets, features, and theme pages. Get the best Elementor Addons for your WordPress website.