How to Install Elementor Pricing Carousel Widget
Xpro Pricing Carousel widget for Elementor is another game-changing widget for your WordPress websites. It’s a premium widget that lets you make creative as well as detailed pricing carousel in a few minutes. A Carousel allows you to showcase all of your content in one go and represent your work professionally.
Also, there are tons of personalization options like looping your pricing, adding a lazy load feature, or simply enabling/disabling the autoplay on the items carousel. Eventually, an attractive carousel would let your visitors easily navigate and explore your portfolio. Let’s check out all features of this awesome widget and how you can fully utilize them for your website.
Requirements
You need to install and activate the PRO version of Xpro Elementor Addons. If you already have the plugin installed, just make sure the Carousel Pricing Widget is ‘Enabled’, so you can find it in the Elementor editor.
To enable the widget, simply follow these steps:
Step 1
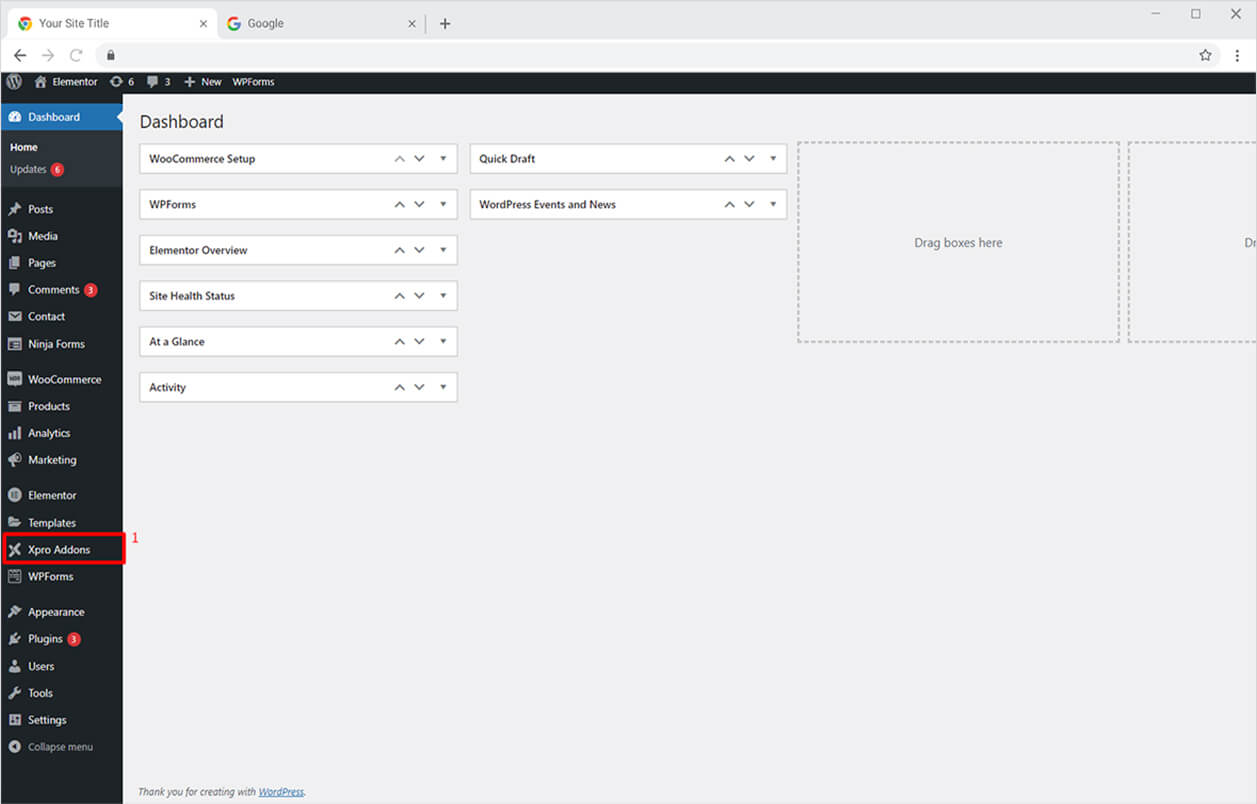
Click on the Xpro Addons option available on the WordPress Dashboard Menu.
Step 2
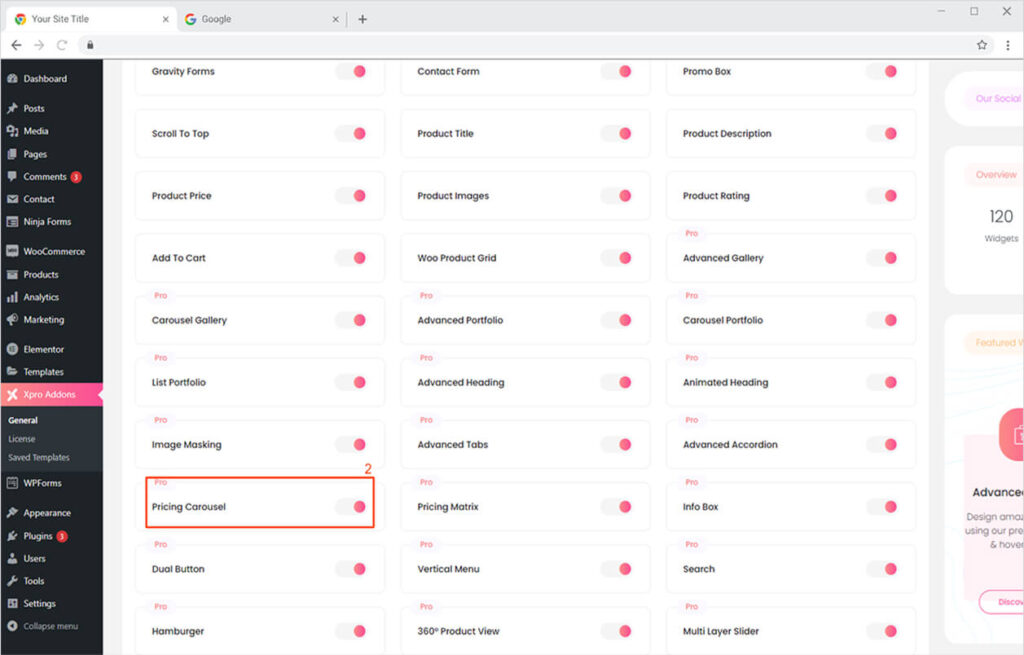
From the Xpro Addons Dashboard, click on the Widgets Tab, find the Pricing Carousel widget, and finally, toggle the button ON to enable it.
How to Use Xpro Carousel Pricing Widget for Elementor
Using our Xpro Pricing Carousel, you can easily create a professional pricing list/table on your website. Clean and detailed pricing is the most effective way to let your audience engage with your pricing info and take action. Adding a carousel to it not only allows you to add numerous packages but also helps to optimize the space of your page. Eventually, sort your huge content in an attractive carousel. You can present your packages in multiple categories with detail-oriented information & features. Our widget is feature-rich, fun, and time-saving! Here’s how to use the brilliant Elementor Pricing Carousel widget.
Step 1
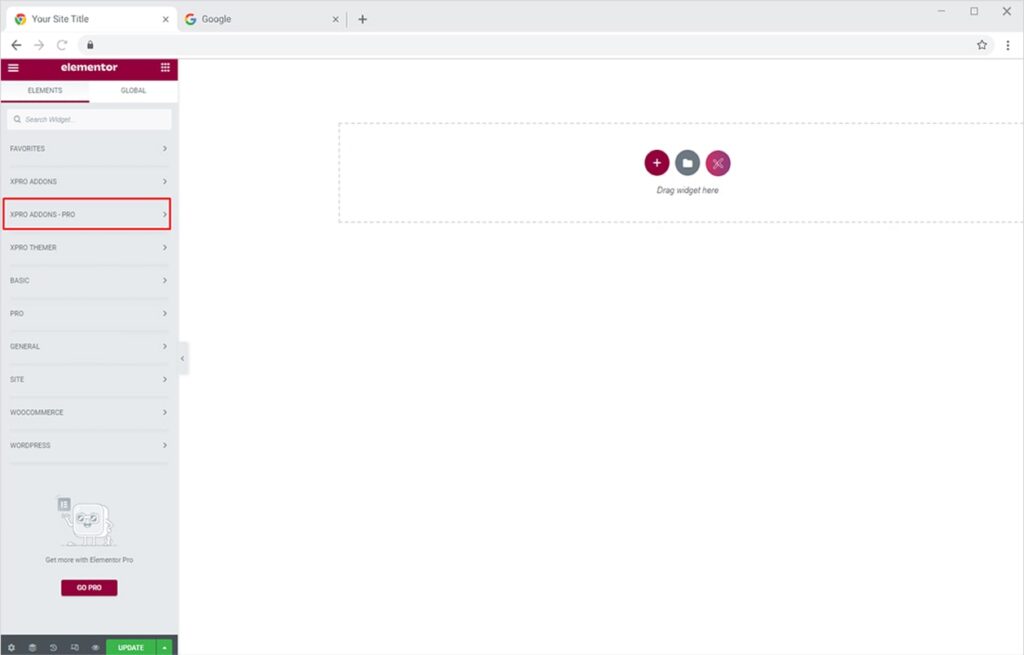
Click on the Xpro Addons-Pro section available in the Elementor Editor.
Step 2
From the Xpro Addons-Pro section, simply drag’n’drop the Carousel Pricing widget on your desired page.
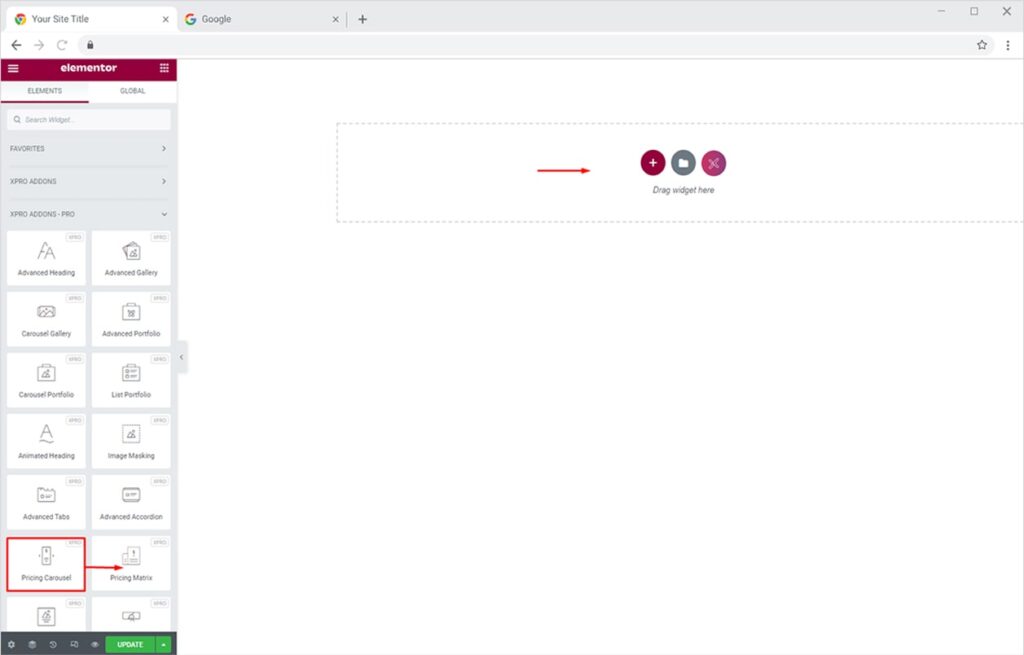
This is the default view of our Xpro Pricing Carousel Widget.

How to Add Content to your Xpro Pricing Carousel Widget
In the Pricing section under Content Tab, click any of the default items and from the drop-down option, you can add the content to your pricing. At first, you can add the Title, Icon, and price to your pricing.
- For the title, you can rename the default title according to you. You can also change the Media type to an image instead of an icon, you can upload the chosen media type from the icon or media library.
- Add prices, that is surely the most significant reason why the Xpro Pricing Carousel widget is developed, you can add different prices, change the currency and interval of time for the payments.
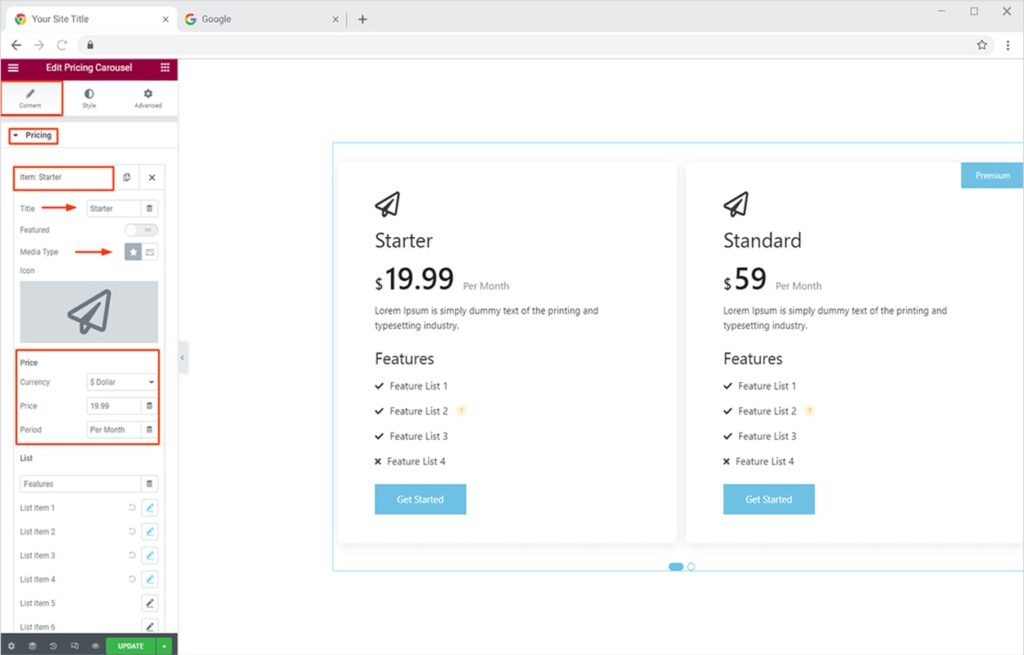
Secondly, you can add a list of features & descriptions to your pricing by scrolling down in the Pricing section. You can add up to 6 features to your pricing, or you can add tooltips and icons to them. This widget also allows you to make your list feature active or non-active.
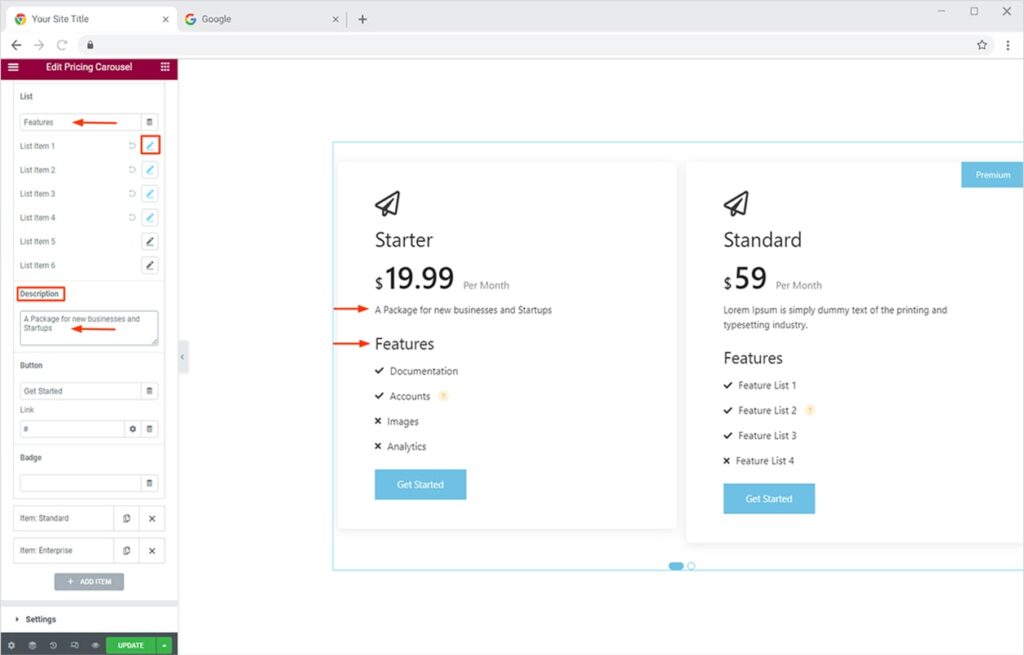
Scroll further down the Pricing section, here you can add a button and badge to your pricing. A button is used to indicate a user to take action, whereas the badge is used to show prominent differences between the packages. You can create amazing Buttons/Badges for your pricing in a glimpse of time with our Xpro Pricing Carousel Widget for Elementor. Moreover, you can add a link to your button to shift your users to a more detailed information page or checkout page.
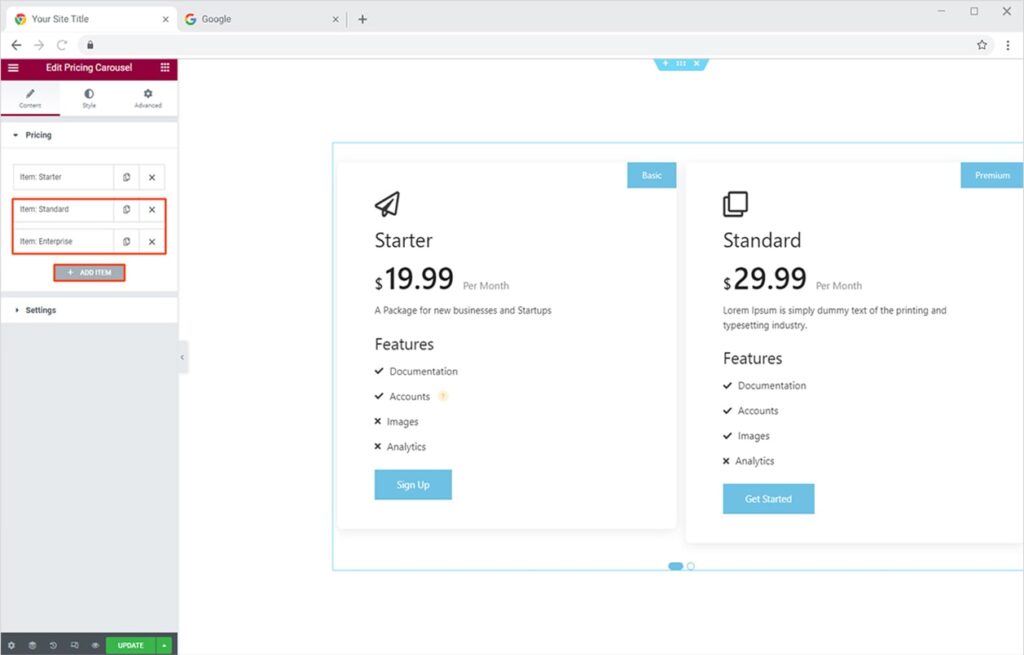
Similarly, you can add content to other default items and can add more items (packages) by clicking the Add Item Option.
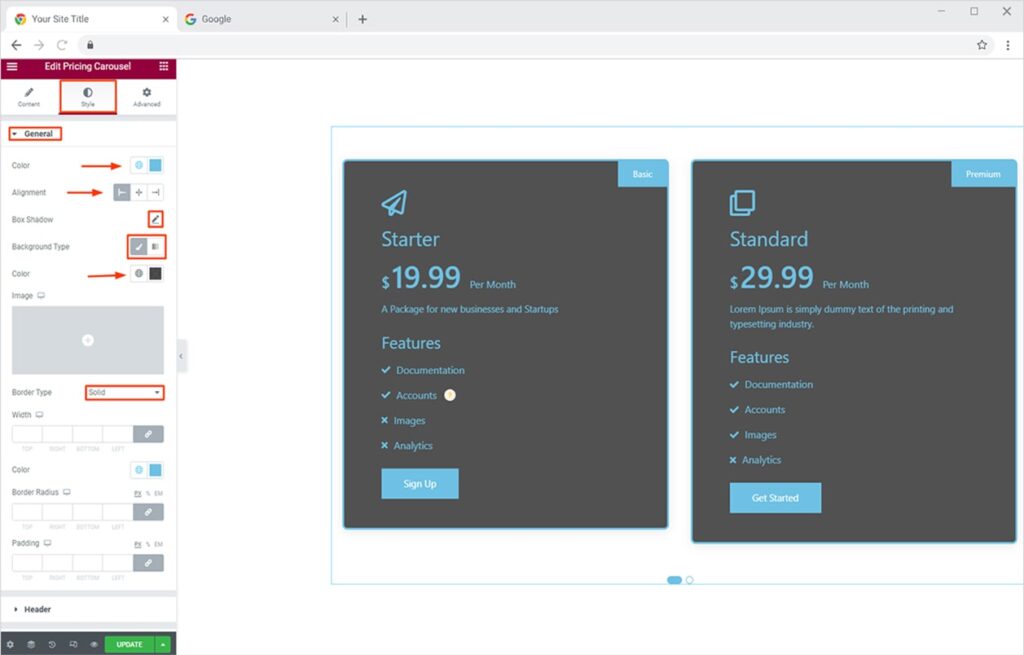
Now we can shift to the best part which is styling, you can style every add option in the Content Tab differently from the Style Tab.
At first, from the General section in the Style Tab, you can style the entire content in the pricing in one go. From color, alignment, Box shadow, background, and border respectively.
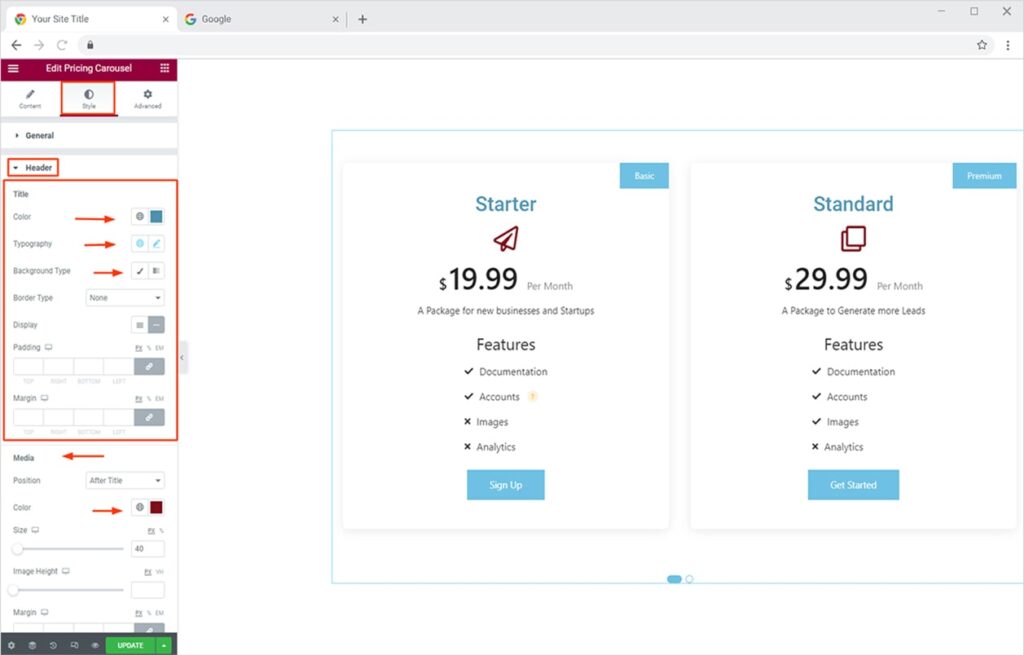
How to Style Header for Pricing Carousel in Elementor
You can even Style your header most attractively from the Header section in the Style Tab and design it the way you love. Firstly, here you can change the color, typography, background, border of your Title. You can also set the padding and the margin as well.
Below that, from the media option, you can style the size and color of your icon/image.
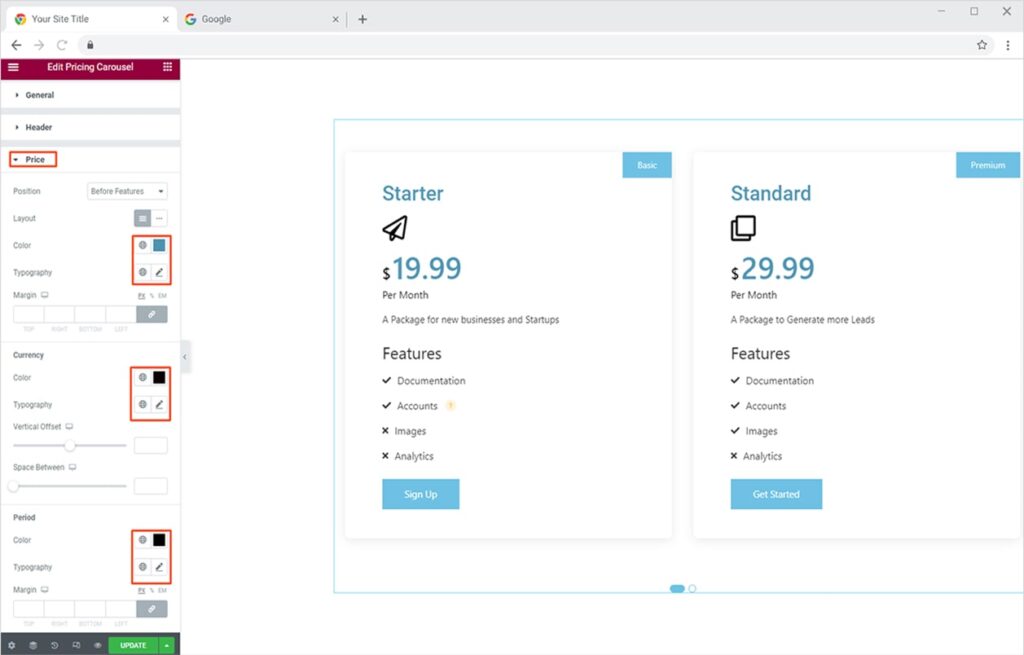
How to Style Price & Features in Xpro Carousel Pricing Widget
After that head towards the Price section under the Style Tab, where you can separately style the price, currency, and period according to your desired results.
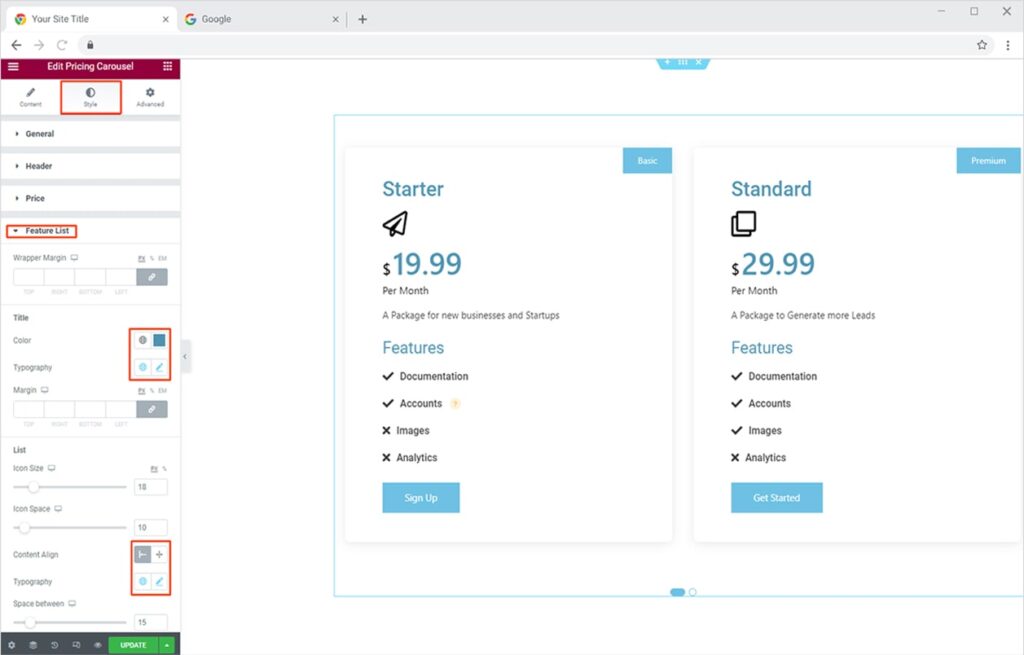
Now by staying in the Style Tab, from the Feature Section in that, you can style your features most efficiently. Here you play around with creativity, change colors, typography, background, and much more to get the best design for your pricing menu.
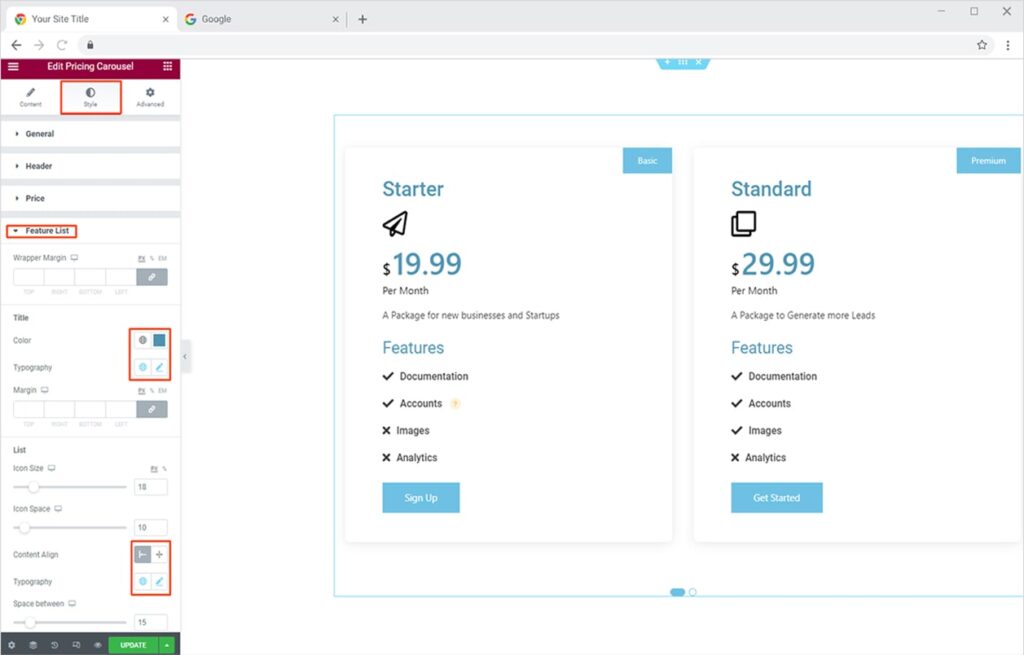
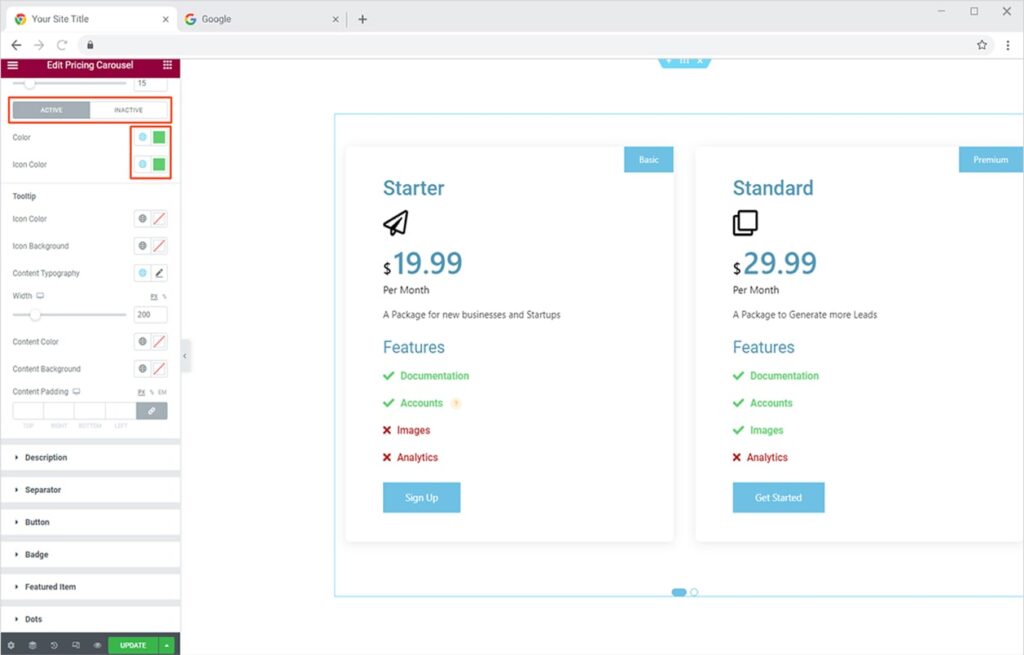
Scroll down in the Feature List section, here you can style differently the active and nonactive features and also style your tooltip.
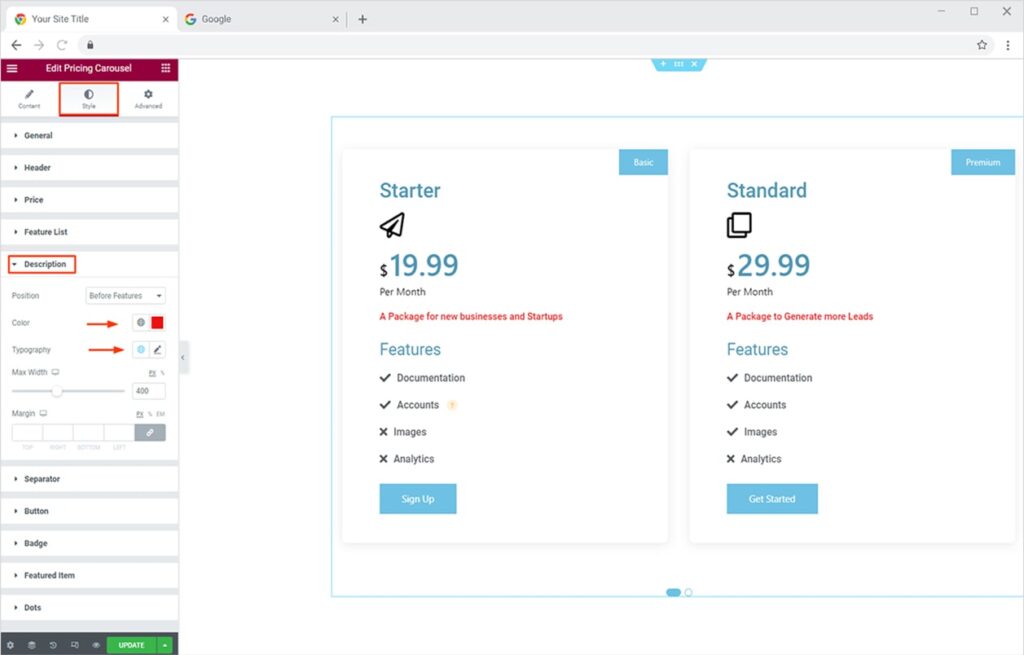
Furthermore, Simply switch to the Description section in the Style Tab where you can easily change the color & typography of your descriptions.
Try our free theme builder for Elementor and enjoy creating custom templates for WooCommerce stoes, archive temp[lates, page aand post template and much more.
By Xpro Elementor Addons
How to Style Button & Badge in Xpro Pricing Widget for Elementor
Now Shift towards the Button Section of the Section Tab to make the most amazing style for your take action button according to the theme of your site. Here you can set the display, typography, color, and background of your button.
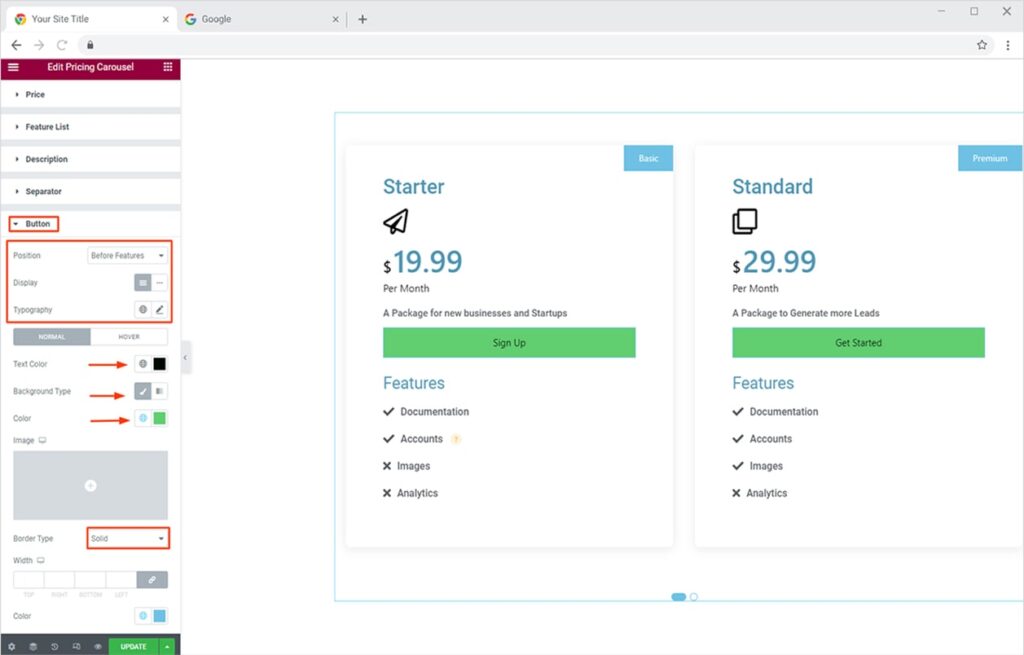
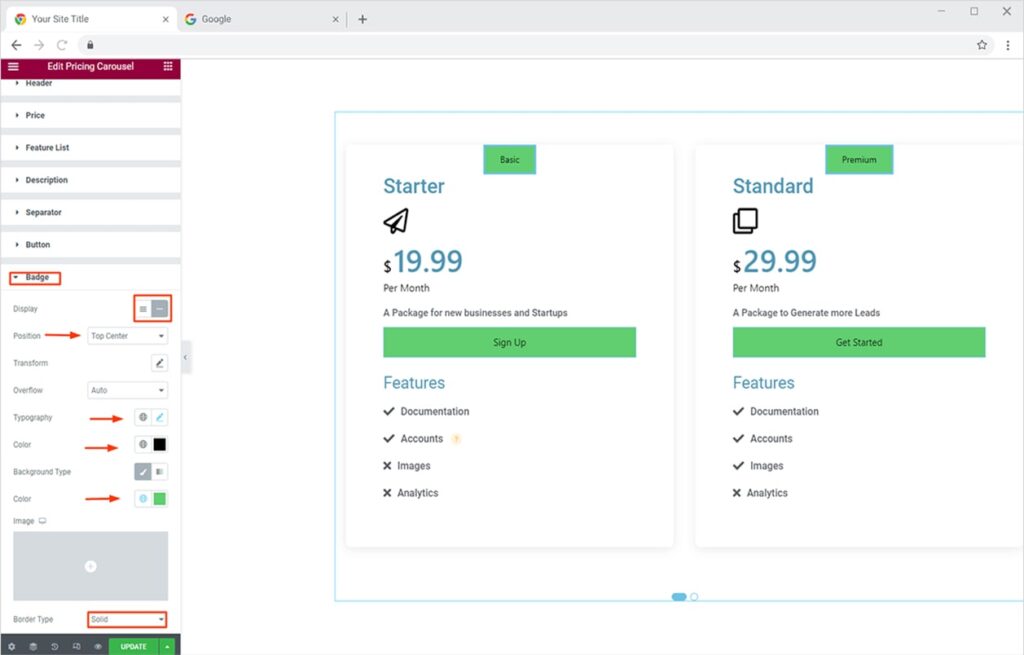
Then toggle towards the Style Tab and from the Badge section, style your badge most attractively. Here you can adjust the display, position, typography, color & background of your badge.
How to Add & Style Featured Item for Xpro Pricing Carousel Widget
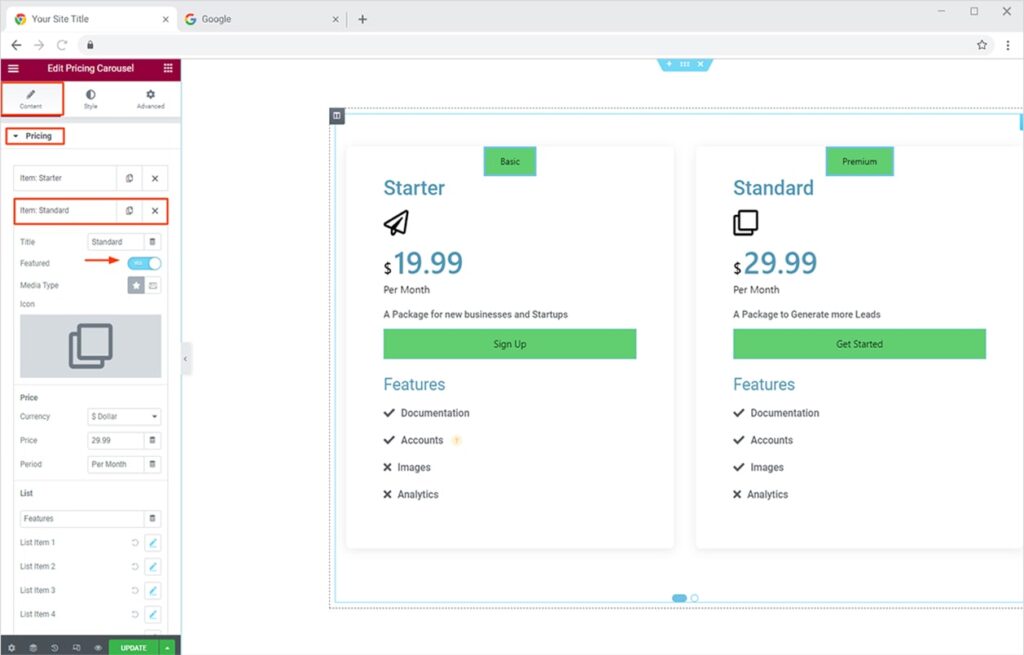
Highlighting any of your pricing items as featured allows you to design two different styles for your pricing. To add a featured item head back towards the Pricing section in the Content Tab and click any of the items you want to make a featured item. From the drop-down menu, slide the featured Button to “Yes”.
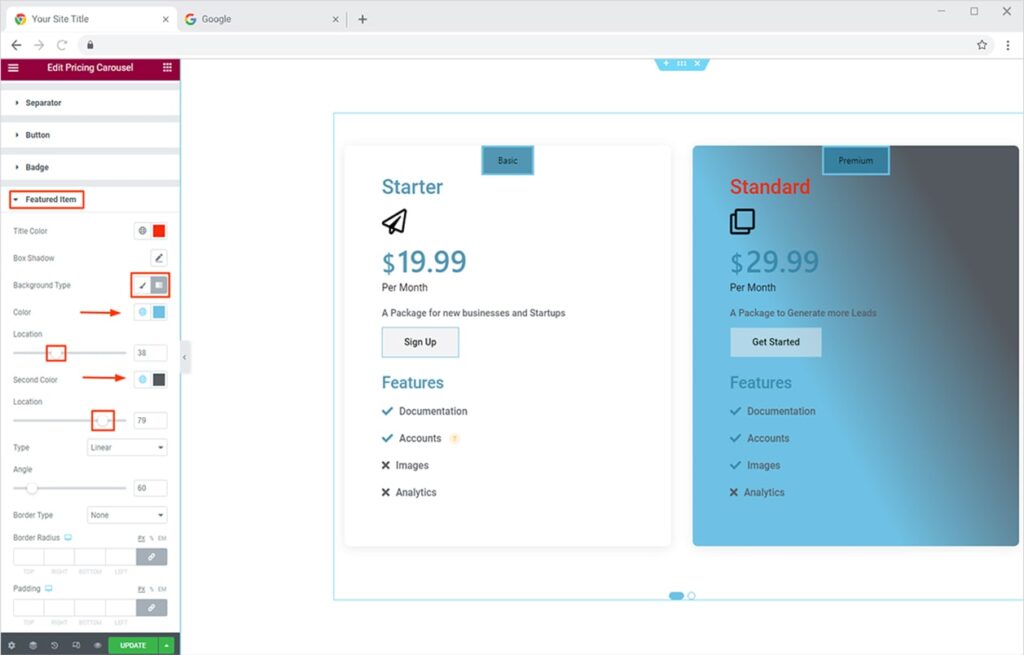
Now, you can style your feature item separately. This will help you to highlight your content in a more appealing pattern and you can also make your most important package more prominent.Shift towards the Featured Item section in the Style Tab, from Here you can style all the content of the featured item separately. At first, add the color of the Title, you can also add a background to your pricing from the classic/gradient option.
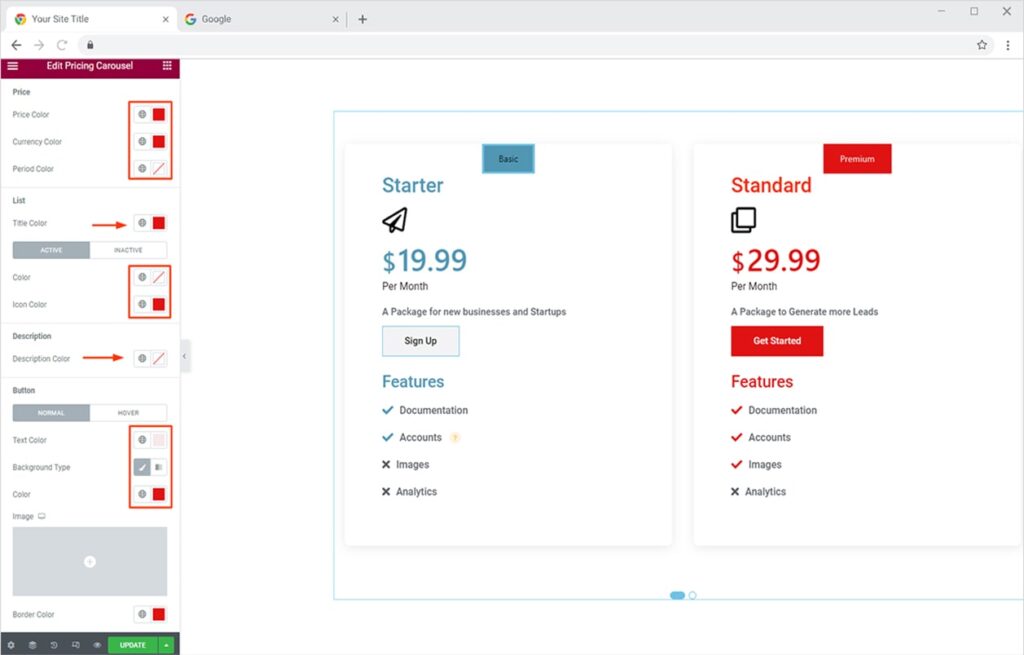
Scroll down the Featured Item section here you can style the price, list, description, button, and Badge respectively.
How to Add Loop to Your Pricing Carousel Portfolio in Elementor
Adding a loop to your carousel is a creative approach that makes your visitors stick to your content. It allows you to represent your content in a never-ending loop. The end is the new beginning for looped pricing items. Eventually, helps you get more interaction from the users.
You can also turn on the Lazy Load feature that simply loads your content only when the site visitor navigates to them. Simply go to the Content Tab and click on the Settings section. From here, you can toggle the Lazy Load and Loop button to ‘Yes’.
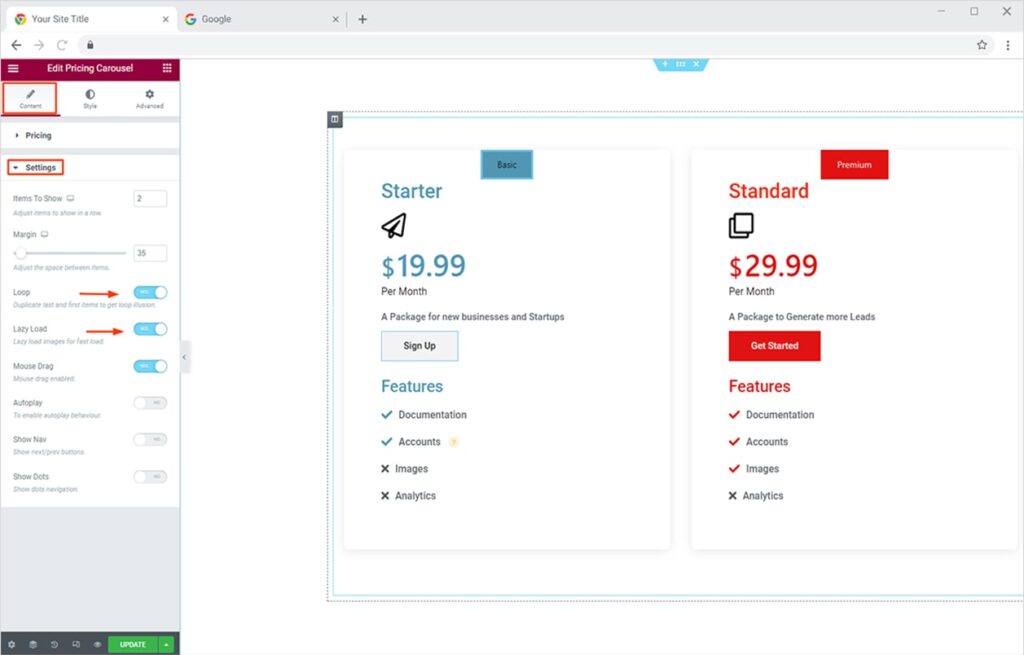
A loop created using the Xpro Pricing Carousel Portfolio widget will work something like this, just with the mouse drag which is the default enabled feature.

How to Add Autoplay Feature to Your Pricing Carousel in Elementor
One of the most prominent features of the Xpro Pricing Carousel widget is the “Autoplay” option. It allows you to instantly grab the attention of site visitors with this amazing feature. It’s like showcasing all your portfolio items in one go! Let’s see how to do this.
Go to the Content tab, click on the Settings section and simply toggle the Autoplay option to ‘Yes’. You can also set the interval time.
The final carousel will look something like this on the live site with Autoplay & Loop options enabled.

How to Add & Style Navigation Arrows to your Carousel Gallery
Adding navigation arrows to your pricing carousel will help you to indicate to the users that there is more content to view. Now for a better understanding of how these navigation arrows work in Carousel Gallery.
Move towards the Settings section in the Content Tab and enable the Show Nav Button. These navigation arrows are clickable to view the remaining pricing.
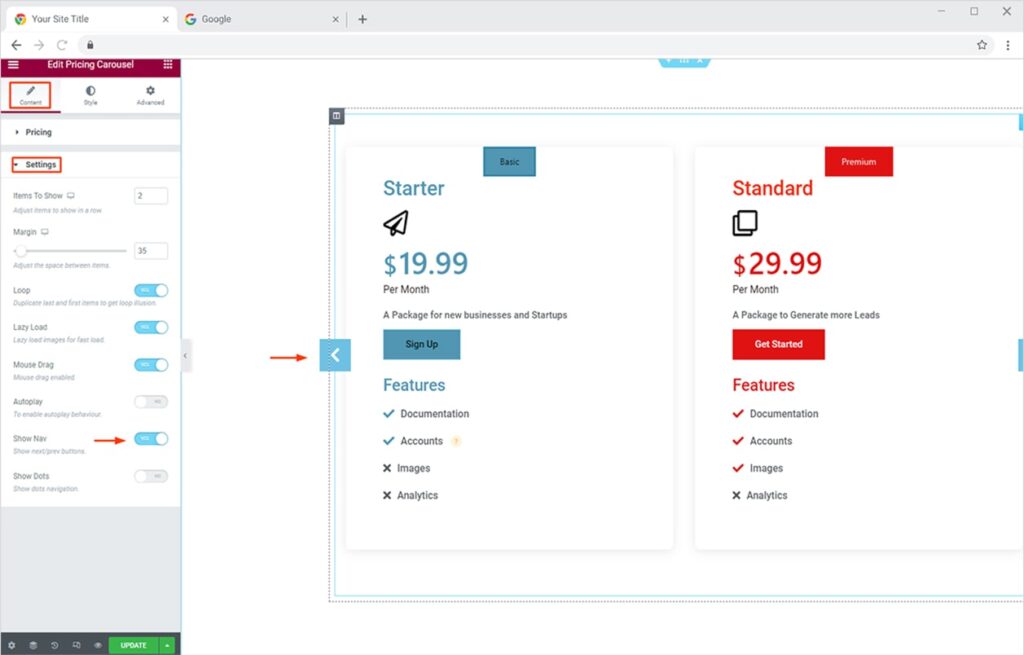
Now let’s style these navigation arrows to give a pleasant experience to your site visitors. Click on the Style Tab and then open the Navigation section. Here, you can change the size of the navigation icon, the size of the background, and the position of these navigation arrows respectively. Moreover, you can use any color combination to style these icons most attractively.
Similarly, you can change the color accent of your navigation arrow on hover mode. Just click on the Hover option and add the colors of your choice to the icon and background.
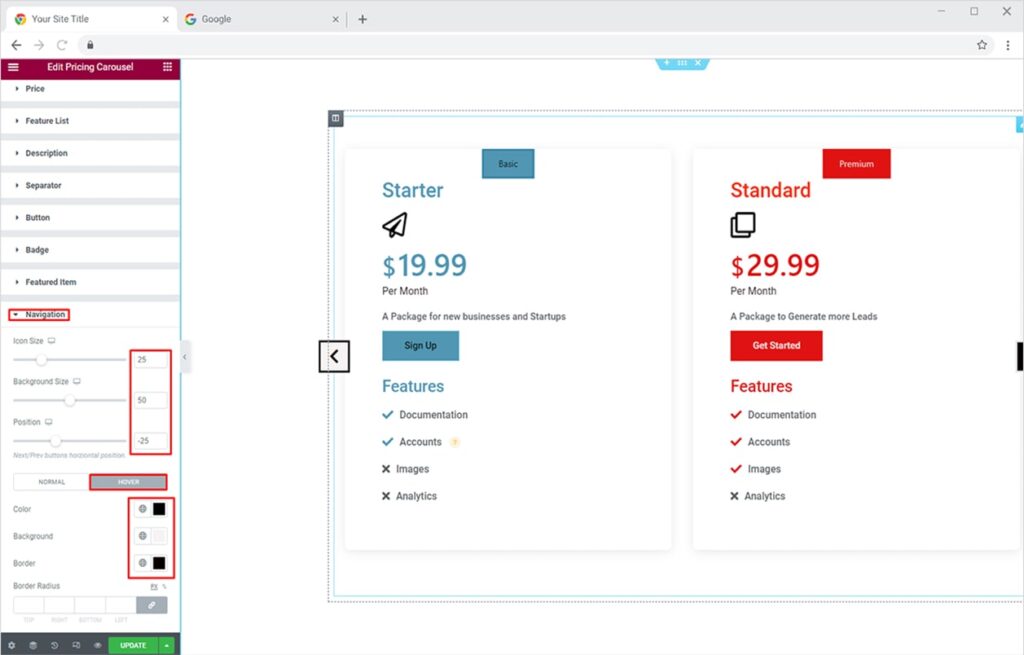
The navigation arrows will give an enticing experience to users like this.

How to Add & Style Dot Navigation to Your Pricing Carousel
Adding dot navigation is another brilliant way to highlight your unseen content in the carousel. These dots are vital for highlighting all the content and for easy navigation throughout your portfolio.
Click on the Content Tab, open the Settings Section and turn ON the Show Dots option. Somehow, this is also the default active feature of the pricing carousel.
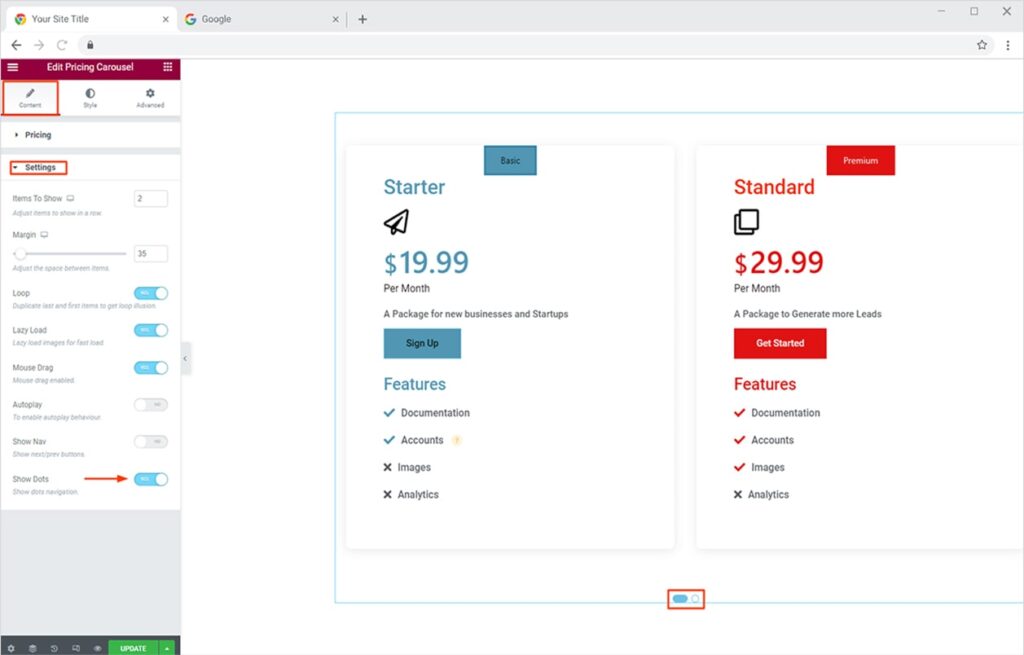
Now let’s fully style the dots navigation from the Style Tab. Click on the Dots section to find amazing editing options for your navigation. You can adjust the height, width, and space between your dots. Apart from this, you can easily change the color of your dots for both Normal and Active modes. You can also add a prominent border to your dots navigation.
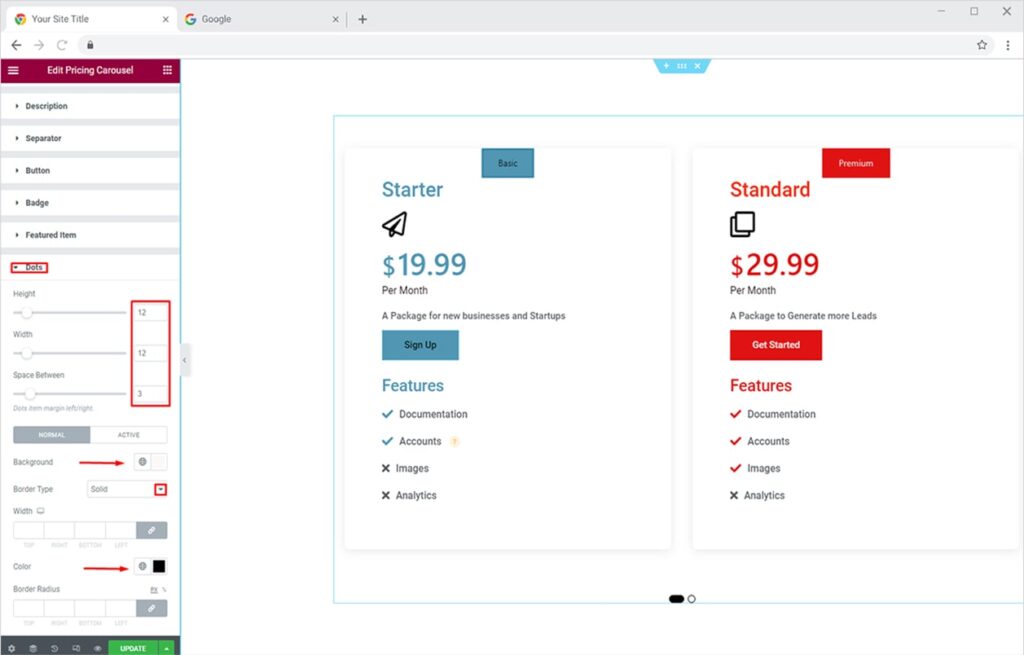
Let’s see how your edited dot navigation will look on the live website.

Best Pricing Carousel Widget for Elementor
This is all from our functional Xpro Pricing Carousel Widget for Elementor. I hope now you have a better understanding of how to fully utilize our handy pricing carousel widget and create an effective, stylish & creative pricing carousel for your Elementor websites. Xpro also offers free Elementor Addons. If you want to develop FREE simple pricing then try our Free Xpro Pricing widget for Elementor. Also, try our advanced Pricing Matrix widget for Elementor.
Xpro Elementor Addons provide more than 120 widgets, 10 extensions, and 100 templates which can be utilized to create a fully functional WordPress website.