How to Install Elementor Multi Layer Slider
Xpro Multi Layer Slider for Elementor is hands down the most advanced slider plugin for Elementor. It gives you extreme freedom to create highly engaging sliders for your website in no time. It’s a modern, drag’n’drop-based slider that offers hundreds of customization options to help you create interactive sliders for your sites. You can import any Xpro widget, set the layout as you like, and customize your slides on the go. The widget allows you to add captivating floating, mouse, scroll, and transform effects to your layers.
Xpro Multi Layer Slider for Elementor is fully responsive and comes with 100s of slider templates. You can add amazing hover and animation effects to each element of your slides with a touch of unique backgrounds including gradient, image, video, slideshow with Ken Burns effect, parallax effect, and much more!
Also, there are tons of personalization options like looping your slides, adding autoplay, and button/dot navigation to your slider. Eventually, an attractive slider would let you highlight your product or service to your site visitors. Let’s check out all features of this awesome widget and how you can fully utilize it for your Elementor website.
Requirements
You need to install and activate the Pro version of Xpro Elementor Addons in order to use our Multi Layer Slider. If you already have the plugin installed, just make sure the Multi Layer Slider Widget is ‘Enabled’ from the plugins section of Xpro Dashboard, so you can find & use the widget in the Elementor editor.
To enable the widget, simply follow these steps:
Step 1
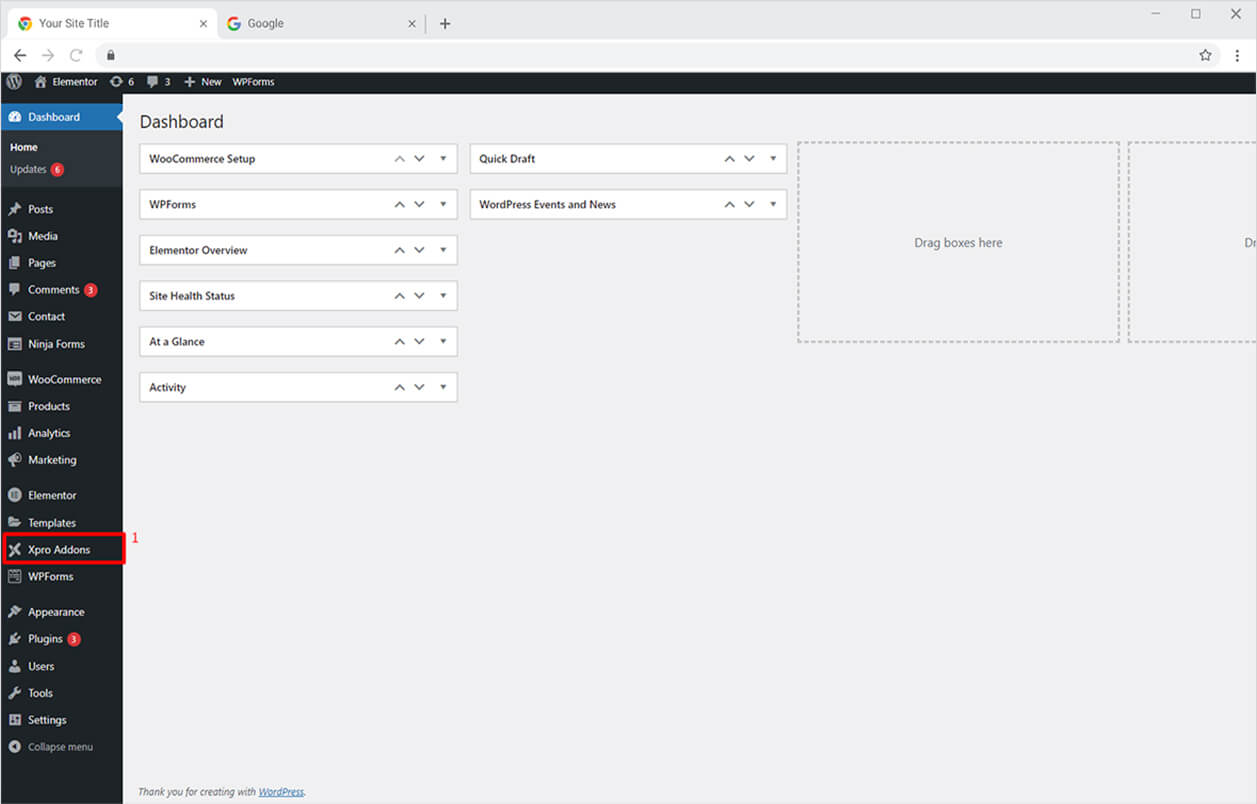
Click on the Xpro Addons option available on the WordPress Dashboard Menu.
Step 2
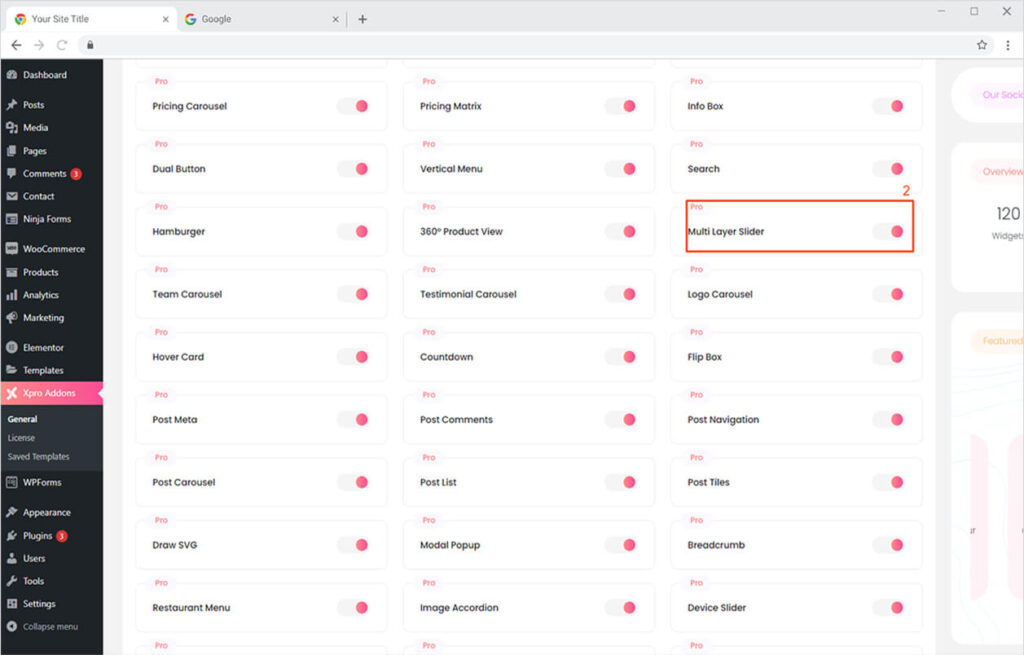
From the Xpro Addons Dashboard, click on the Widgets Tab, find the Multi Layer Slider widget, and finally, toggle the button ON to enable it.
How to Use Xpro Multi Layer Slider Widget for Elementor
With Xpro Multi Layer Slider for Elementor, you can easily create amazing full-width, full screen, or custom sliders on the go! Simply import any of our modern slider templates or create your custom slider from scratch. It’s fun, drag’n’drop based, and saves tons of your time. Let’s dig deep and see how you can fully utilize this awesome widget.
Step 1
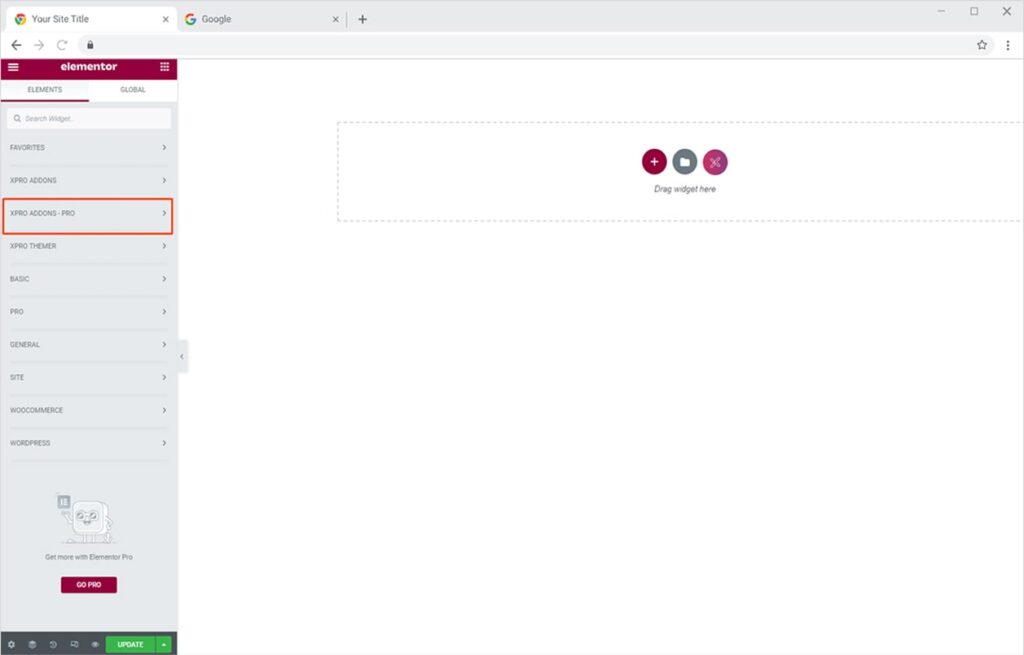
Click on the Xpro Addons – Pro section available in the Elementor Editor.
Step 2
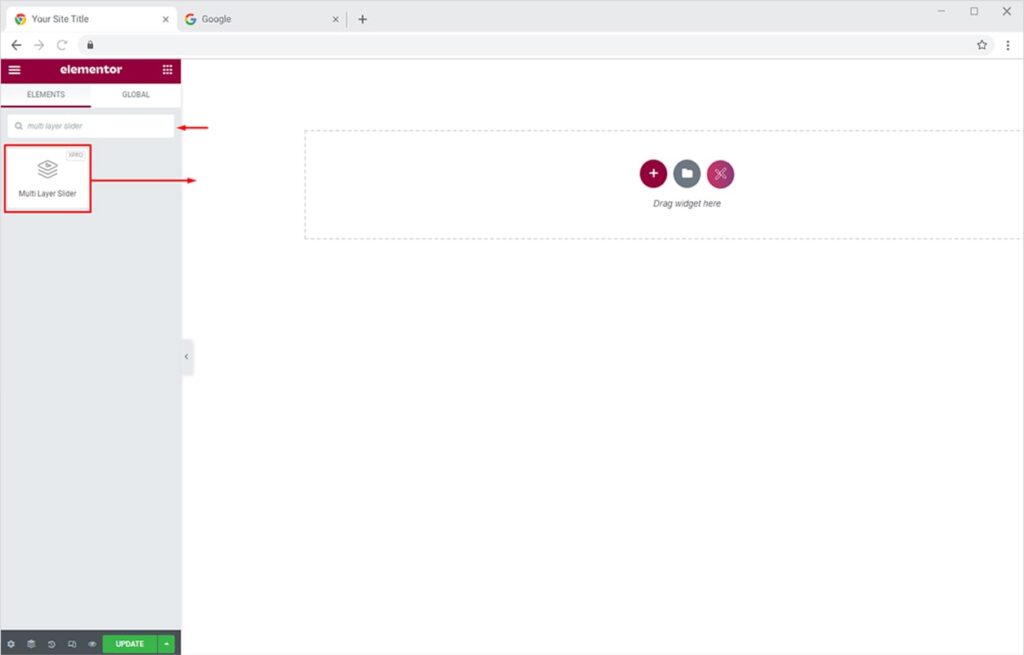
From the Xpro Addons – Pro section, search for ’multi layer slider’ in the search bar and simply drag’n’drop the widget on your desired page location.
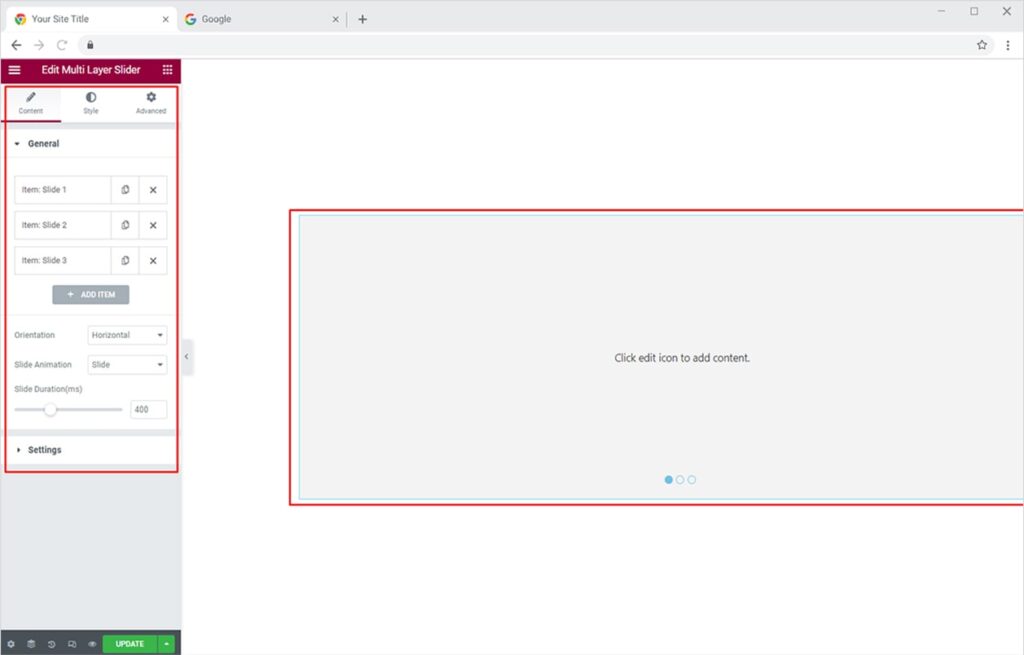
This is the default view of the widget:
How to Setup Xpro Multilayer Slider for Elementor
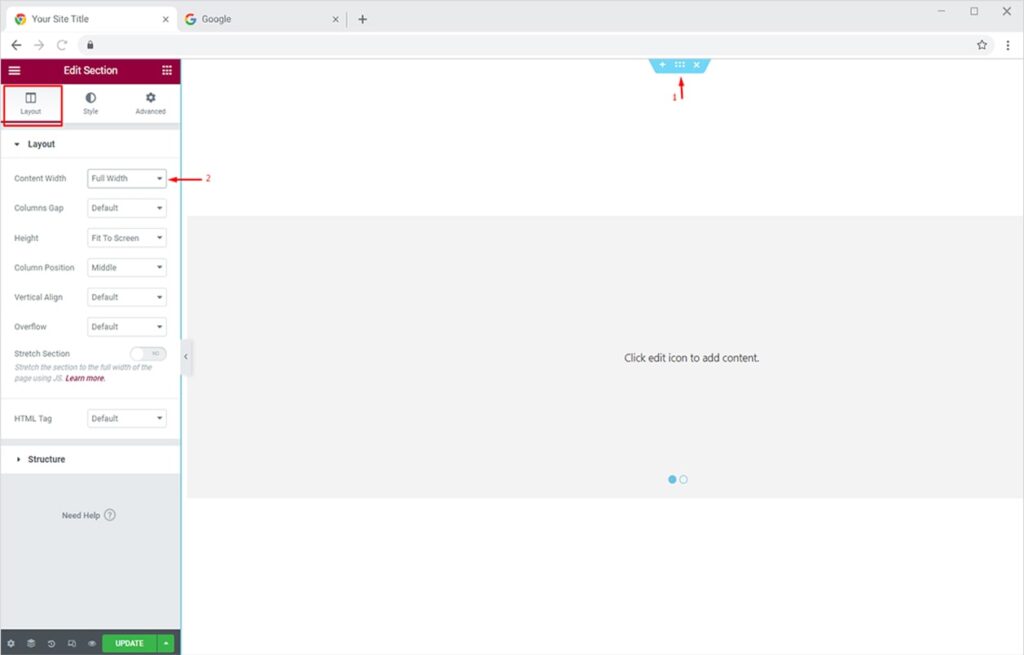
First things first, let’s set up our multi layer slider before importing templates or creating our slides by using any Xpro widget. Xpro Multi Layer Slider gives you the complete freedom to set your layout as you want and create an awesome full-width, full screen, or custom slider for your website. Let’s set up our slider for ‘full width’ content.
Click on the Edit Section icon, under the Layout Tab, set the Content Width to ‘Full Width’ from the dropdown.
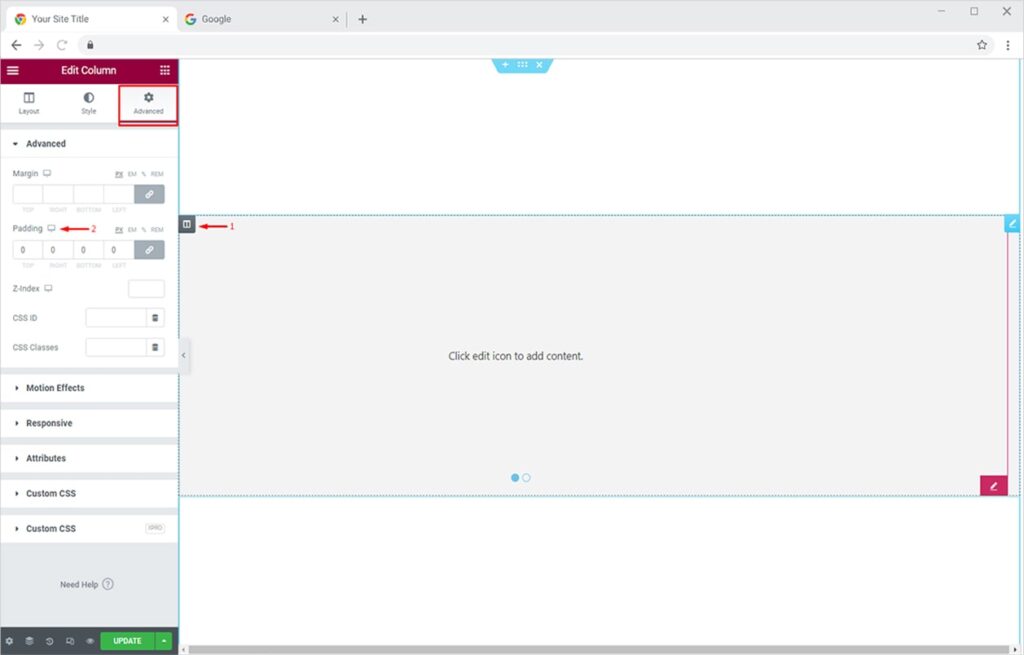
Now we will set the column padding to 0. To do this, click on the Edit Column icon, and from the Advanced Tab set the Padding to ‘0’.
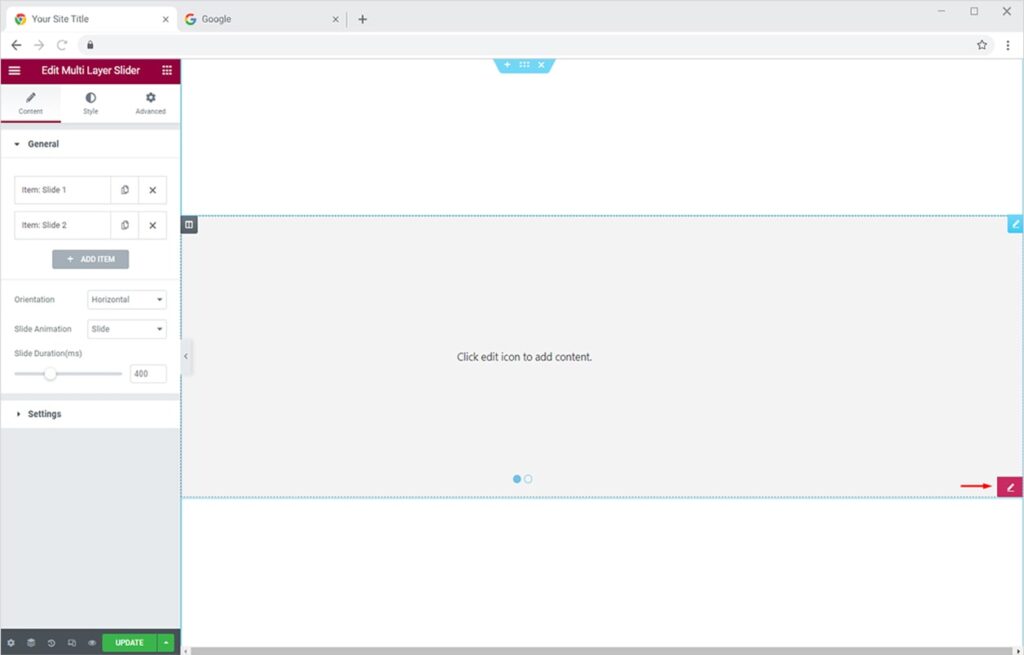
Your full-width slider is now set up. Now click on the ‘Edit Slider’ icon to add slides, set orientation, and add a nice animation to your slides. Remember, we are just setting up the foundation of our slider, we will add content and design a fully functional slider later on.
From the Content tab, set the orientation of your slider to either Horizontal or Vertical. You can add an amazing slide animation (fade or slide) to your slides from the Slide Animation option. Tweak the slide duration as you please.
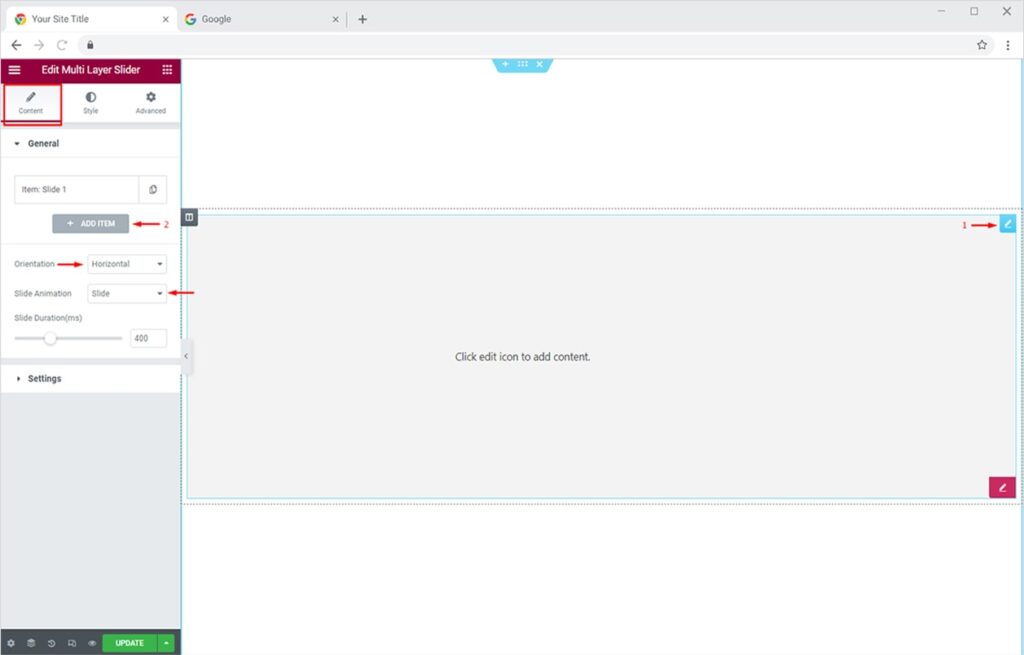
Click on the Add Item button to add a new slide. You can give any title to your slide from the Title section and add an interactive Thumbnail to it (we will activate and style thumbnails later on).
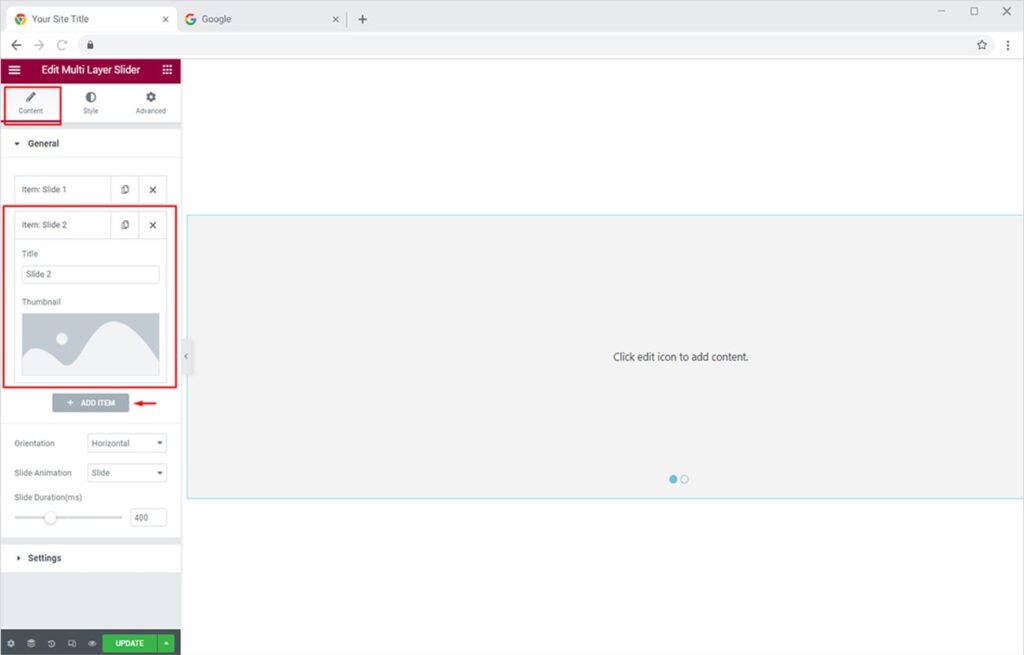
How to Add Content in Slides of Xpro Multi Layer Slider for Elementor
Once our slider is fully set up for a full-width layout, now we will import a modern Xpro slider template and customize it as we want. Remember, you can create a fully functional slider by importing any Xpro widget and styling it as you like. Here, let’s customize an existing Xpro Slider Template and add amazing customizations to it.
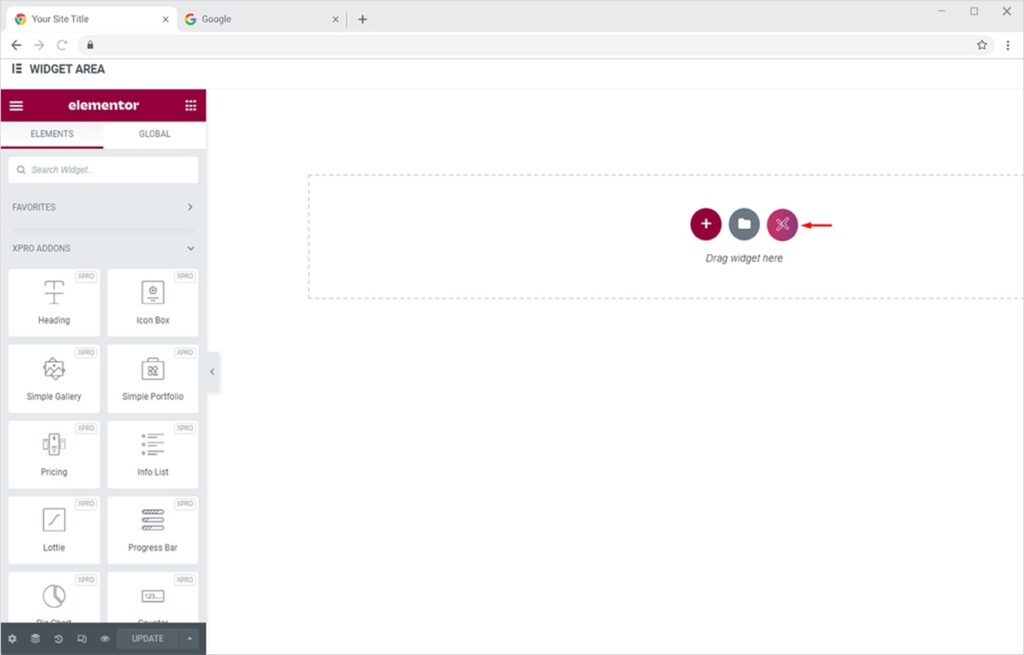
Click on the Edit Icon to open the Elementor Widget Area.
Widget Area pop will appear on your screen now. Click on the Xpro Icon to import a slider template.
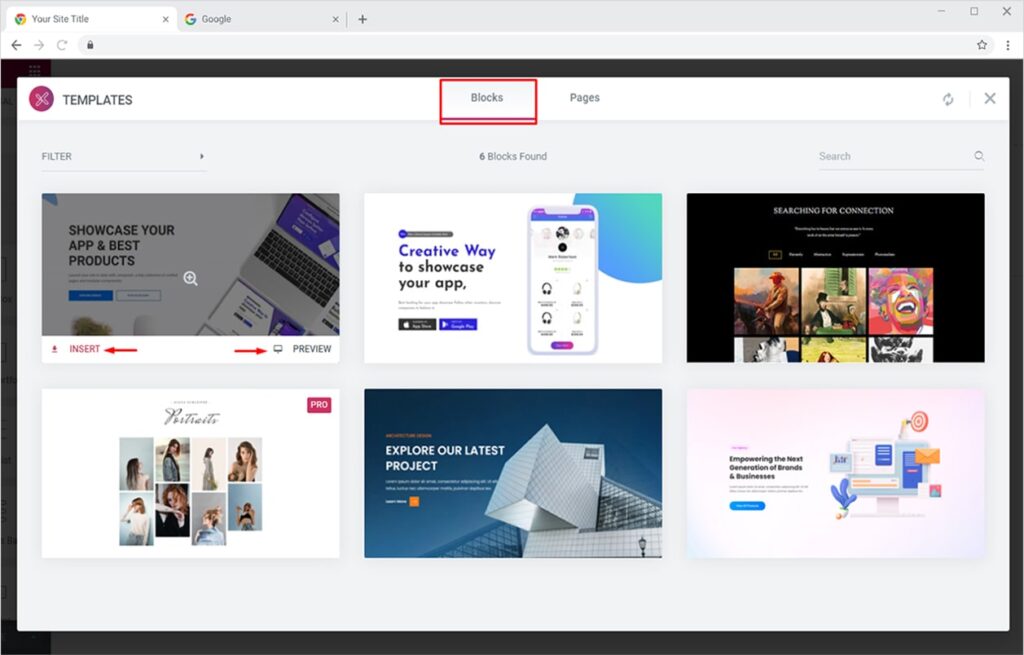
Now from the Blocks section, insert any modern starter template of your choice. You can also preview it first from the preview option to get an idea of how it’d look on your website. Click on the Insert button to import your slide. I am going to insert the first slide here.
Once you click on the Insert button, the template will be imported into your slide. The view will be like this:

Now you can fully customize any layer of your slider. Let’s change the heading of our slide. Click on the Heading Widget edit icon to find editing options under the Content tab. Here you can change the title, add a link to your heading, set its size, alignment & HTML tag. After editing your widget, always Update your slide by clicking on the Update button available in the footer of Elementor Editor.

You can also customize your heading from the Style tab. Make it more personalized by changing the typography, and color, and adding a stroke & shadow to your heading.

Similarly, you edit each layer of your slide and customize it as you like. Now let’s style our slides by adding captivating background, parallax effects, and much more.
How to Style Your Slides using Xpro Multi Layer Slider for Elementor
Adding attractive background to your slides makes your slider look more appealing to your site visitors. Xpro Multi Layer Slider offers 4 premium background options for your Elementor website that includes Classic, Gradient, Video, and Slideshow background with Ken Burns Effects. Let’s try the Classic background first.
How to Add Solid Background Color to your Slides
Click on the ‘Edit section icon’ and go to the Style tab. Here you will find multiple options under the Background section. Now from the Background Type option, click on the first icon (Classic) and pick a color of your choice from the color picker.

How to Add Image Background to your Slides
Similarly, you can add an image as a background from the Classic background option. Follow the same steps as above and instead of clicking the Color option, simply upload your image by clicking the Image box. You can upload a new image or choose from the media library. You can also set the position, size, and attachment of your background image from the available options.

How to Add Video Background to your Slides
Smartly created videos always appeal more than static color or images, right? Keeping this in mind, our power slider plugin for Elementor allows you to add exciting videos in the background of your slides. You can simply add a YouTube/Vimeo video link in the Video Link option and it will work like a charm! You can also upload your video to the Media Library and add its link too. Let’s see how we can do that.
Click on the ‘Edit section icon’ and go to the Style tab. Here you will find multiple options under the Background section. Now from the Background Type option, click on the third icon (Video) and simply paste the link of the video you want as a background. You can also tweak the start-end time and upload an image in the Background Fallback. This image will replace your video in case the video doesn’t autoplay on your slide. Turn on the Play Once and Play On Mobile options as per your needs.

Your slide with this amazing video background will look like this on the live site.

How to Add Image Slideshow Background to your Slides
Now let’s try adding an eye-popping slideshow background to our slide. To do this, simply click on the ‘Edit section icon’ and go to the Style tab. Here you will find multiple options under the Background section. Now from the Background Type option, click on the fourth icon (Slideshow) and simply choose your slideshow images from the Media Library.
You can choose any of the 5 transitions, set transition duration, customize the background size and position. Turn on the Ken Burn Effect and set its direction to either In or Out. This effect creates a motion for your static images and adds smooth moves to your slideshow images.
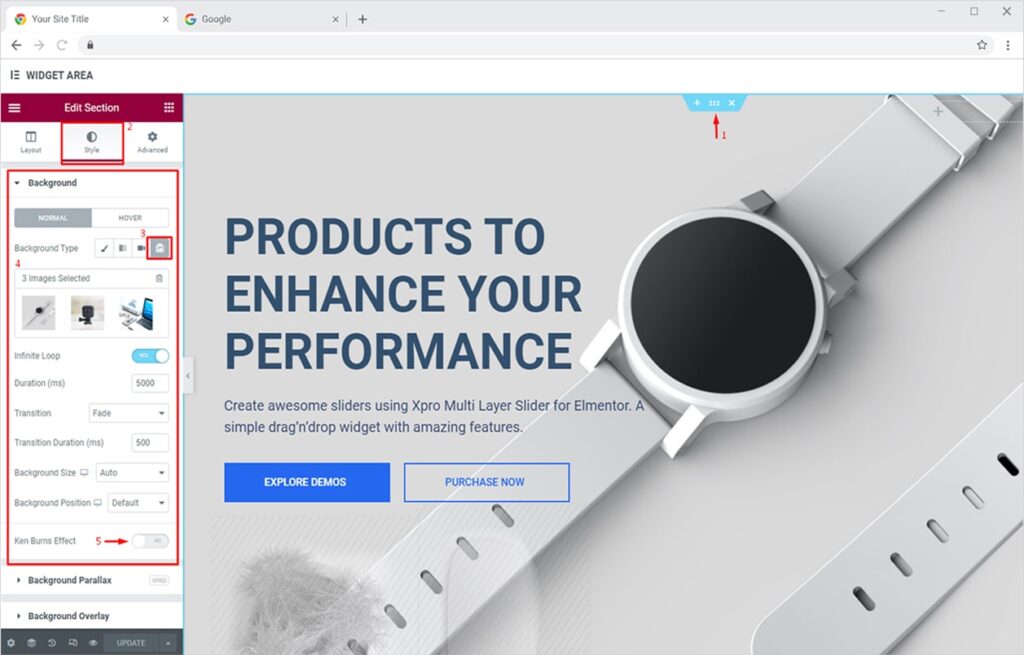
The final output of your slide with a slideshow background will look like this.

How to Add a Parallax Background to your slides in Elementor
Now let’s add a parallax effect to our slide. Simply click on the ‘Edit section icon’ and open the Style tab. Find the Background Parallax section and toggle the button to ‘Yes’. Now simply select the parallax type (4 available) and set its speed.
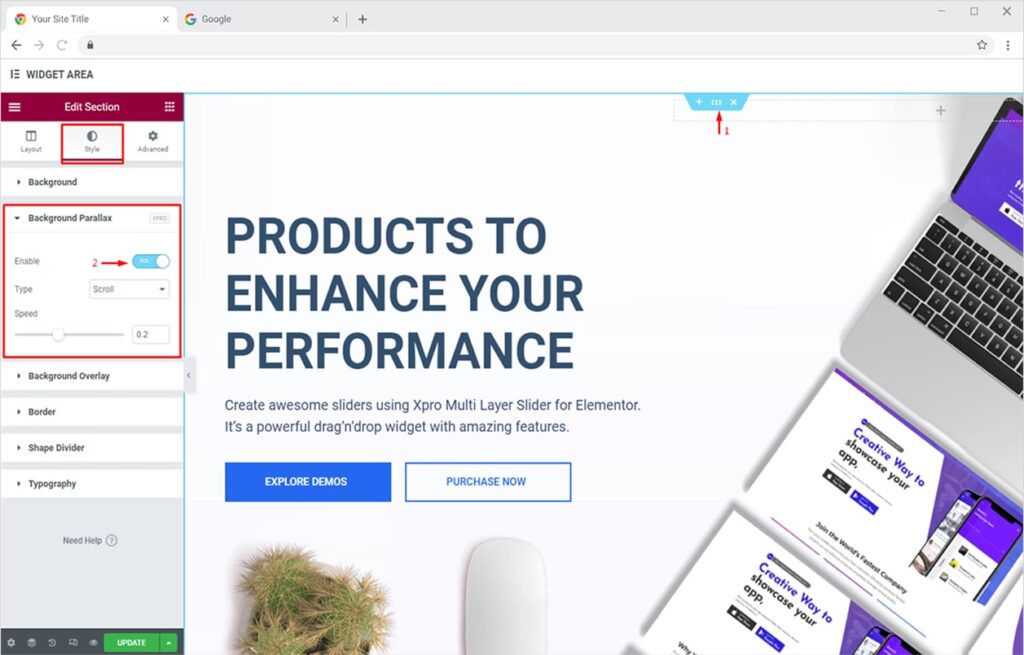
Your parallax background will look like this on the live site.

How to Add Animation to Layers of Your Xpro Elementor Slider
You can add exciting entrance animations to any layer of your slide using our premium Multi Layer Slider for Elementor. Add different entrance animations to your layers and give your slider a premium feel. Let’s apply motion effect/animation to our slide layers now. First, we will apply a motion effect on our heading.
Click on the Widget Edit icon and move to the Advanced tab. Here, you will find different options and effects for your widget. Now click on the Motion Effects option and choose your Entrance Animation from the available dropdown options. I am applying the ‘Xpro Mask from Up’ animation here.
You can also set the duration for your animated heading by setting the Animation Duration option to either Slow, Normal, or Fast. The duration is basically the time of your animation to fully appear and set in your slide. You can now tweak (in microseconds) the Animation Delay option as per your liking.
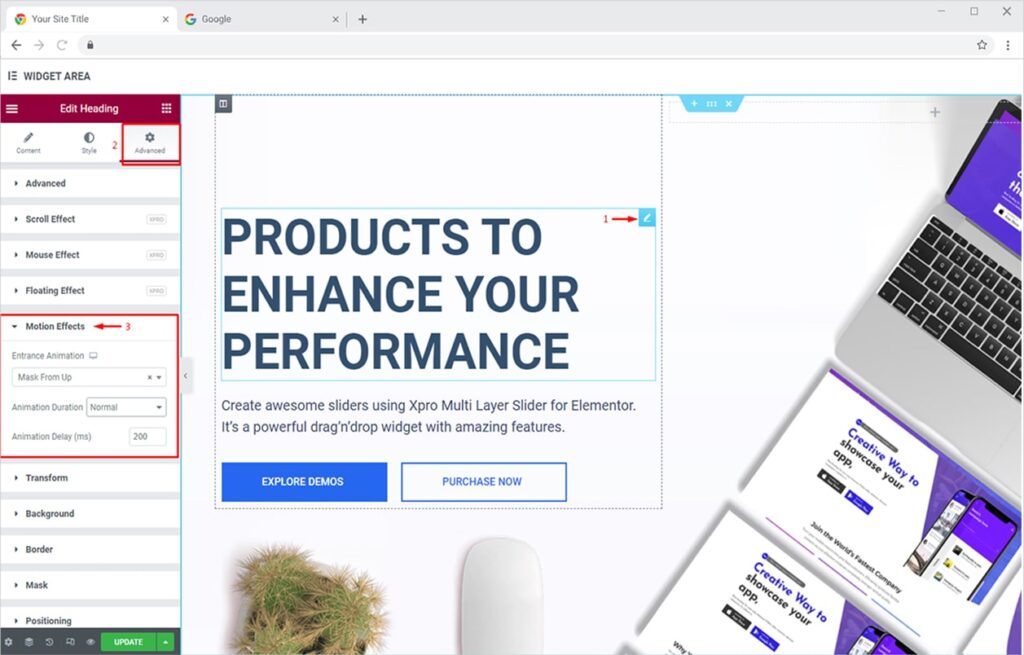
Similarly set the animations for other layers and the final output will look like this.

How to Apply Mouse Effect on Layers of Xpro Multi Layer Slider for Elementor
Adding a mouse effect to your layers makes them more eye-popping to your site visitors. Using Xpro Multi Layer Slider, you can apply Mouse Track and 3D Tilt mouse effects to your layers. Let’s try the Mouse Track effect first.
We will apply it to one of the images in our slide. Click on the Edit Widget icon of the layer you want to apply the mouse effect to. Go to the Advanced tab and open the Mouse Effect section. Now simply toggle the Enable button to ‘Yes’ and then click on the Mouse Track icon. Here you can choose any of the 2 available directions and set the speed for your tracking.
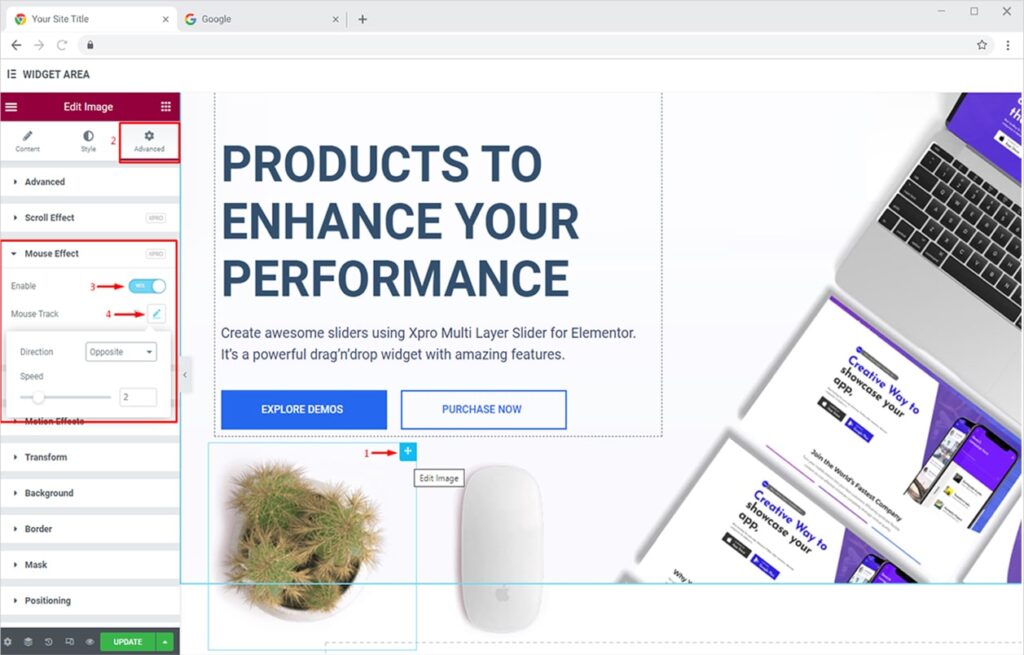
The output will look like this for the image we applied the ‘Mouse Track’ effect to.

Similarly, you can apply the 3D Tilt effect to your layers. Set the direction to either opposite or direct and tweak the options like speed, scale, and glare of your tilt.
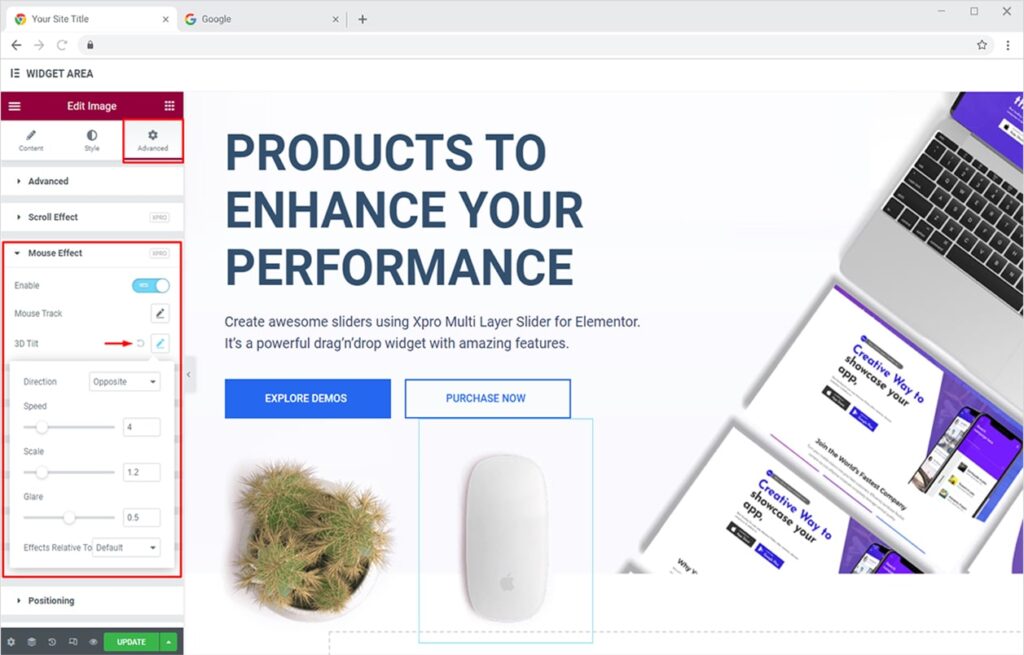
The output will look like this for the image we applied the ‘3D Tilt’ effect to.

Customize a theme’s default templates by using our free Elementor theme builder.
By Xpro Elementor Addons
How to Apply Floating Effect on Layers of Xpro Multi Layer Slider for Elementor
Our state-of-the-art slider for Elementor also allows you to apply incredible Floating Effect to the layers of your slides. You can apply Translate, Rotate, and Scale effects to your layers. Here, we will apply the Translate effect to one of our Image widgets.
Simply click on the Widget Edit icon and open the Advanced tab. Now open the Floating Effect section and toggle the Enable button to ‘Yes’. Finally, click on the Translate icon and set the X-Y axis. Duration, and delay as you like. Duration is the speed on the image to complete one translation across your set pixels.
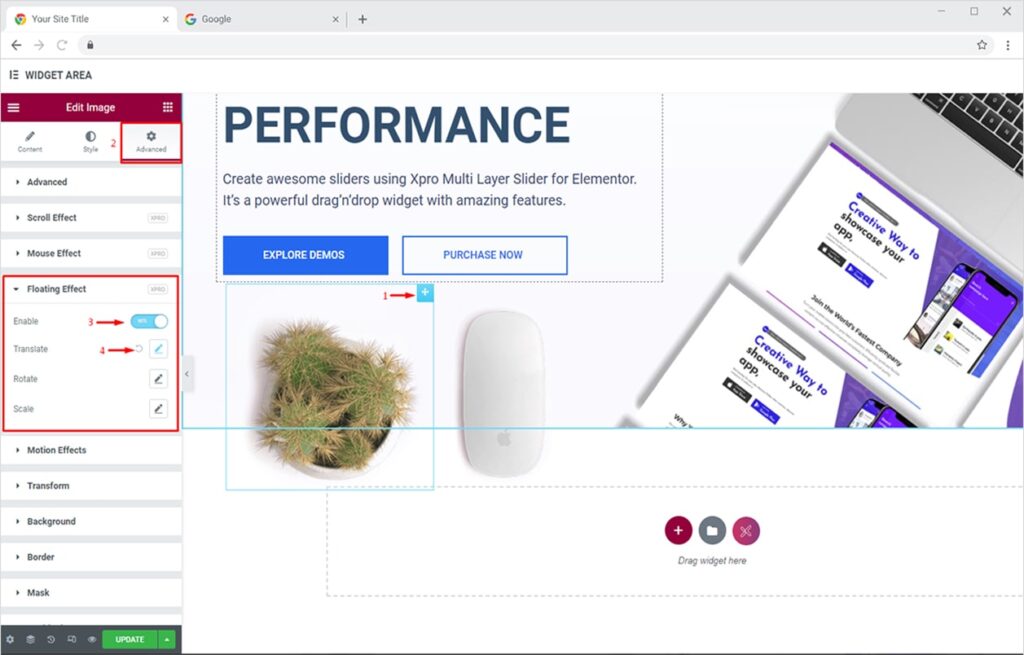
The layer will now float on your slide like this.

How to Apply Scroll Effect on Layers of Xpro Multi Layer Slider for Elementor
Now let’s add enticing scroll effects to different layers of our slider. The scroll effect basically makes your website incredibly appealing to site visitors because at every scroll you can add amazing effects. You can make your objects/layers move in a vertical or horizontal position, rotate or scale them in a custom-defined position, and more. Let’s try applying Scroll Effect (Rotate) to one of our image layers in the slide.
Click on the Edit Widget icon of the layer you want to apply the scroll effect to. Go to the Advanced tab and open the Scroll Effect section. Now simply toggle the Enable button to ‘Yes’ and then click on the Rotate icon. Here you can set the amount of Rotation, Start and End Offset values, and the Transform Origin of your layer.
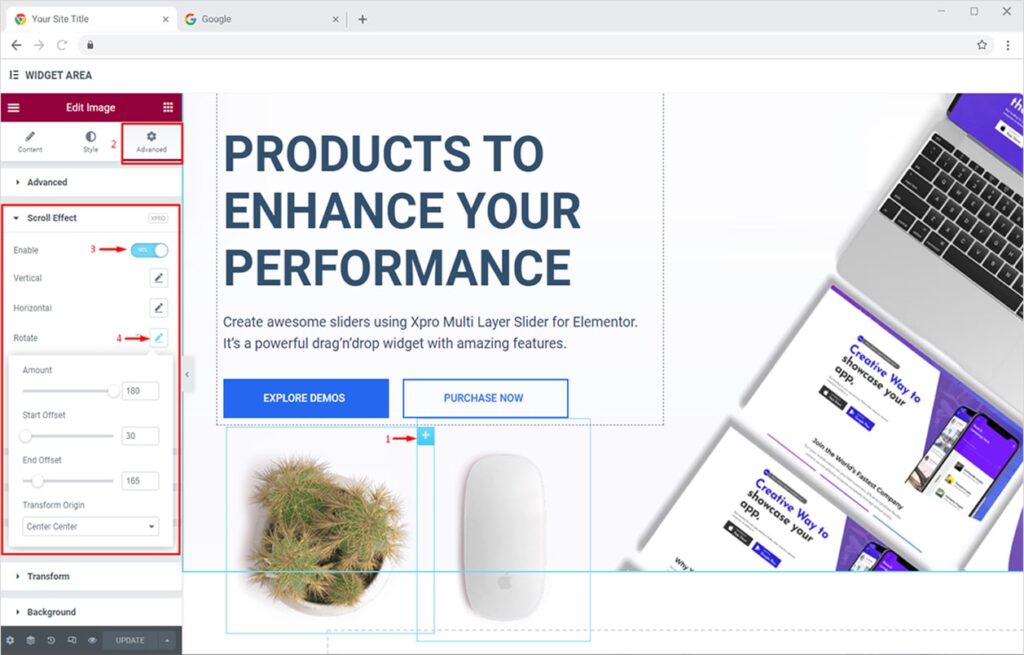
The layer will now rotate like this every time a site visitor scrolls your slider.

How to Apply Positioning on Layers of Xpro Multi Layer Slider for Elementor
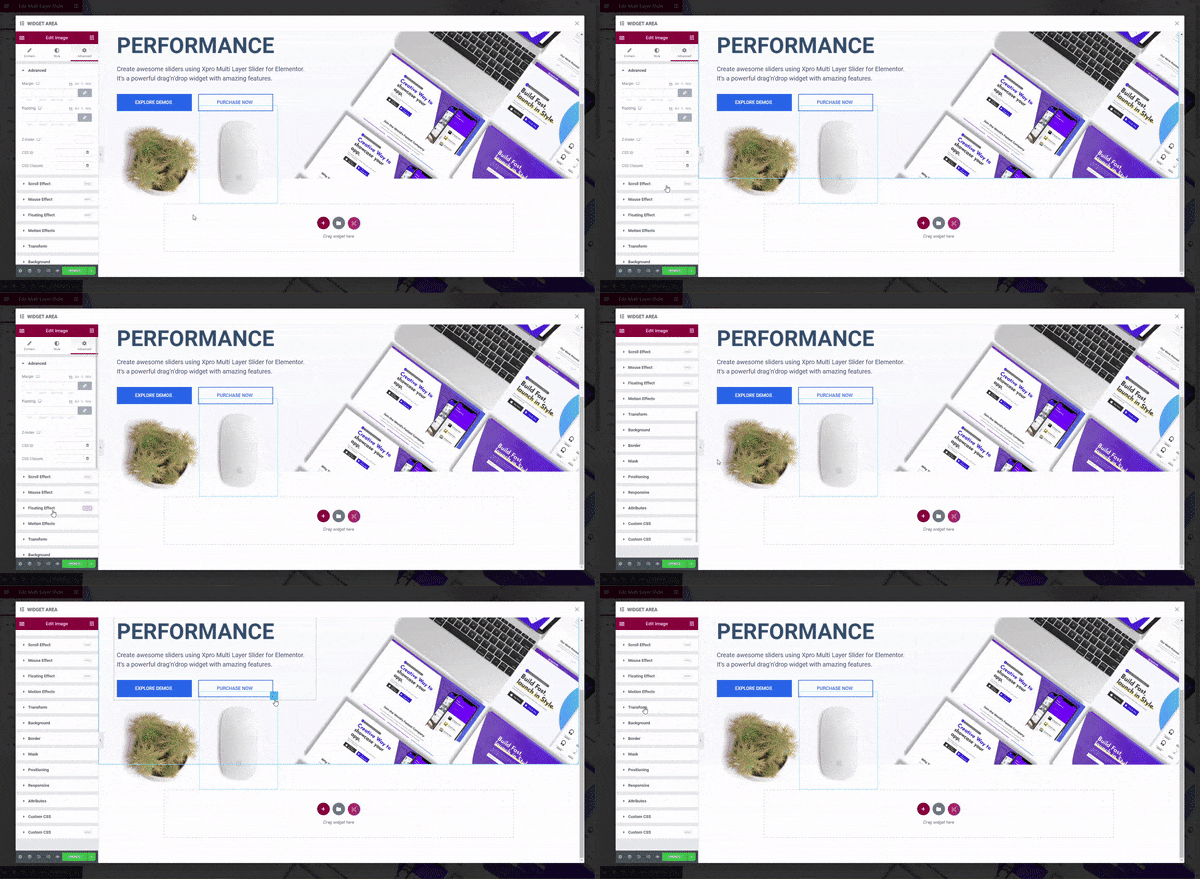
Positioning opens up extreme customization options for you. It lets you place any object anywhere on your slide and set it as an Absolute or Fixed object. The Absolute Position makes your object absolutely to its first positioned parent. In the Fixed Position, the element is positioned relative to the user’s viewport.
Let’s try positioning our image object. To do this, simply click on the Edit Widget icon of the layer you want to apply the positioning on. Go to the Advanced tab and open the Positioning section. You can set the position to Absolute or Fixed, change the Vertical & Horizontal orientation with offset adjustment.
How to Add & Style Thumbnails to Slides of Your Multi Layer Slider
Once you’ve added multiple slides in your slider, you’d want to give a glimpse of the next slide to your site visitor. For this, our premium slider for Elementor offers a tempting thumbnail option to you. You can add thumbnails for each slide and create nice thumbnail navigation for your users.
First, let’s add thumbnails to our slides. Click on the ‘Edit slider icon’ and open the Content tab. Now from the General section, click on the slide item you want to add a thumbnail to. Finally, choose your thumbnail image by clicking on the Thumbnail option. You can upload a fresh image or choose from the Media Library.

Follow the same steps to add thumbnails to other slides. Now we will activate the thumbnail navigation on our slider For this, open the Settings section from the Content tab and toggle the Show Thumbs option to ‘Yes’. This will activate the thumbnail navigation on your slider.

Once our thumbnails are activated, we can now fully style and design them according to our liking. Switch to the Style tab and open the Thumbs section. Here we can change the layout to either Classic or Modern, set the orientation to horizontal or vertical, and position or thumbnail navigation anywhere we want from the Position option.
Xpro Multi Layer slider is all about giving you complete freedom to customize your slider. These customization options work all over the slider features including the Thumbnail Navigation. You can change the number of items visible in the thumbnail container and customize the height, width & space between the items too.

Now let’s add some colors and borders to our thumbs. You can add color to the background for both Normal and Active thumbnails. You can also add any of the 5 available borders and give them a nice color touch for Normal and Active modes.

Your thumbnails will work like this on the live website.

How to Add & Style Navigation Arrows to Your Multi Layer Slider in Elementor
Adding navigation arrows to your slider will help you engage your site visitors to view more of your slides. It is a quick way to let users navigate towards the next/prev slides and take action on your content. Now let’s see how we can add engaging navigation arrows to our Multi Layer Slider for Elementor. Click on the Content Tab, open the Settings Section and toggle the Show Nav option to ‘Yes’.

Now let’s style these navigation arrows to give a pleasant experience to your site visitors. Click on the Style Tab and then open the Navigation section. Here, you can choose from 2 available layouts (Classic. and Modern), change the size of the navigation icon, the size of the background, and the position of these navigation arrows respectively. Moreover, you can use any color combination to style these icons most attractively. You can also add a border (5 available options) and give a color to it.

Similarly, you can change the color accent of your navigation arrow for hover mode. Just click on the Hover tab and add the colors of your choice to the icon, background, and border.

The navigation arrows will give an enticing next/prev slide navigation experience to your site visitors.
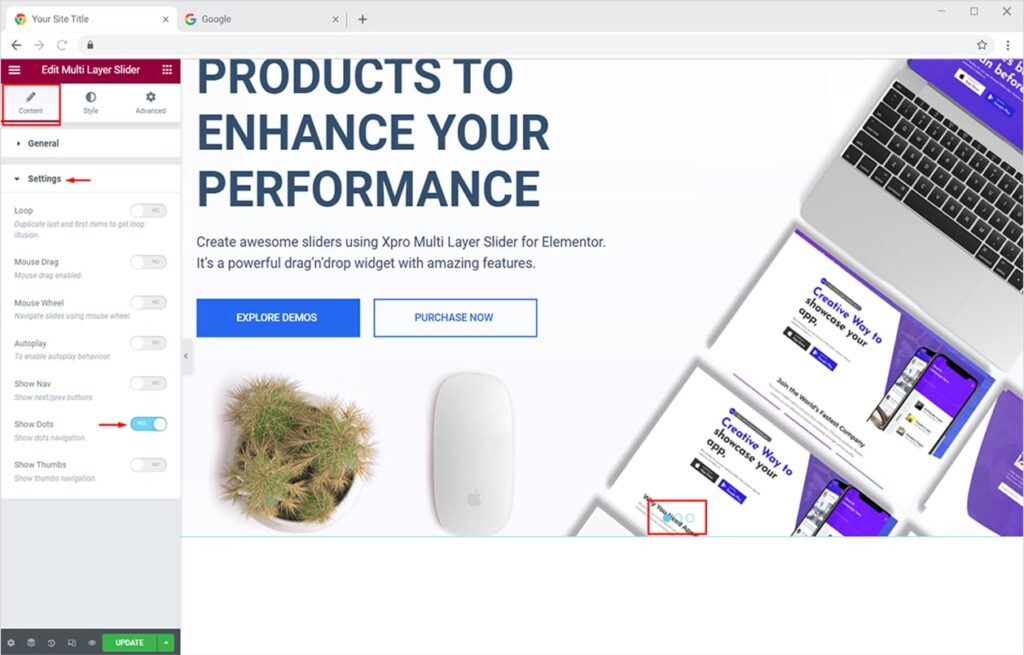
How to Add & Style Dot Navigation to Your Multi Layer Slider in Elementor
Adding dot navigation is another brilliant way to engage users with your unseen slides. These dots are vital for highlighting all of your slides and for easy navigation throughout your slider. It is the sleekest and most pleasant type of navigation you can add to your slider. Let’s see how we can do that.
Click on the Content Tab, open the Settings Section and toggle the Show Dots button to ‘Yes’.
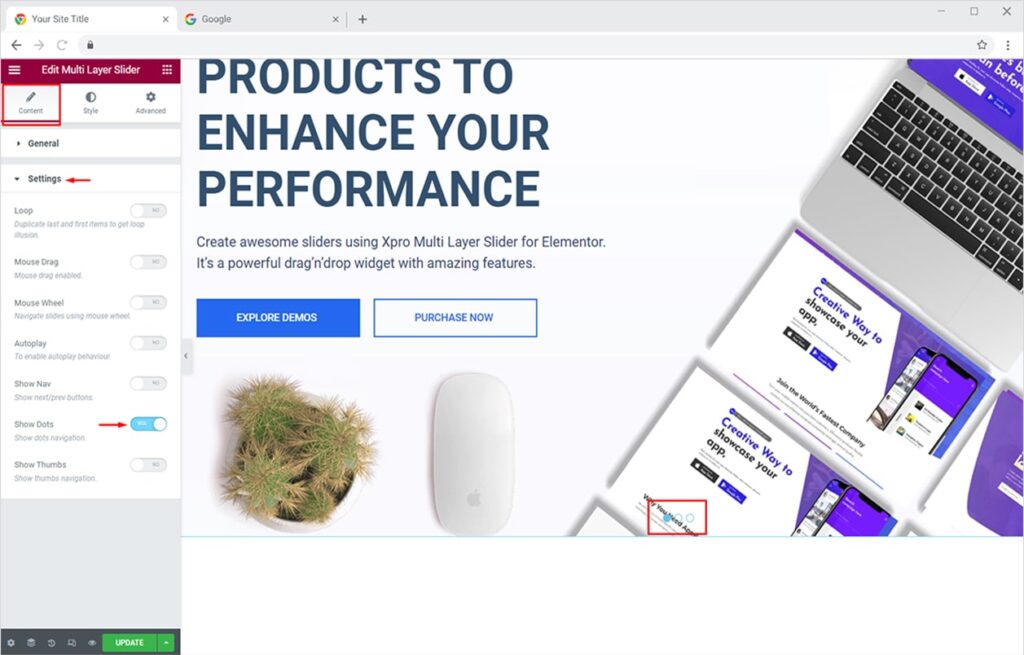
Now let’s fully design your captivating Dots Navigation from the Style Tab. Click on the Dots section to find amazing editing options for your dots nav. Choose from 2 amazing layouts (Classic and Modern), here we will try the Modern layout. Now you can change the Orientation (Horizontal or Vertical) and the Positon (8 options available) of your dots too. You can also adjust the height, width, and space between your dots. Apart from this, you can easily change the color of your dots for both Normal & Active modes, and add a prominent border to them.

Let’s see how lovely your customized dot navigation will look on the live slider.

How to Add Loop to Your Xpro Multi Layer Slider in Elementor
Adding a loop to your Xpro Elementor Slider is somewhat a creative approach that makes your visitors stick to your slides and consume content in seconds. It allows you to represent your slides in a neverending loop, meaning the slides repeat themselves once ended. The end is the new beginning for looped slides. It helps you get more interaction from the users.
Simply go to the Content Tab and click on the Settings section. From here, you can toggle the Loop button to ‘Yes’.

An amazing loop created using the Xpro Multi Layer Slider for Elementor will work something like this.

How to Add Autoplay Feature to Your Multi Layer Slider in Elementor
One of the most prominent features of the Xpro Multi Layer Slider for Elementor is the autoplay option. Make your slides instantly grab the attention of site visitors with this amazing feature. It’s like showcasing all your slides in one go! Let’s see how to do this.
Go to the Content tab, click on the Settings section and simply toggle the Autoplay option to ‘Yes’. You can also set the interval time between different slides.

The final sliders with autoplay turned on will look something like this.

How to Add Mouse Drag & Mouse Wheel Feature to Your Multi Layer Slider in Elementor
If you don’t want to add any navigation dots or arrows, you can simply add Mouse Drag and Mouse Wheel features to your slider. These are premium features that let your users simply drag slides to view new ones. The mouse wheel feature allows your users to navigate slides if their pointers in on the slider.
These are amazing features for your slider, let’s see how we can activate both. First, let’s activate and see the Mouse Drag feature in action.
Simply open the Content tab and click on the Settings section. Now toggle the Mouse Drag option to ‘Yes’.

The Mouse Drag feature works like this on your live site.

Similarly activate the Mouse Wheel feature from the Settings section under the Content tab.

Let’s see how the Mouse Wheel option works on our slides.

Best Slider Widget for Elementor – Create Beautiful Slides in No Time
I’ve explained the prominent features of the Xpro Multi Layer Slider for Elementor in this document. Again, you can create custom slides from scratch or simply import our premium slider templates to get started quickly. You can create a slider of any size and place it anywhere on your website too. If you want to create a FREE Simple Gallery for your Elementor website then try our Free Elementor Simple Gallery widget. On the contrary, if you are looking to create modern portfolios then head over to our detailed guide on Free Elementor Simple Portfolio widget.
Xpro Elementor is packed with stunning Elementor Addons that include a wide range of widgets, features, and theme pages. Get the best Elementor Addons for your WordPress website.