How to Install Elementor Tab Widget
The Xpro Elementor tab widget is a wonderful tool to showcase more in less space anywhere on your Elementor site. The widget lets you design & present your content more creatively in Vertical or Horizontal styles. This dynamically improves the overall user experience as your site visitors don’t have to scroll endlessly to find the relevant content on your site. Xpro Elementor Tab widget comes with a lot more powerful features like 20+ animation effects, dynamic content, and numerous styling options for lists, content, and accordion sections.
Requirement
You need to install and activate the Pro version of Xpro Elementor Addons. If you already have the plugin installed, just make sure the Advanced Tabs Widget is ‘Enabled’ from the Xpro Dashboard, so you can find the widget in the Elementor editor.
To enable the widget, simply follow these steps:
Step 1
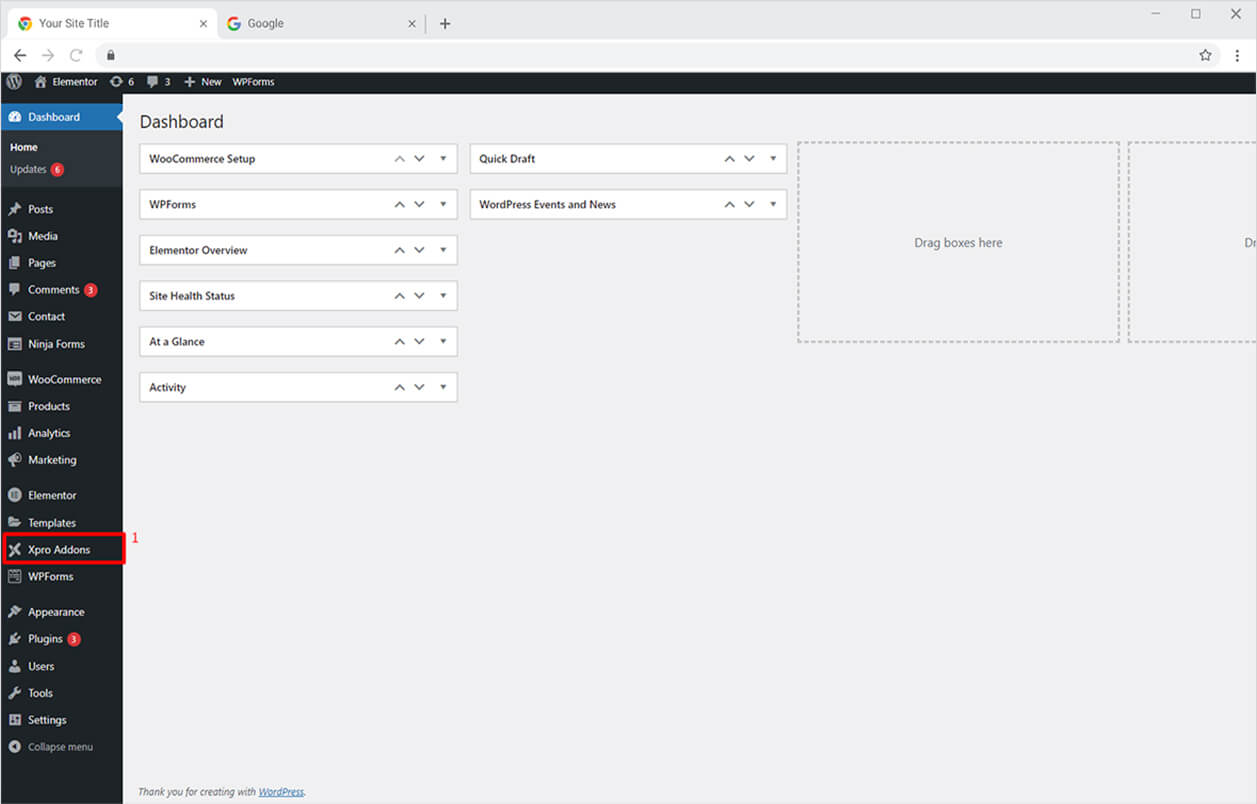
Click on the Xpro Addons option available on the WordPress Dashboard Menu.
Step 2
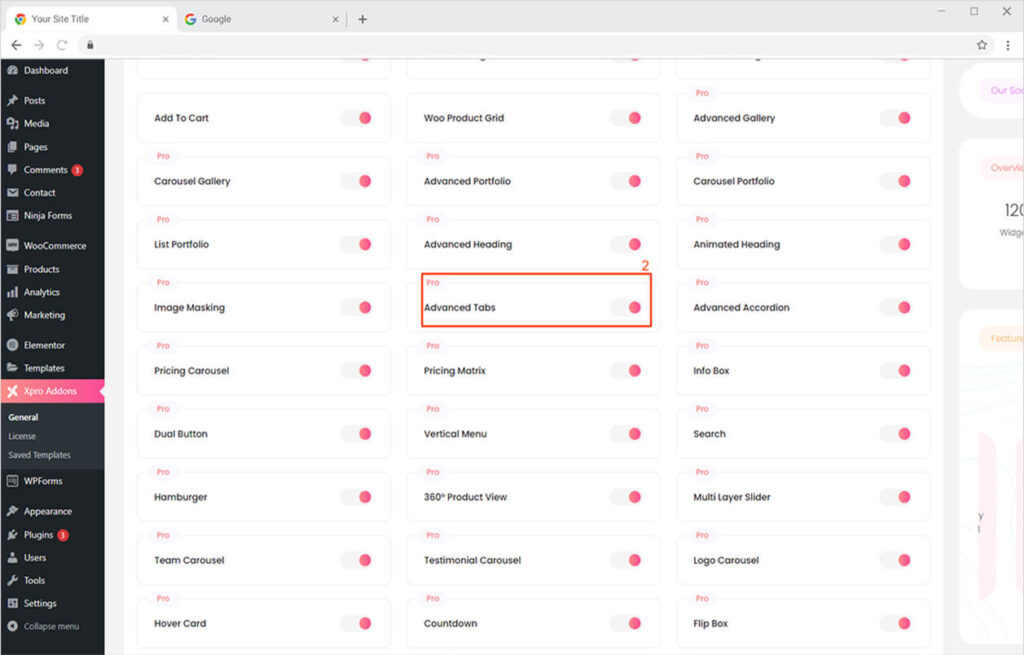
From the Xpro Addons Dashboard, click on the Widgets Tab, find the Advanced Tabs widget, and finally, toggle the button ON to enable it.
How to Use Xpro Elementor Tab Widget
Tabs are the best way to beautifully present offers and content in a concise way. You can instantly grab your site visitor’s attention and direct them to any detailed page of your website. Put dynamic content in each tab or apply stunning animations in the easiest way possible. It’s fun, easy, and time-saving! Let’s dig deep and explore the endless benefits & features of the Elementor Tab widget.
Step 1
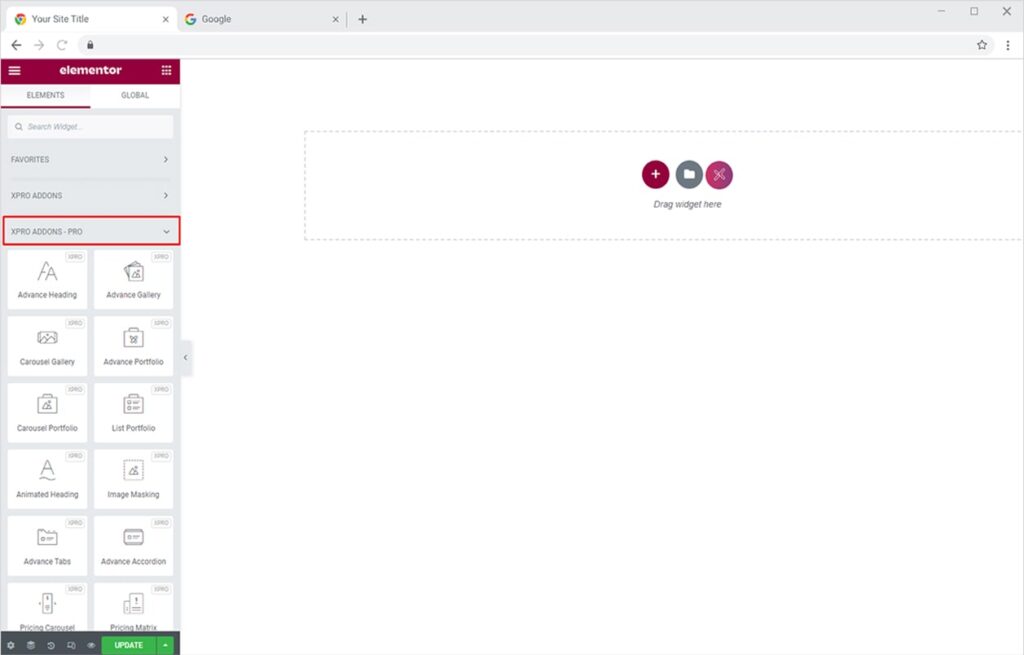
Click on the Xpro Addons section available in the Elementor Editor.
Step 2
From the Xpro Addons – Pro section, search and simply drag-drop the Advanced Tabs widget on your desired page location.
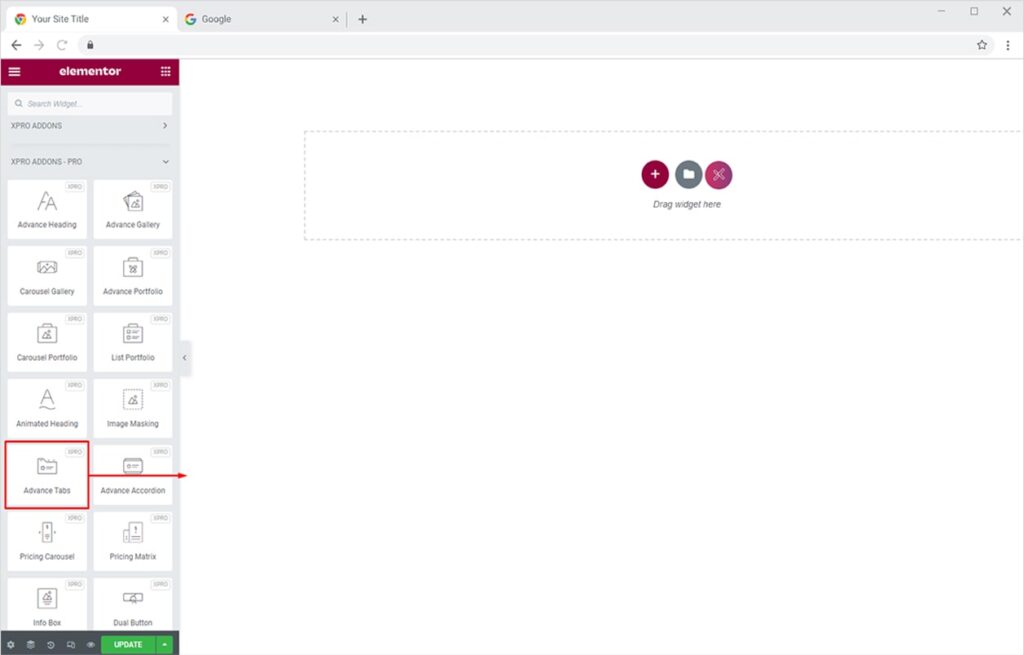
This is the default view of the Xpro Advanced Tabs widget once you drop it at your desired location.
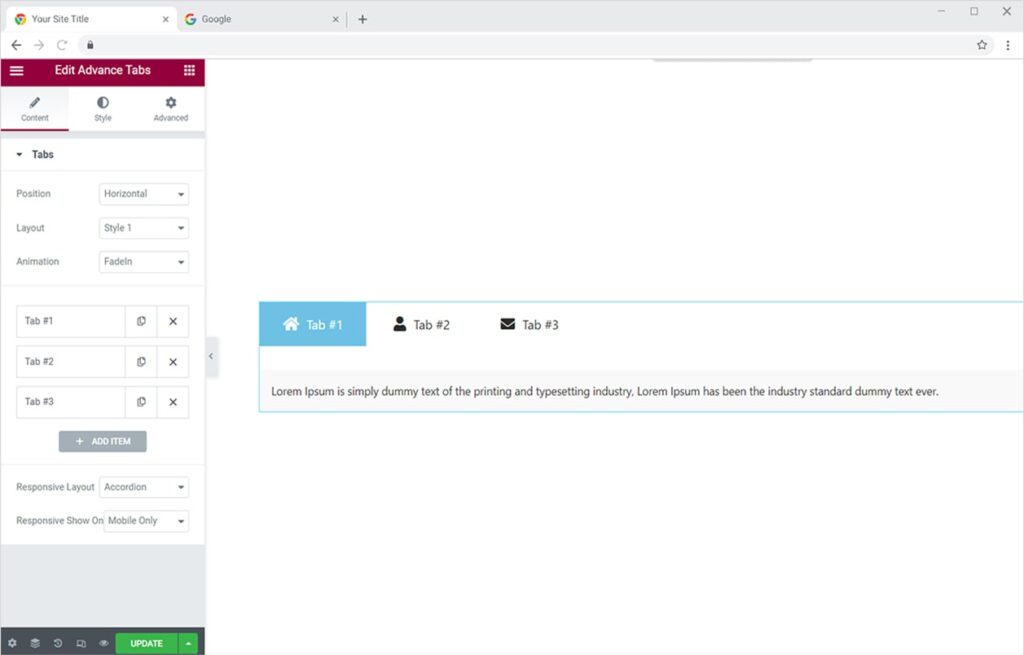
Understanding The Content Section of Advanced Tabs Widget
Our Advanced Tabs widget for Elementor lets you dynamically populate content in each tab, apply animation to description/dropdowns, and choose from 16+ horizontal layout styles. You can easily create attention-grabbing Tabs for your site in no time. Let’s understand the options available in the Content Section.
Once you drop the widget on the desired location, you will see multiple options in the Content section while editing the widget. Under the Tabs dropdown, you’ll see multiple options like position, layout, animation, tab content editor, add item option and responsive layout.
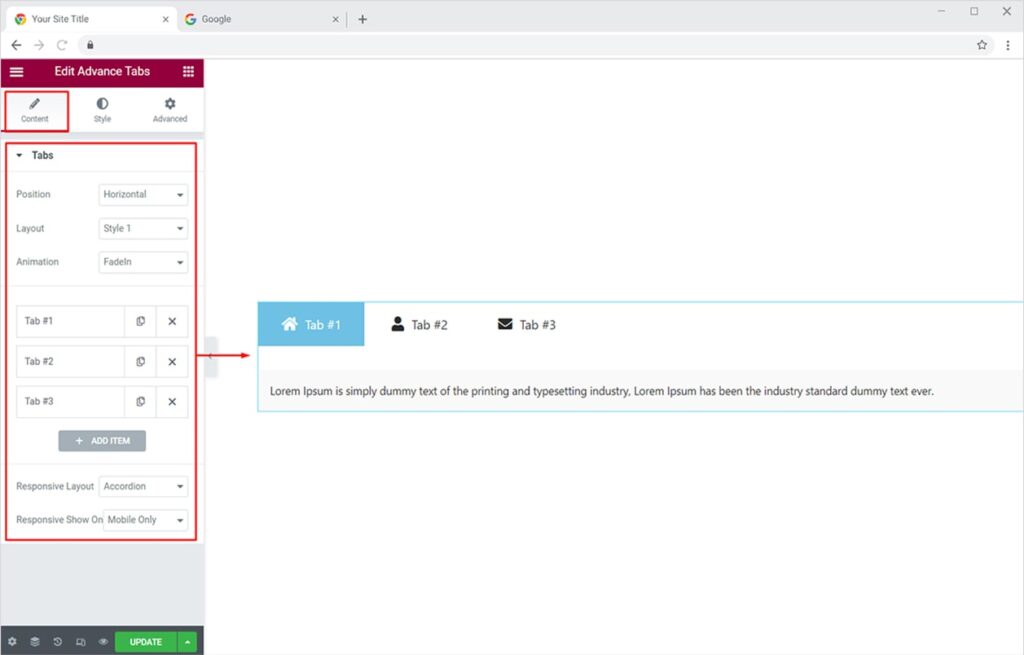
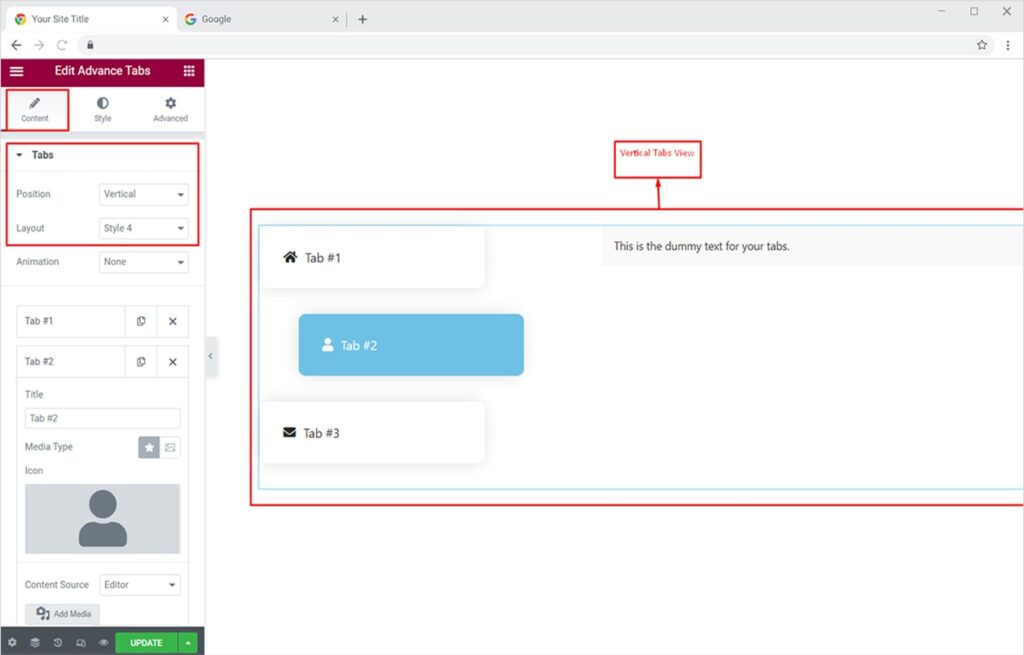
You can change the Position of the Tabs to either vertical or horizontal. Also, you can select the layout style of your choice and add a nice animation to your tabs (we will apply style animations later on).
Horizontal View
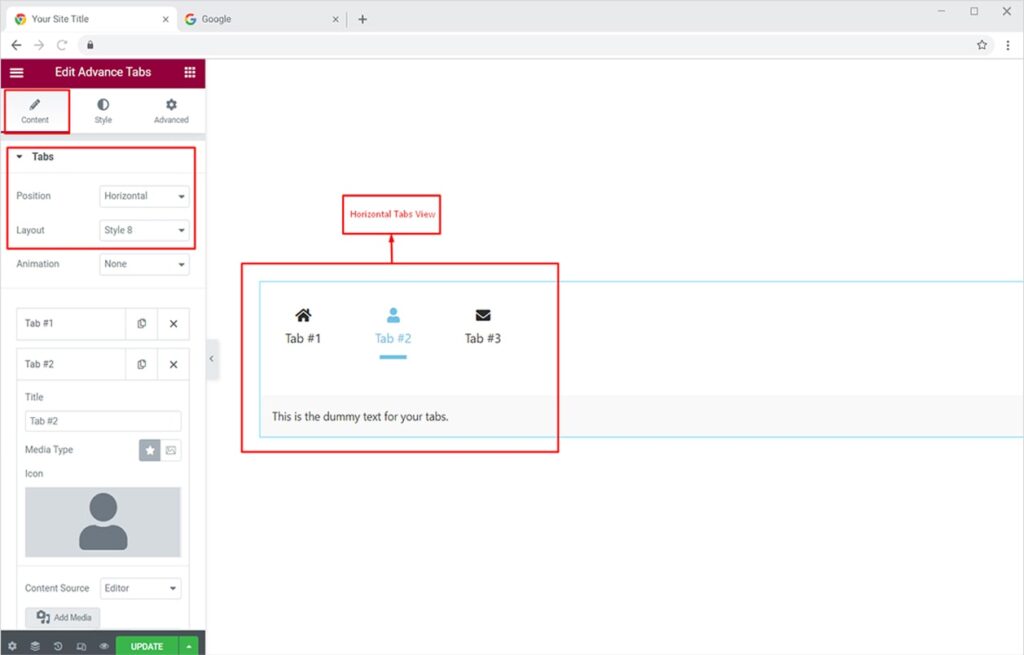
Vertical View
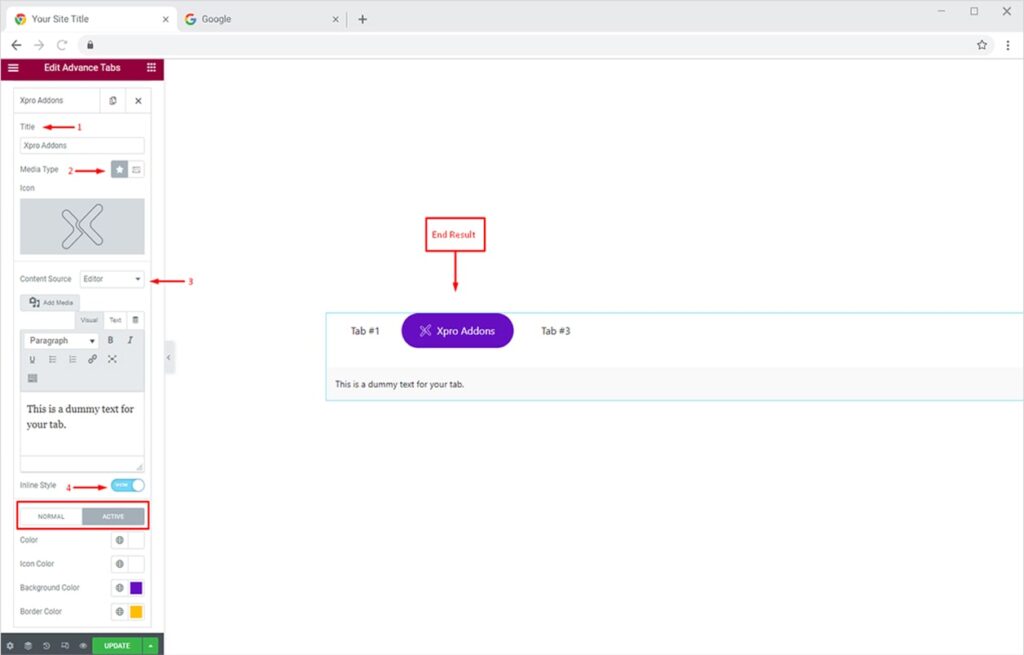
From the Tabs Editor, you can:
- Add tab title from the Title field
- Select your Media Type. Here you can choose icons from the Font Awesome library or Xpro Icon library (300+ unique line icons). You can also add an image/GIF as a media type.
- Add Dynamic content by switching the Content Source to Dynamic. (we will add dynamic content styling later)
- Set the Inline Style of your Tab by adding custom color to the text, icon, background, and border of the tab.
Try our free theme builder for Elementor and customize default theme parts however you like. It’s fully compatible with Hello, Xpro, Astra, and GeneratePress themes.
By Xpro Elementor Addons
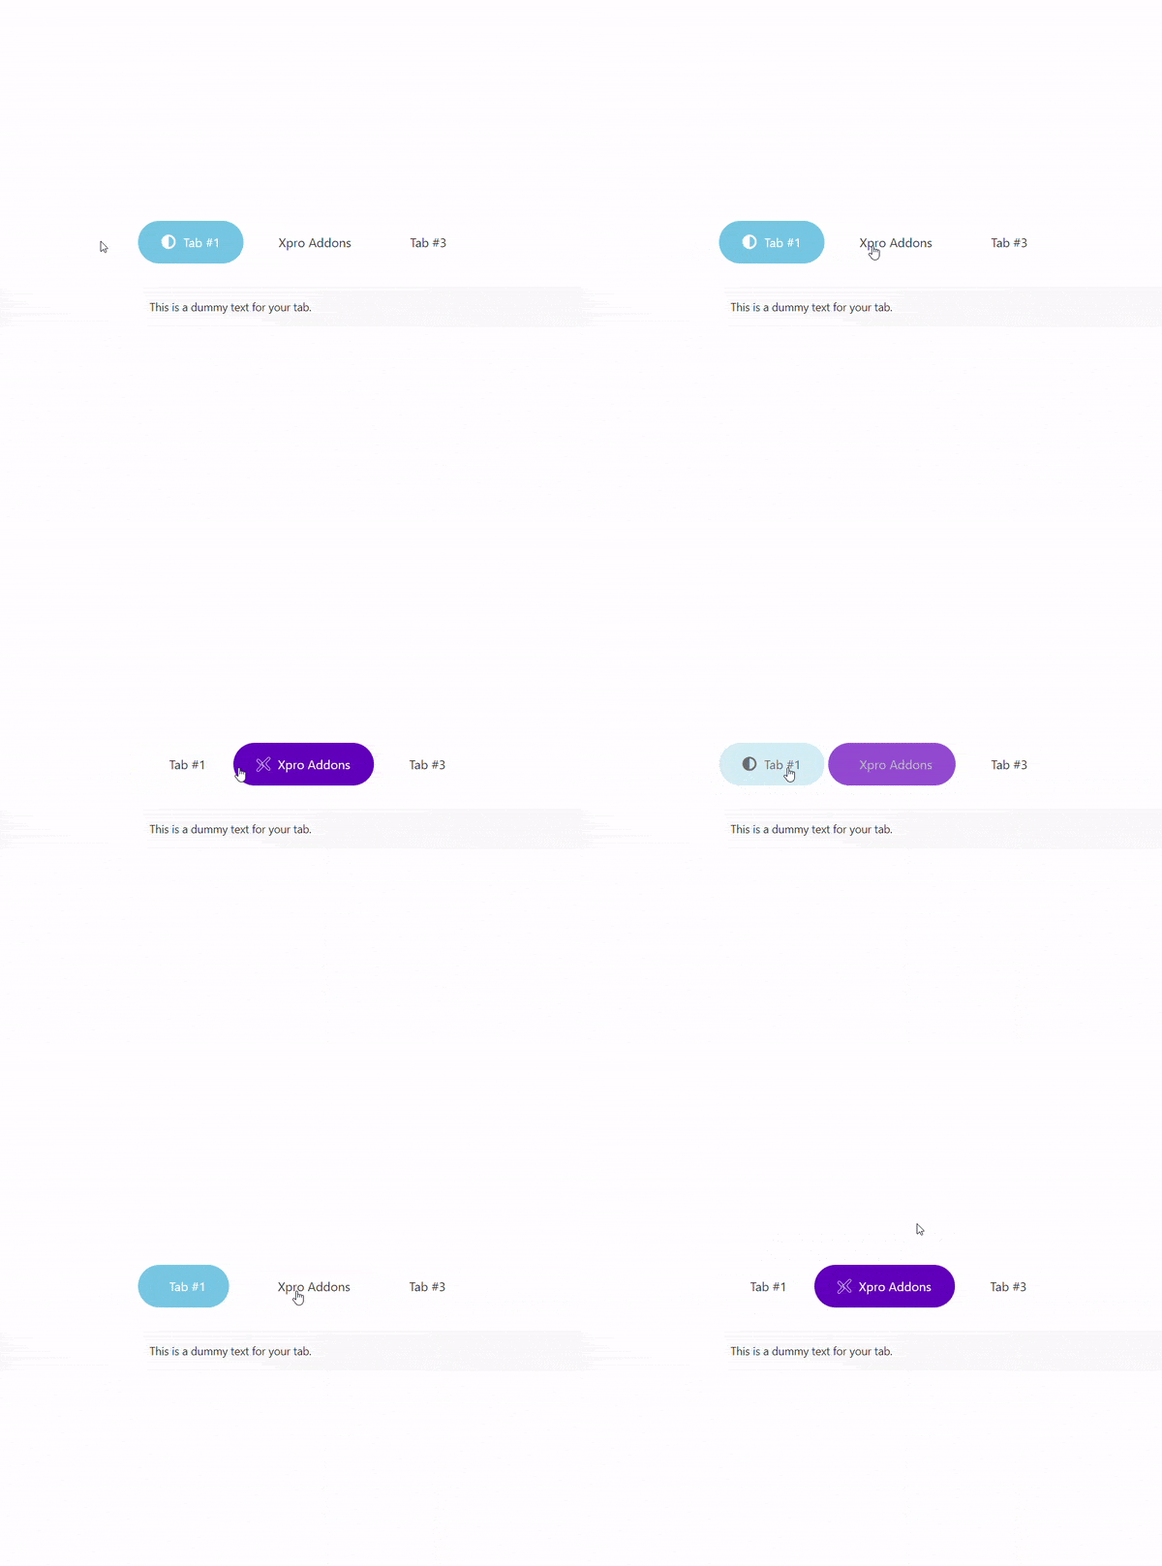
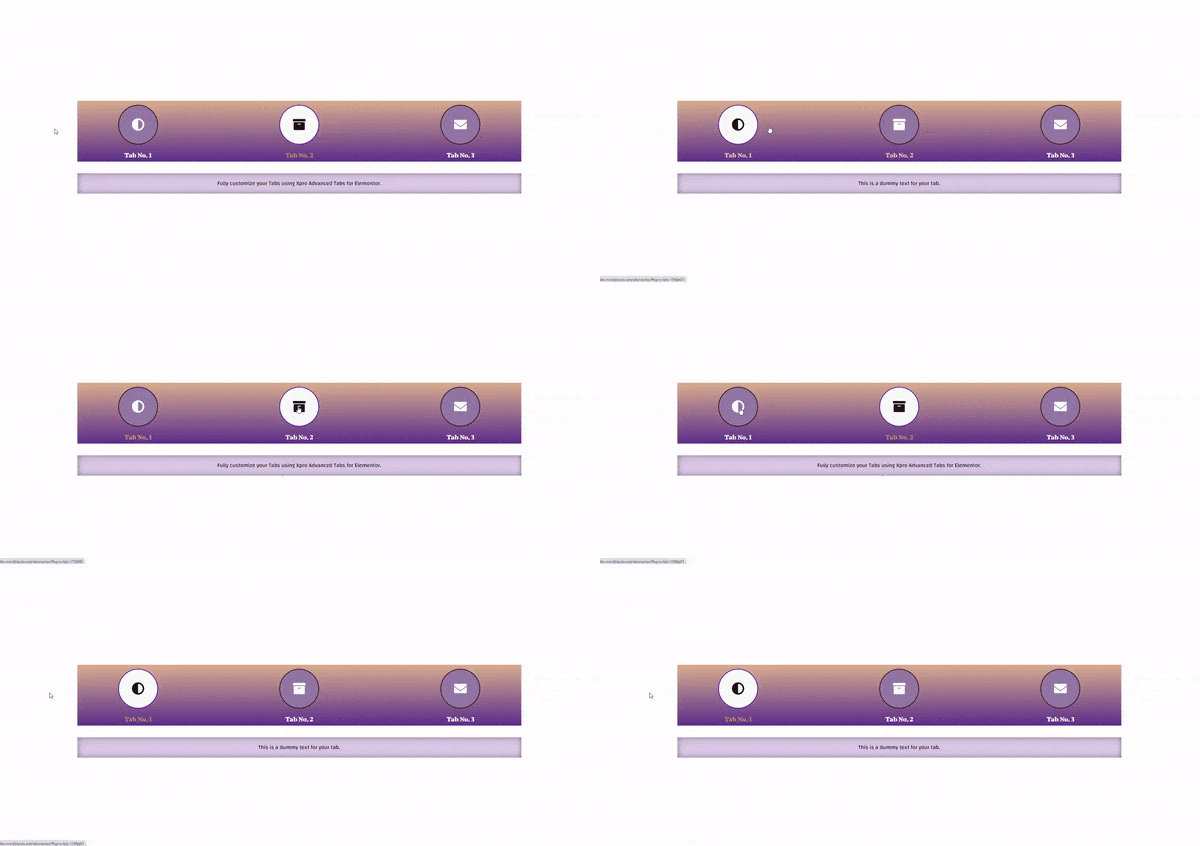
In the example below, I set the Inline Style for the Active option, which means the style would apply once that tab is active. This is a useful option if you want to style each tab differently. You can also set the inline style when the tab is inactive by switching to the Normal option under Inline Styling.
The Active and Normal modes of the tab will look like this:
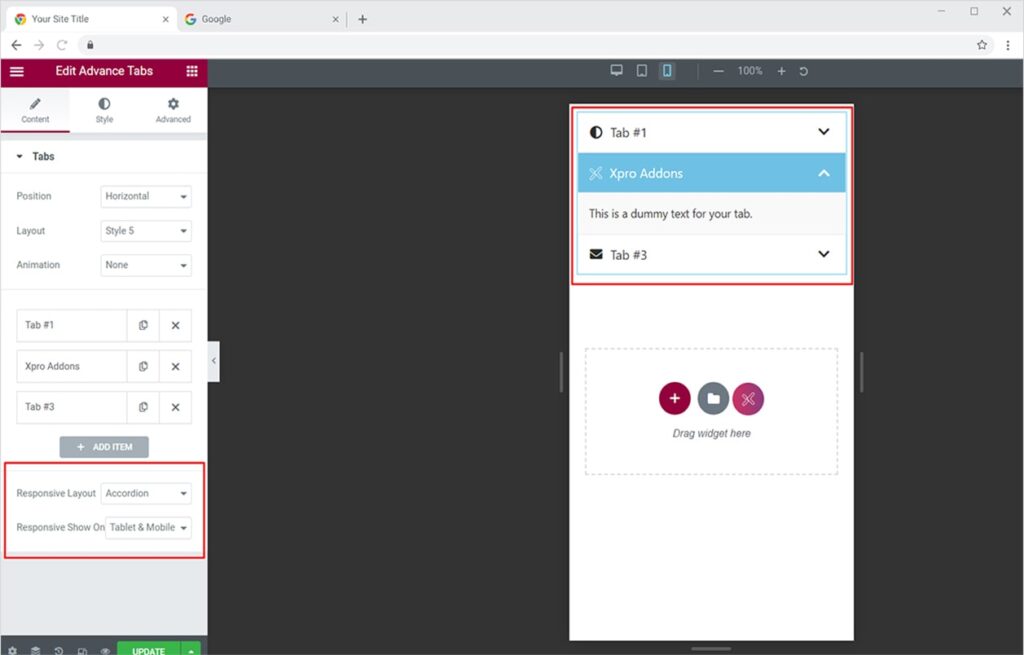
You can set the Responsive Layout to ‘Accordion’ or ‘Dropdown’ and design it from the Style section. Also, you can set the responsive layout for only ‘Mobile devices’ or ‘Tablets & Mobile’.
How to Style Tabs List Using Xpro Advanced Tabs for Elementor
Head over to the Style Section to fully design your tabs list beautifully. From the Tab List dropdown, you can customize the typography by changing fonts, weight, transform, style, and much more. You can also change the icon & background size, add a nice border with a custom color to your tabs, and set the space between your tabs.
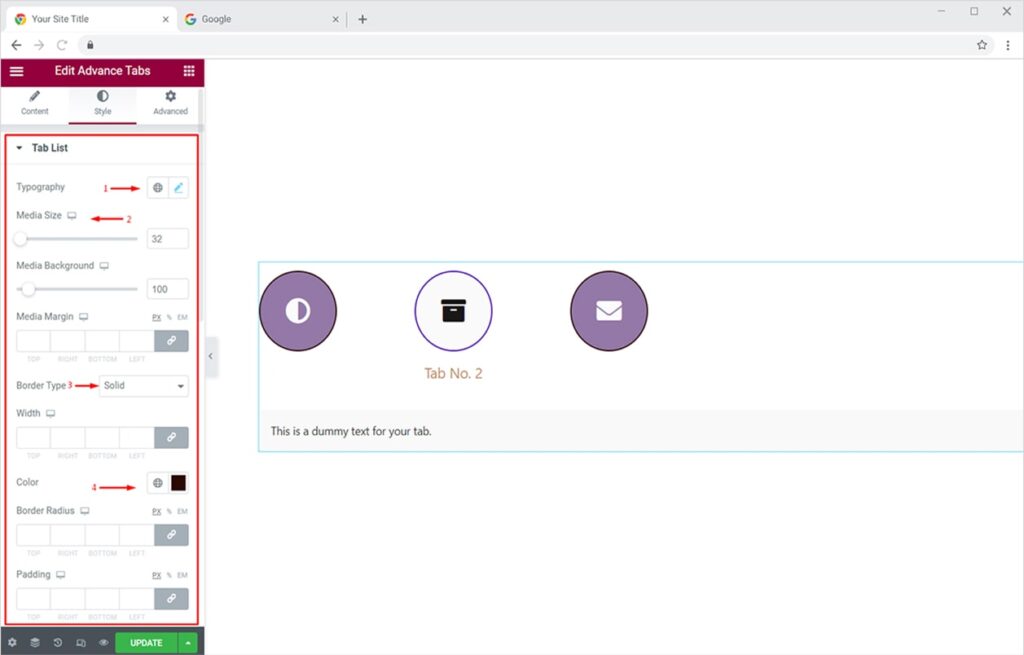
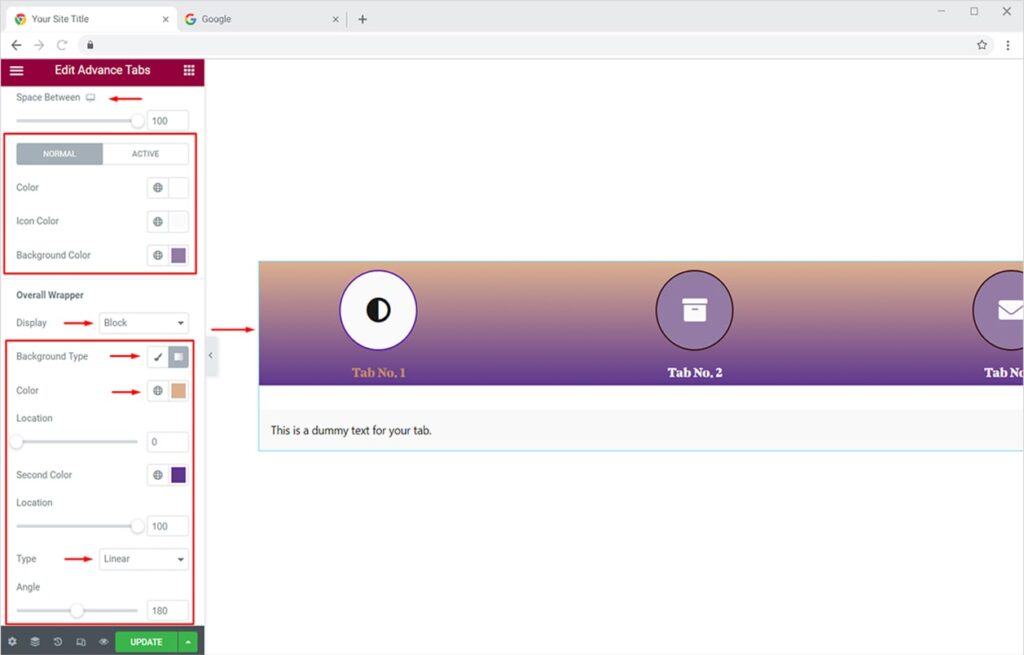
Furthermore, for increased visibility, you can set the space between tabs as per your liking. Set the colors for icons, background, text, and border in Active view. An incredible option is to set the overall wrapper of your tabs to ‘block’ or ‘inline’ and set a background type to either classic or gradient. You can also set the gradient as ‘linear’ or ‘radial’ and angle it as you desire. This will result in a beautiful tab section on your website.
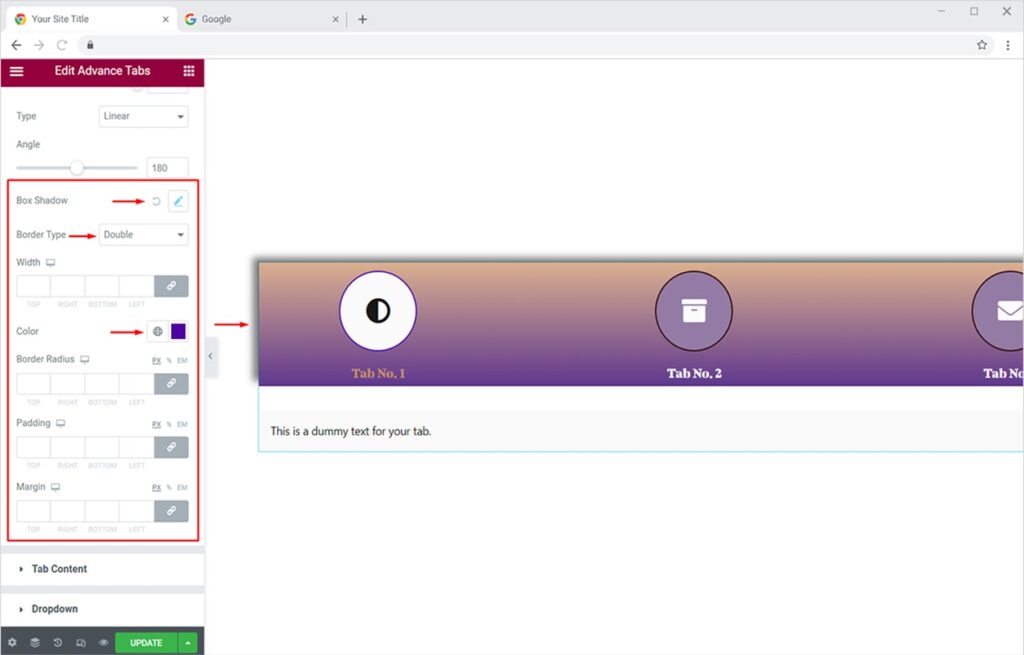
Now you can finally set a box shadow for your tabs and add a border to it. There are 5 border types available for you.
How to Style Tabs Content Using Xpro Advanced Tabs for Elementor
Just like we designed the tabs from Tabs List, we can also customize our content from the Tab Content dropdown in the Style Section. You can customize the following:
- You can set custom typography
- Text alignment
- Text Color
- Add an elegant background type (classic or gradient)
- Add a nice box shadow to the content of your tab and much more
- Enhance the visibility by adding a border (5 options available)
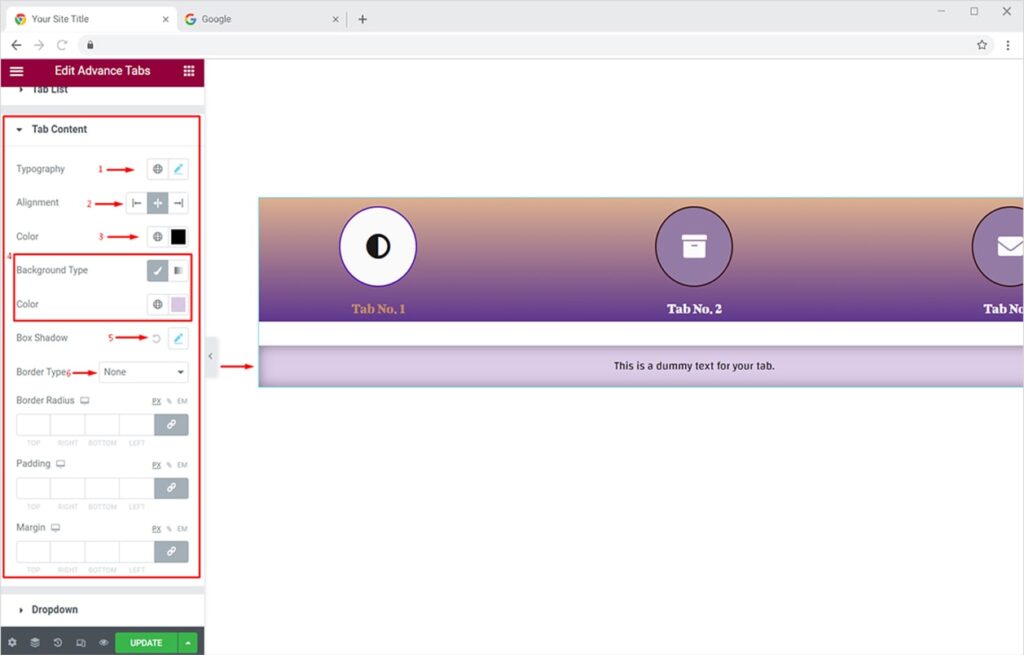
The customizations will result in something like this:
How to Add & Style Dynamic Content to Tabs In Elementor
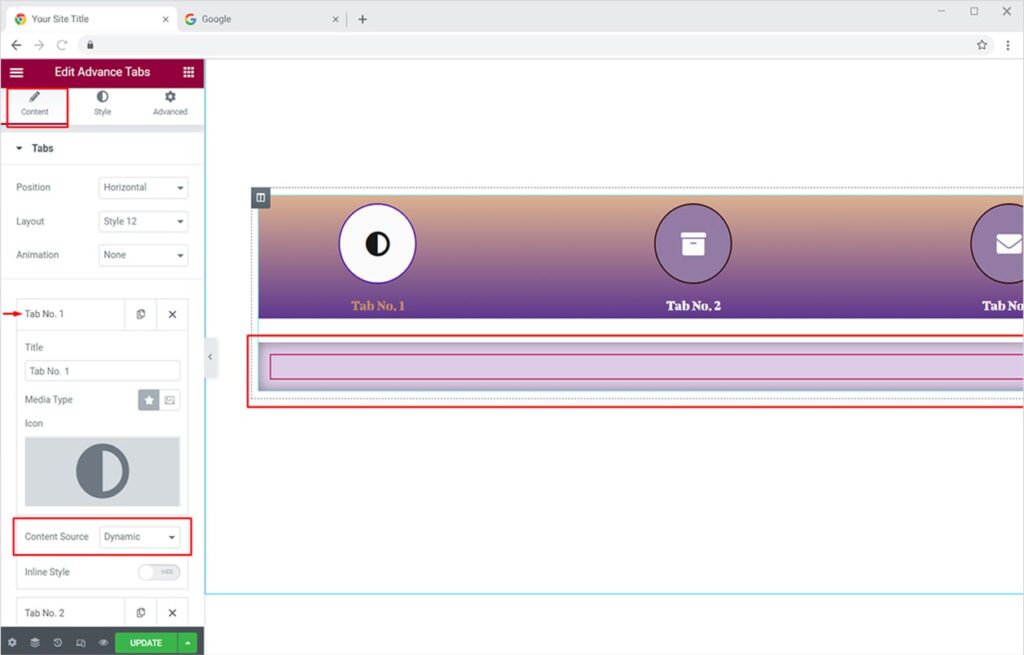
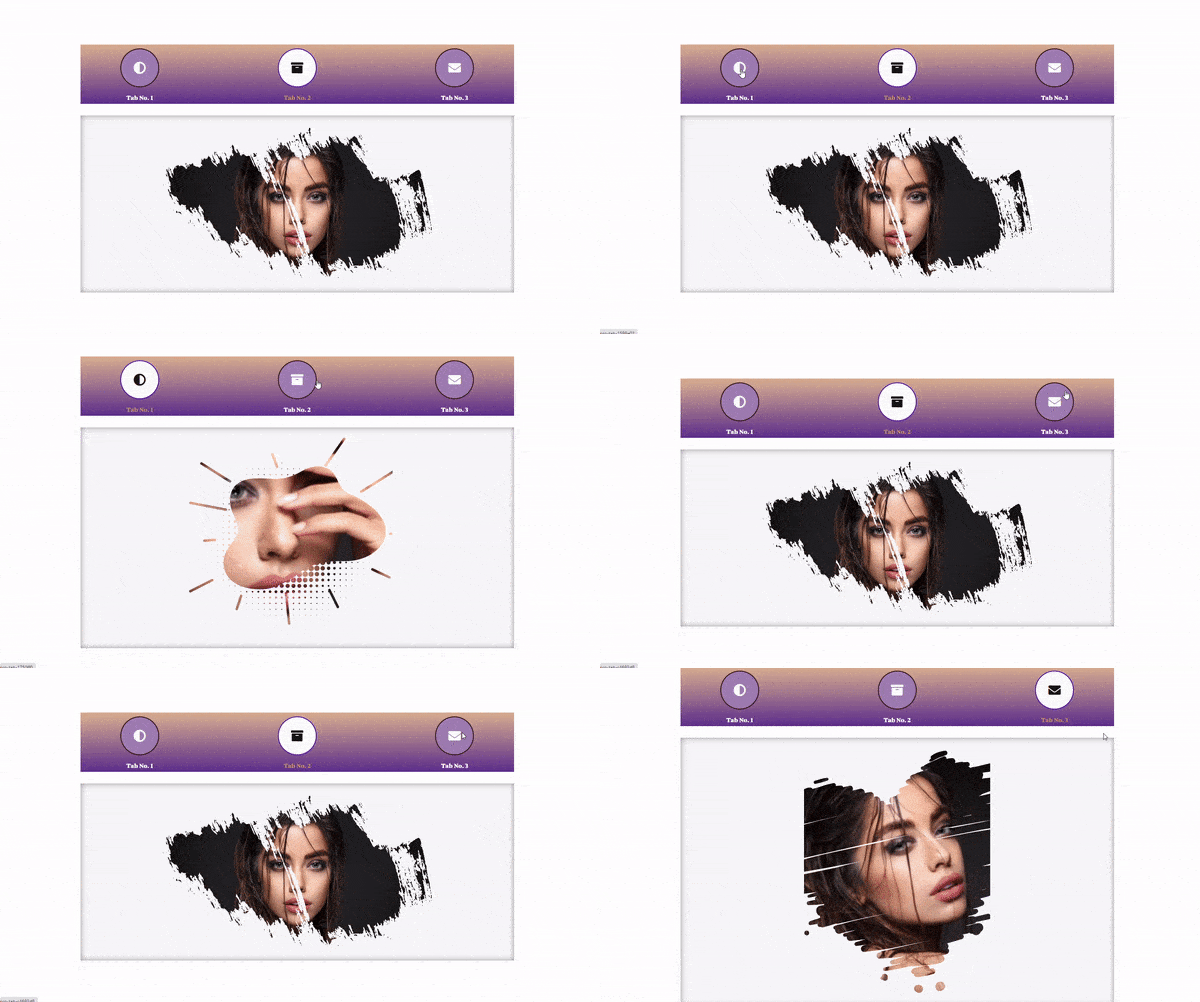
The most powerful feature of the Xpro Advanced Tabs widget for Elementor is the dynamic content addition in your tabs. You can create a modern design by adding any widget in your tab and styling it the way you like. To do this, simply go to Content Section, select the tab you want to add dynamic content to, and change the Content Source to ‘Dynamic’ under options. Now click on the ‘Edit’ icon to add a widget of your choice. Here I will give you a tutorial by adding the ‘Xpro Image Masking’ widget.
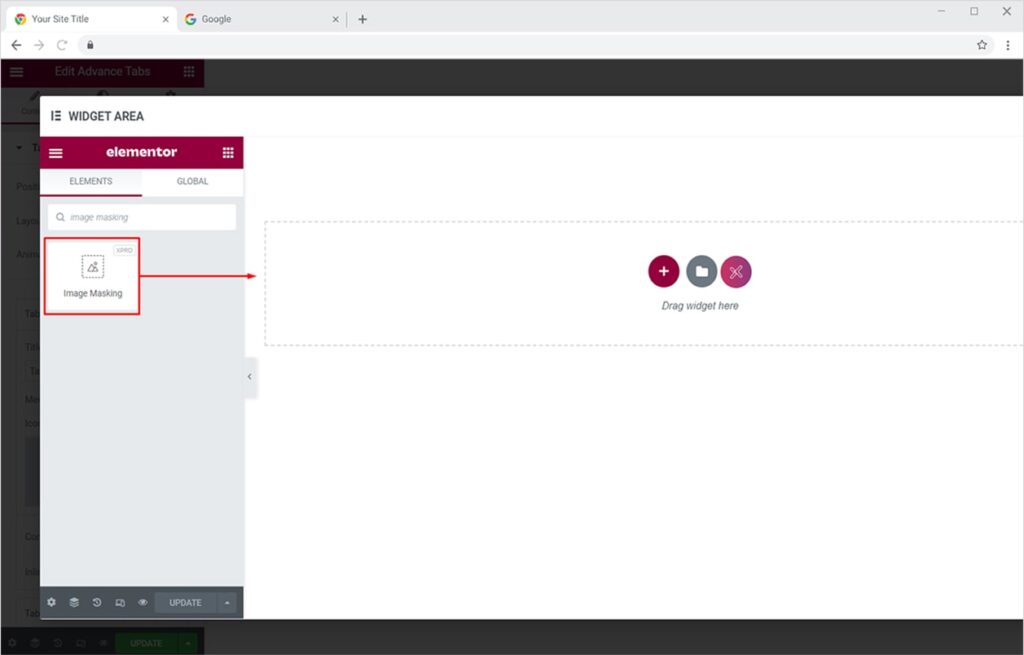
On clicking the edit icon, you will be taken to Widget Area, from there select any Xpro Widget of your choice and drop it on the editor.
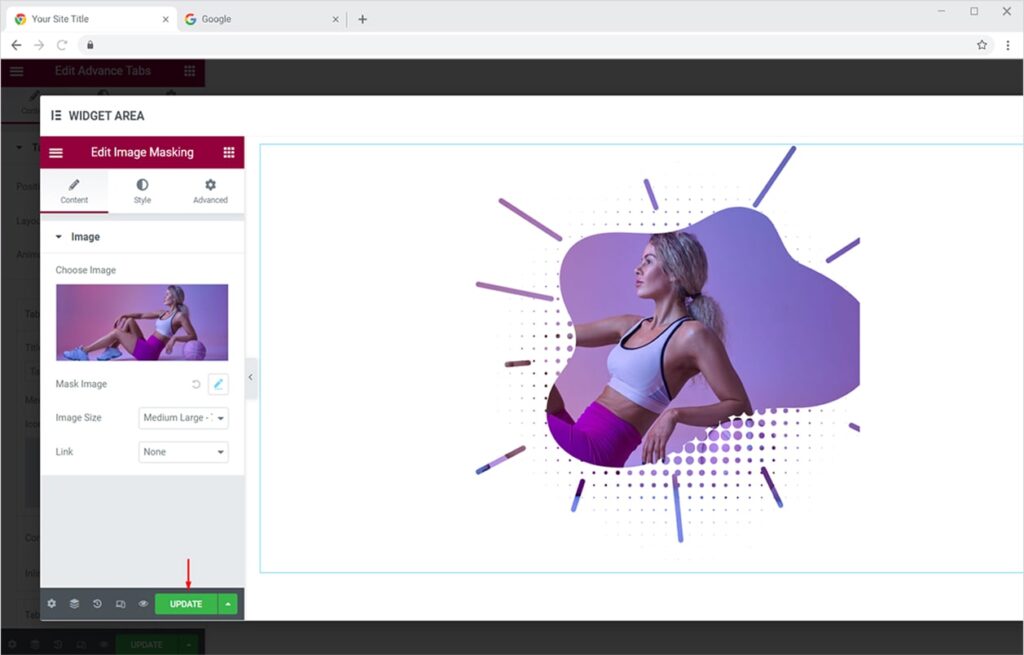
Now you can simply edit the widget as per your liking and click on the ‘Update’ button once done. In this example, we are going to edit the Xpro Image Masking Widget for Elementor. For a complete design guide, please head over to the Xpro Image Masking Widget documentation and understand how you can fully customize this widget for your website.
The result would captivating Tabs with dynamic content which means you can enhance your Tabs by adding any other Xpro Widget to them.
How to Style Your Tabs for Responsive Layout
You can set the Responsive Layout to ‘Accordion’ or ‘Dropdown’ and fully design it from the Style section. To do this, switch to the Content Section and set your responsive layout.
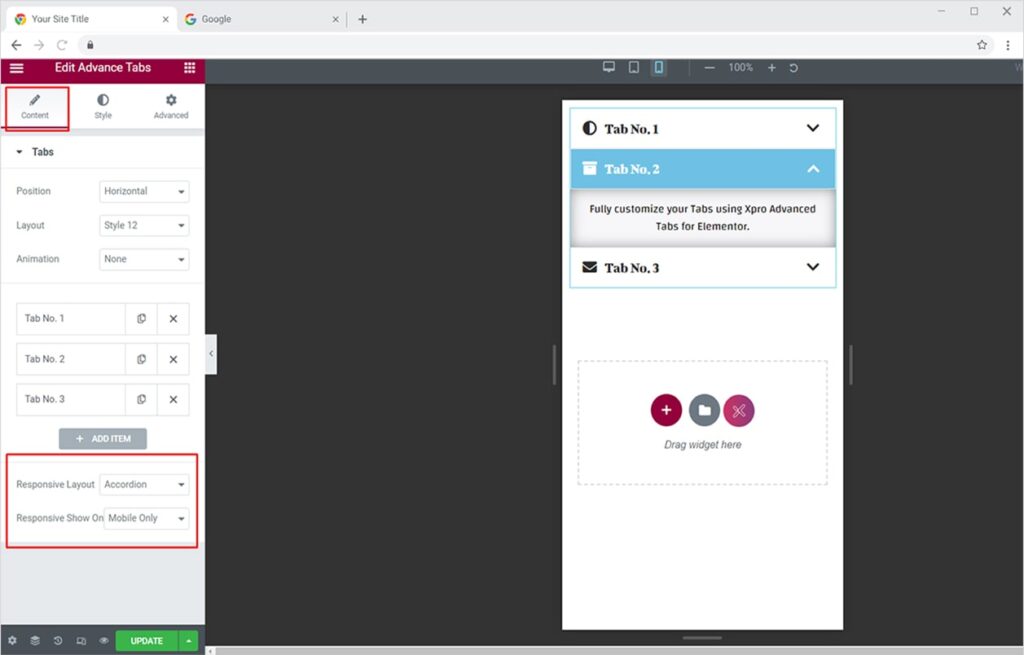
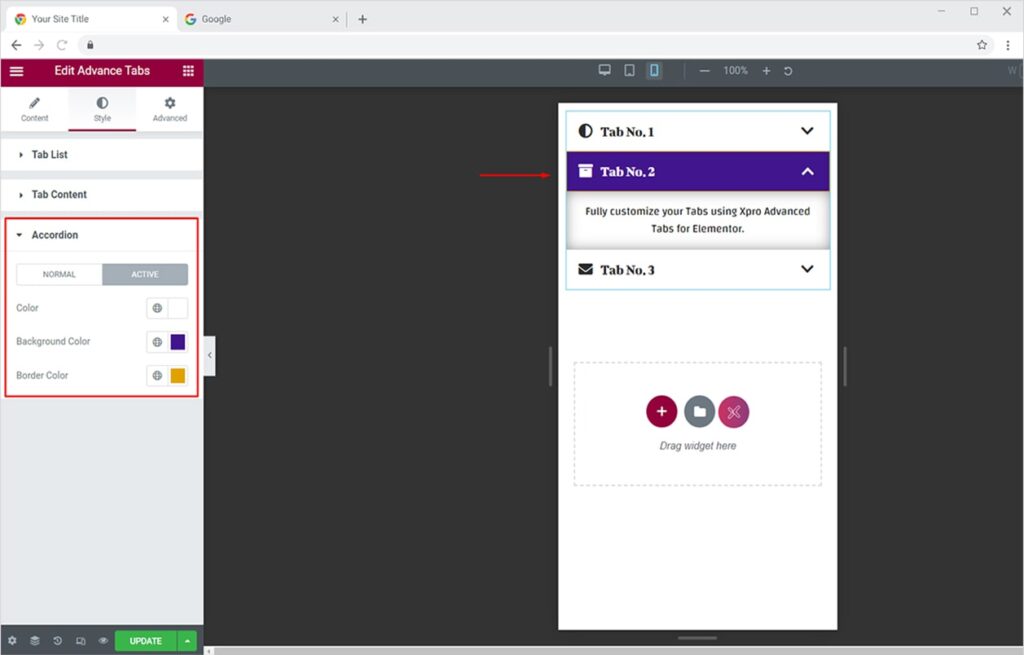
You can design the Tab list and Tab content the same way we did for the desktop view. For now, we will further style the Accordion or Dropdown layout. To do this, simply switch to the Style Section and click on the Accordion dropdown. From there you can change the color combination for the Active and Normal accordion.
Best Elementor Advanced Tabs Widget
This is pretty much it from the Advanced Tabs widget. I hope now you have a better understanding of how to fully utilize this amazing Tabs Widget for Elementor. Try other popular Elementor widgets like the Elementor Progress Bar widget and Elementor Step Flow widget.
Xpro Elementor Addons offers a wide range of widgets, theme templates, and box template for Elementor that helps you create a fully functional website without any need for coding. Get the best Elementor Addons for your WordPress website.