How to Install Elementor Carousel Portfolio Widget
Xpro Carousel Portfolio Widget is one of the most powerful portfolio widgets for Elementor. It’s a premium widget that lets you create awesome carousel portfolios in no time. It’s modern and offers hundreds of customization options that help you portray the best of your work in front of site visitors. With the Xpro Elementor Carousel Portfolio widget for Elementor, you can easily create highly attractive portfolios on your website. Add a touch of customization with 12+ hover layouts, 10+ unique pop up layouts, and 8+ animations. You can choose from our 3 modern carousel layouts like Simple, Creative, and Unique.
Also, there are tons of personalization options like looping your portfolio items, adding a lazy load feature, or simply enabling/disabling the autoplay on the items carousel. Eventually, an attractive carousel portfolio would let your visitors easily navigate and explore your portfolio. Let’s check out all features of this awesome widget and how you can fully utilize them for your website.

Requirements
You need to install and activate the Pro version of Xpro Elementor Addons. If you already have the plugin installed, just make sure the Carousel Portfolio Widget is ‘Enabled’, so you can find it in the Elementor editor.
To enable the widget, simply follow these steps:
Step 1
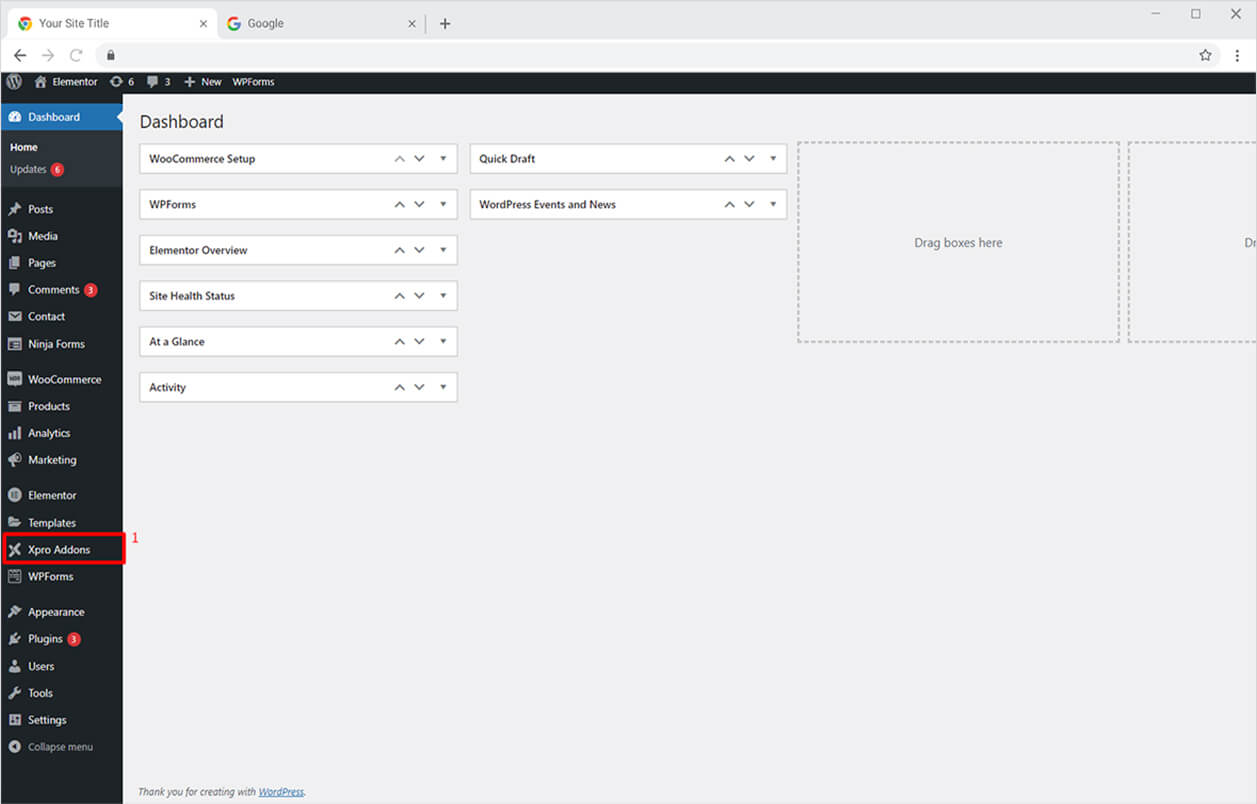
Click on the Xpro Addons option available on the WordPress Dashboard Menu.
Step 2
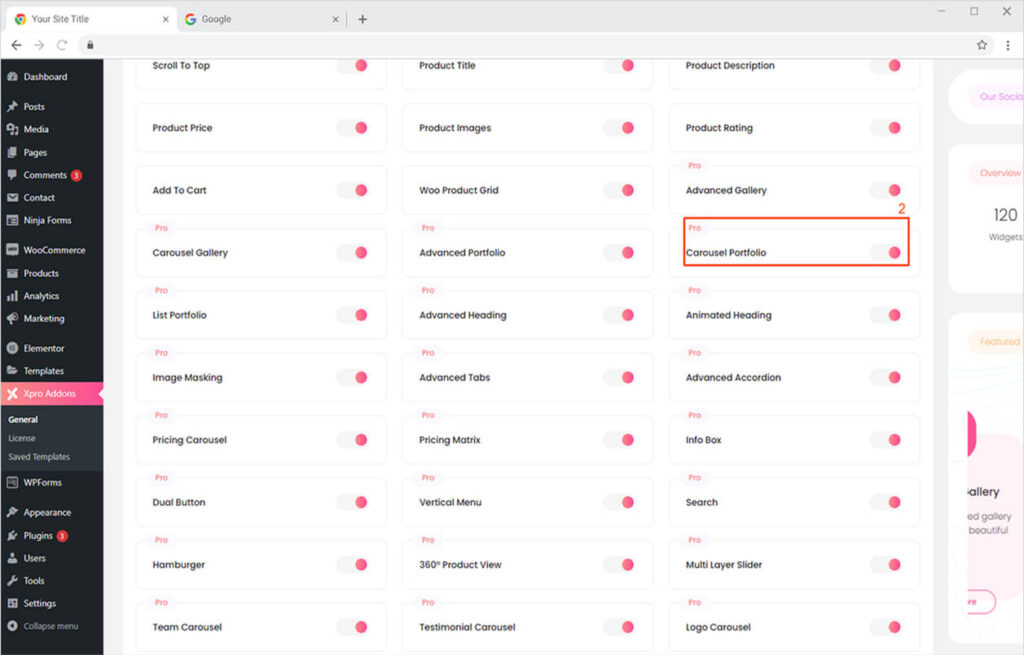
From the Xpro Addons Dashboard, click on the Widgets Tab, find the Carousel Portfolio widget, and finally, toggle the button ON to enable it.
How to Use Xpro Carousel Portfolio Widget for Elementor
With Xpro Carousel Portfolio, you can easily create highly attractive portfolios on your website. Add a touch of customization with unique pop up layouts and animations. You can choose from our 3 modern carousel layouts like Simple, Creative, and Unique. There are tons of personalization options like looping your portfolio items, adding a lazy load feature, or simply enabling/disabling the autoplay on the carousel. This amazing carousel portfolio widget for Elementor is powerful, easy to use, fun, and time-saving! Let’s dig deep and see how you can fully utilize this widget.
Step 1
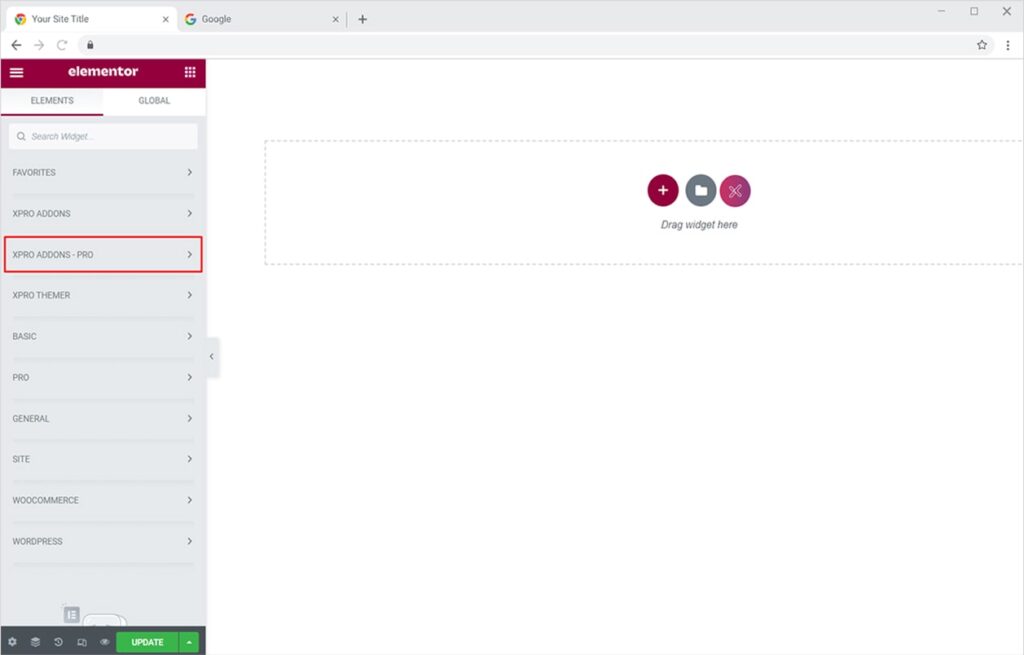
Click on the Xpro Addons – Pro section available in the Elementor Editor.
Step 2
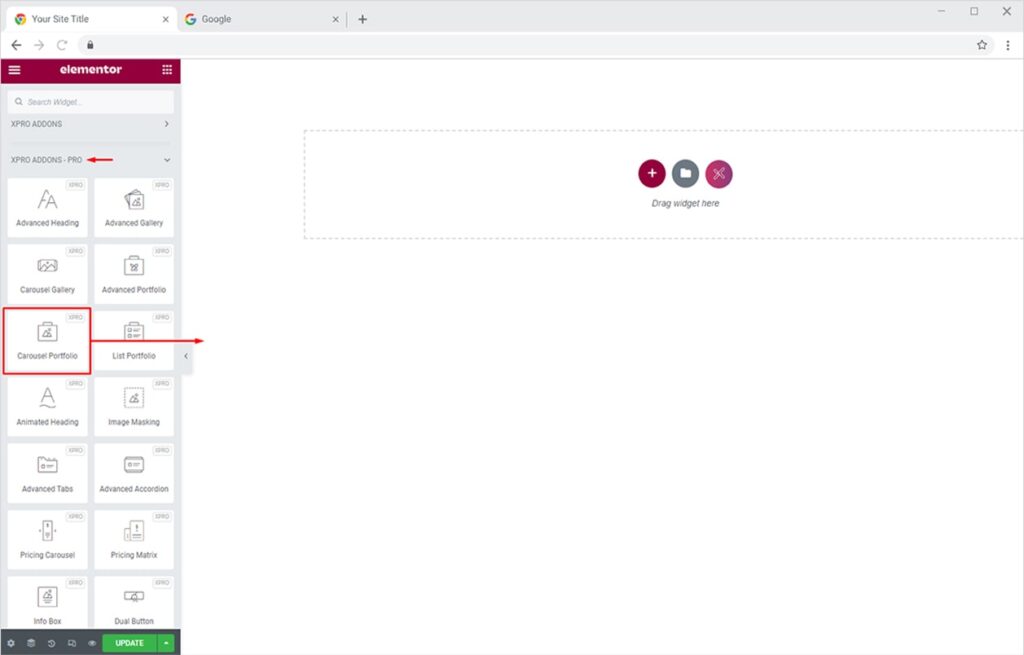
From the Xpro Addons section, find and simply drag’n’drop the Carousel Portfolio widget on your desired page location.
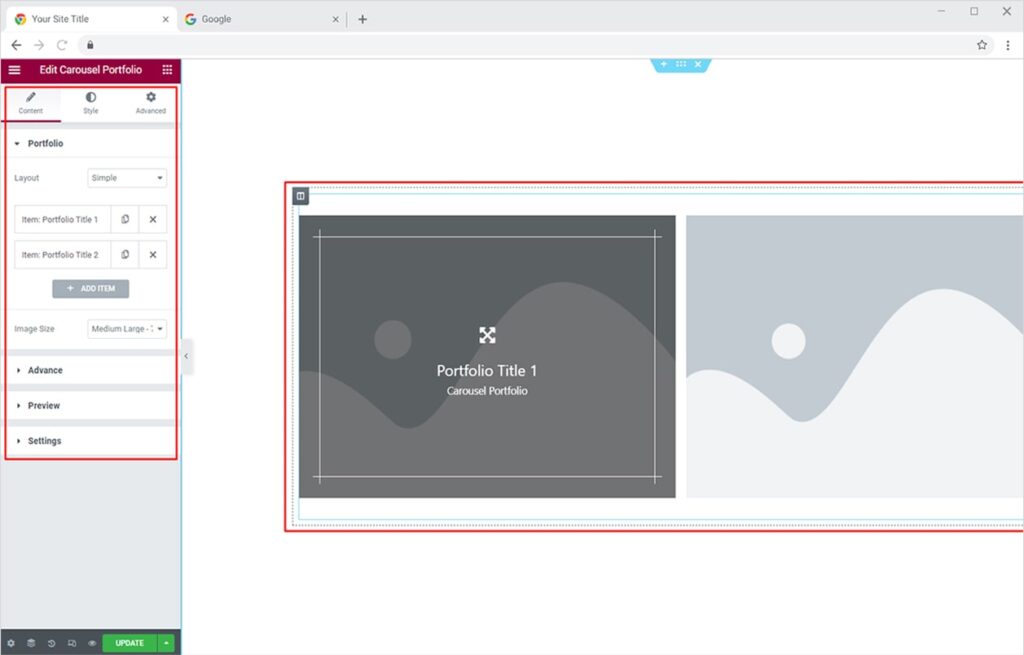
This is the default view of the widget:
How to Create a Simple Carousel Portfolio in Elementor
A simple carousel portfolio instantly gives an elegant touch to your website. Carousel portfolio items are attractive and they lure the visitors to engage with your portfolio. Let’s see how you can create a spectacular simple carousel portfolio for your Elementor website.
From the Content Tab, click on the Portfolio section. Now select ‘Simple’ layout from the Layout option and add your featured image by clicking the Item option. You can rename the title, add a description, and add as many items as you want by clicking the Add Item option.
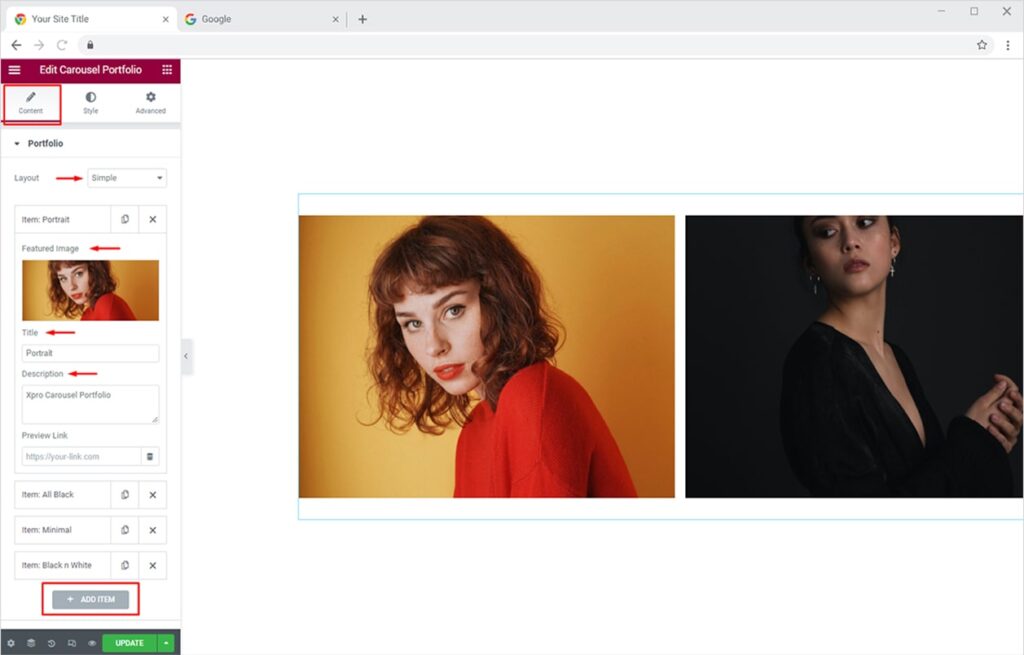
Let me show you how it’d look on your live website.

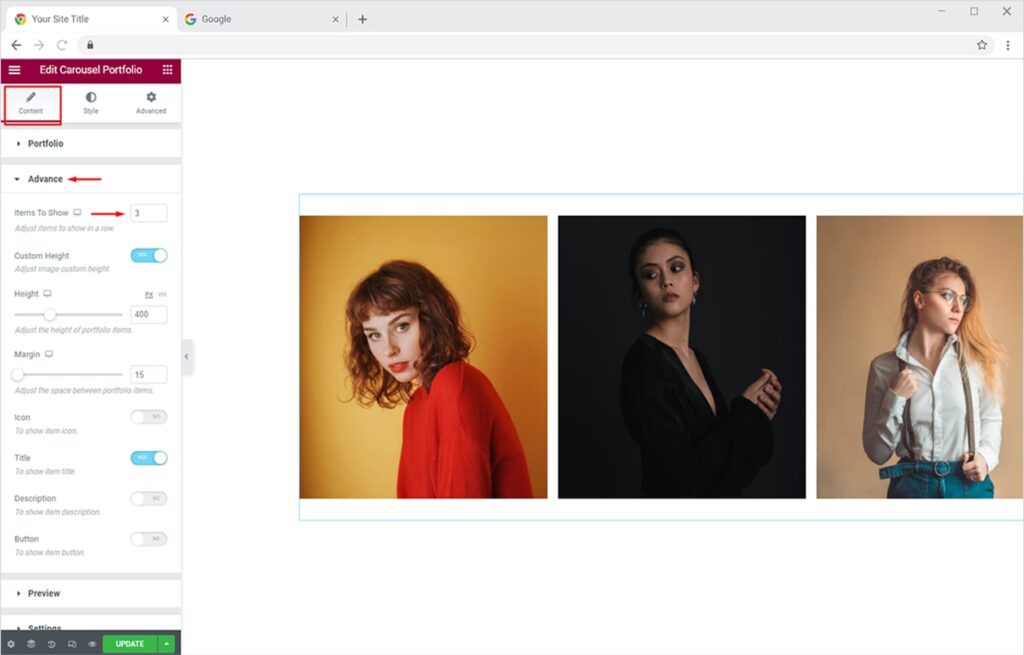
You can always set the layout of your carousel portfolio as per your needs. From the Content Tab, simply open the Advance section and adjust the number of items from the Items to Show option. Here I tried 3 items for the demo.
Now let’s add some styling to your simple carousel portfolio. Go to the Style Tab and open the Misc. section. From here you can turn the Content Outside option on to display your content outside your portfolio items and not on it. You can also set the alignment of content (title, description, buttons) and add a nice background color to it.
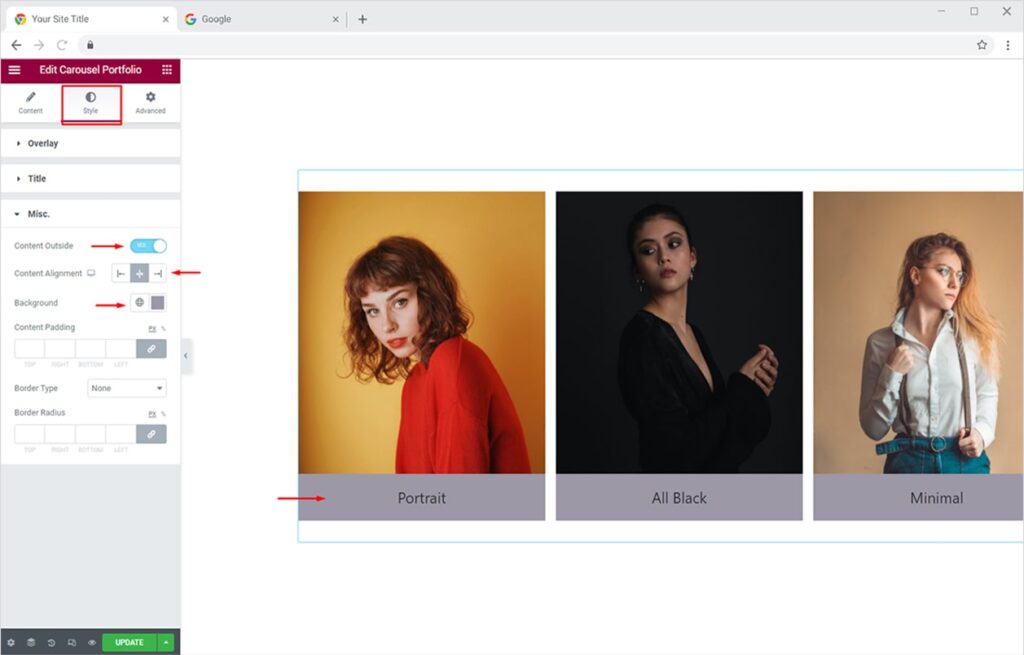
You can also add a border to your portfolio items from the Border Type option. Choose from 5 available borders and add a color of your choice for a crisp-looking carousel portfolio.
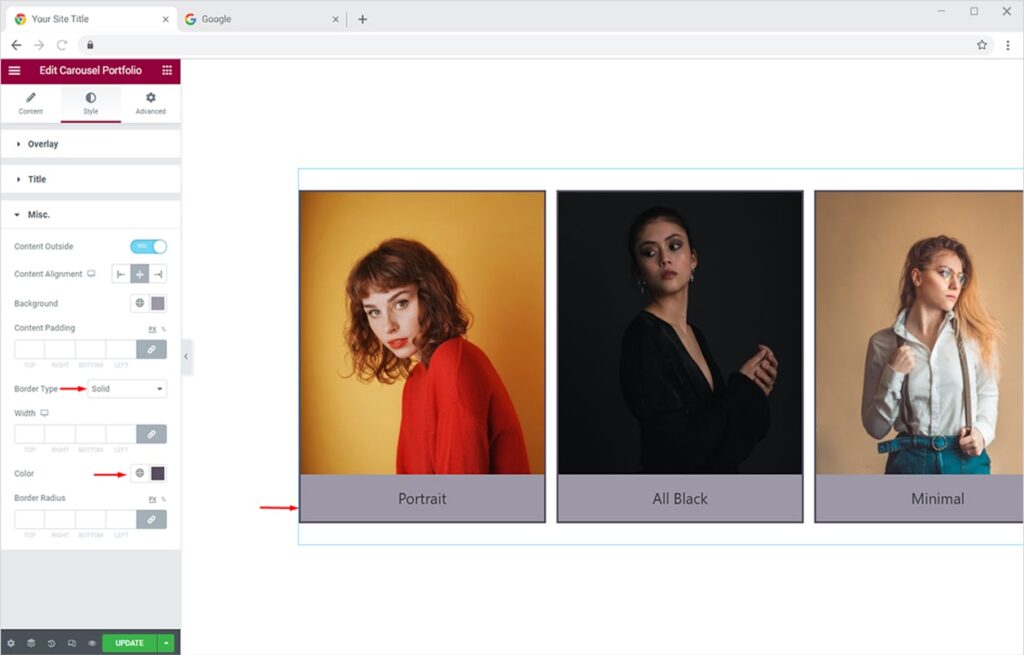
The final look after these changes will be like this:
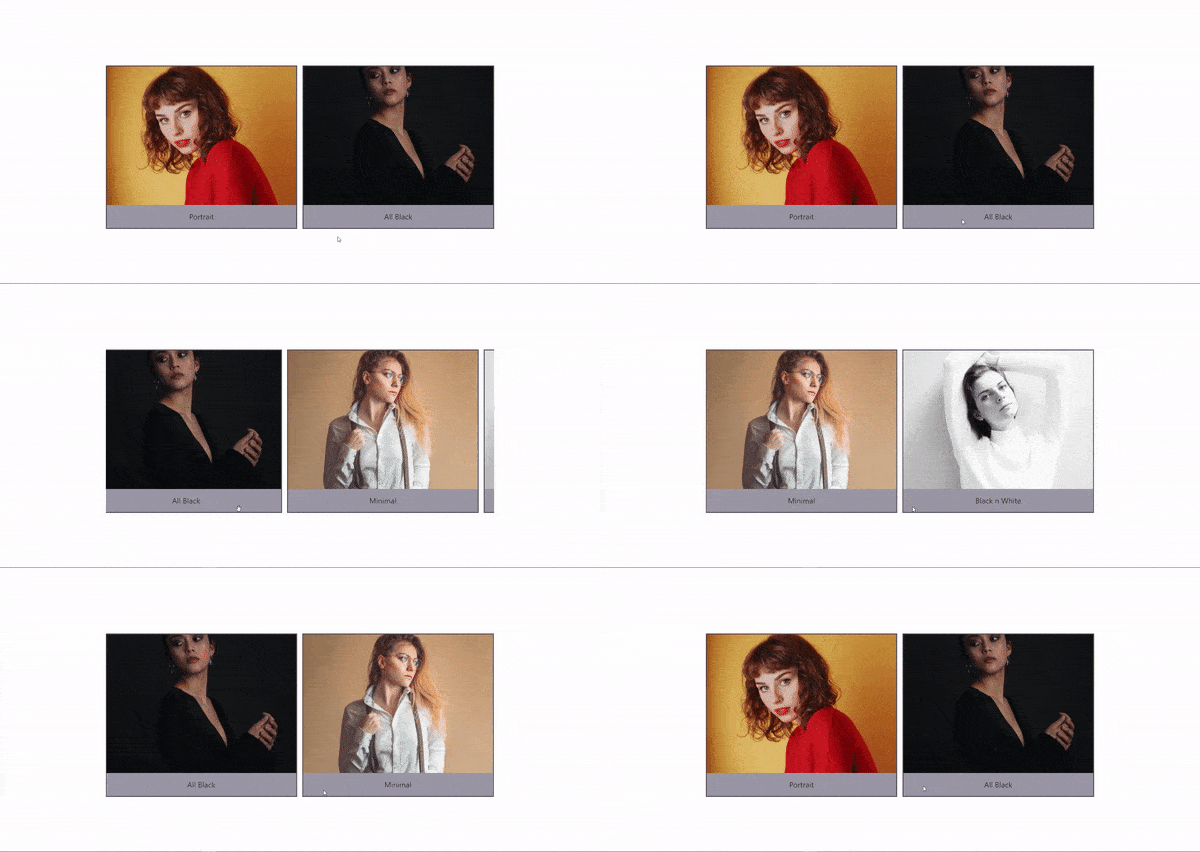
How to Create a Unique Carousel Portfolio Using Xpro Carousel Portfolio for Elementor
A simple carousel portfolio might not be enough to attract your audience. You might need something more creative & interactive on your website. To serve this purpose, we have come up with 2 modern carousel portfolio layouts, ‘Unique’ and ‘Creative’. Here, I’ll explain how you can create an eye-popping carousel portfolio using our ‘Unique’ layout style.
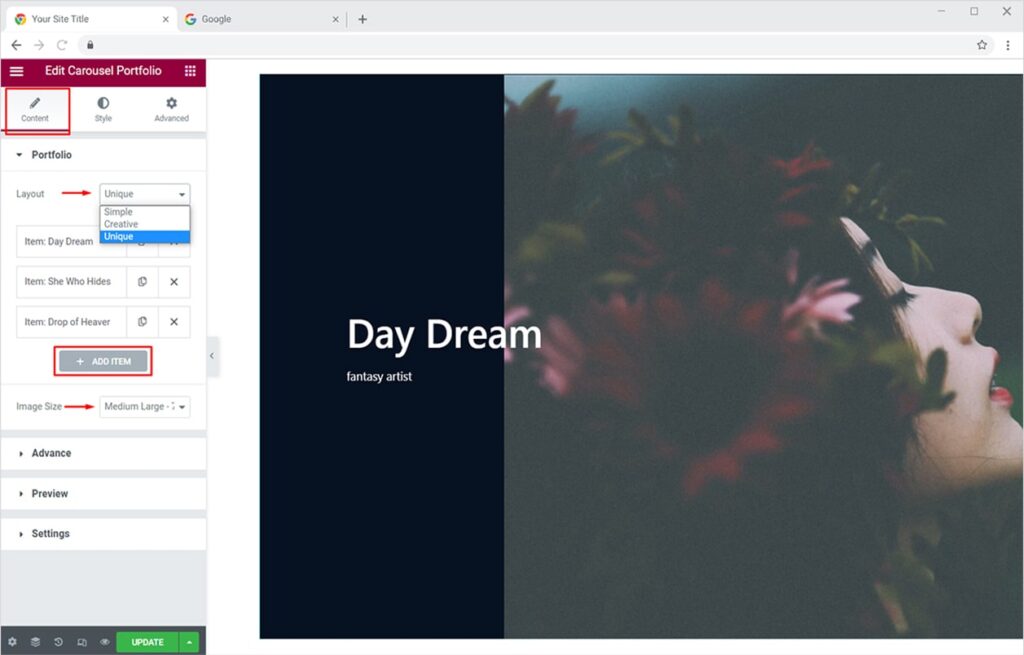
Go to the Content Tab and open the Portfolio section. Now change the Layout to ‘Unique from the dropdown. Add your portfolio items to style them for an enticing carousel portfolio. You can always change the size of the uploaded image from the Image Size option.
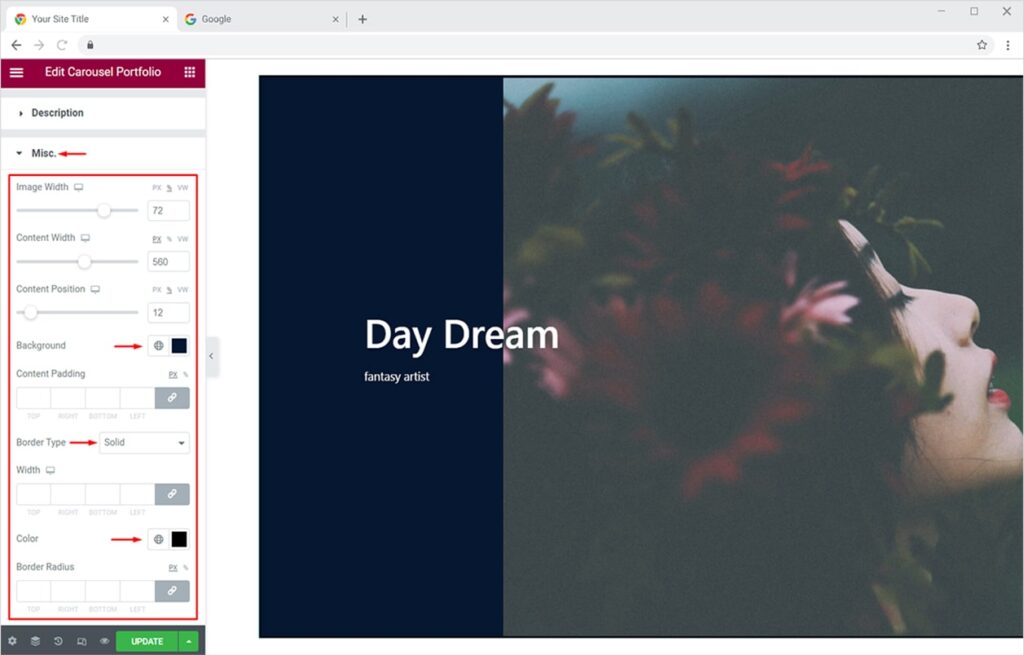
Now Let’s see how we can pleasantly design our ‘Unique’ carousel portfolio layout from the Style tab. Click on the Misc. section to find numerous customization options. You can adjust the image width, change the background color and add a nice border to your carousel portfolio.
This will be the final look n feel of your carousel portfolio.

Similarly, you can create a carousel portfolio using our ‘Creative’ layout. Now let’s add and style captivating titles, descriptions, buttons, etc. to our portfolio items.
Useful Links: Best Theme Builder for Elementor – customize default theme templates
By Xpro Elementor Addons
How to Add & Style Icon, Title, Description of Your Portfolio Items
Add incredible Icons, captivating Titles, Descriptions, and Buttons to your portfolio items and entice your users once they hover over your portfolio items. This is another amazing feature you can add to your portfolio using our Pro Xpro Carousel Portfolio Widget. Adding Icons to your portfolio items makes them more appealing and engaging for visitors.
Titles & descriptions also help you to give a brief statement about your portfolio items, making it easier to get the attention of the users. You can also add buttons to your carousel portfolio but here I will stick to the prior mentioned items because adding all would make the portfolio a bit cluttered. I will now be editing for the ‘Creative’ layout.
First, you need to activate the icon, title, and description options from the Content Tab. Under the Advance section, toggle the buttons to ‘Yes’ against all options.
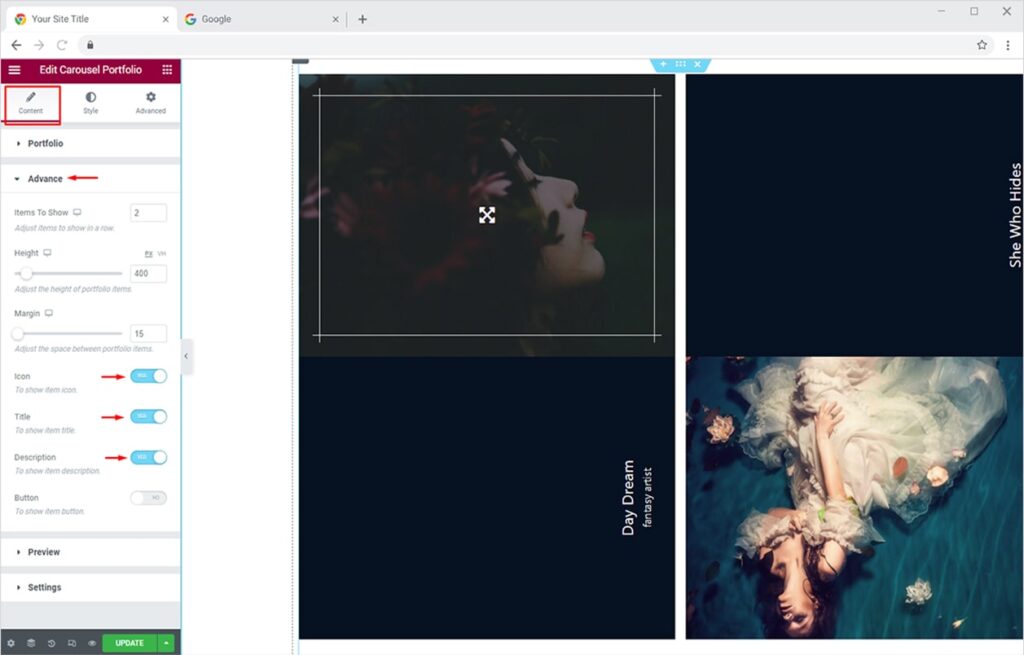
Once you have activated all options, now you can style each one for your carousel portfolio.
Style Your Icon for Elementor Carousel Portfolio Items
You can customize the icon for your portfolio items from the Style Tab. Click on the icon section, you’ll see multiple options for styling your icon. You can add any icon of your choice by uploading a custom SVG or choosing from our massive Xpro Icon library or Font Awesome library. Adjust the size of the icon and icon background.
You can also change the color accent of the icon and add a border for ‘Normal’ mode. Choose a border you like, add a pleasing color to it too.
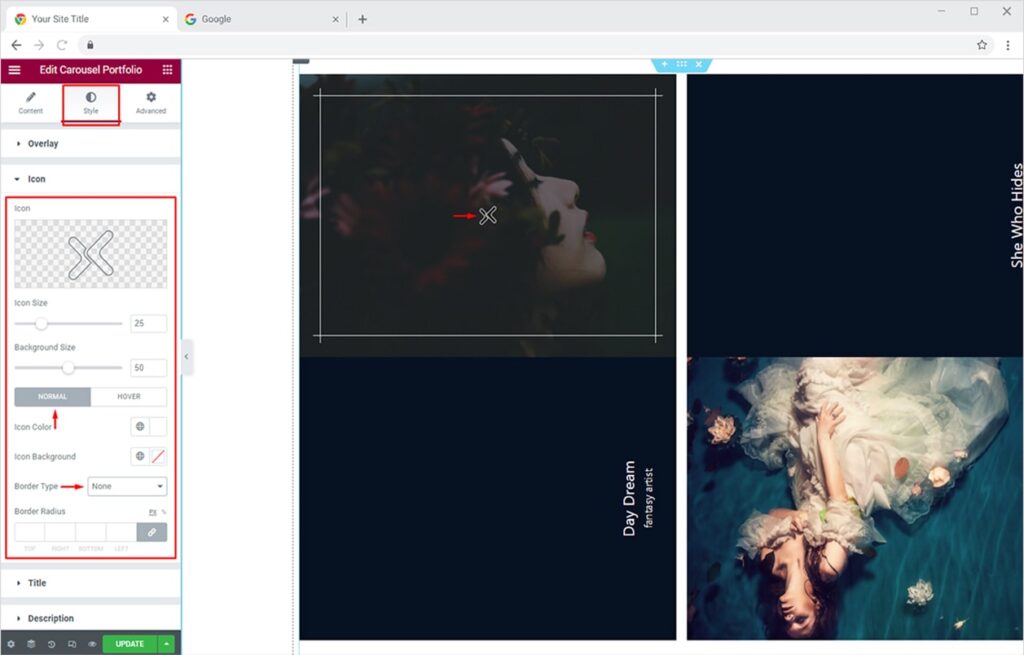
You can also change the color of your icon for the hover effect. Just switch to the ‘Hover Tab’ and add the colors of your choice for the icon, background, and border.
Style Your Title & Description for Elementor Carousel Portfolio Items
Once you’ve activated the Title and Description from the Carousel section, you can now add an attractive title and description for each portfolio item. Click on any portfolio item visible in the Portfolio section. Now add your desired text in the Title and Description field.
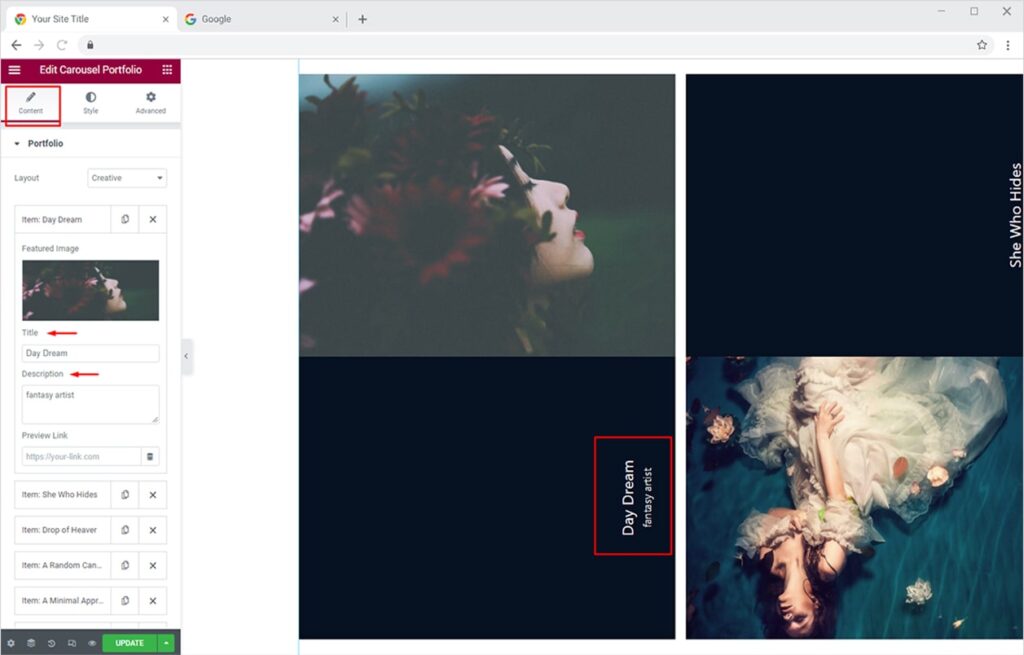
From the Style tab, you can change the color, typography and adjust the margin of your title and description (same options).
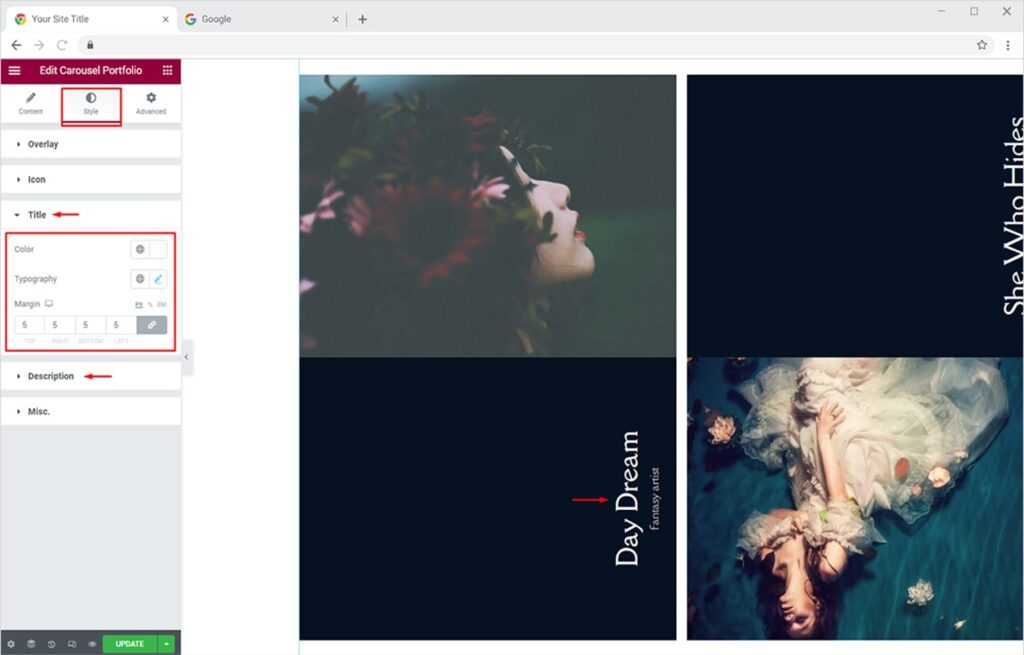
Finally, after playing around with your creativity, your carousel portfolio will look something like this.

How to Add & Style Navigation Arrows to Your Carousel Portfolio in Elementor
Adding navigation arrows to your carousel portfolio will help you indicate to your site visitors that there’s more content to view. Now let’s see how we can add engaging navigation arrows to our carousel portfolio. Click on the Content Tab, open the Settings Section and turn ON the Show Nav option.
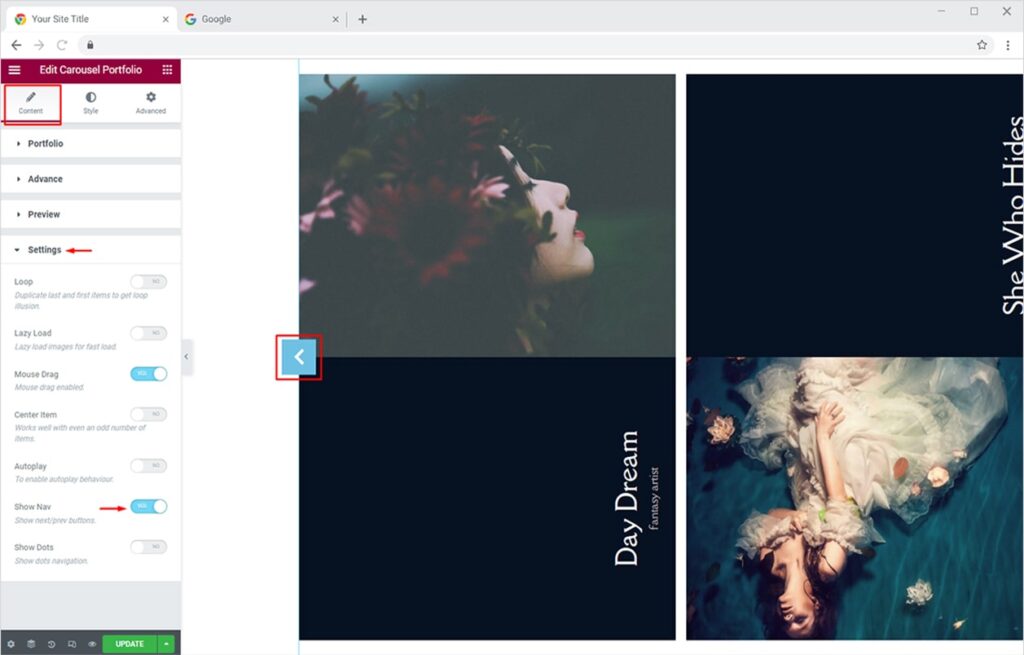
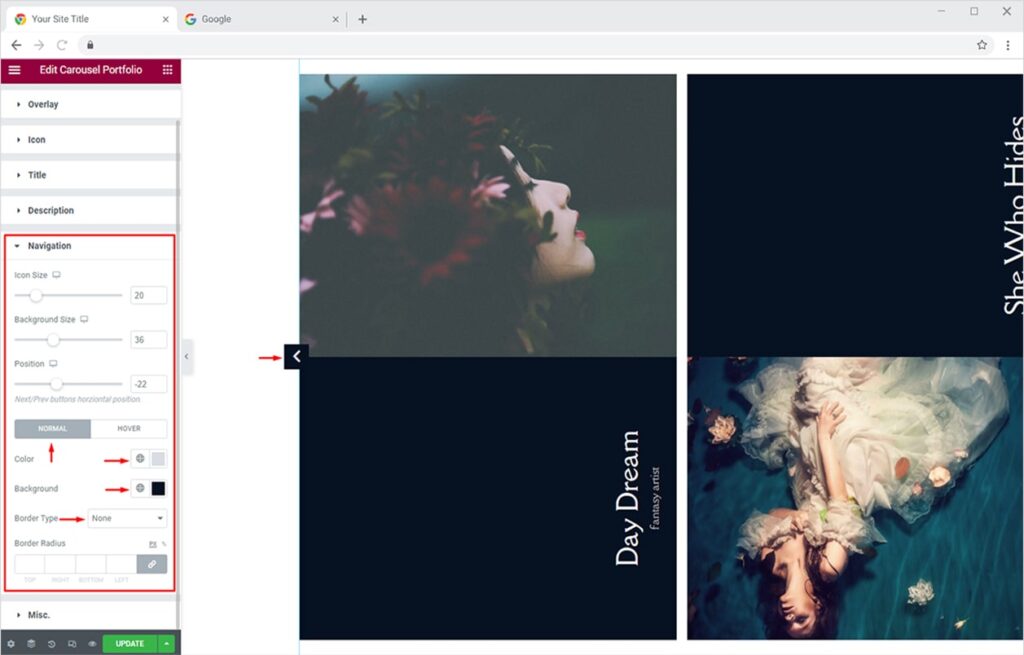
Now let’s style these navigation arrows to give a pleasant experience to your site visitors. Click on the Style Tab and then open the Navigation section. Here, you can change the size of the navigation icon, the size of the background, and the position of these navigation arrows respectively. Moreover, you can use any color combination to style these icons most attractively. You can also add a border (5 available options) and give a color to it.
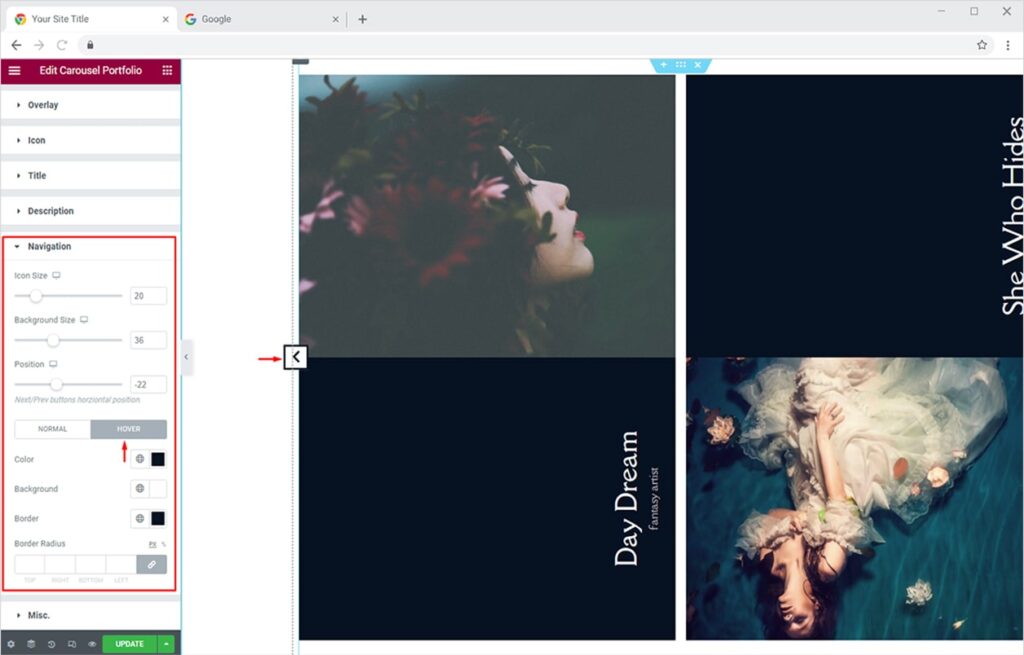
Similarly, you can change the color accent of your navigation arrow on hover mode. Just click on the Hover tab and add the colors of your choice to the icon and background.
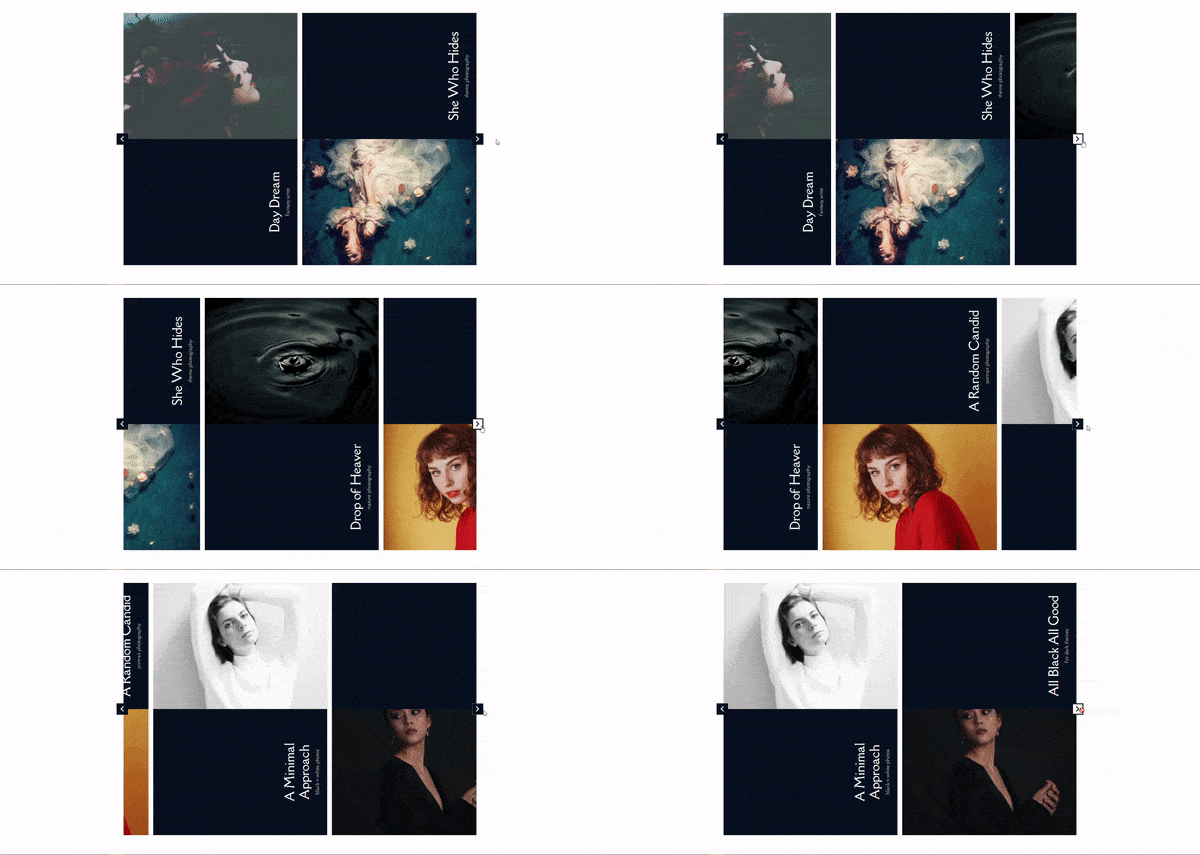
The navigation arrows will give an enticing experience to users like this.
How to Add & Style Dot Navigation to Your Carousel Portfolio in Elementor
Adding dot navigation is another brilliant way to highlight your unseen content in the carousel portfolio. These dots are vital for highlighting all the content and for easy navigation throughout your portfolio.
Click on the Content Tab, open the Settings Section and turn ON the Show Dots option.
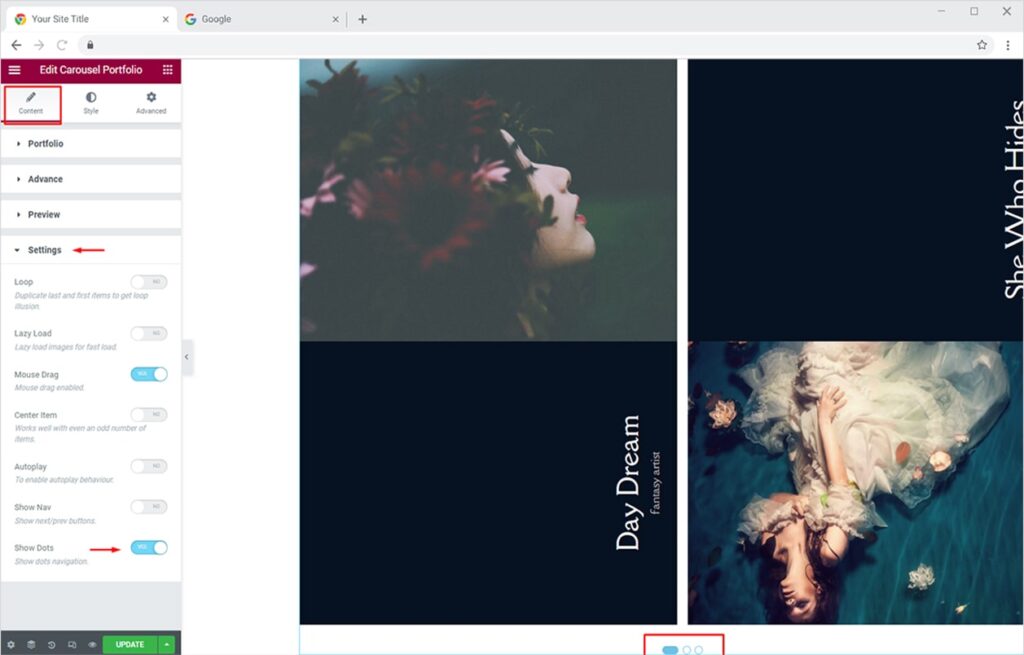
Now let’s fully design your captivating dots navigation from the Style Tab. Click on the Dots section to find amazing editing options for your navigation. You can adjust the height, width, and space between your dots. Apart from this, you can easily change the color of your dots for both Normal and Active modes. You can also add a prominent border to your dots navigation.
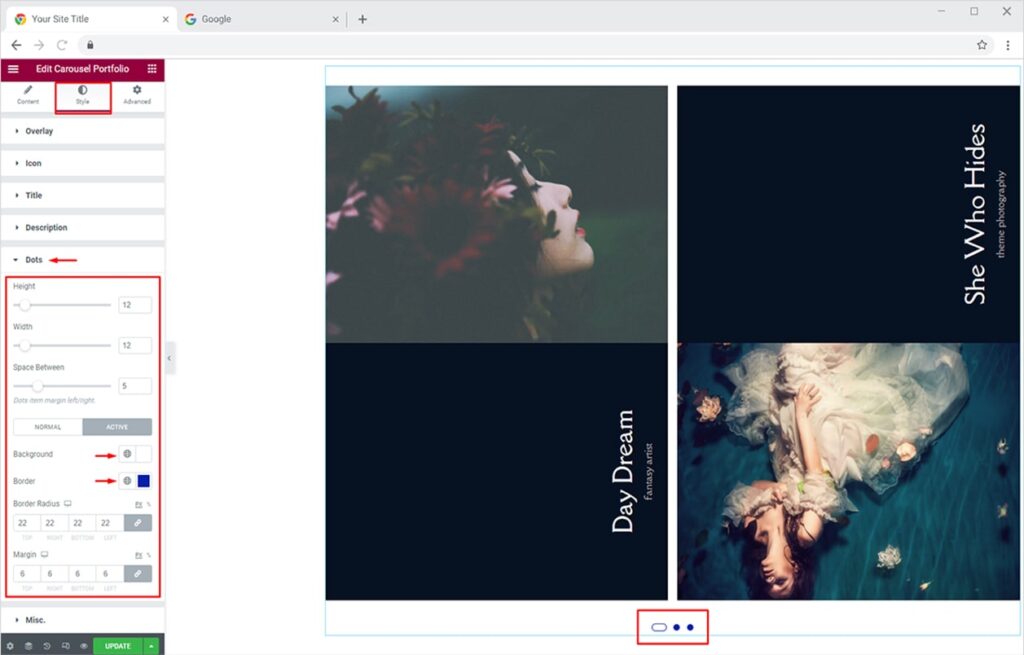
Let’s see how lovely your edited dot navigation will look on the live website.
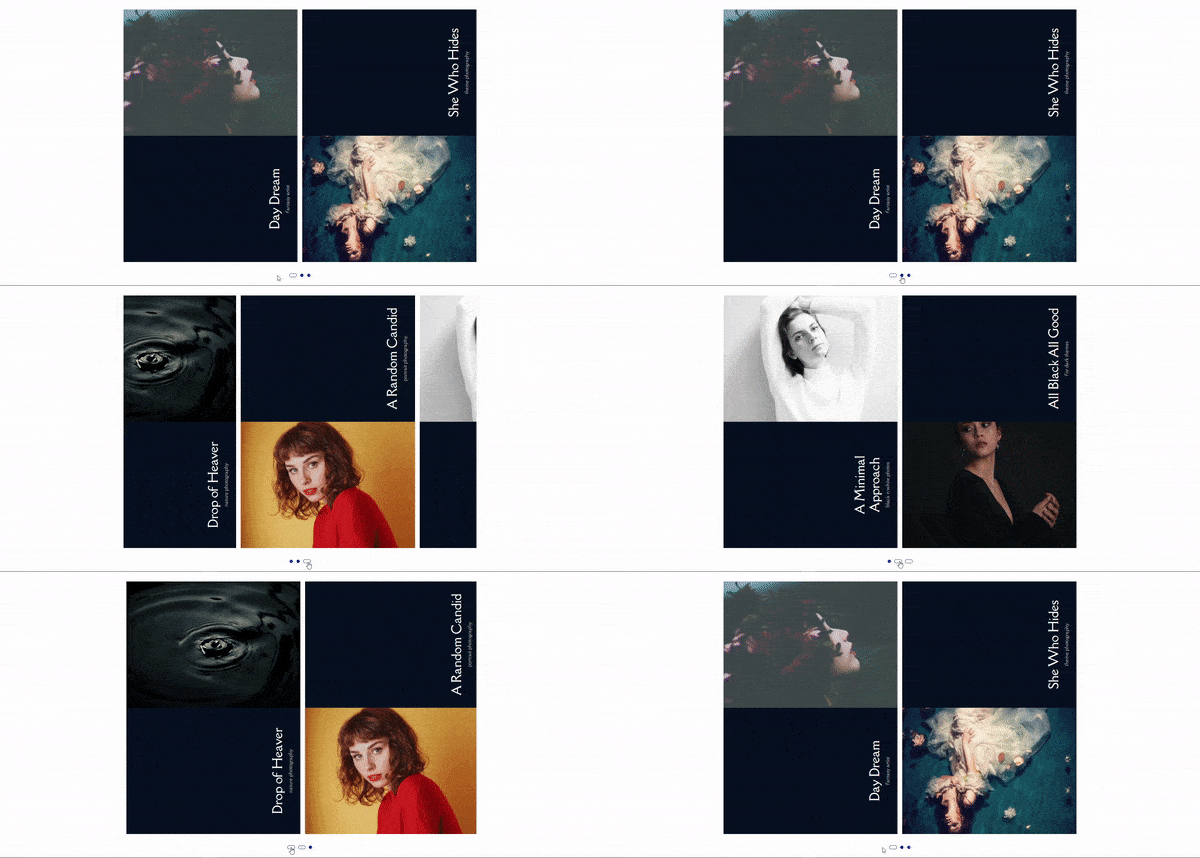
How to Add Loop to Your Carousel Portfolio in Elementor
Adding a loop to your carousel portfolio is somewhat a creative approach that makes your visitors stick to your portfolio. It allows you to represent your portfolio items in a neverending loop, meaning the portfolio items repeat themselves once ended. The end is the new beginning for looped portfolio items. It helps you get more interaction from the users.
Adding a loop to your carousel portfolio is somewhat a creative approach that makes your visitors stick to your portfolio. It allows you to represent your portfolio items in a neverending loop, meaning the portfolio items repeat themselves once ended. The end is the new beginning for looped portfolio items. It helps you get more interaction from the users.
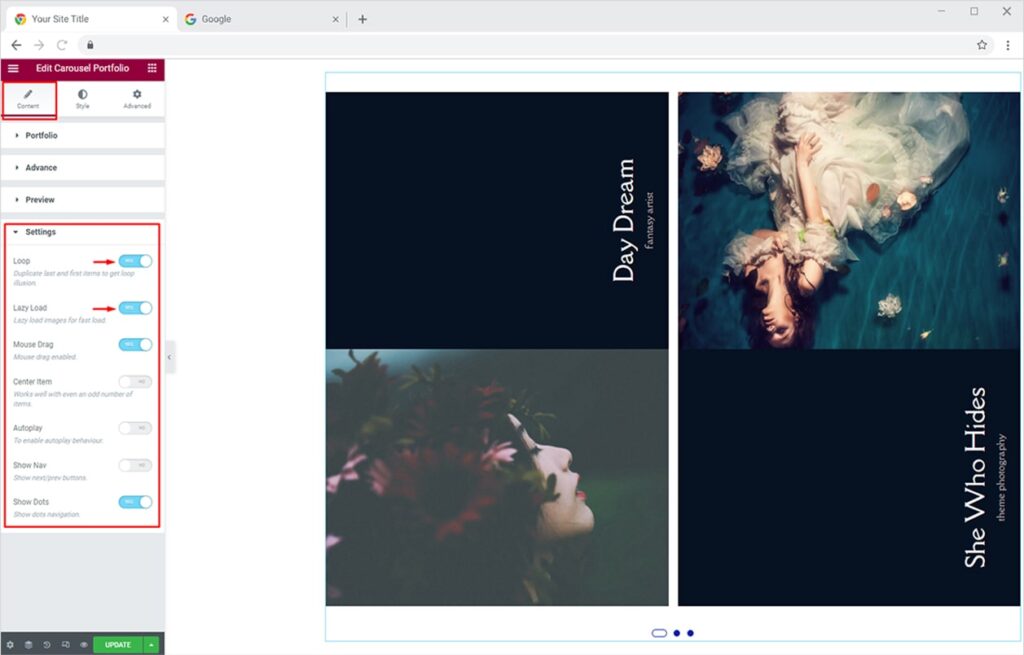
An amazing loop created using the Xpro Carousel Portfolio widget will work something like this, just with the mouse drag which is the default enabled feature.

How to Add Autoplay Feature to Your Carousel Portfolio in Elementor
One of the most prominent features of the Xpro Carousel Portfolio widget is the autoplay option. Make your carousel portfolio instantly grab the attention of site visitors with this amazing feature. It’s like showcasing all your portfolio items in one go! Let’s see how to do this.
Go to the Content tab, click on the Settings section and simply toggle the Autoplay option to ‘Yes’. You can also set the interval time between different portfolio items.
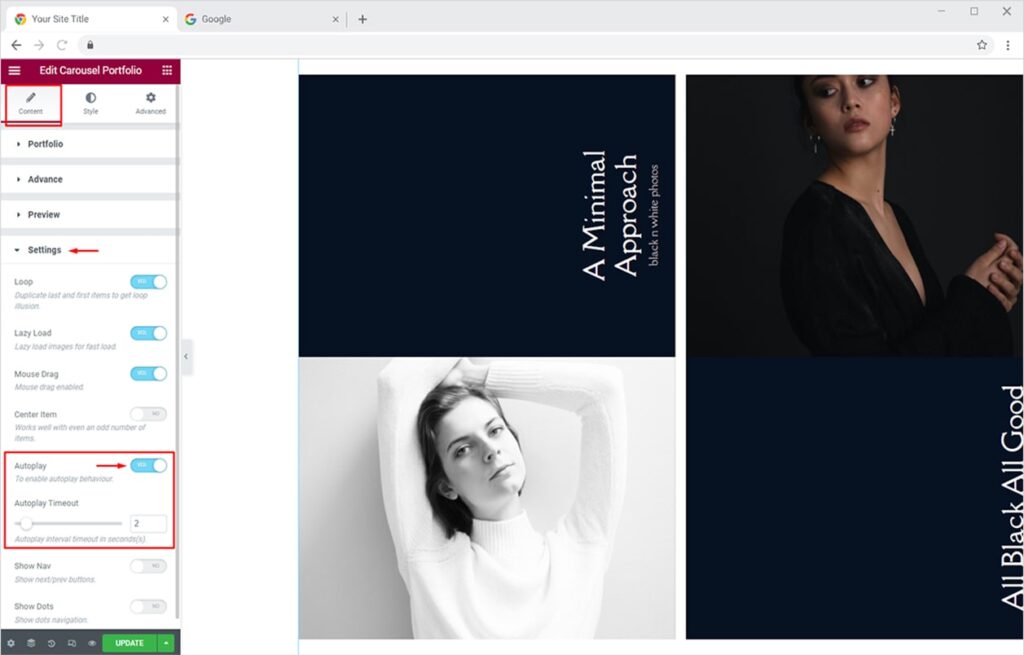
The final carousel portfolio will look something like this on the live site.

How to Add & Style Item Hover Effects for your Carousel Portfolio in Elementor
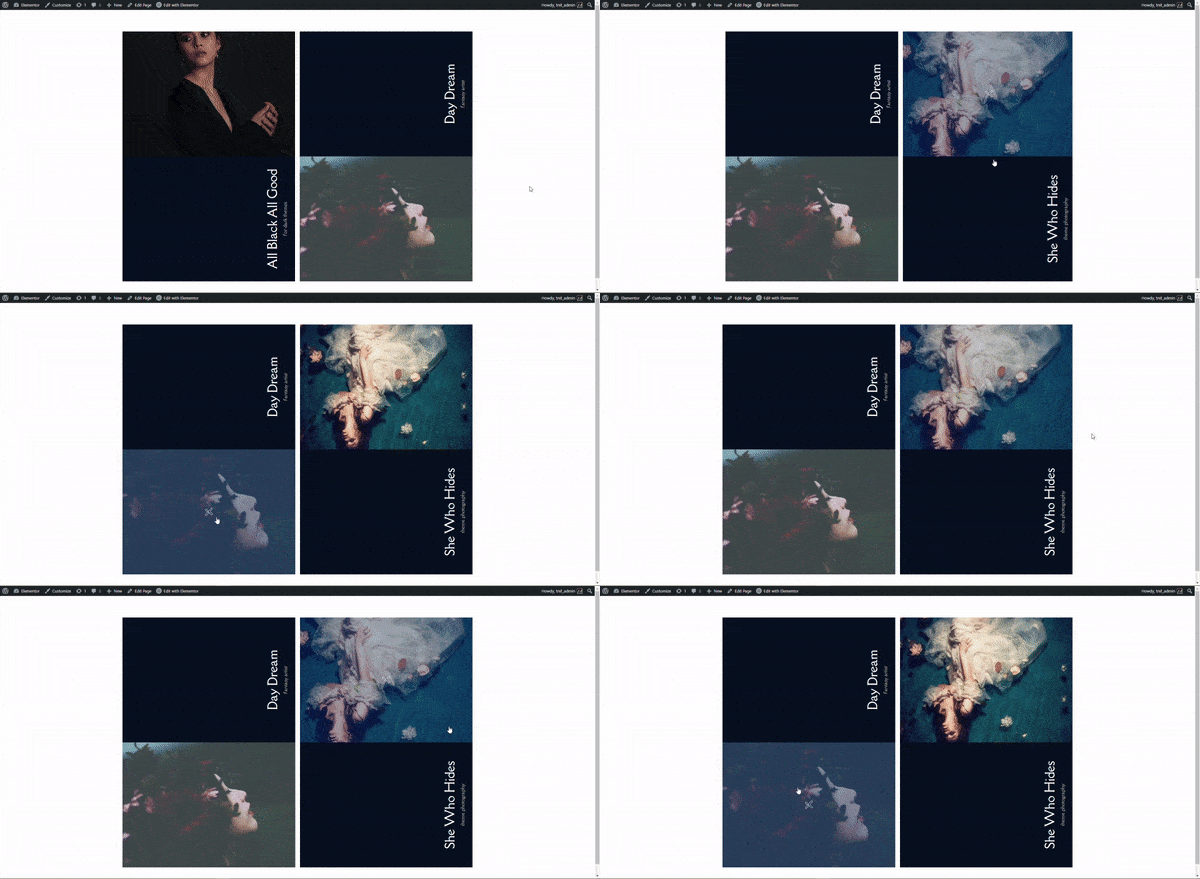
You can add appealing hover effects on your portfolio items within minutes. Let’s design them to instantly captivate your site visitors. Go to the Style Tab and click on the Overlay section. From the options available, you can add any of the 12+ Pro Hover effects. Set a gradient background with linear or radial type and position it as you please. You can also set the outline color of specific hover effects like the one I am using here, ‘Zoom Box Out’.
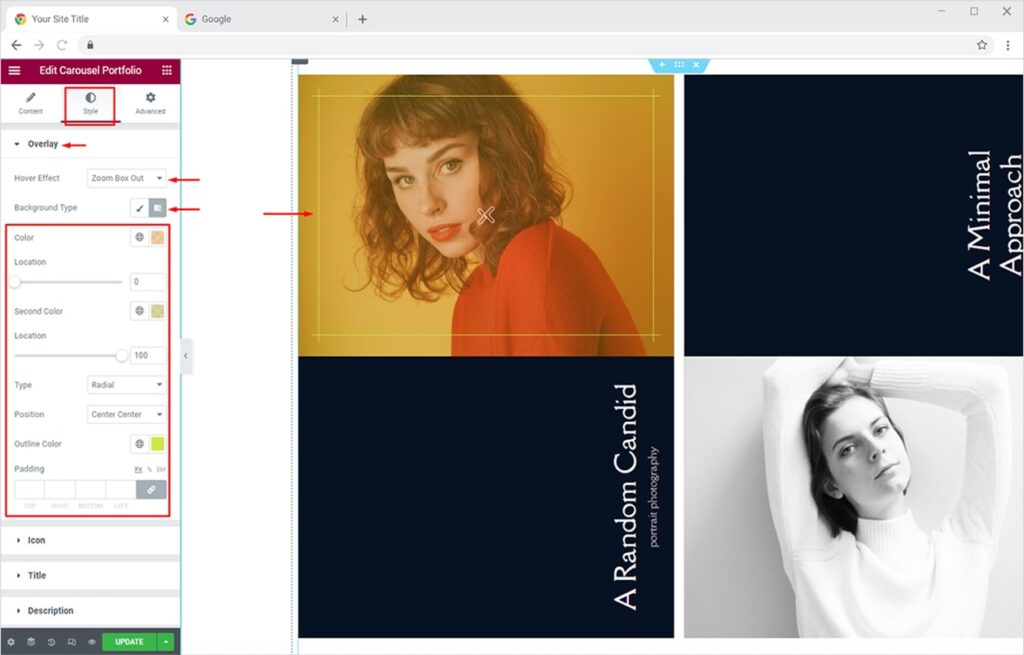
Your portfolio items will look like this on hover with the ‘Zoom Box Out’ effect.
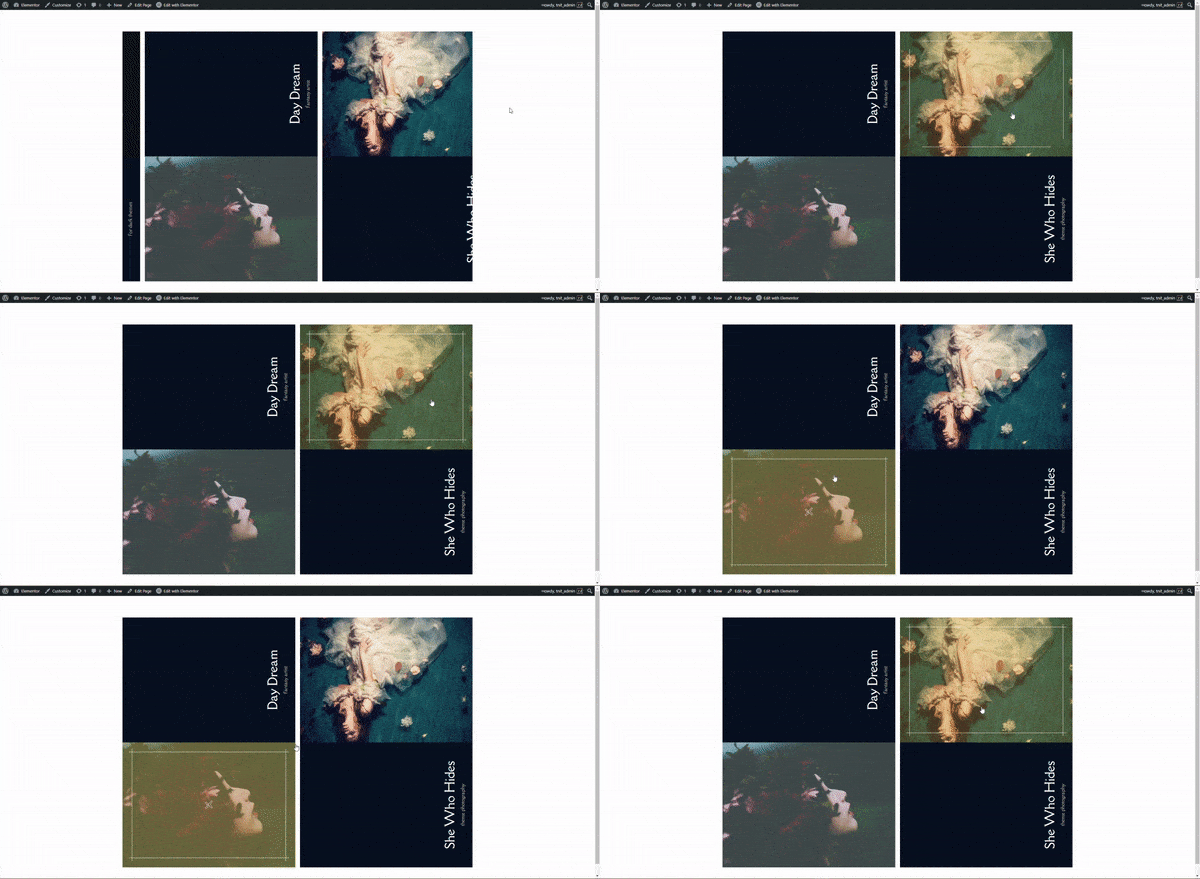
You can also set a solid color as a background type. To do this, select the Classic option from the Background Type section, set the color of your choice, and give it the opacity you want.
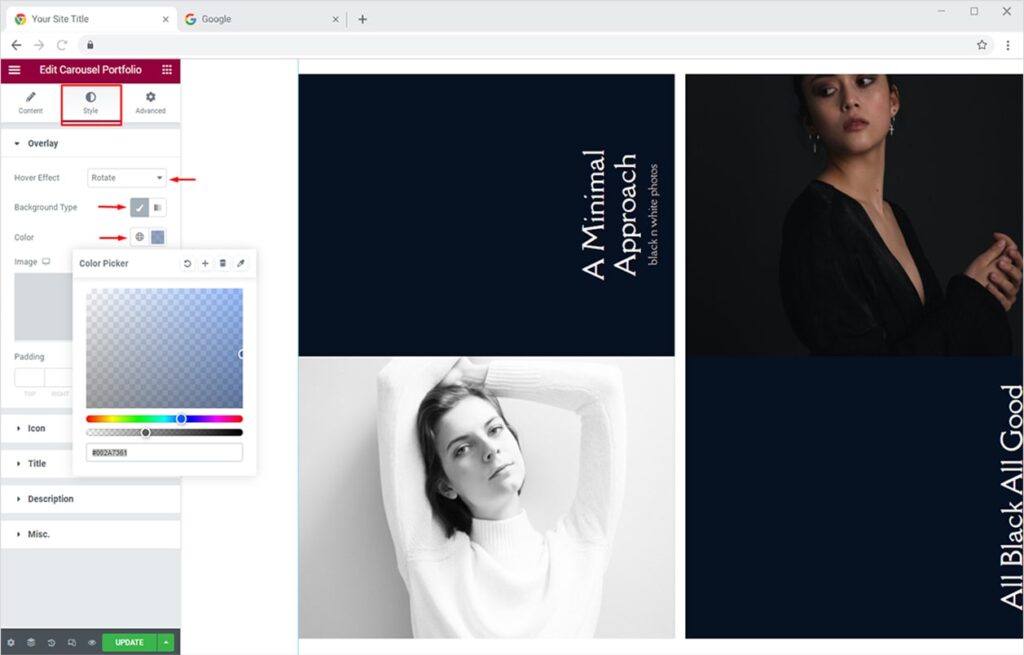
The final output will look like this with the ‘Rotate’ hover effect.
How to Add & Style Preview Popup of Portfolio Items in Elementor
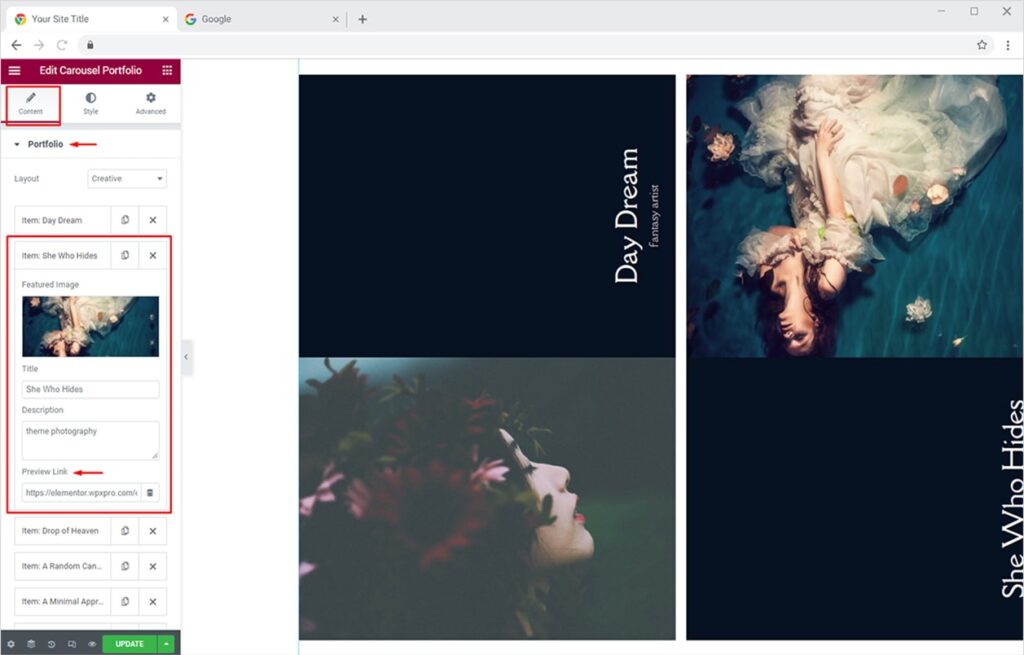
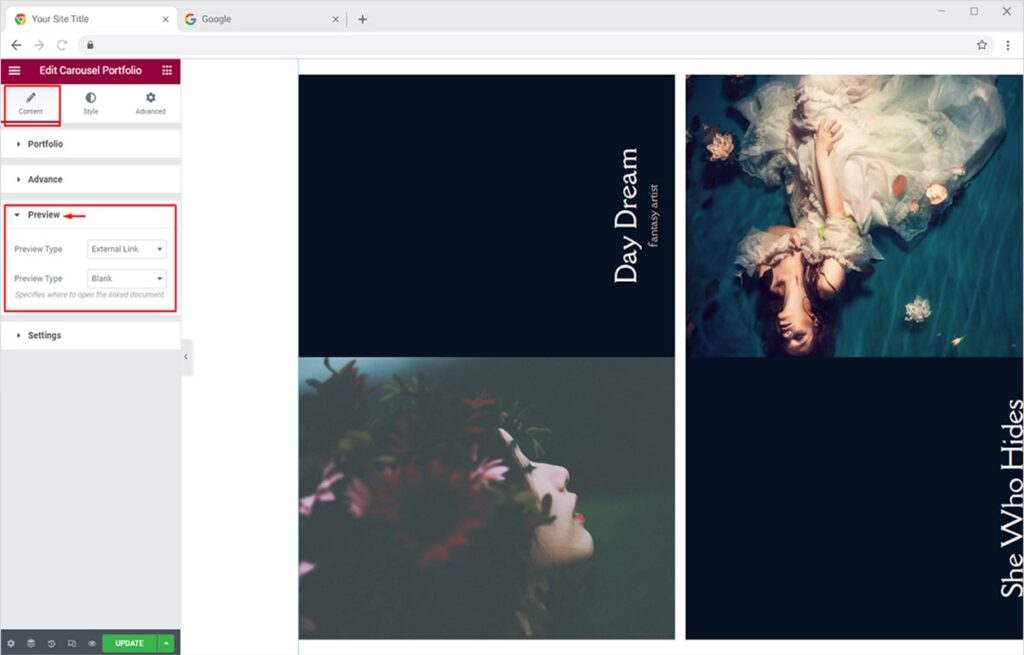
Now that everything is set up nice and stylish for your portfolio items. You surely want to redirect your site visitors towards a detailed page once they click on any of your portfolio items. You have 2 options to preview your portfolio (Popup and External Link). Firstly, open the portfolio item whose preview you want to show. Go to the Content Tab and open the Portfolio section. Click on the desired portfolio item and add your link in the Preview Link option.
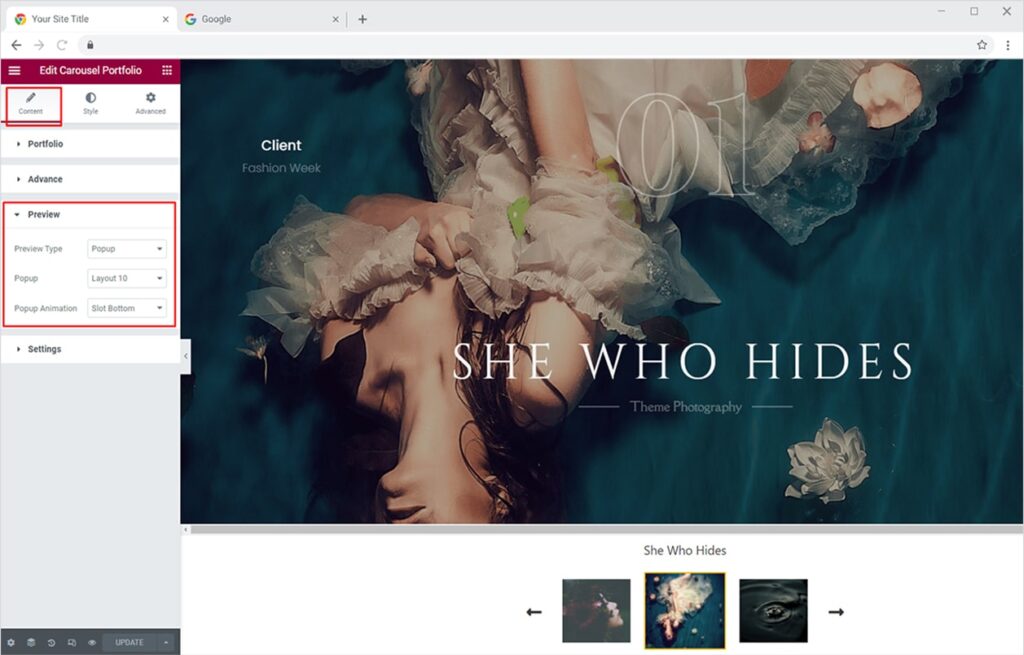
Now click on the Preview section under the Content tab and choose the preview type you like. Here we will try the Popup preview first. You can choose from the 10 premium layout available and add a nice popup animation to it (8 animations available).
Now let’s style your preview popup from the Style Tab. Click on the Popup section to find design options for each element of your preview popup. From here, you can set custom colors for popup overlay, background, preview title, and separator. Similarly, you can set colors of your choice for Close and Next/Prev buttons for both modes, Normal and Hover.
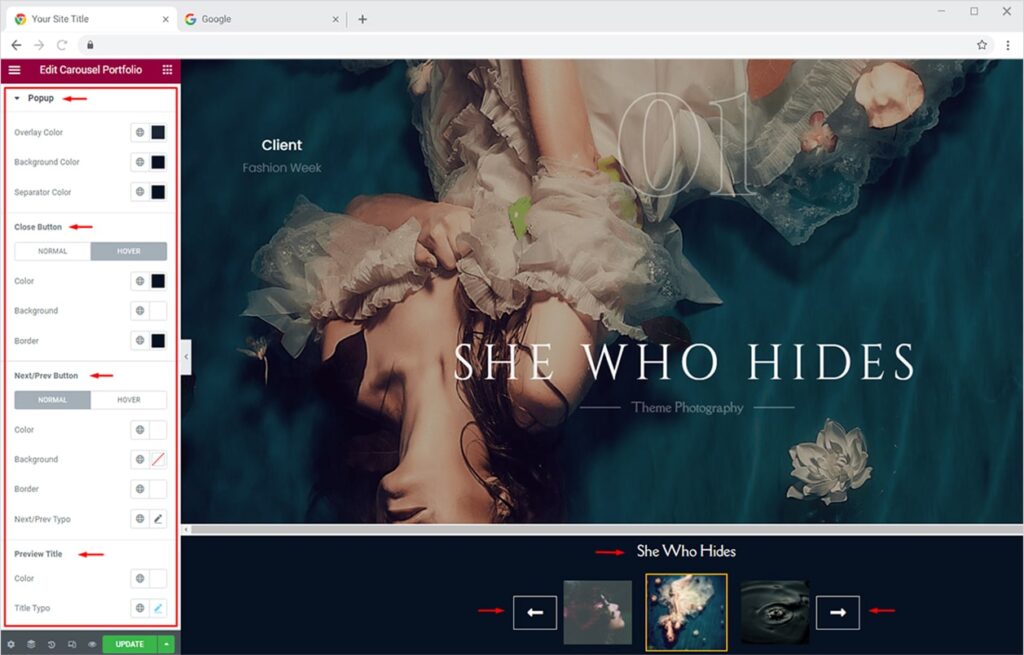
This amazing popup preview feature will make your carousel portfolio stand out! The popup preview will look like this whenever your visitors will preview any of your portfolio items.
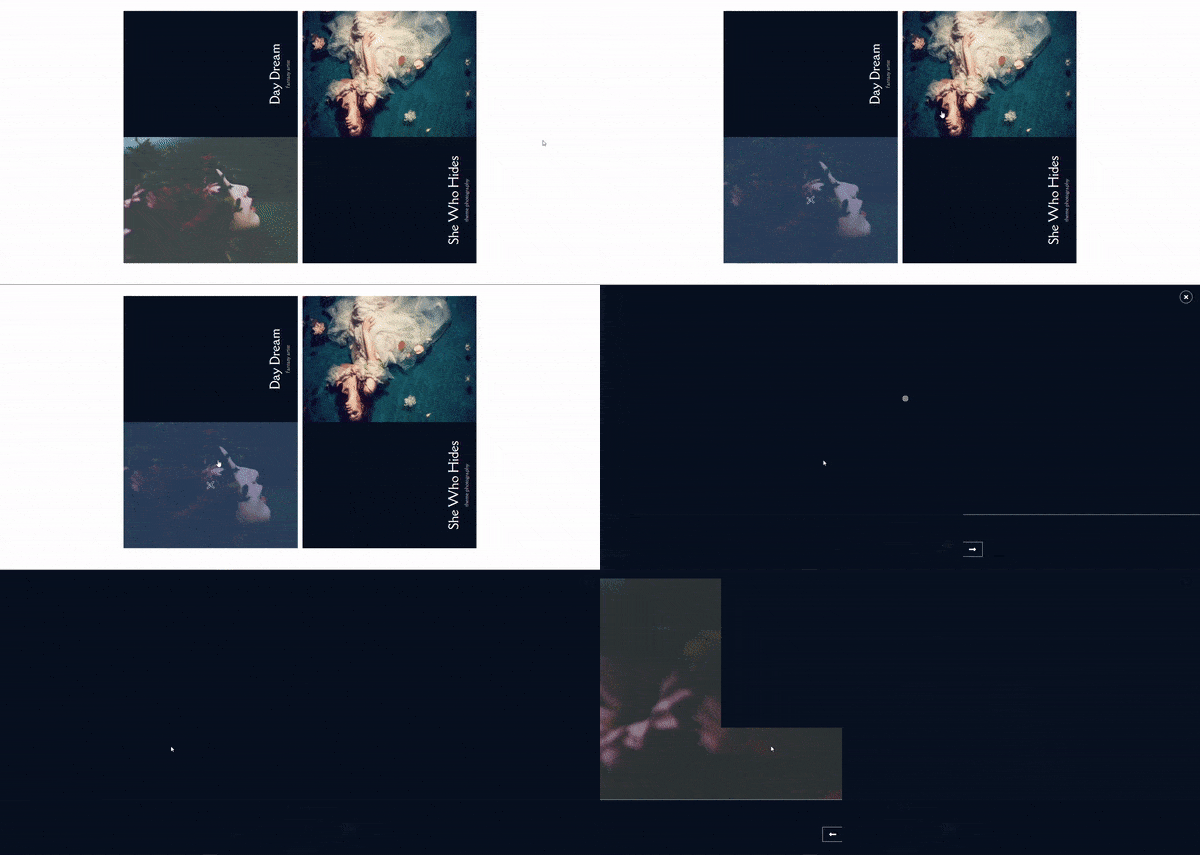
Similarly, you can let your site visitor open preview popups in the external tab. To do this, simply change the preview type to External Link from the Preview Type section under Content Tab. Set the Target to either Blank (new tab )or Self (same page).
Best Carousel Portfolio Widget for Elementor
This is all from Xpro Carousel Portfolio Widget for Elementor. I hope now you have a better understanding of how to fully utilize our amazing portfolio widget and create outstanding carousel portfolios for your websites. If you want to create a FREE simple portfolio then try our Free Simple Portfolio widget for Elementor. Xpro Elementor provides 50+ free Elementor Addons. On the contrary, if you are looking to develop modern portfolios with mosaic & masonry style layouts and want to add advanced features like load more, multiple layouts, buttons/icons/titles, animations then try our Pro Advanced Portfolio widget for Elementor.
Xpro provides a huge range of addons for Elementor that include stunning widgets, features, and theme pages. Get the best Elementor Addons to design your WordPress website.