How to Install Elementor Carousel Gallery Widget
Our Xpro Carousel Gallery widget for Elementor is a supreme addon for creating an amazing gallery for your site. This premium widget allows you to create interactive carousel/sliders for your gallery items. You can do tons of customization with this widget within minutes to represent the best of your work in front of your site audience. Making a Carousel Gallery helps you showcase all your categories or items in sliders. Eventually, making it easy for your users to navigate across your site. You can utilize the modern Autoplay option to easily represent all your work to the user in one go. You can play around with your creativity by applying 12+ Hover Effects, and 4+ Pop-up styles. Add enchanting captions, descriptions, icons, and much more to give a brief statement about your gallery items and make the layouts responsive for all types of devices.

Requirement
You need to install and activate the Pro version of Xpro Elementor Addons. If you already have the plugin installed, just make sure the Advance Gallery Widget is ‘Enabled’ from the Xpro Dashboard, so you can find the widget in the Elementor editor.
To enable the widget, simply follow these steps:
Step 1
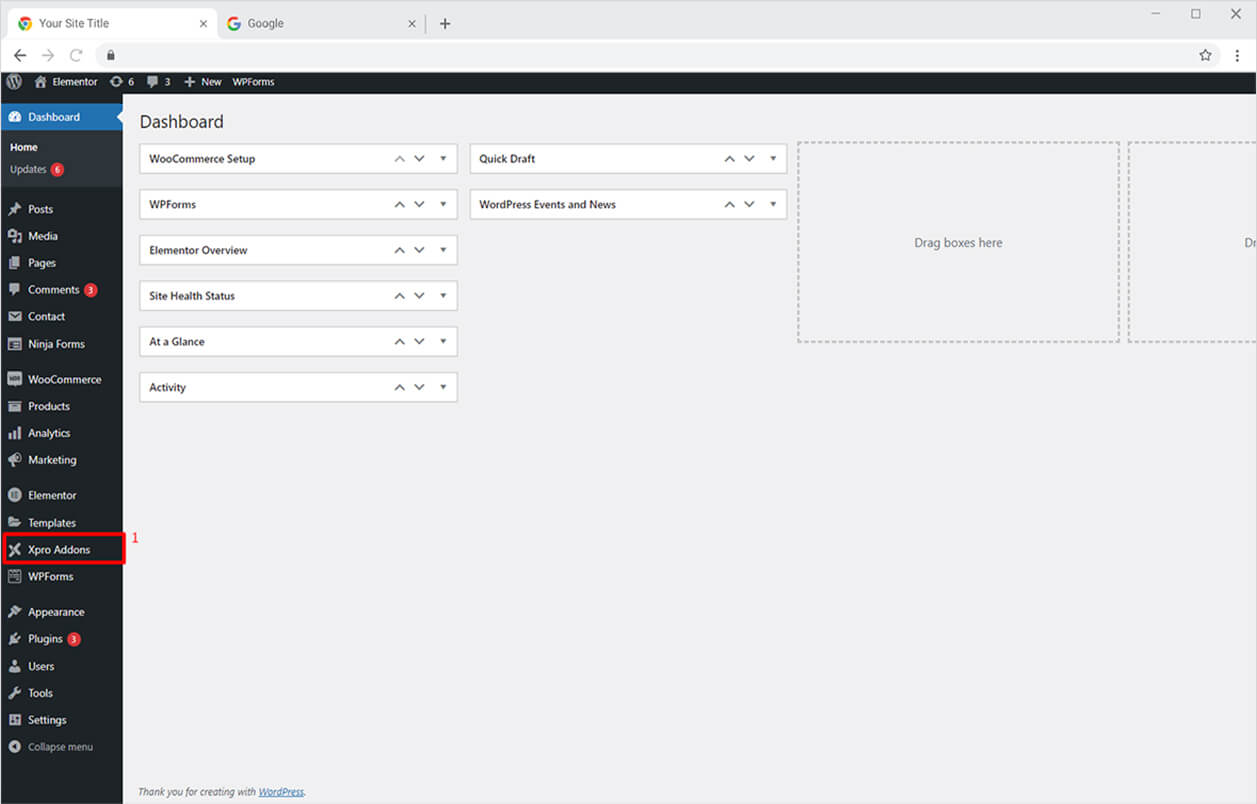
Click on the Xpro Addons option available on the WordPress Dashboard Menu.
Step 2
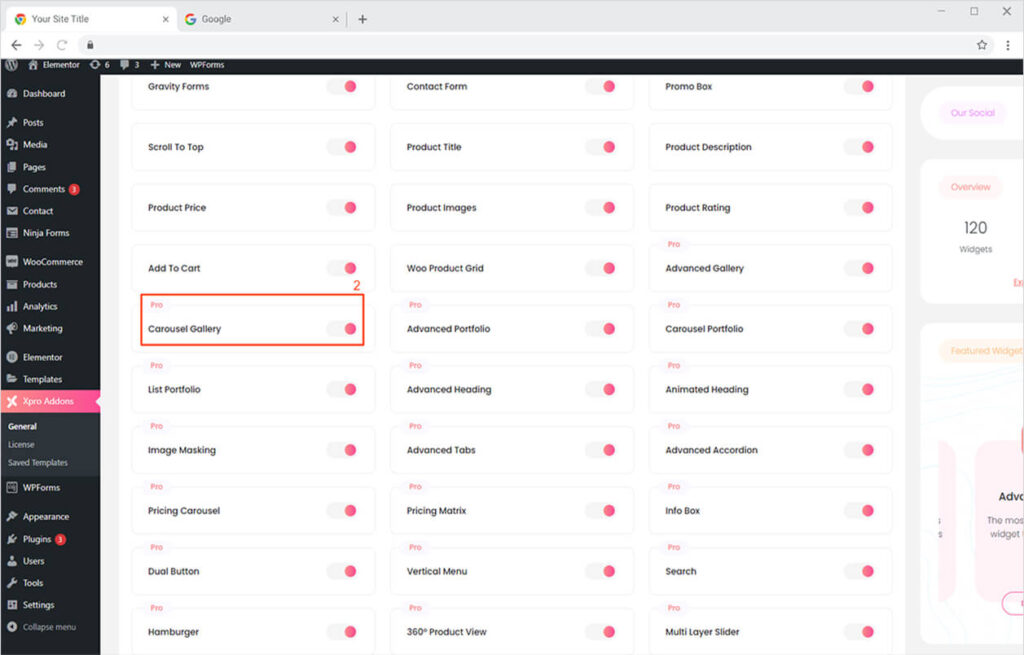
From the Xpro Addons Dashboard, click on the Widgets Tab, find the Carousel Gallery widget, and finally, toggle the button ON to enable it.
How to Use Xpro Carousel Gallery Widget for Elementor
The premium widget allows you to perfectly optimize all your gallery items. It also gives a professional look to your website. Using our Xpro Carousel Gallery Widget for Elementor you can create amazing user-friendly gallery layouts to grab the attention of the visitors of your site. You can use multiple eye-popping hovers or pop-up effects as it is the most effective way to let your audience notice your work and take action.
Here’s how to use this amazing, unique, fun, and time-saving Carousel Gallery widget to get the best result for any site.
Step 1
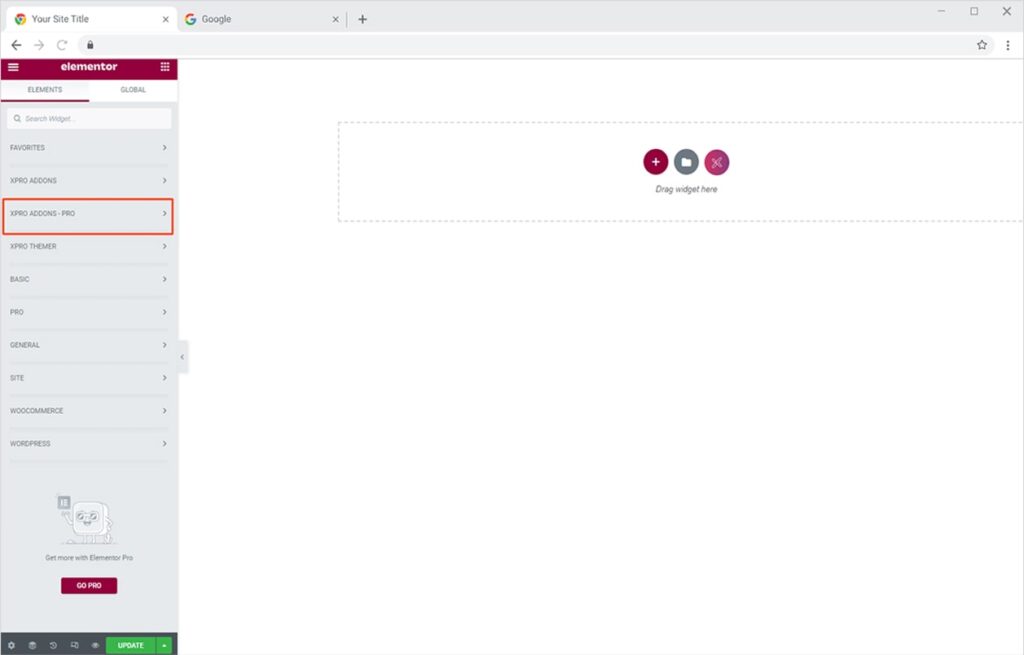
Click on the Xpro Addons-Pro section available in the Elementor Editor.
Step 2
From the Xpro Addons-Pro section, simply drag’n’drop the Carousel Gallery widget on your desired page location.
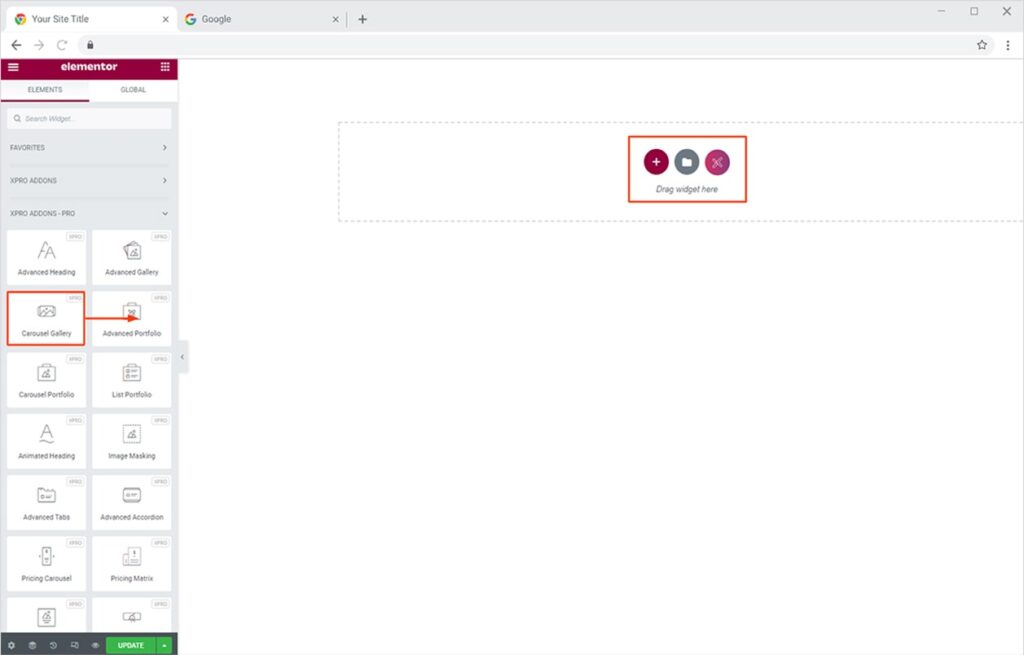
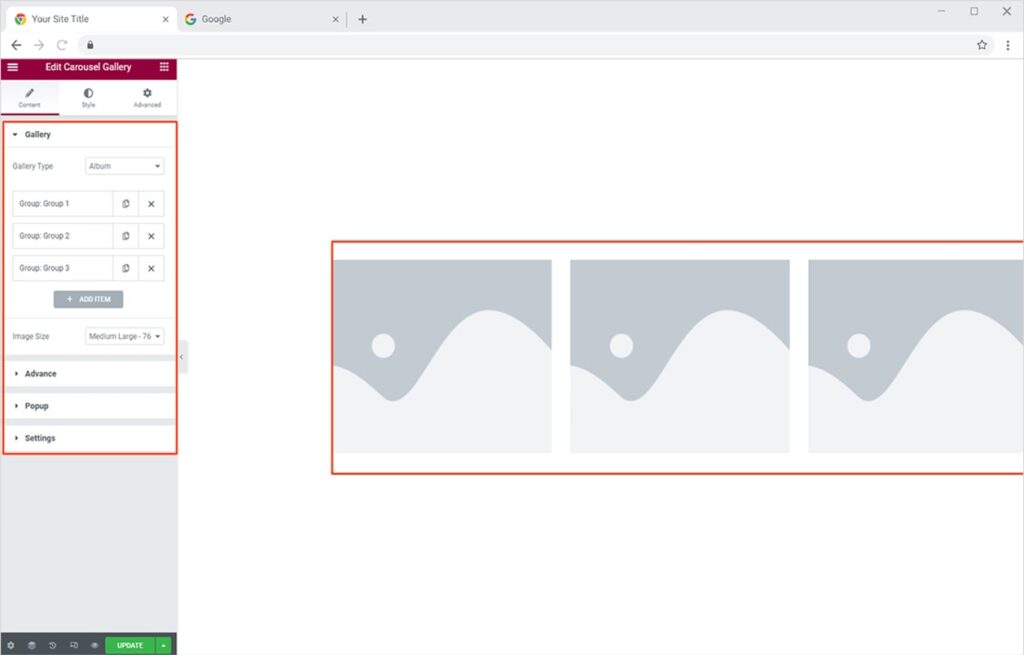
This is the default view of the Xpro Advance Gallery widget once you drop it at your desired location.
How to make Album Gallery using Xpro Carousel Gallery Widget
This amazing widget allows you to create an attractive Album Gallery in which you can make separate layouts for every different set of items in each different default group. This allows you to make a unique album for your different categories. Let’s see how to do that.
Click on the Gallery Section under the Content Tab. Select the Album Gallery from gallery type. After that, you will see multiple groups by name (default). Click on any of these groups and name it as you like. Here you can even set the featured image and add multiple items in one group to create an Album Gallery.
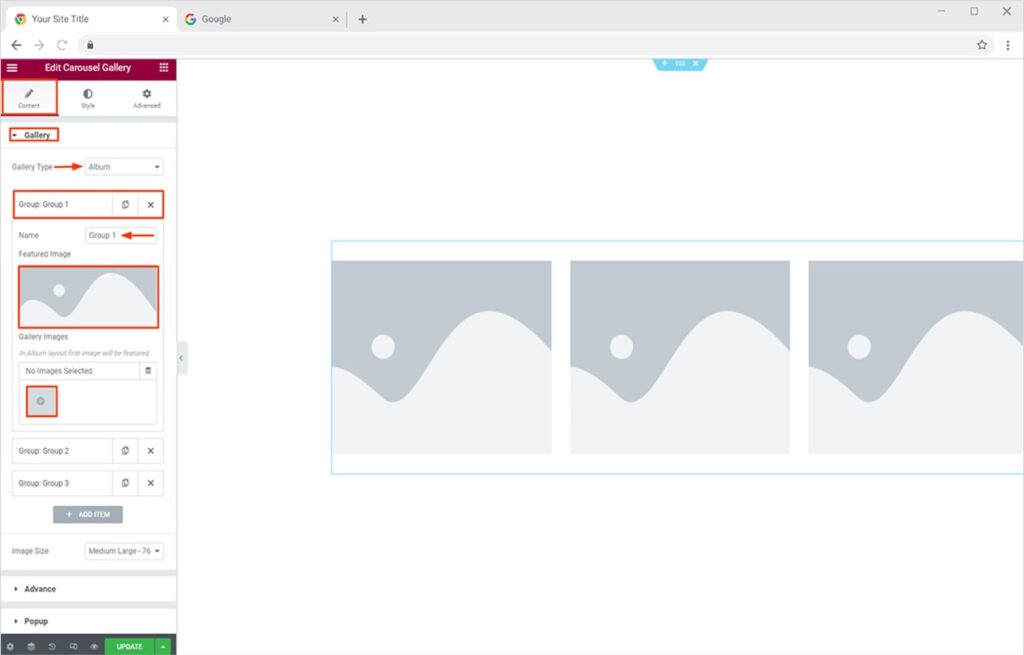
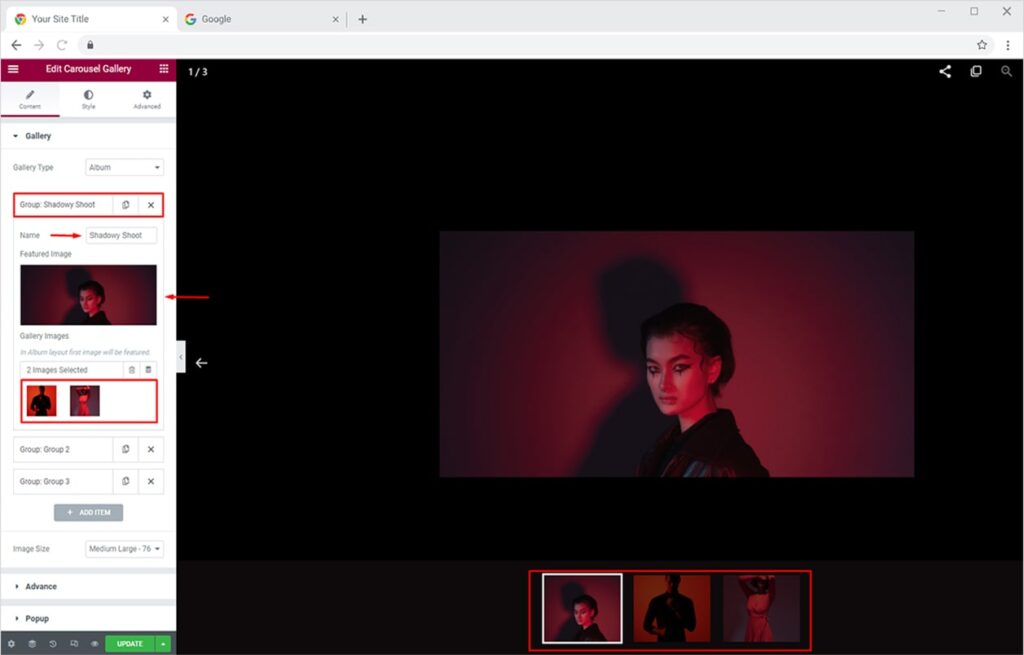
Now to set the featured image, click on the Featured Image option and choose any image of your choice from the media library or upload it from your PC. Then by clicking the option under gallery images insert multiple items under one group/category to showcase other items of the gallery. I have also renamed the group according to the set of items.
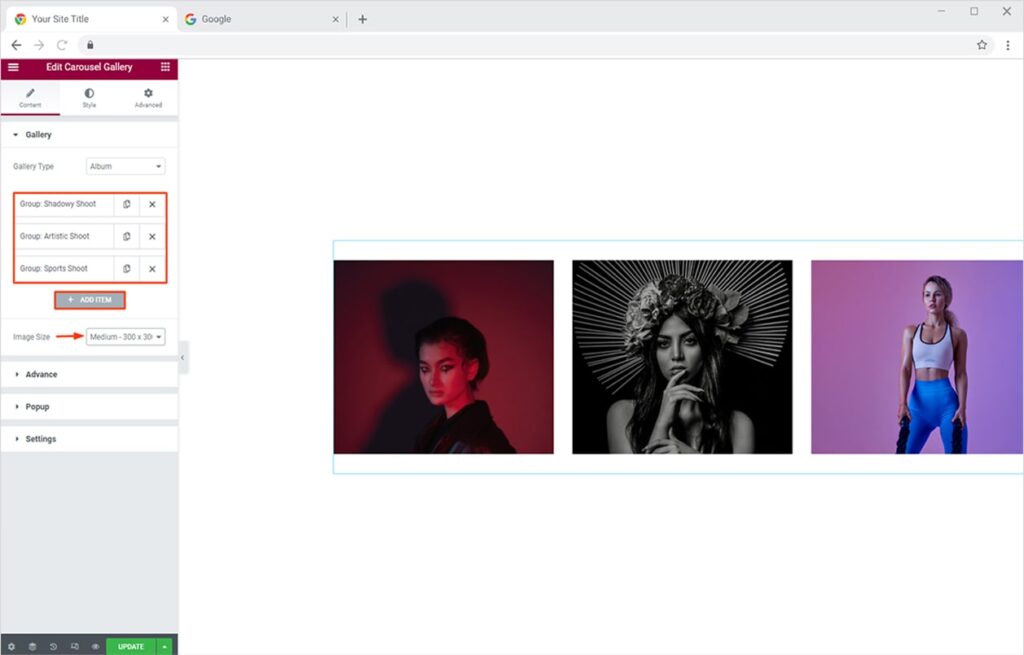
Similarly, you can add a feature and gallery images to all the default groups or even add more groups by clicking on the Add Item option. This option also allows you to set the size of your image to get the best adjustment for resolution. The Feature image of every set of album gallery items will show up on the front.
Let me also show a preview of these albums, how they will appear in real-time on your site.

How to make Simple Gallery using Xpro Carousel Gallery Widget
You can even create an attractive Simple Gallery using our Premium Carousel Gallery Widget. From the Content Tab click on the Gallery Section. Select the Simple Gallery from gallery type. Just click any of the default groups and similarly add the feature image & gallery items the same way we did above for Album Gallery.
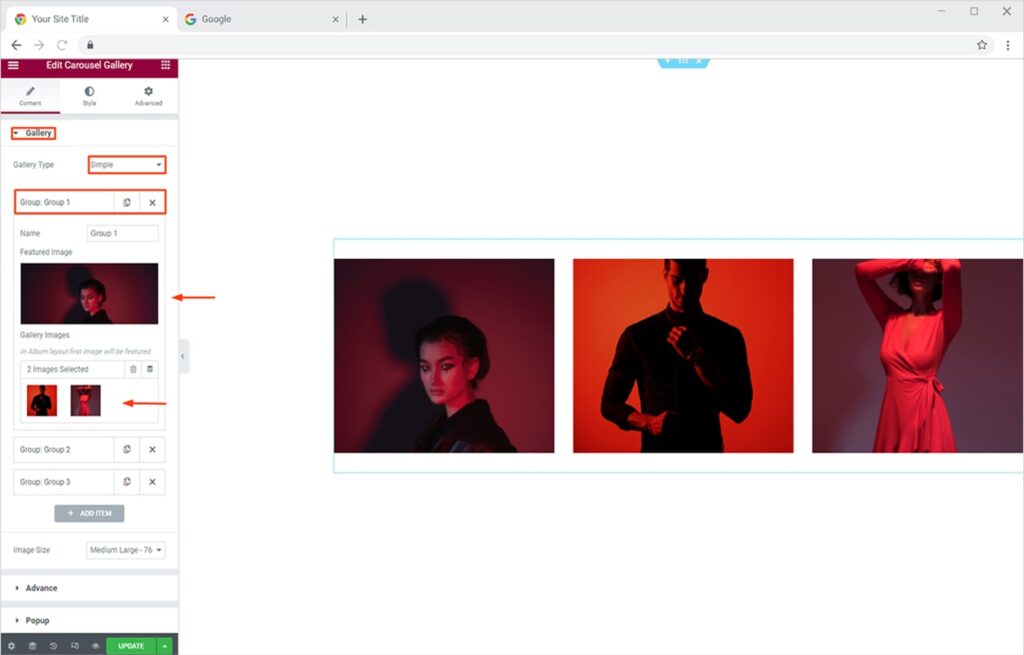
Just like we did for Album Gallery above, here while creating Simple Gallery you can add a feature and gallery images to all the default groups or even add more groups by clicking on the Add Item option. A Simple Carousel Gallery works similarly to an image carousel where all your gallery items can be shown in front one after another. Here is a preview of this.

How to Add & Style Navigation Arrows to your Carousel Gallery
Adding navigation arrows to your carousel gallery will help you to indicate to the users that there is more content to view. Now for a better understanding of how these navigation arrows work in Carousel Gallery.
Move towards the Settings section in the Content Tab and Enable the Show Nav Button. These navigation arrows are clickable to view the remaining gallery.
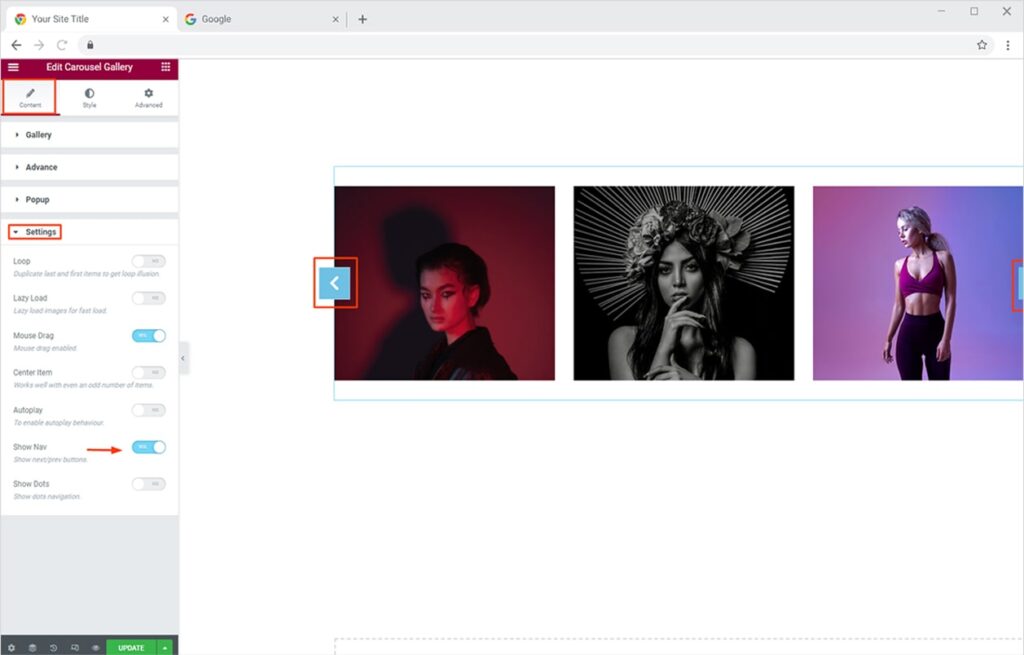
So if you use 4 different sets of Album Gallery with the Show Nav Button active, the real-time result will look something like this.

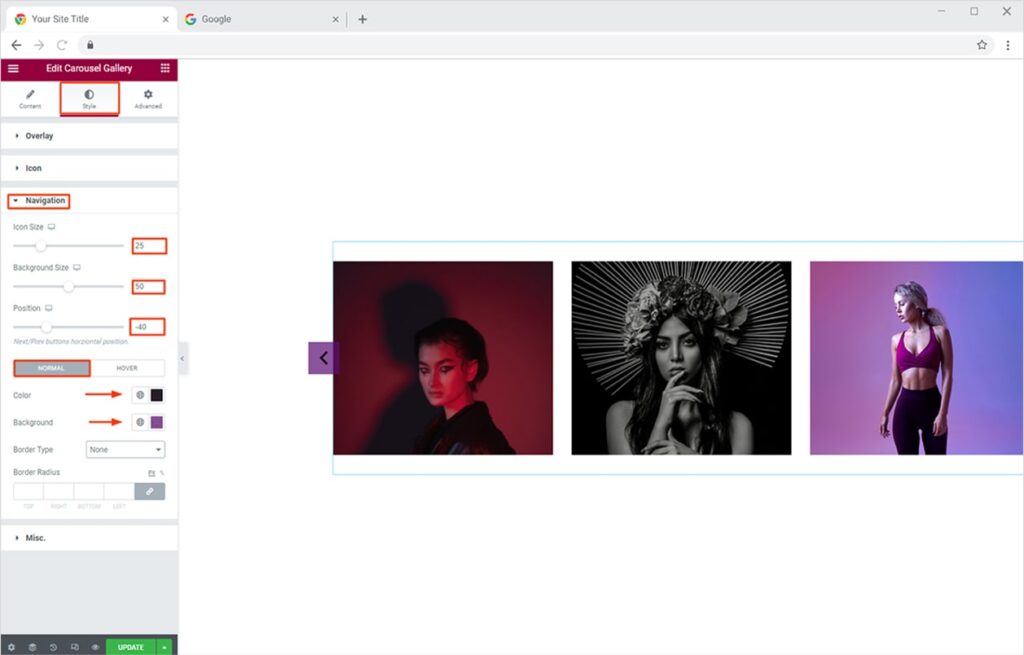
Once you have done adding the navigation arrows, you can even style it according to the theme of your website and make a better UX. Just toggle towards the Style Tab and below from the Navigation section. From there you can change the size of the navigation icon, the size of the background, and the position of these navigation arrows respectively. Moreover, you can use any color combination to style these icons most attractively.
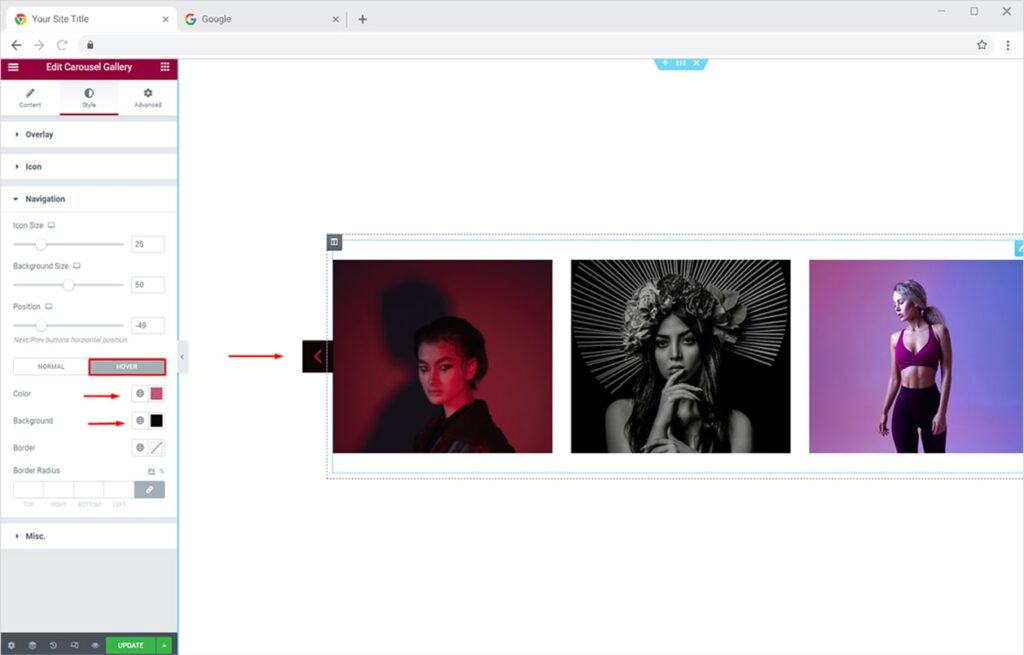
You can even add a Hover Effect to the arrows, just by toggling to the hover option and similarly selecting the icon and background color.
Useful links: Best theme builder for Elementor
Xpro Elementor Addons
How to Add & Style Dot Navigation to your Carousel Gallery for Elementor
Adding dot navigation is another brilliant way to highlight your unseen content in the carousel gallery. These dots are vital for highlighting all the content and for easy navigation through the carousel gallery. Simply activate the show dot option from the Setting section under the Content Tab.
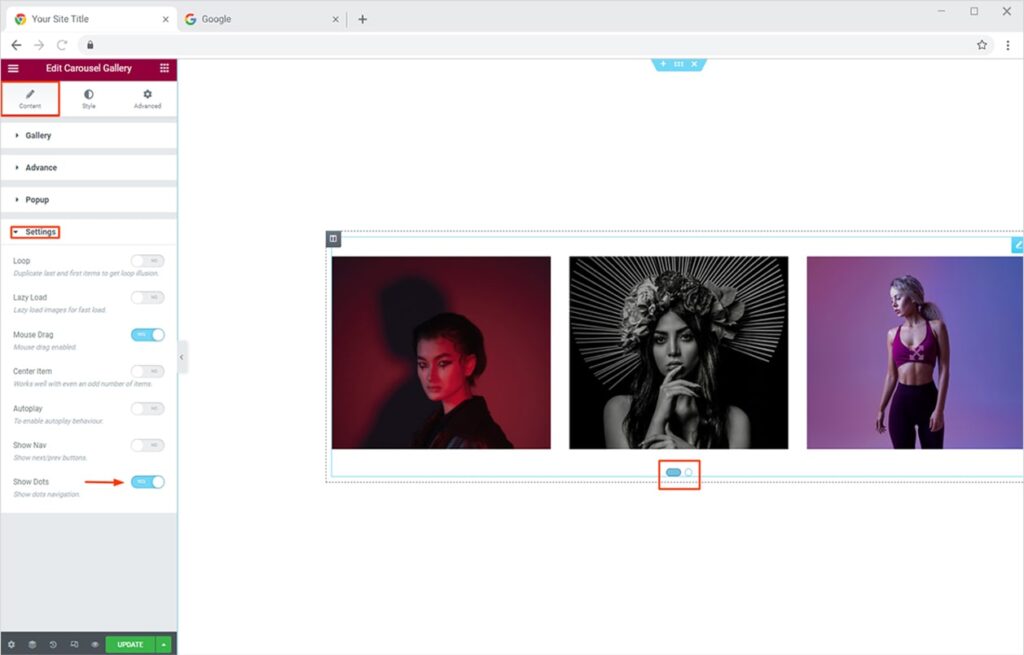
This is the amazing thing about our Xpro Pro Addons, you can even style the options to make the most attractive and cheerful. This will not only give your site a professional look but also help you highlight important aspects. Eventually, help your site visitor for easy navigation across your amazing Carousel Gallery.
Simply, just head towards the Style Tab, and from the Dot section, style your navigation dots in the most presentable matter. From here you can style the size and the color of your navigation arrows best according to the UX of your site. You can even style the Active mode of your dot, to highlight the currently showcasing album.
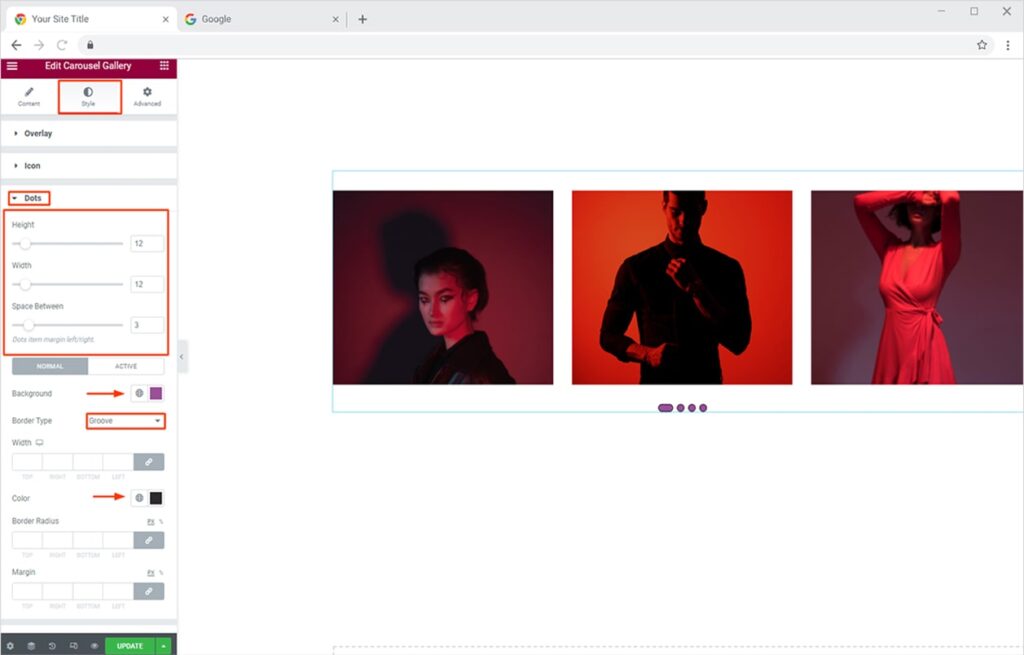
Let me also show a preview of how the dot navigation and its active mode will work in real-time. Given Below, I am using 4 different groups of Simple Gallery.

How to Add Loop to your Carousel Gallery in Elementor
Adding a loop to your carousel gallery is a magnificent approach. It allows you to represent your gallery in recycle process, the end is the new beginning. It helps you get more interaction from the users. You can also use the Lazy Load feature, which will eventually help in loading your website at lightning-fast speed. To add these amazing features, just turn on the Loop and Lazy Load option from the Setting section.
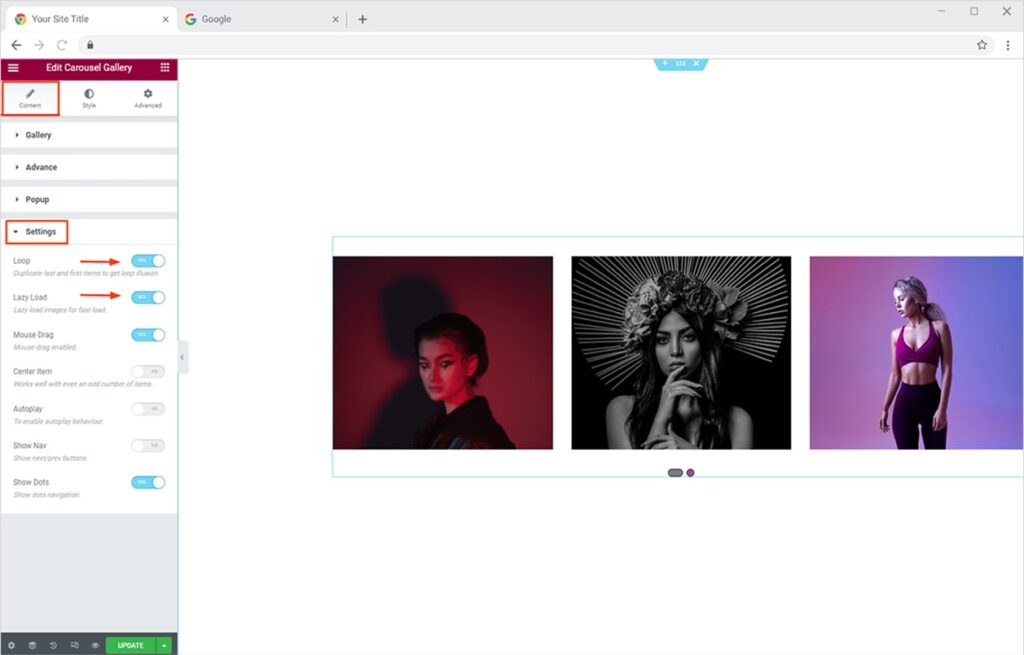
An Amazing Loop made through our Xpro Carousel Gallery will work something like this, just with the mouse drag which is the default enabled feature.

How to Add and Style Center Item for Carousel Gallery
A center item is another fantastic feature to highlight more details about your gallery. It will highlight your first group of a gallery in the center of the layout. You can easily activate this option from the Center Item option under the Setting sections.
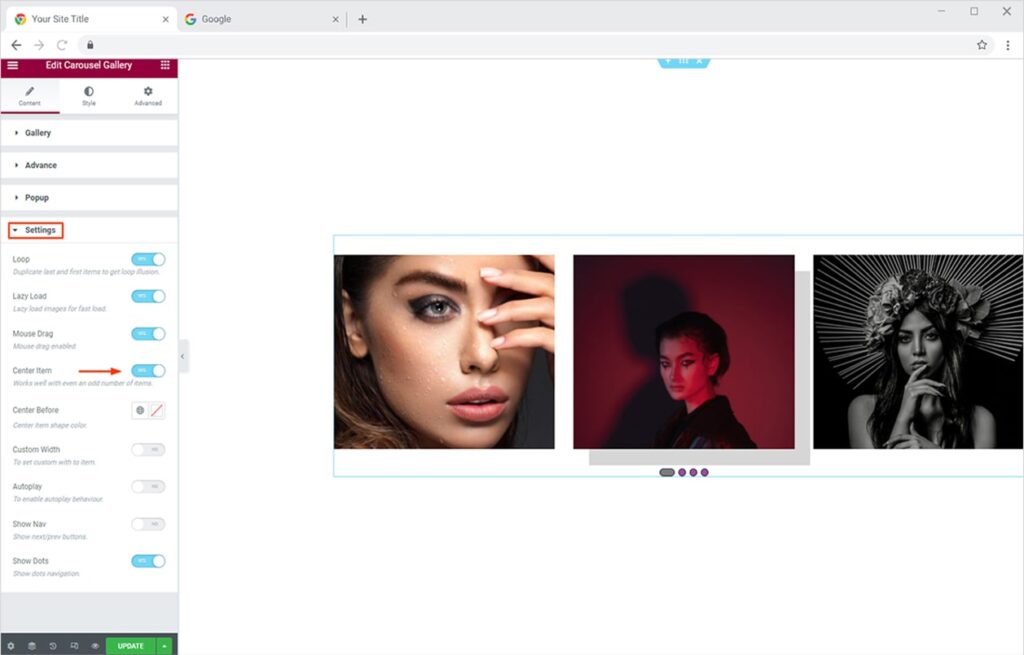
After turning ON the center item option you can even style its color and custom width from the drop-down menu that appears.
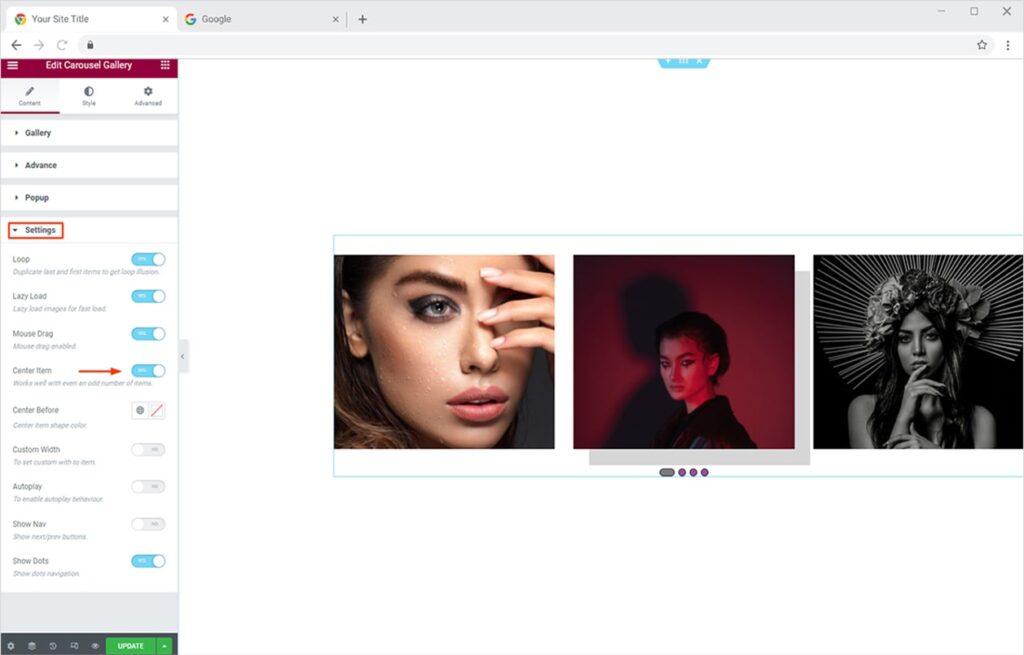
The final result will look like this with the loop feature enabled.

How to Add Autoplay Effect to Carousel Gallery in Xpro
Providing the access to add an autoplay effect to the carousel gallery is the best thing about this widget. You can showcase all your astonishing groups of the gallery to your site’s visitors in one go.
Let’s see how to do this.
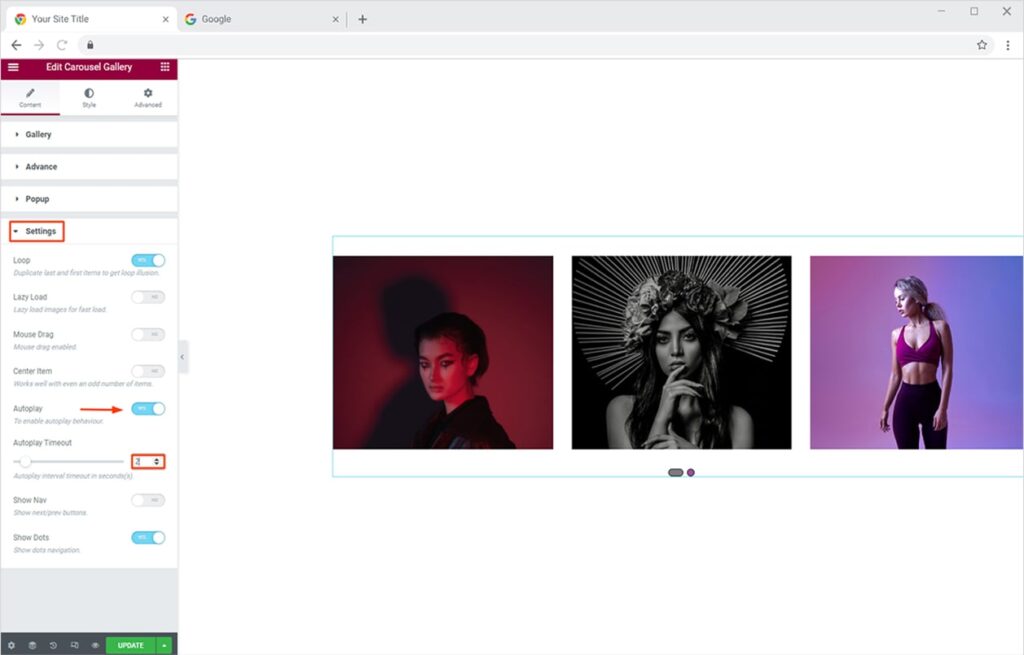
Simply enable the Autoplay Option from the Settings section. Here you can also adjust the time of your Autoplay.
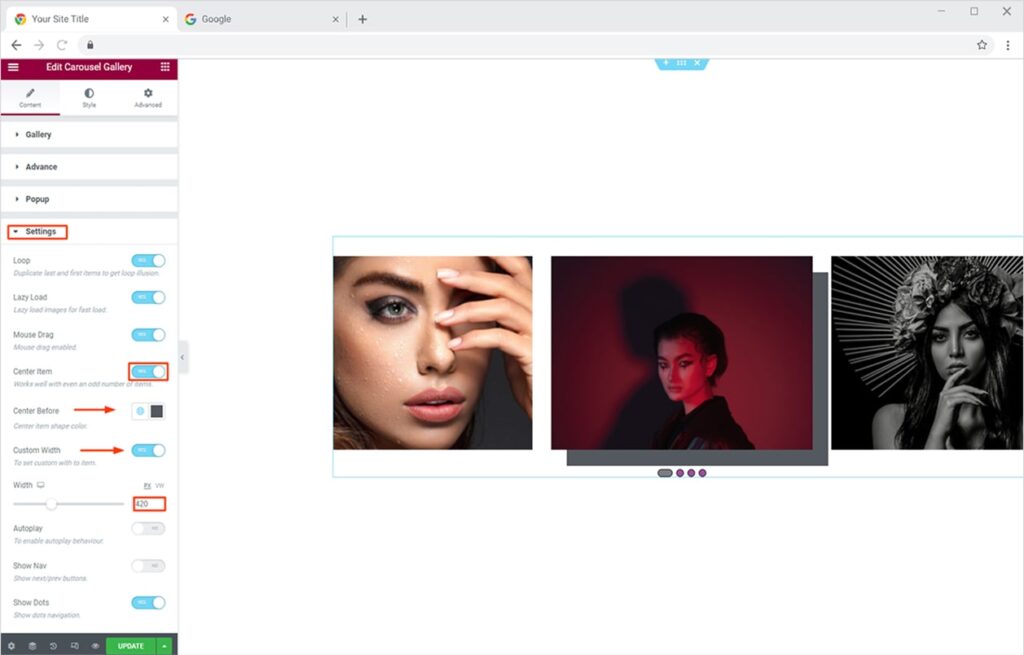
This amazing autoplay feature will look something like this on your site.

How to Adjust the Layout of your Carousel Gallery
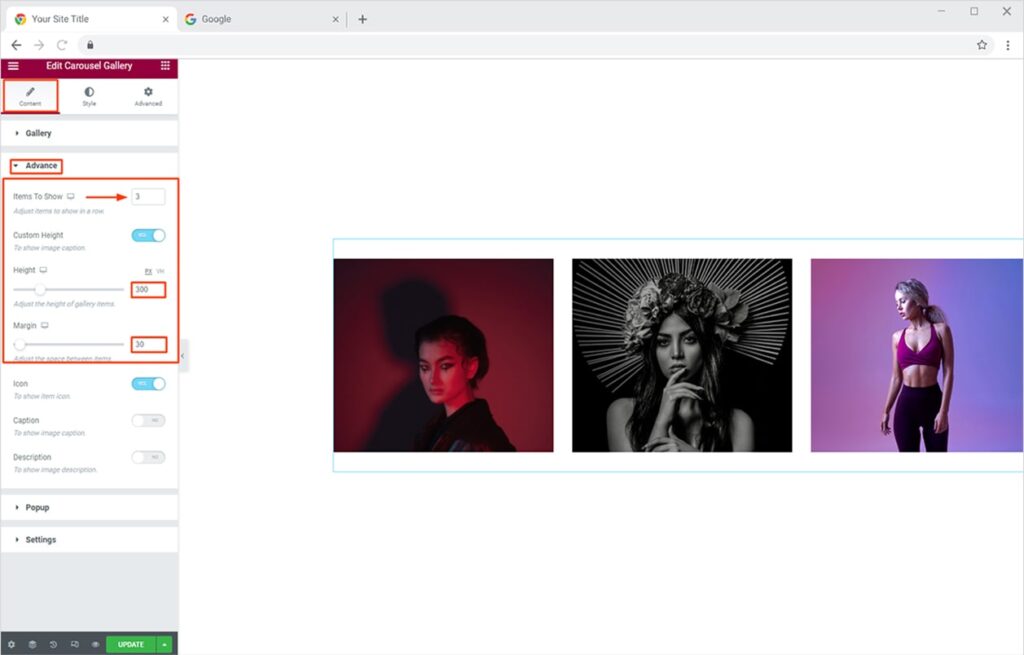
Here you can adjust the layout of your gallery according to your desired design. Start by clicking the Advance Section in the Content Tab. You can create the best layout for your sets of the gallery, just by adjusting the number of items per row. Moreover, you can scroll the Margin & Height sliders for adjusting the margin or height for the items in the Gallery.
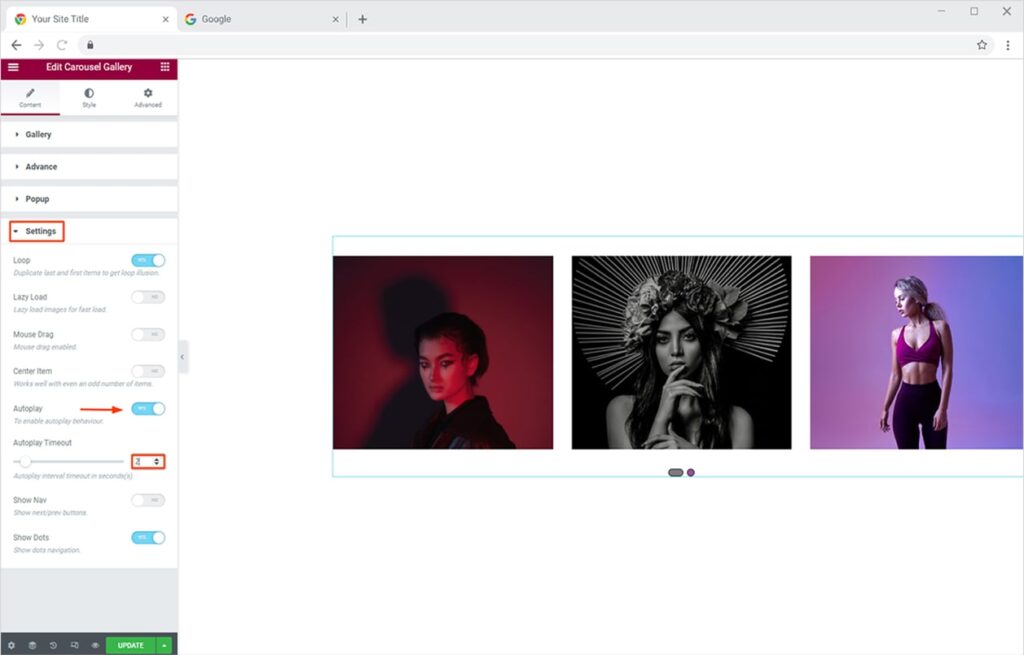
You can play around with multiple combinations, to get the best result, I have used 2 items per row for the given below carousel gallery.
How to Add & Style Icons for your Carousel Gallery Items
The use of the right Icons can quickly indicate to your audience what they will see inside your gallery. Our Xpro Carousel gallery widgets allow you to add unique Icons to your gallery items from the wide range of icons in our Xpro icon gallery. It also allows you to upload a custom SVG from your Pc for the best representation of your work. So, if you want to add an icon to your gallery items, you can do it from the Advance section in the Content Tab. Here, you will find the slider in front of the Icon option is enabled by default and a default icon will appear on your gallery item.
After that, you can toggle to the Style Tab to add or style the most relevant icons on your gallery items. You can use the Icon Sections to add icons of your choice from the icon gallery and can also upload a custom SVG from your Pc. This feature also allows you to change the size, background, and color of an icon. You can also adjust the size & color of the background of the icon as well.
How to Add & Style Captions or Descriptions for your Carousel Gallery
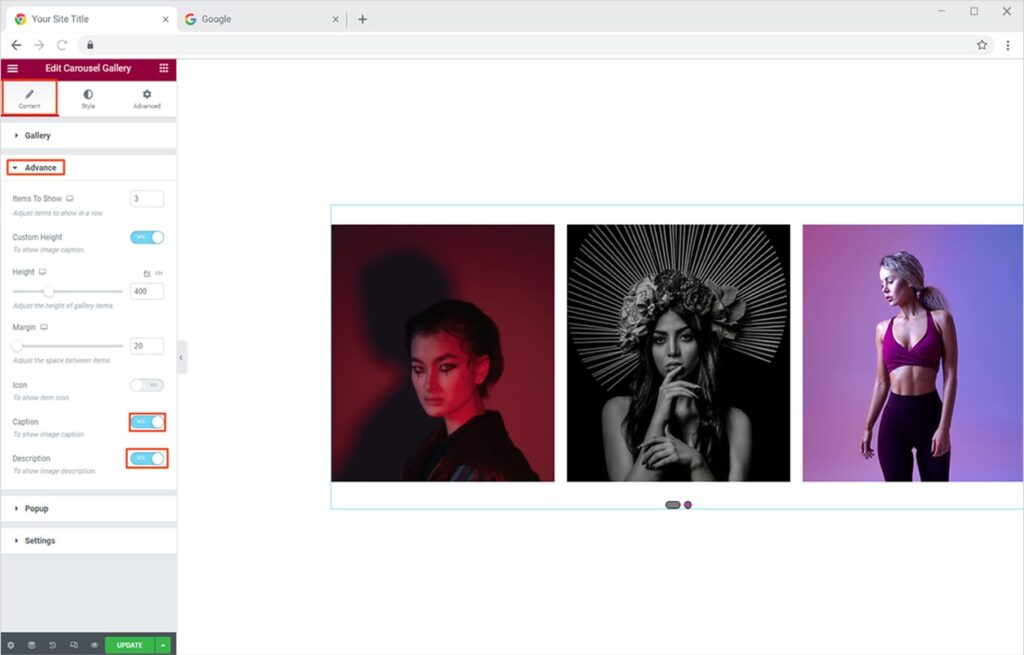
Add captivating and brief Captions & Descriptions to your gallery items. This is another supreme feature you can use while using our premium Xpro Carousel Gallery Widget. Adding relevant captions to your gallery items will surely make them more appealing and engaging. Moreover, you can add a Description that will give a strong statement about your item when a user hovers on your gallery item.
First, you need to activate the caption & description, from the Content Tab. Under the Advanced section, toggle the buttons to ‘Yes’ against options.
To add the caption & description head back to Gallery Section and then click on any of the gallery groups and the gallery items respectively.
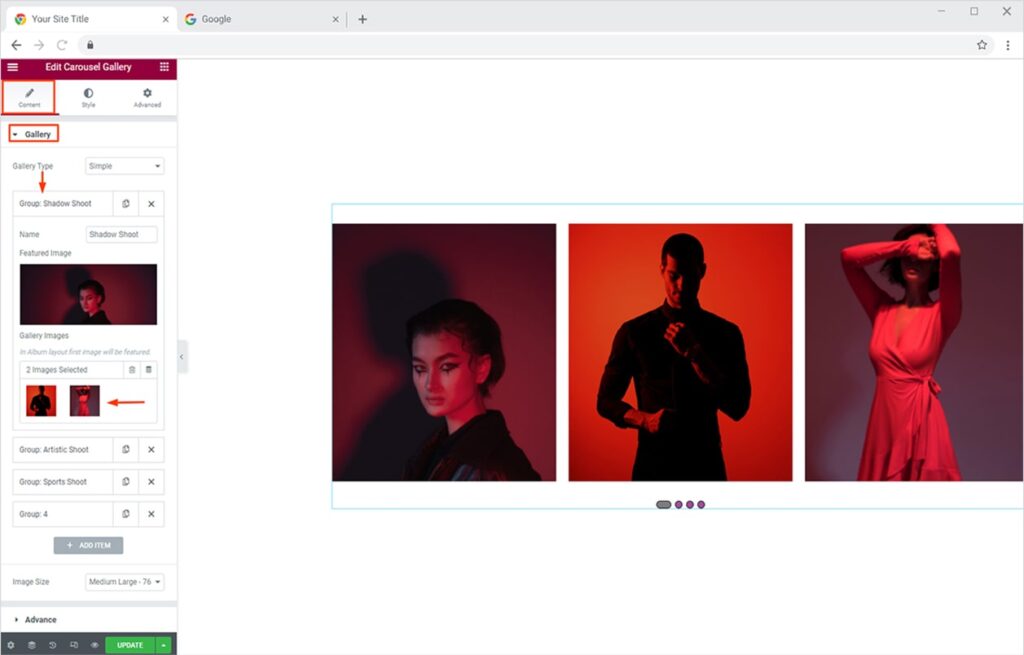
Similarly, using the way given below you can add Captions & Descriptions to all your gallery items.
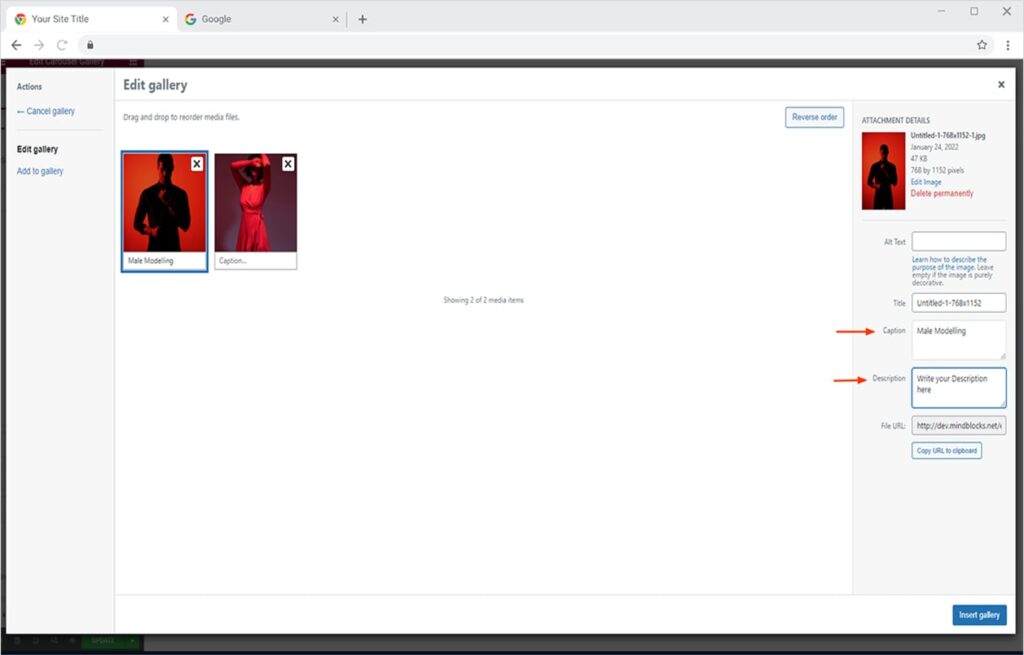
The final result will look something like this when a user hovers on your gallery item
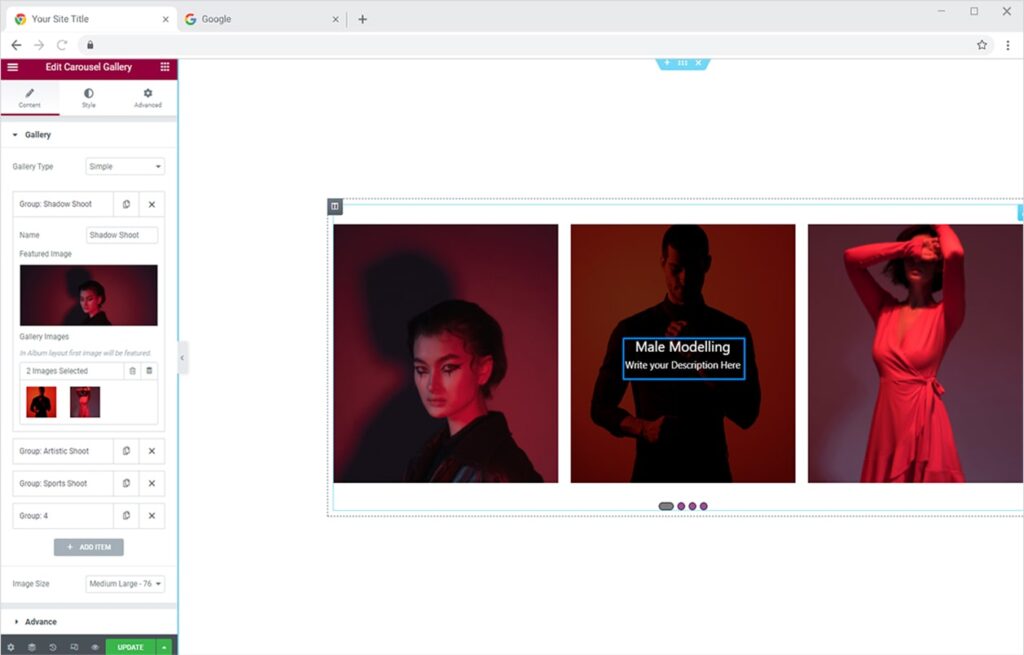
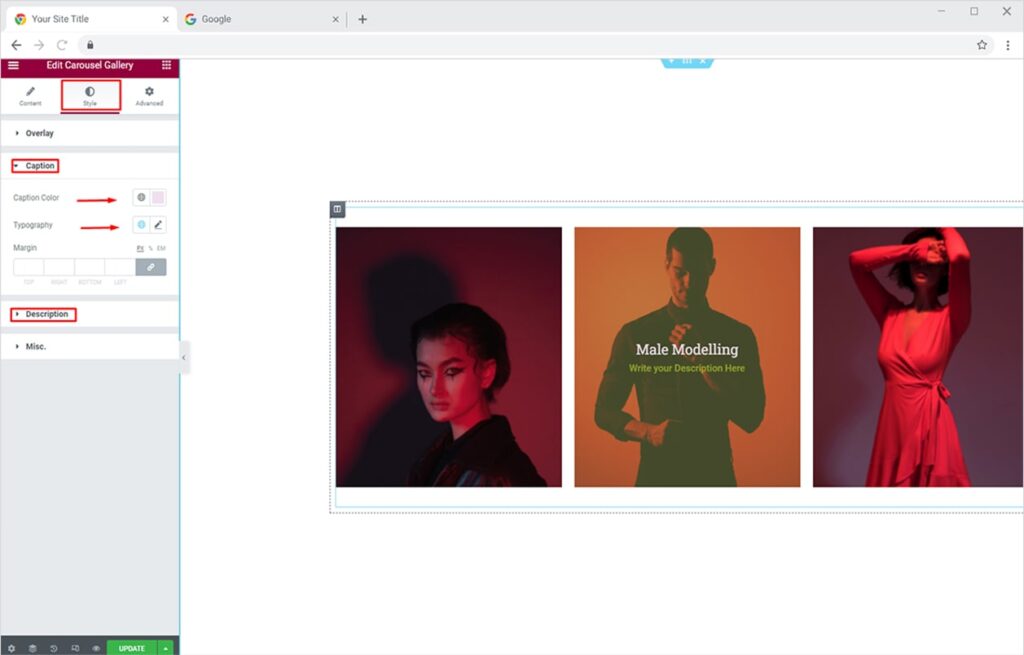
Now from the Style tab, you can change the color, and typography and adjust the margin for your caption and description.
How to Add & Style Preview Popup for Carousel Gallery
Now that everything is set up nice and stylish for your gallery items. You surely want to highlight every detail in a presentable way to your site visitors once they click on any of your gallery items. Using the Pop-up feature you can attract a lot of potential users because you are showing them every single detail about your Product/Service. Enabling this feature will help you highlight all the details of the item.
Just move towards the Pop-up section in the Content Tab and change the options in front of the pop-up menu from default to any of these (Classic, Creative, Innovative, Minimal, or even None). Moreover, the default settings of this option can show the thumbnails of other gallery items, an icon for downloading, and social sharing of your gallery item in the Popup Section. You can also deactivate these
features if you want to.
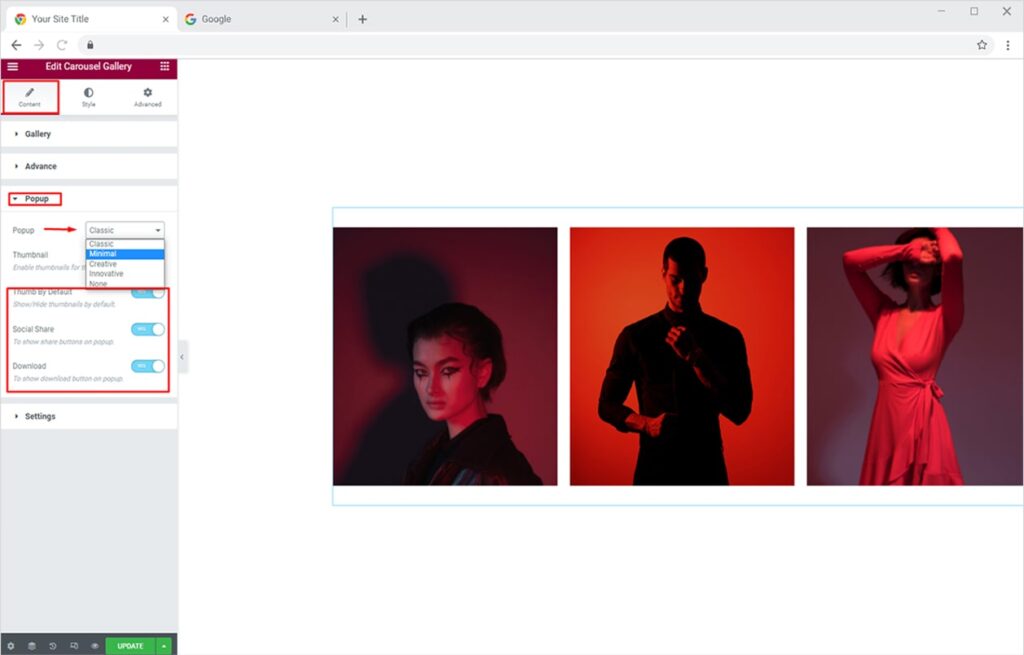
Let’s show you a preview with the minimal popup effect, that is how it will look in real-time.

How to Add & Style Item Hover Effects for your Portfolio in Elementor
You can add appealing hover effects on your gallery items in a glimpse of time. Let’s design them to instantly attract your site visitors. Go to the Style Tab and click on the Overlay section. From the options available, you can add any of the 12+ Pro Hover effects. To make your hover effect more appealing you can also set a solid color as a background type. To do this, select the Classic option from the Background Type section, set the color of your choice, and give it the opacity you want.
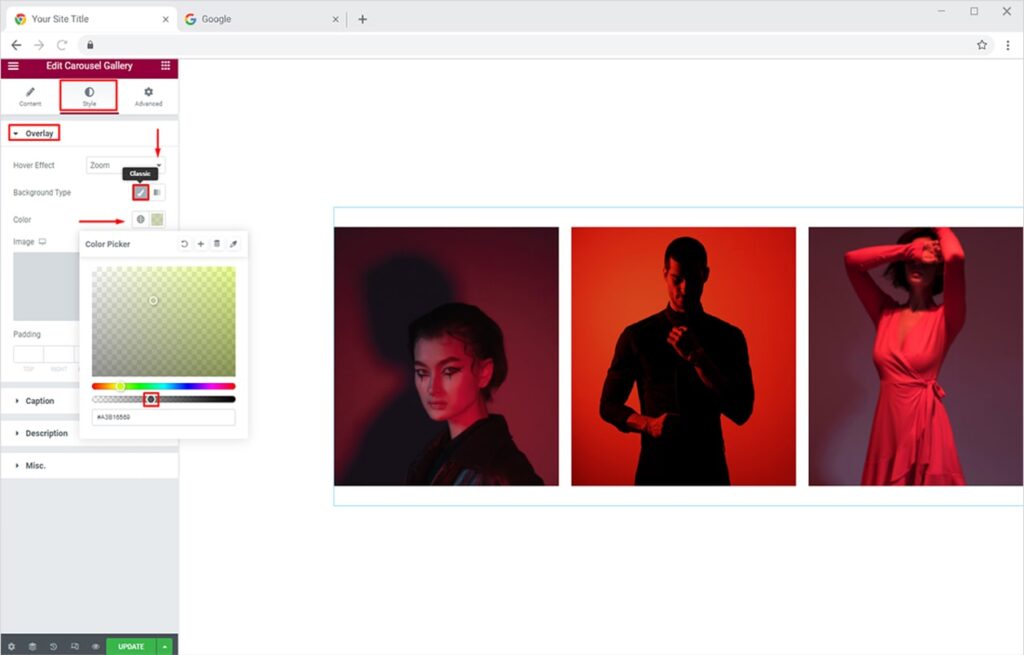
Your gallery items will look like this with the ‘Reveal Top’ effect when the user hovers on your gallery items

Best Carousel Gallery Widget for Elementor
This is all from our Xpro Carousel Gallery Widget for Elementor. I have highlighted all the important details about this amazing widget. I am hopeful now that you have a better understanding of how to fully utilize every section of the Content & Style Tab of our amazing carousel gallery widget. Now you can create the most attractive and sassy layouts for your gallery with our unique Xpro Advanced Gallery widget for Elementor. You will surely find more incredible editing options about this unique, time-saving widget once you start using it. Moreover, if you want to create a quick simple gallery for Free, switch to our doc of FREE Xpro Simple Gallery widget for Elementor right now.
Xpro Elementor provides more than 50 free Elementor addons that can help you create a good-looking site. Get our premium Elementor Addons to create the best-looking website.