How to Install Elementor Display Conditions Extension
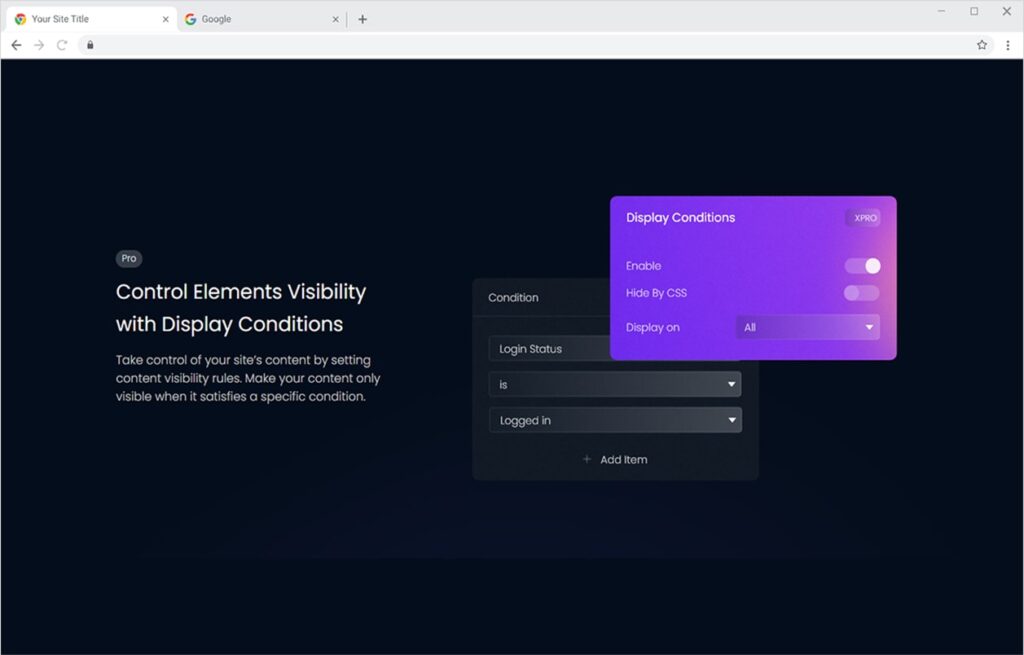
Xpro Display Conditions for Elementor is a premium extension that offers you a professional way to manage your website content by setting custom conditions. It’s the perfect solution for marketers and online stores who want to create targeted campaigns for website visitors.
You can set display conditions based on different scenarios:
- User Roles
- Login Status
- Operating System
- Browser
- Date & Time
- Single (post, page, post type)
- Archive (taxonomy, term, date, author, search, post type)
The extensions come with the Pro version of Xpro Elementor Addons and let you take control of your site’s content by setting content visibility rules. It helps you to set your content only visible when it satisfies a specific condition, thus achieving your marketing and business goals! You buy any Pro plan that’s suitable for you here. It’s super easy and fun to set up. Let’s try all features of the Xpro Scroll Effect for Elementor.
Requirements
You need to install and activate the Pro version of Xpro Elementor Addons to use our Display Conditions Extension for your Elementor websites. Once the plugin is installed and activated, just make sure Xpro Display Condition is ‘Enabled’ from the Extensions tab of the Xpro Dashboard. This way you will easily find & use the effect in the Elementor editor.
Follow the steps below to enable the extension:
Step 1
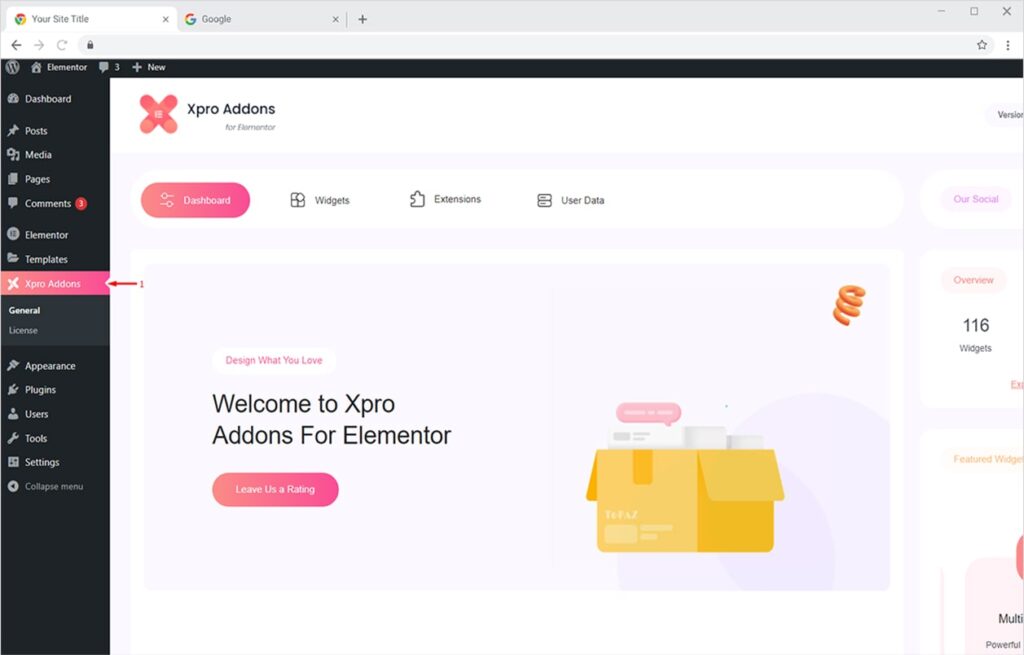
Click on the Xpro Addons option available in the WordPress dashboard menu.
Step 2
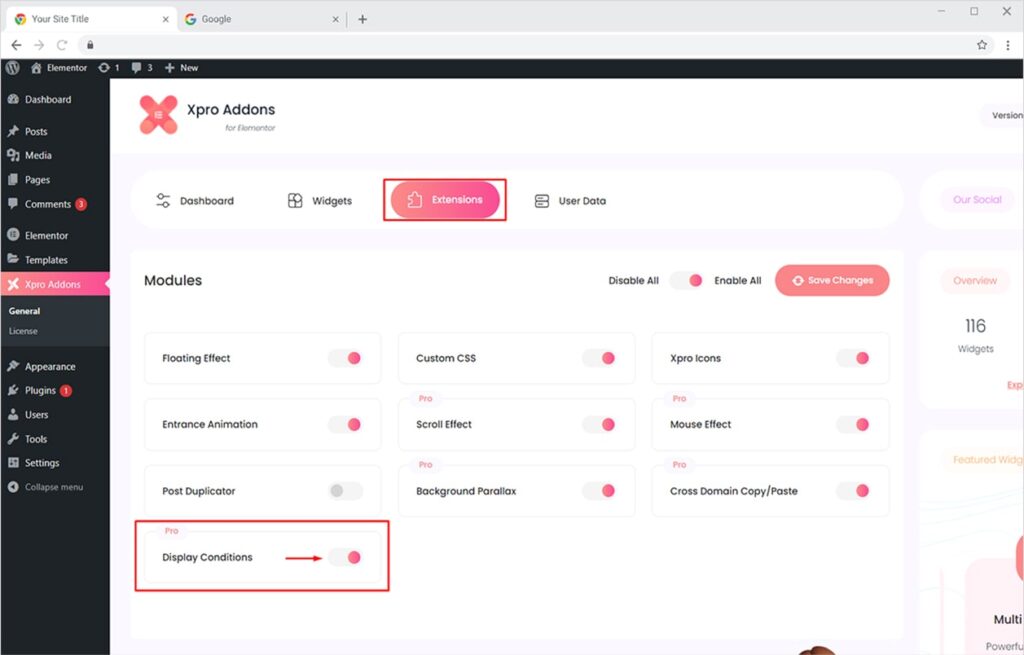
From the Dashboard, click on the Extensions Tab, find the Display Conditions extension, and then toggle the button ‘ON’ to enable it.
How to Use Xpro Display Conditions for Elementor
Once your Pro version of Xpro Elementor Addons is installed and activated, you can easily customize display rules for your site elements in no time. It’s fun, saves tons of your time, and doesn’t require any coding skills. Basically, the premium extension allows you to Enable or Disable any element based on multiple conditions and rules. Let’s see how you can use premium Xpro Display Conditions for Elementor.
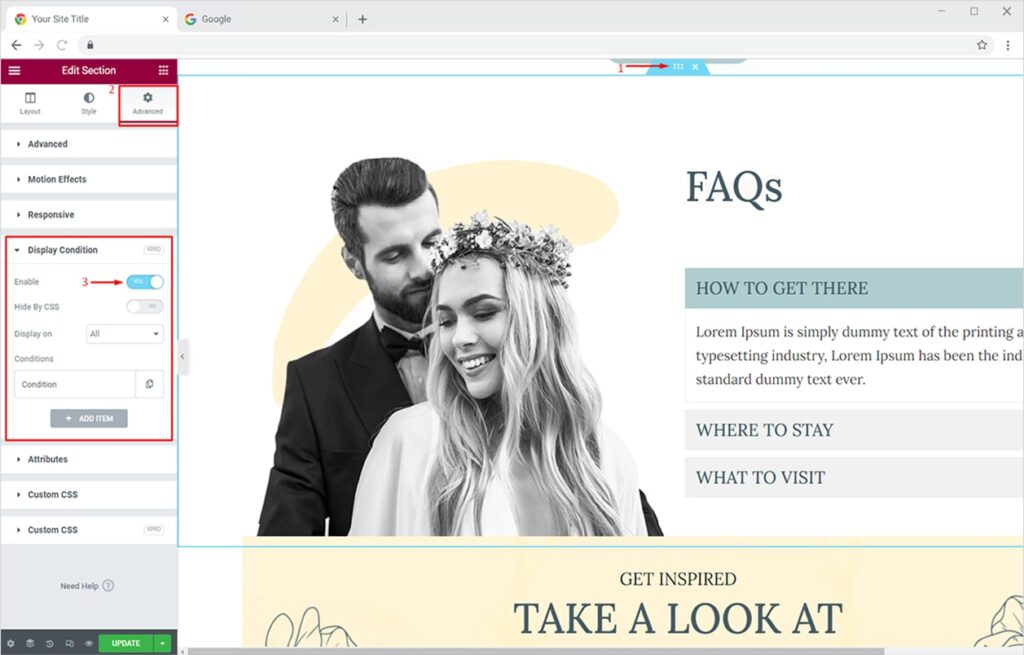
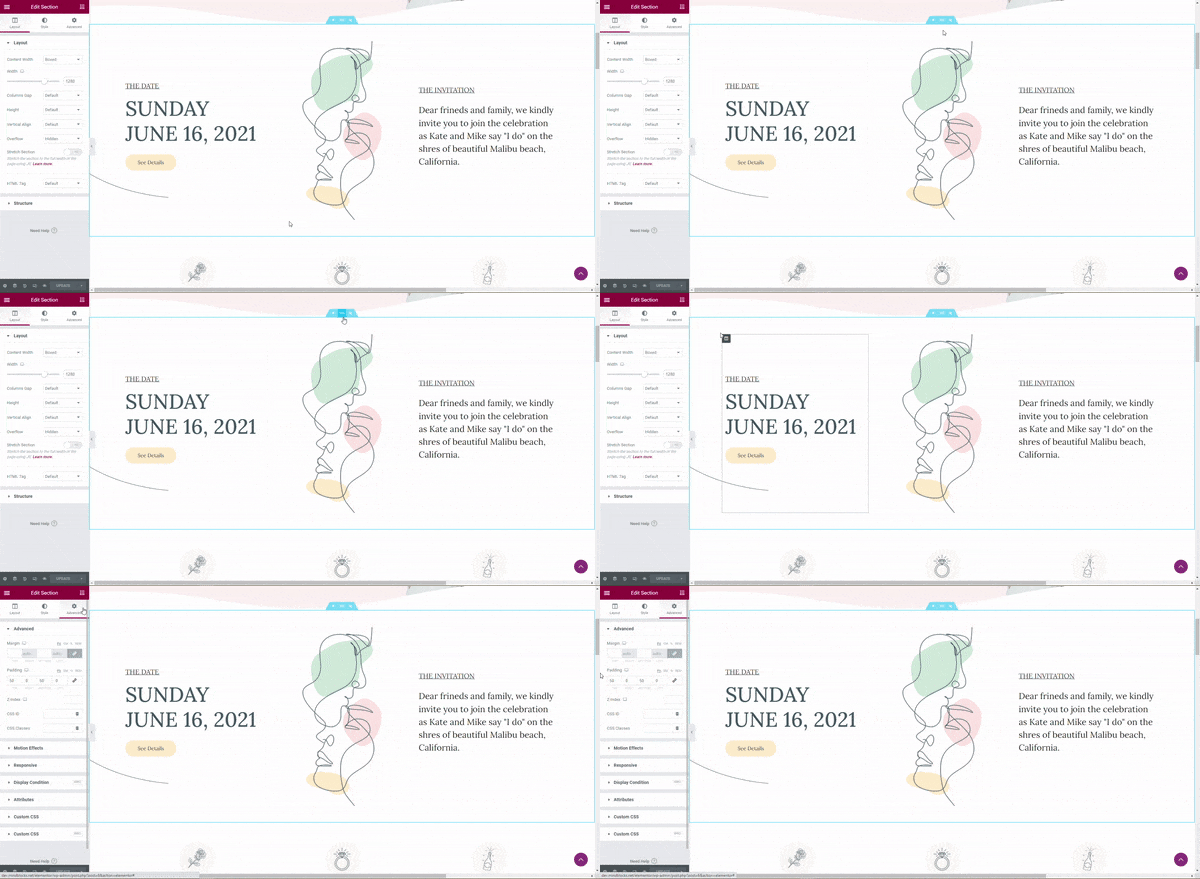
Select the widget, section, or column you want to apply the scroll effect on, and then click the Advanced Tab to find the Display Condition section. Now toggle the button to Yes and enable the feature.
Xpro Display Condition for Elementor – All Features
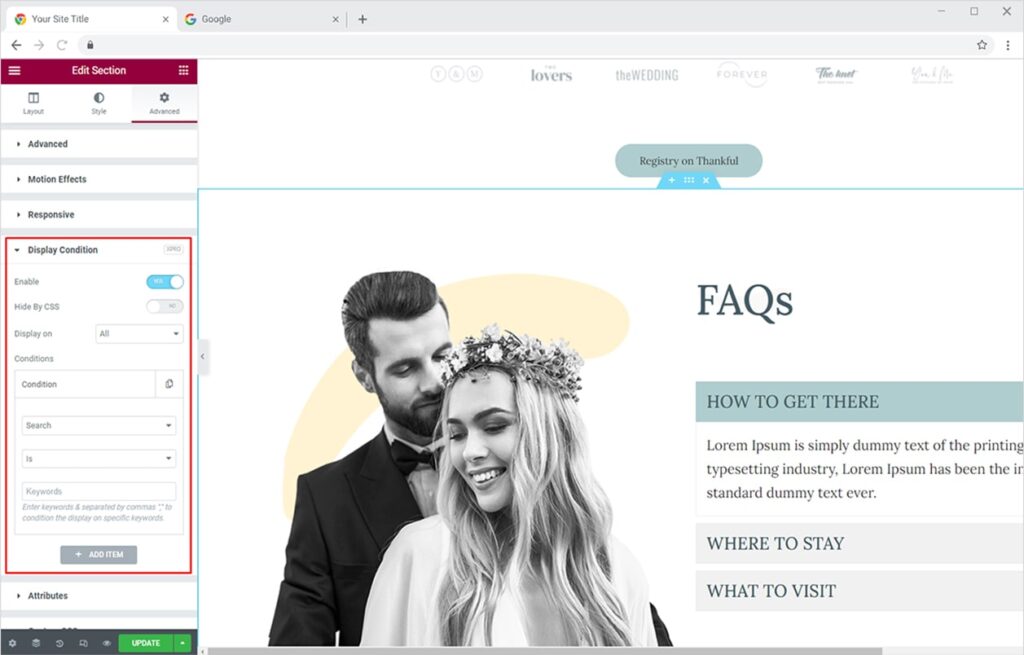
Once you enable the Display Condition extension, you will see multiple options under the section. You can use these settings to set rules for any element like section, widget, or column. For example, you can display a particular element only to Logged Out users and disallow users who have Logged In to view the same element. Let’s go through each option one by one.
Hide By CSS
If this option is turned on, it will render HTML on the front-end and the selected element will be hidden by using Display; None CSS. If disabled, HTML content will not load.
Display On
You get two options here:
- All – all rules are true
- At least one – any of the defined rules is true
Conditions
All display conditions are available under the ‘Conditions’ option. Here you can see and set any of the available display conditions. Currently, there are a total of 17 conditions available under 4 main categories. You can set the required conditions from the list. We will discuss each condition later on.
Add Item
You can add as many conditions as you like from this button. Once you set any condition, click on the ‘Add Item’ button to add another condition.
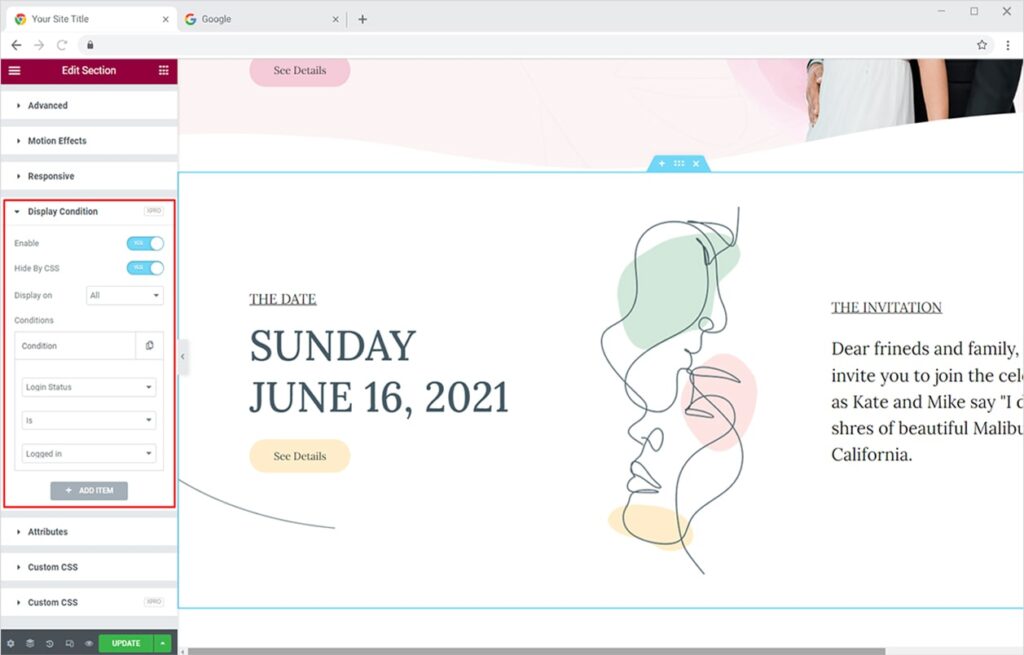
Let’s see how all options under ‘Conditions’ can be used to achieve our goals for site visitors.
Set Conditions based on Login Status of Site Visitors
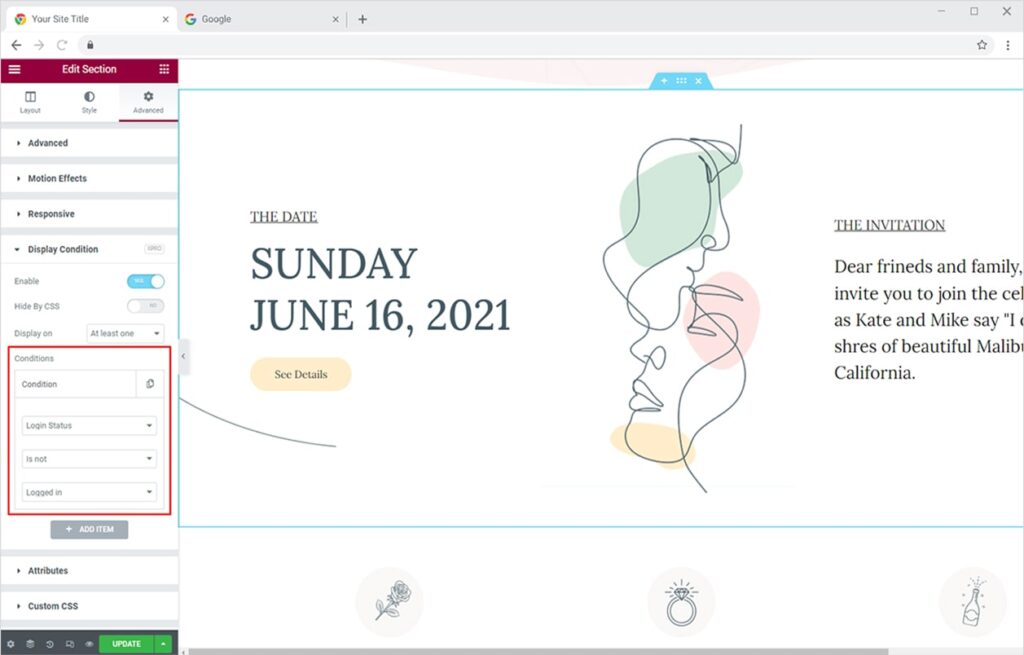
You can set Display Conditions for a specific element based on the status of the visitor, i.e., Logged In or Logged Out.
- Set Login Status > Is > Logged in – to display elements for logged in users
- Set Login Status > Is Not > Logged in – to display elements for logged out users
It’s as simple as that!
Set Conditions based on User Roles
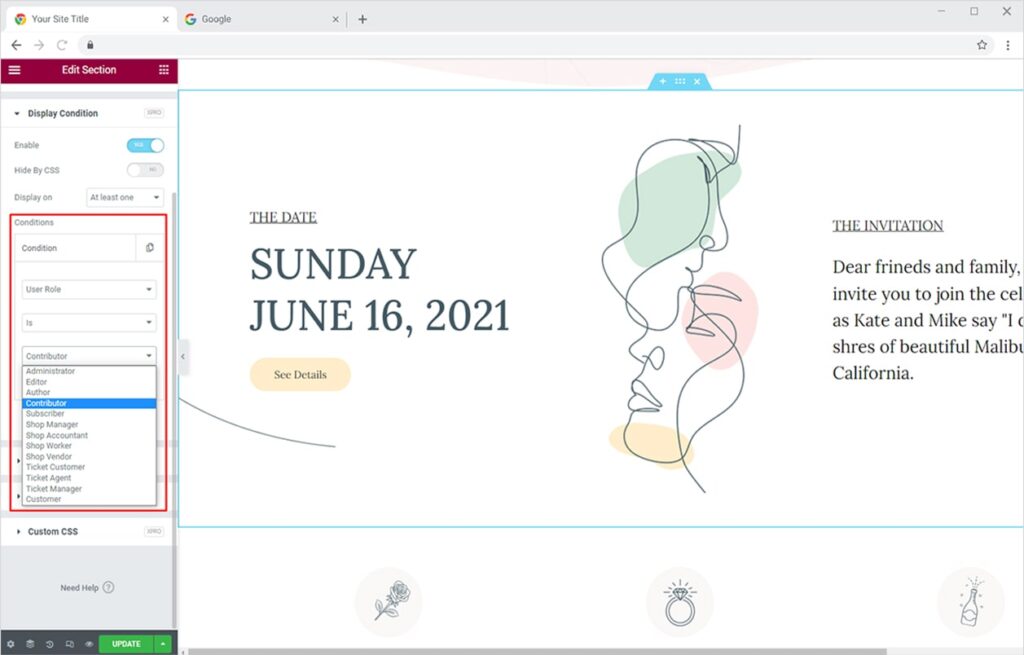
You can easily manage the visibility of web content based on User Roles like Administrator, Editor, Author, etc.
To set the display rule, you have to follow this general rule:
- Set Visitor > User Role > Is / Is Not > Select user role
Here’s a list of all user roles:
- Administrator
- Editor
- Author
- Contributor
- Subscriber
- Shop Manager
- Shop Accountant
- Shop Worker
- Shop Vendor
- Ticket Customer
- Ticket Agent
- Ticket Manager
- Customer
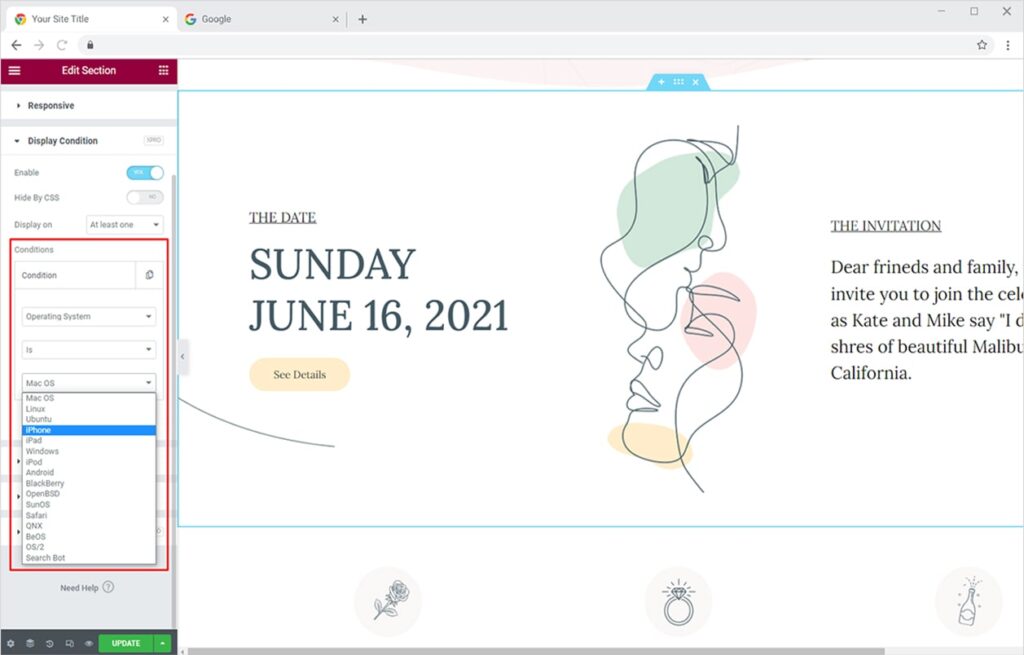
Set Conditions based on Operating System
You have the freedom to display specific web elements only to people who browse your website on an Operating System you specify. If you want to display the content to any specific operating system then you can use this conditional rule.
To set this conditional rule, you have to follow this general rule:
- Set Visitor > Operating System > Is / Is Not > Select operating system
Here’s a list of all operating systems available in Xpro Display Conditions for Elementor:
- macOS
- Linux
- Ubuntu
- iPhone
- iPad
- Windows
- iPod
- Android
- Blackberry
- OpenBSD
- SunOS
- Safari
- QNX
- BeOS
- OS/2
- Search Bot
Set Conditions Based on Browser
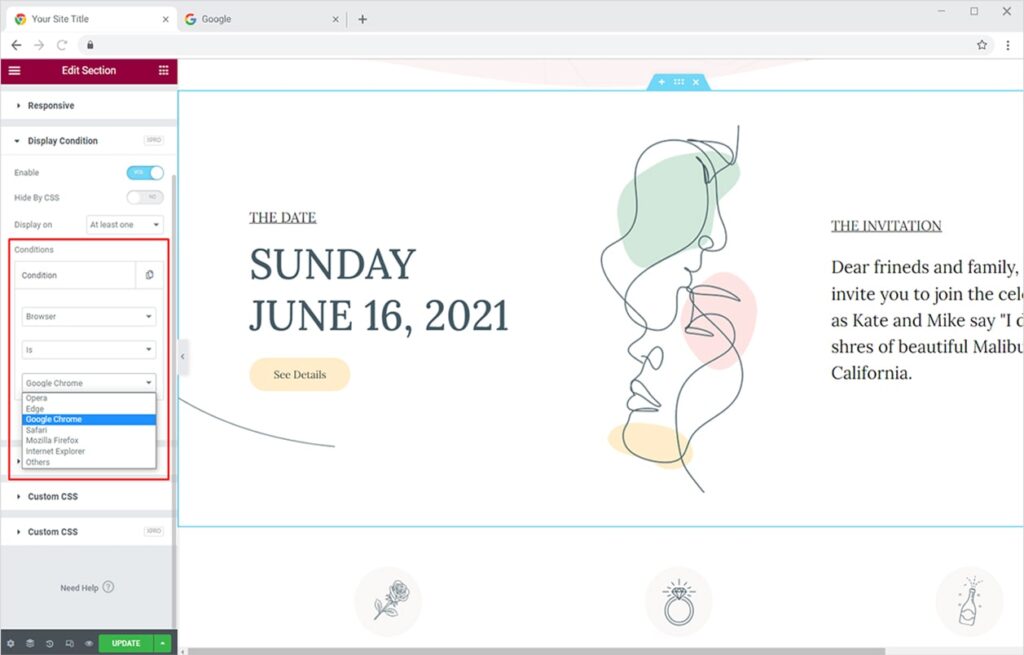
You have the option to display/hide any element from people visiting your website on a specific browser.
To set this conditional rule, you have to follow this general rule:
- Set Visitor > Browser > Is / Is Not > Select Browser
Here’s a list of all browsers available:
- Opera
- Edge
- Google Chrome
- Safari
- Mozilla Firefox
- Internet Explorer
- Others
Set Conditions Based on Date & Time
You can define display rules based on a date range, specific time, and days of the week.
This section offers 3 options:
- Current Date
- Time of Day
- Day of Week
Current Date
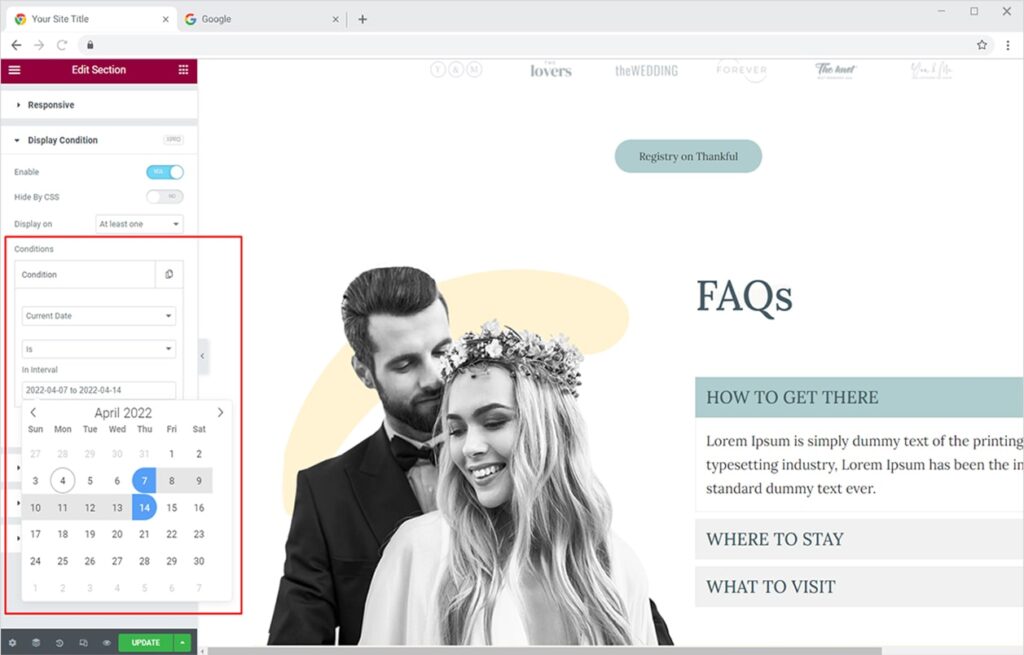
You can select a date range of your choice to display or showcase elements. This is a great feature to display marketing content like banners, promotional sales, etc.
You can:
- Choose any interval
- Display or hide elements on specific dates
Simply follow this rule:
- Set Date & Time > Current Date > Is / Is not in Interval > Select Date Range
Time of Day
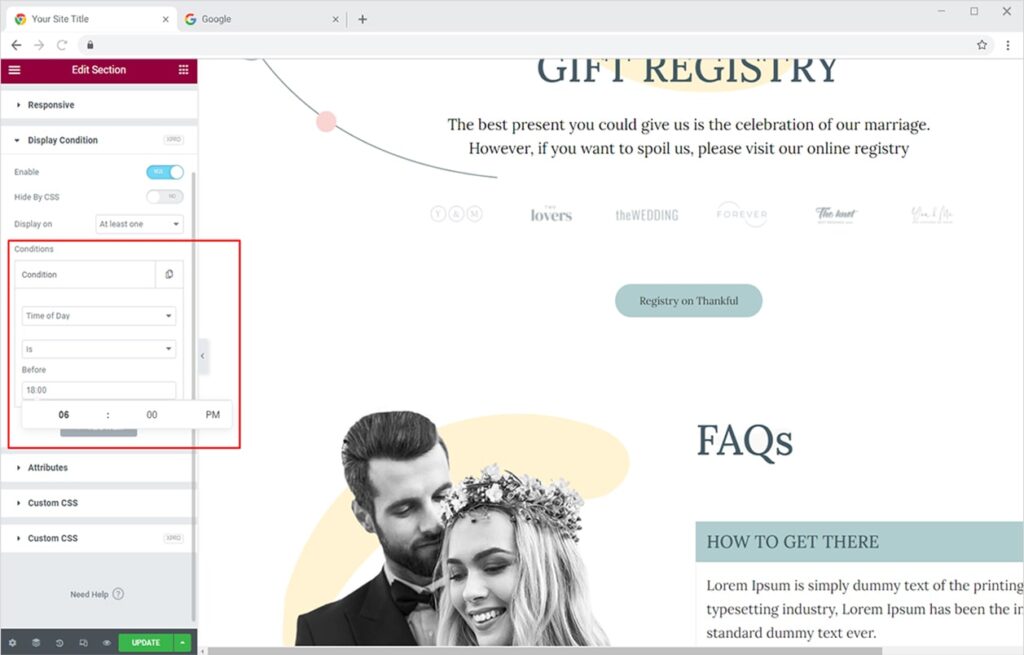
This option gives you the freedom to select a time to display/showcase specific elements. If you want to hide an element before or after a specific time then use this display condition option.
Simply follow this rule to set ‘before’ time (120hour format):
- Set Date & Time > Time of Day > Is / Is not Before > Select Time
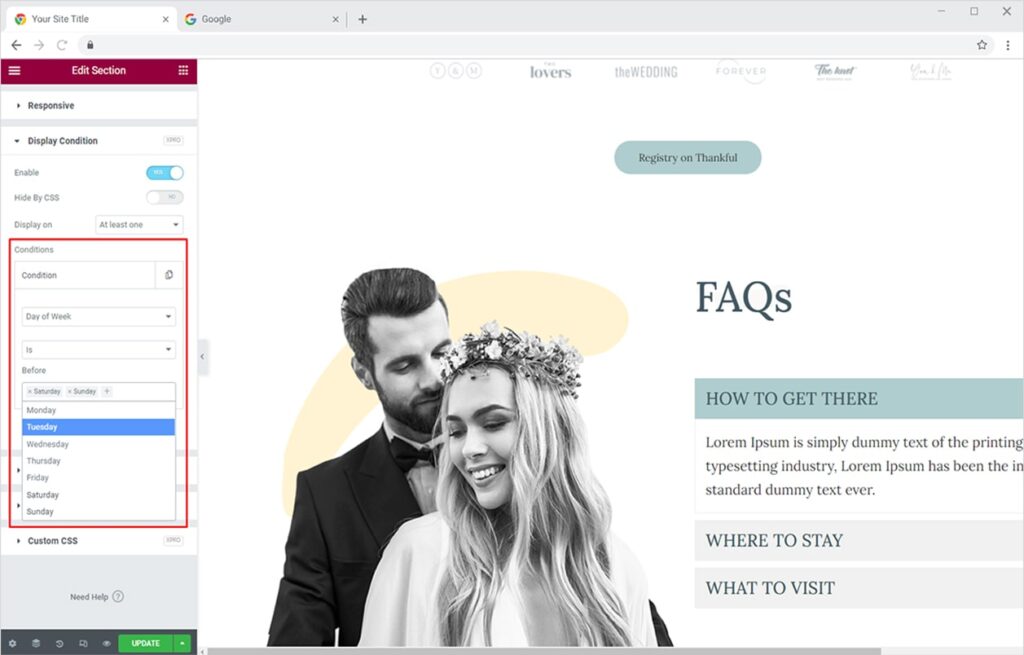
Day of Week
You can select multiple days of your choice to display/hide elements. This is a great feature to display marketing content like banners, promotional sales, etc. on specific days.
You can:
- Choose any day from Sunday to Monday
- Display or hide an element on specific days
Simply follow this rule to choose days of the week:
- Set Date & Time > Day of Week > Is / Is not Before > Select Day/s
Set Conditions Based on Singulars
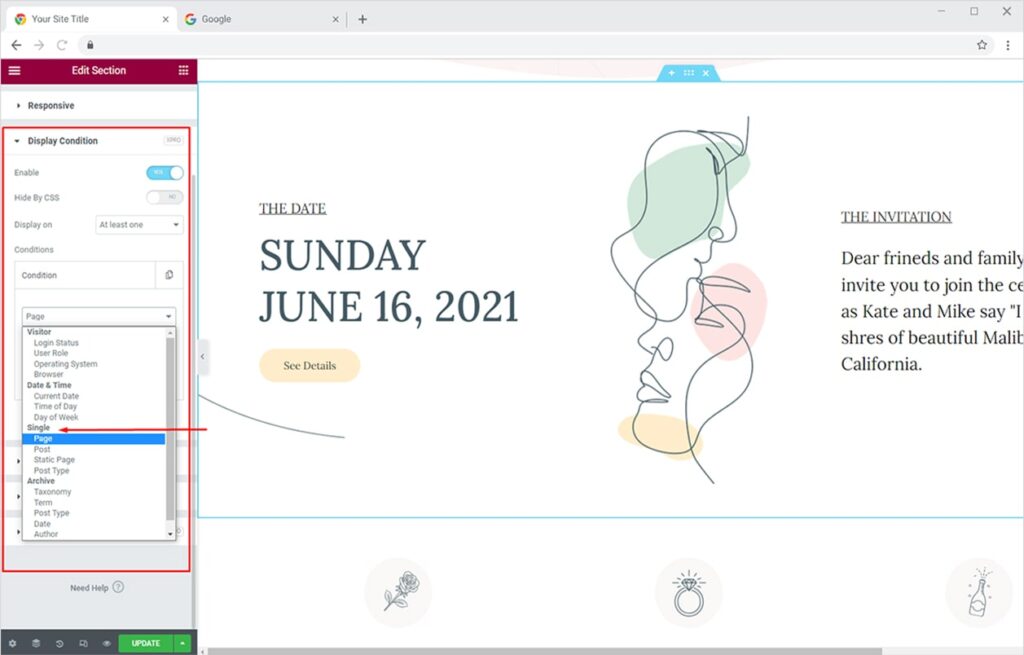
Xpro Display Conditions extension for Elementor gives you the complete freedom to set rules on almost all parts of your website. That being said, you can set display rules for a single page, single post, static page, etc. You can easily:
- Set rules for available pages on your website
- Set rules for available posts on your website
- You can also set display rules for static pages like homepage, 404 page, blog page, etc.
You get 4 options under the Static section.
- Page
- Post
- Static Page
- Post Type
Page
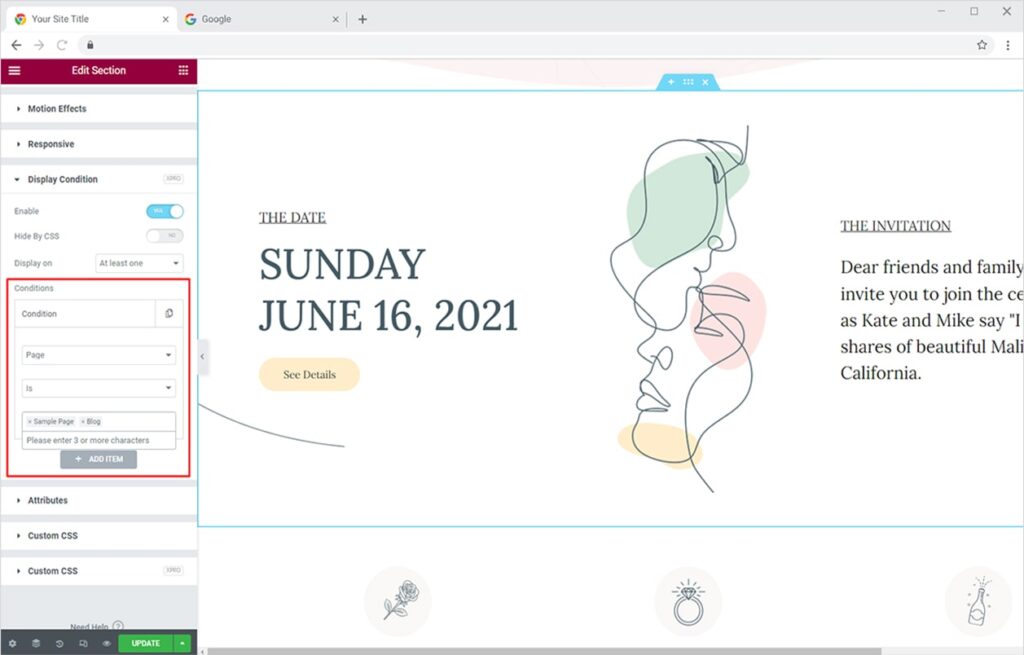
Set display rule for single page by following the steps below:
- Set Single > Page > Is / Is not > Enter Page Name
Post
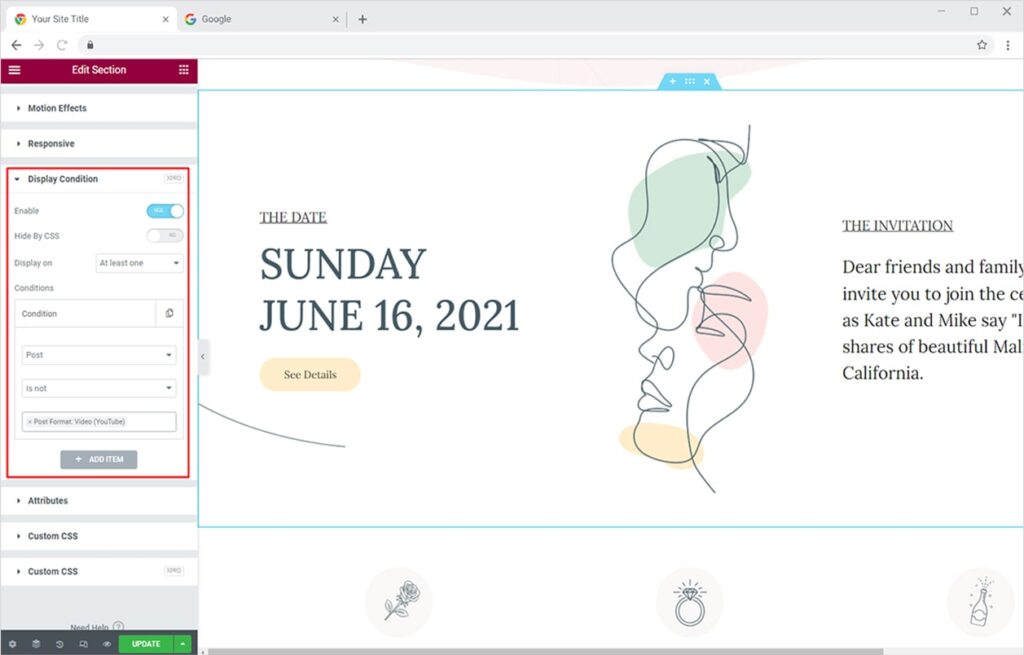
The feature lets you display/hide specific posts available on your website.
Set display rule for a single post by following the steps below:
- Set Single > Post > Is / Is not > Enter Post Name
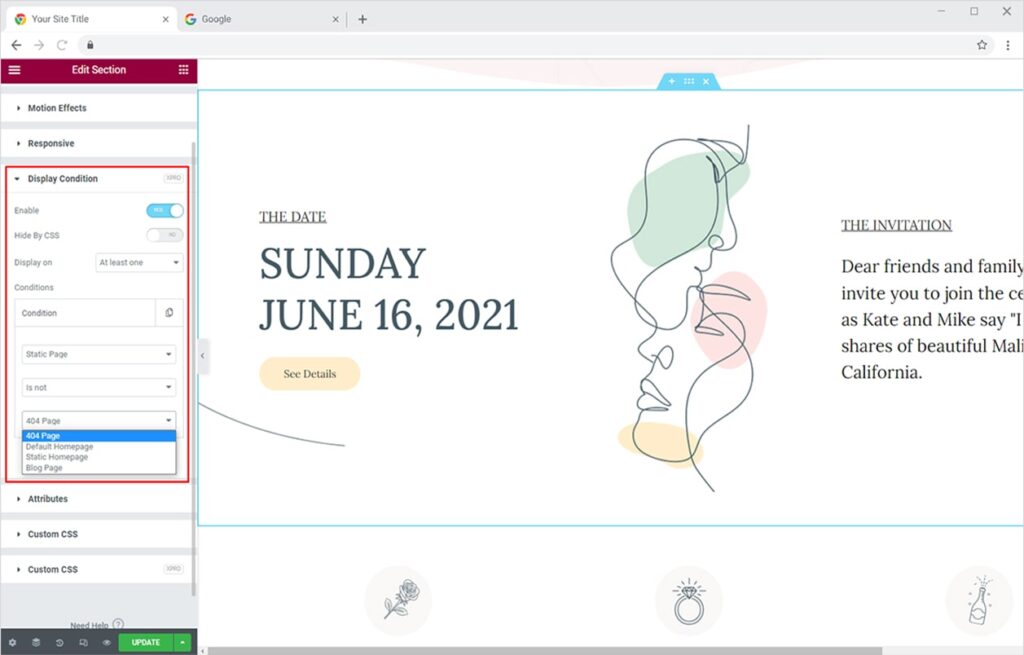
Static Page
This condition lets you display/hide static pages like 404 page, homepage, blog page, front page, etc.
Set display rule for single page by following the steps below:
- Set Single > Static Page > Is / Is not > Choose from List
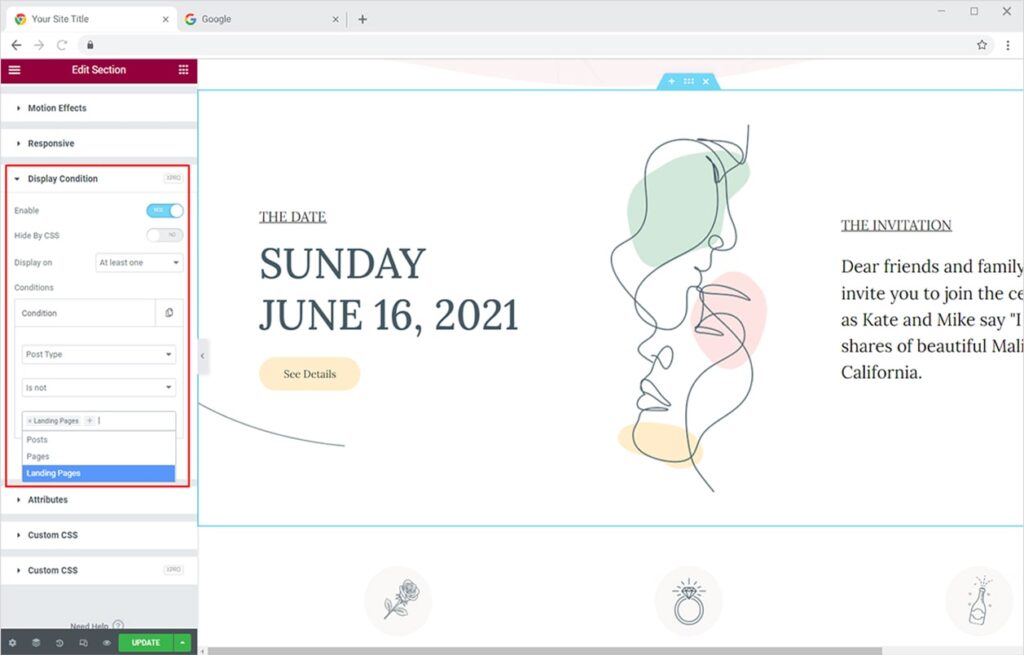
Post Type
Set display rules for specific post types like landing pages, posts, and pages.
Follow the steps below to set up post type rules:
- Set Single > Post Type > Is / Is not > Choose from List
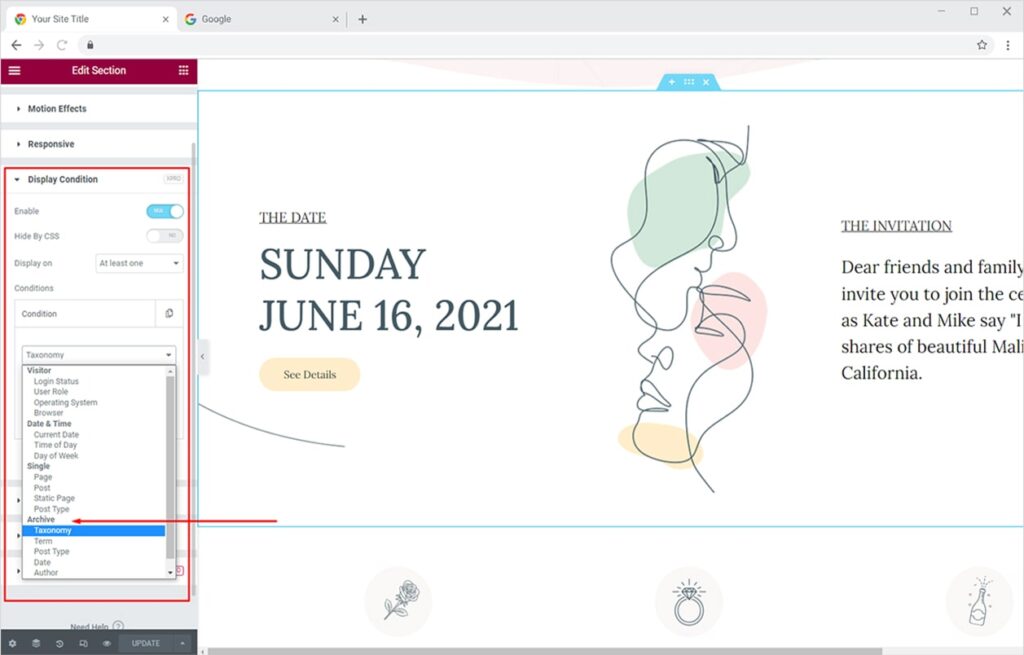
Set Conditions Based on Archive
Xpro Display Conditions extension for Elementor gives you the complete freedom to set display rules for archives of your website like taxonomy, post type, author, search, date archives, etc.
You can easily:
- Set rules for available archive pages on your website
- Set rules for author, date, term archives
You get 4 options under the Static section.
- Taxonomy
- Term
- Post Type
- Date
- Author
- Search
Taxonomy
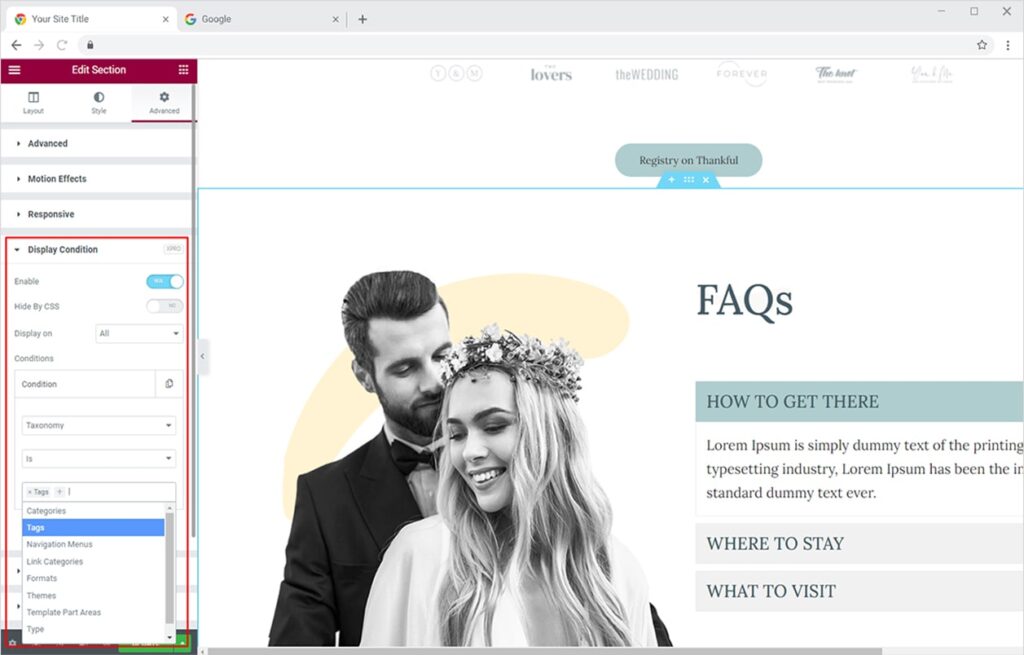
Set display rules for all taxonomies available on the website. Follow the steps below:
- Set Archive > Taxonomy > Is / Is not > Choose Taxonomy/s
You get a list of all available Taxonomies here:
- Tags
- Categories
- Navigational Menus
- Link Categories
- Formats
- Themes
- Template Part Areas
- Type
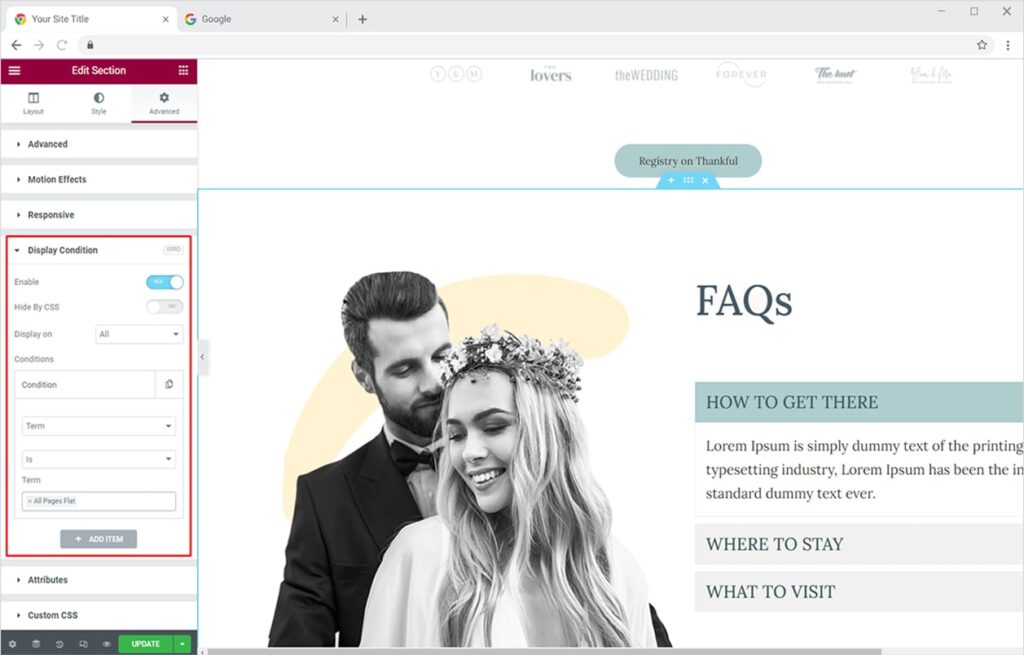
Term
Set display rules for all terms available on the website. Follow the steps below:
- Set Archive > Term > Is / Is not > Type your term
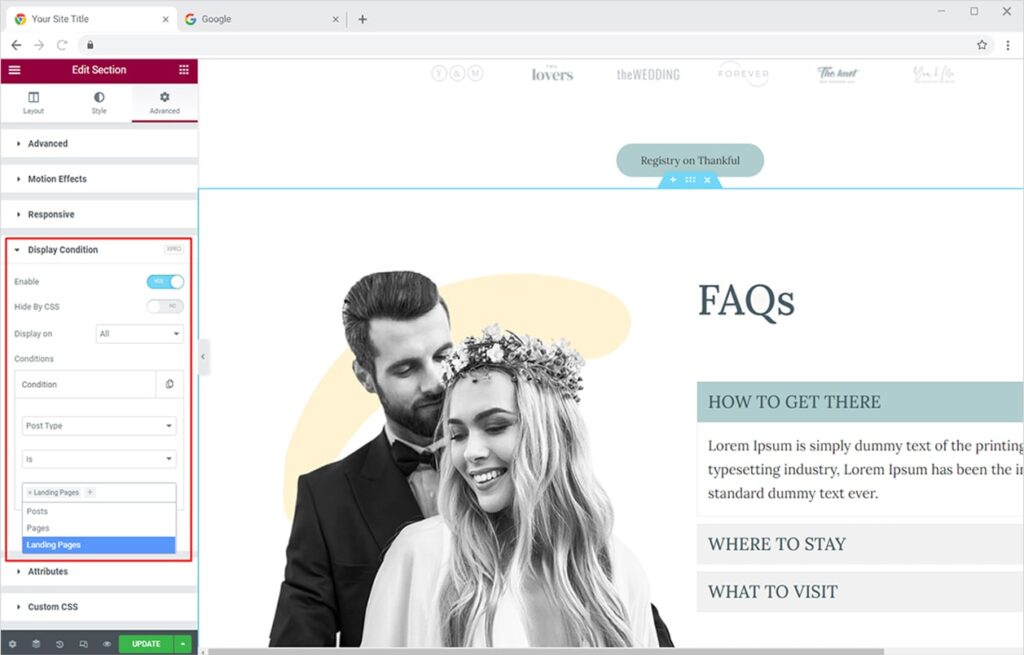
Post Type
Set display rules for all post types available on the website. Follow the steps below:
- Set Archive > Post Type > Is / Is not > Choose Post Types
You get a list of all available Post Types here:
- Posts
- Pages
- Landing pages
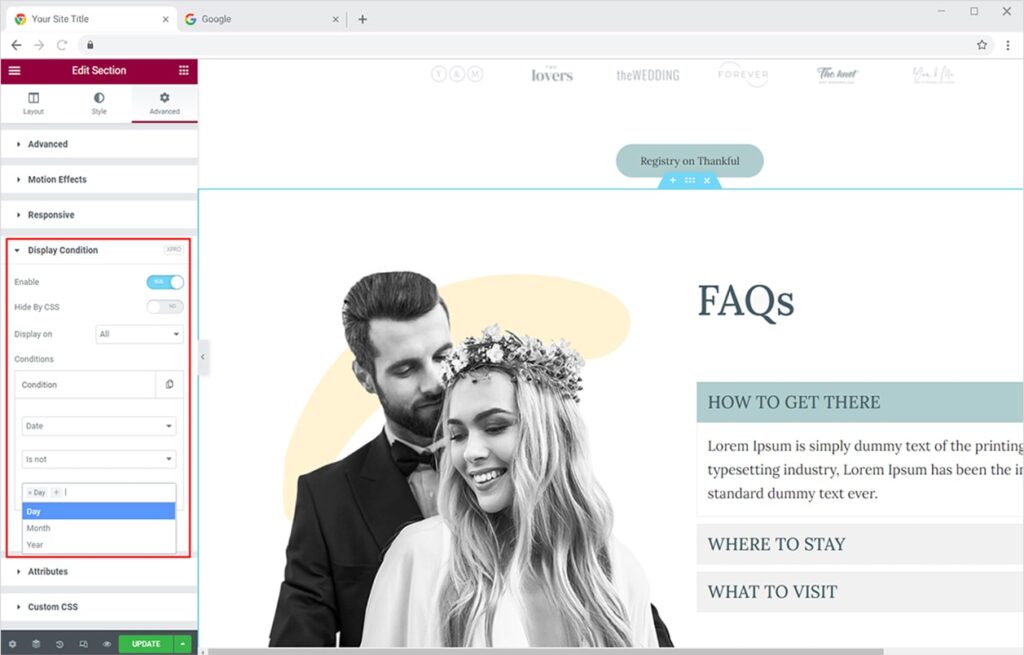
Date
Set display rules for all dates available on the website. Follow the steps below:
- Set Archive > Date > Is / Is not > Choose from list
You get a list of all available date filters by:
- Day
- Month
- Year
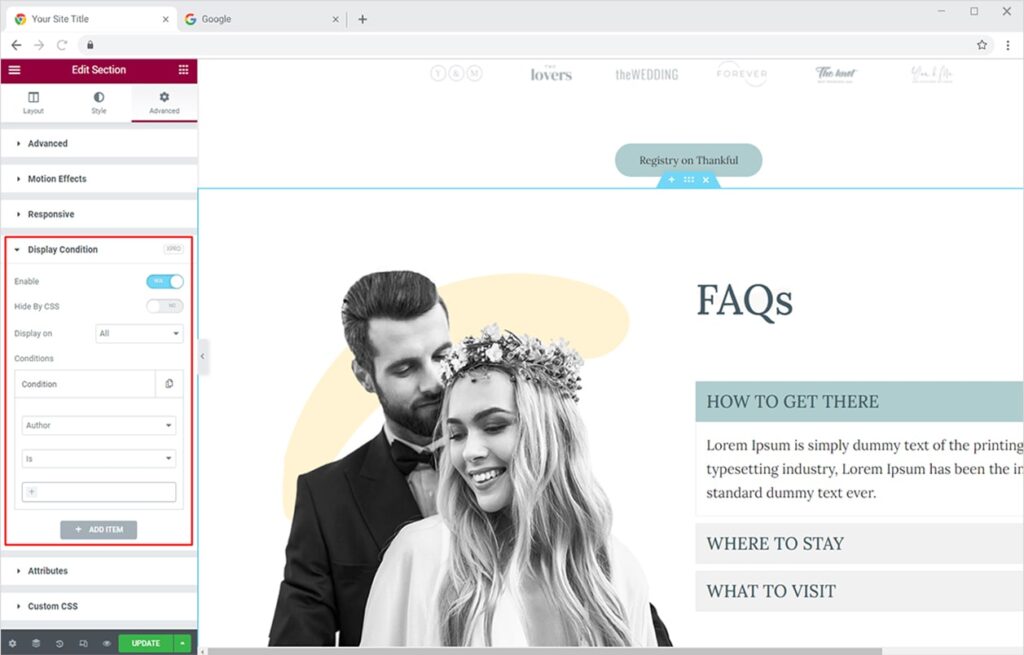
Author
Xpro Display Conditions for Elementor lets you tweak display rules for site authors too. Follow the steps below:
- Set Archive > Author > Is / Is not > Choose authors from list
Search
Xpro Display Conditions for Elementor lets you define display conditions for search terms too. Follow the steps below:
- Set Archive > Search > Is / Is not > Enter keywords
Best Display Conditions Extension for Elementor
Xpro Elementor Display Conditions truly gives you the freedom to achieve your marketing goals by displaying your content only when it satisfies a specific condition. With this magical extension for Elementor, you can create unlimited combinations & advanced display conditions/rules for your content. It’s a huge time saver, as you can do more with existing content without creating multiple templates for specific goals.
You can also add an amazing Background Parallax effect to your website using the Pro version of Xpro Elementor Addons. Simply view our detailed guide on how to add background parallax to Elementor websites and quickly get started.
I hope you have a better understanding of how to get the most of our Display Conditions extension for Elementor. You can view all of our unique Elementor Features and start building professional websites right away.