
The XPro Weather Widget pulls its data from the Google Weather API — but before it can show live temperatures on your Elementor site, you need to generate an API key and connect it. That happens in the Google Cloud Console, not inside WordPress, so it can feel unfamiliar the first time you do it.
Here’s the whole process, start to finish.
What You’ll Need
- A Google account
- A credit card (Google requires billing to be enabled, even though the Weather API has a free monthly quota)
- 5–10 minutes
Step 1: Create a Google Cloud Project
Every Google API key lives inside a “project” — think of it as a container for your API usage and billing.
- Go to the Google Cloud Console.
- Sign in with your Google account.
- Click the project dropdown at the top of the page, then New Project.
- Give it a name you’ll recognize later — something like “My Site Weather Widget” works fine.
- Click Create.
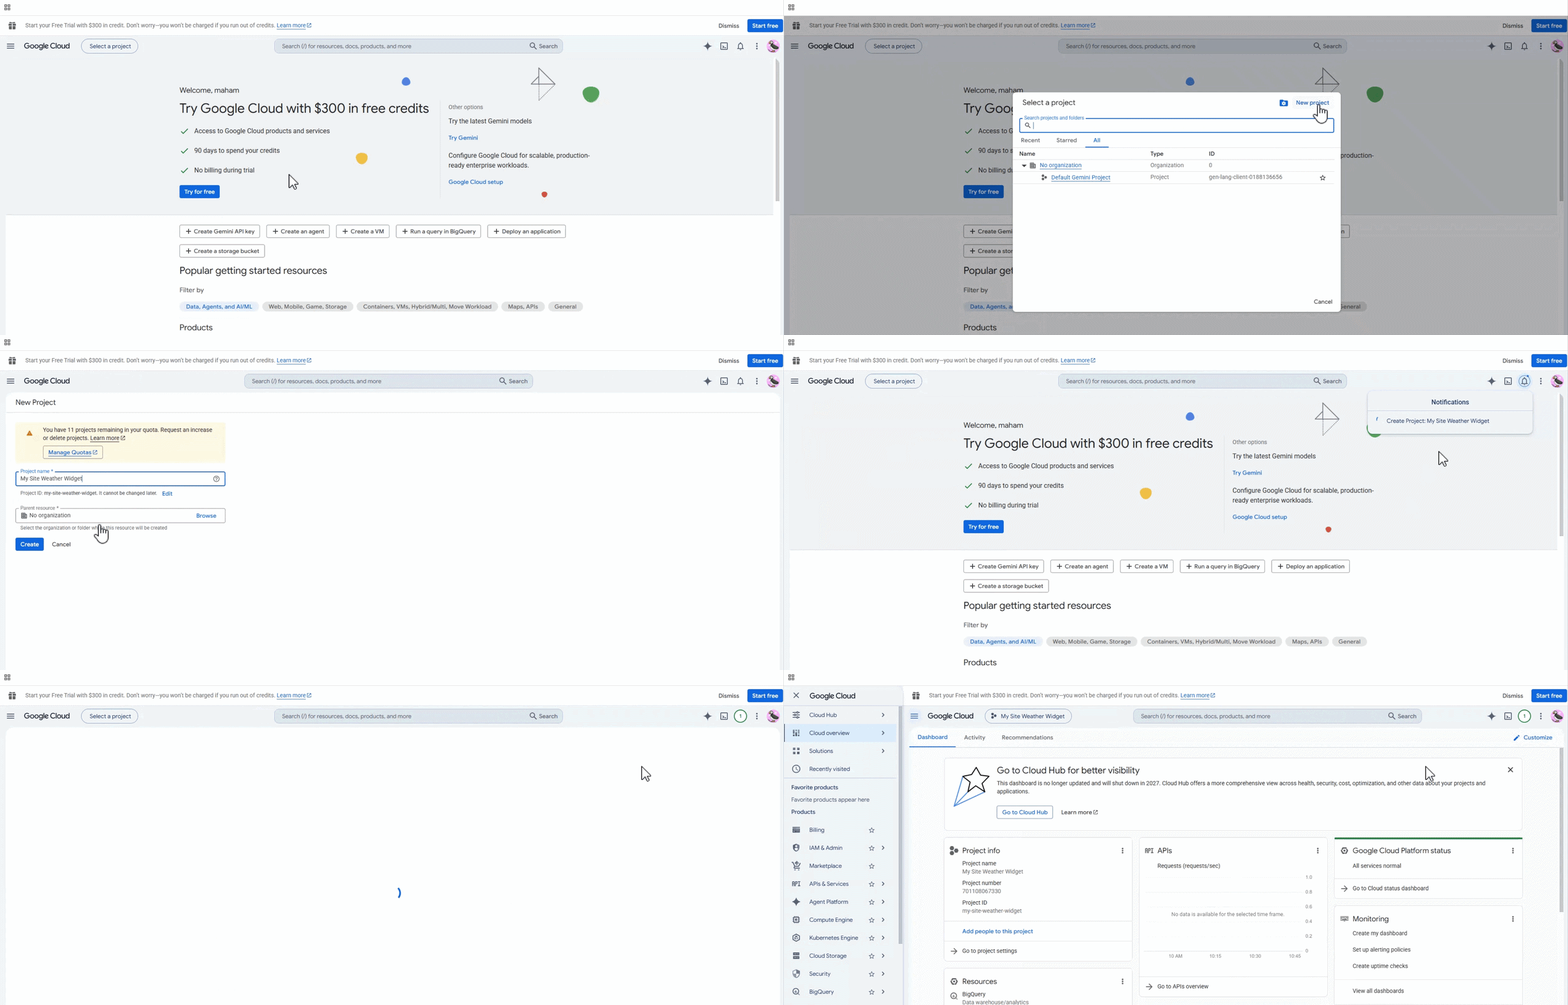
If you already manage other Google APIs (Maps, Analytics, etc.), you can reuse an existing project instead of creating a new one.
Step 2: Enable Billing
The Weather API won’t activate without a billing account attached to the project — this is a Google requirement across most of their APIs, not something specific to weather data.
- In the Cloud Console, open the Billing page from the left-hand menu.
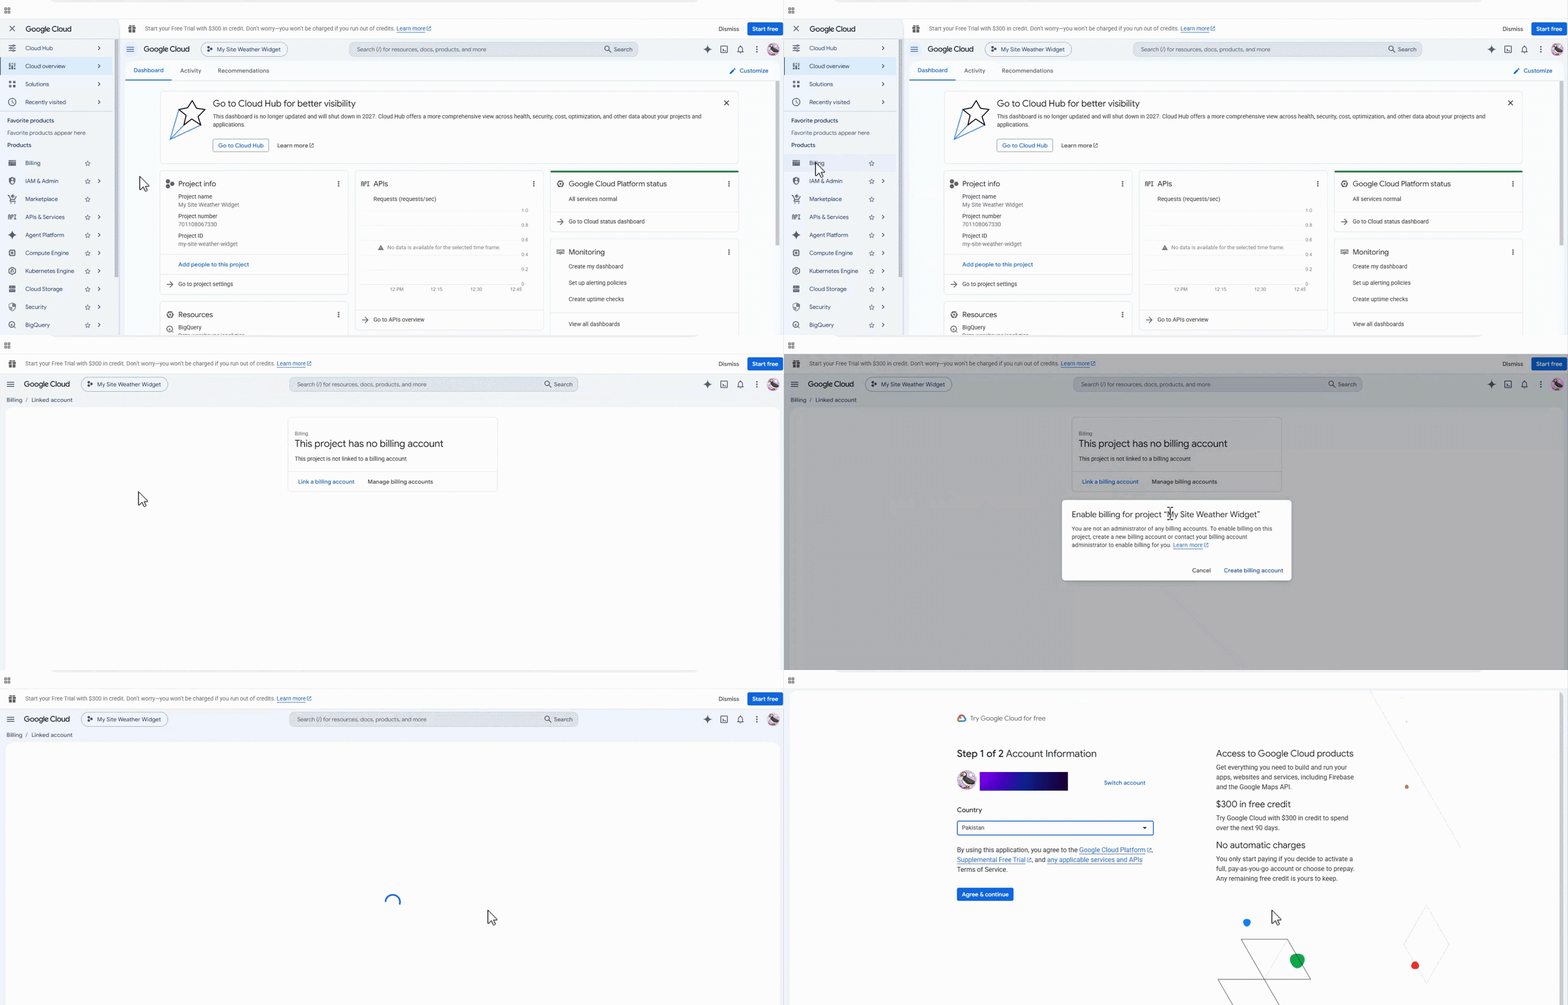
- If you don’t have a billing account yet, click Create Billing Account and follow the prompts to add a payment method.
- Select your Country, click agree & continue.
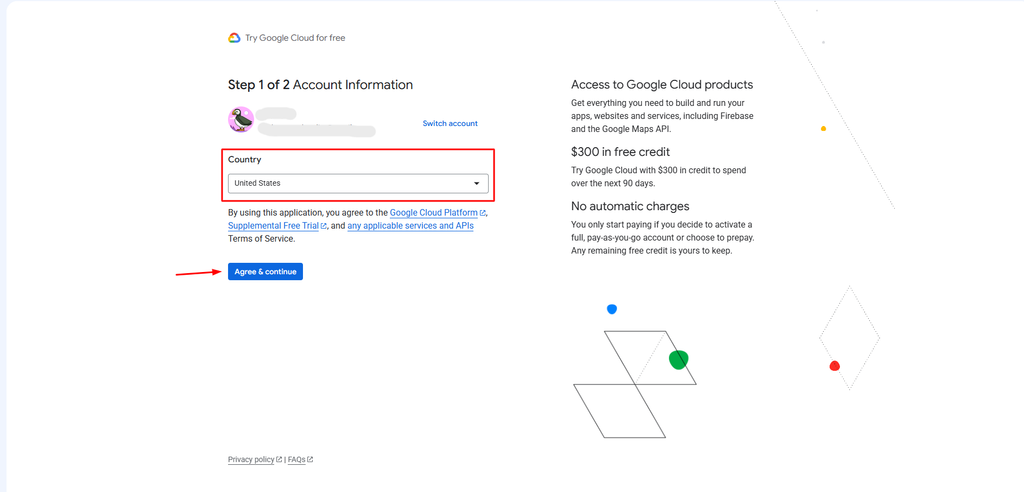
- Then in next step, click on add name and address
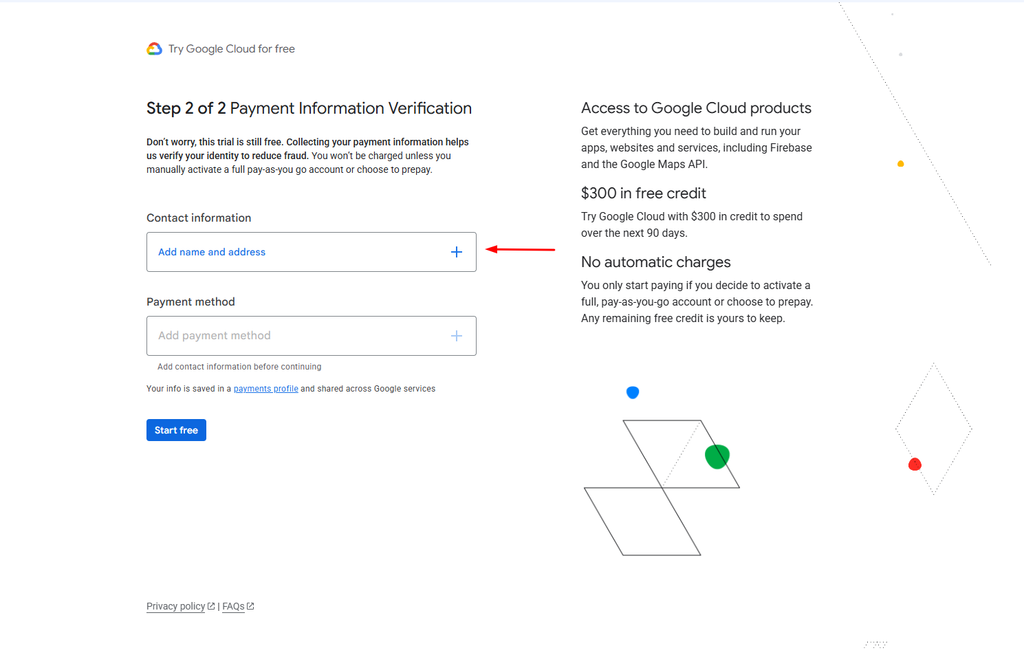
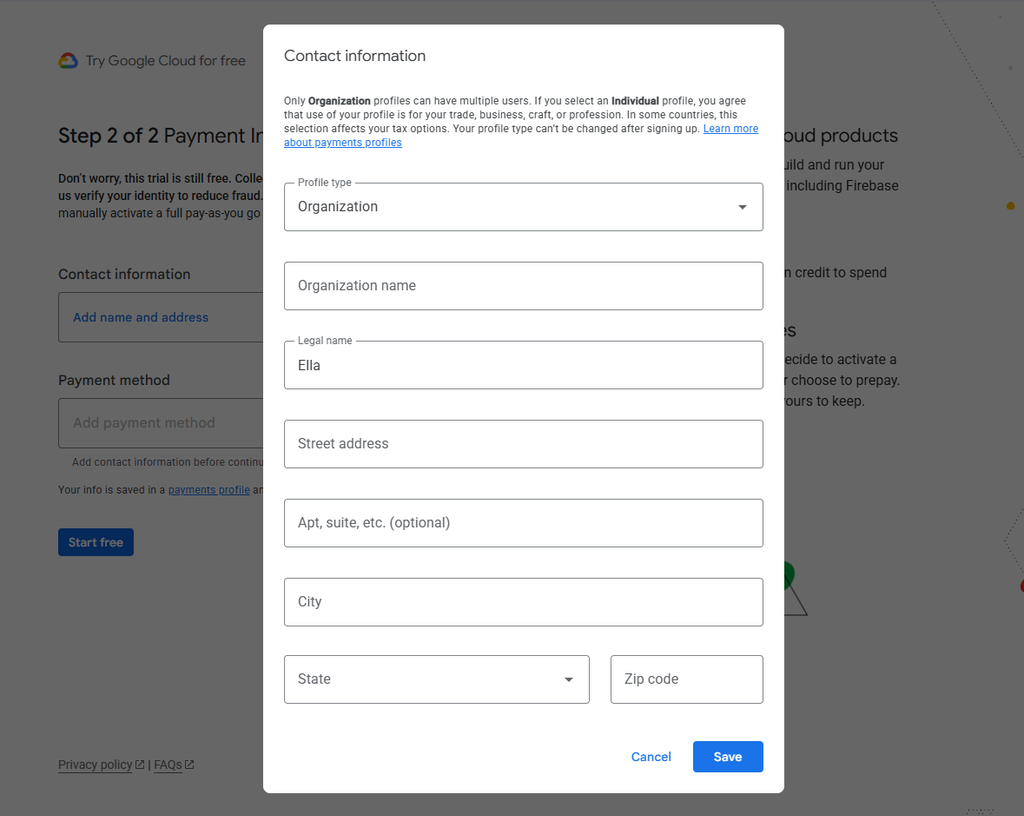
- This popup will show, now fill your contact information in it and save changes.
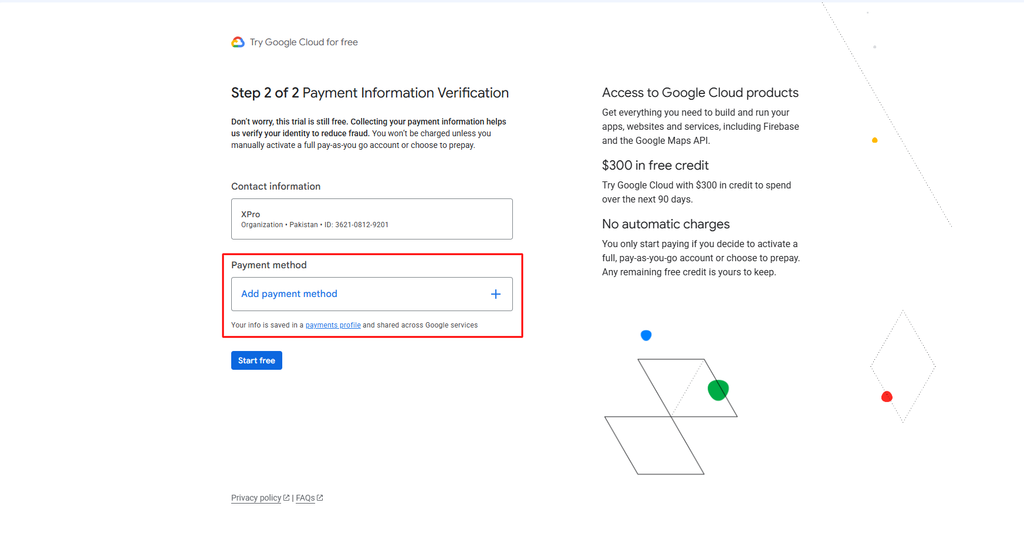
- Now lastly choose the payment method
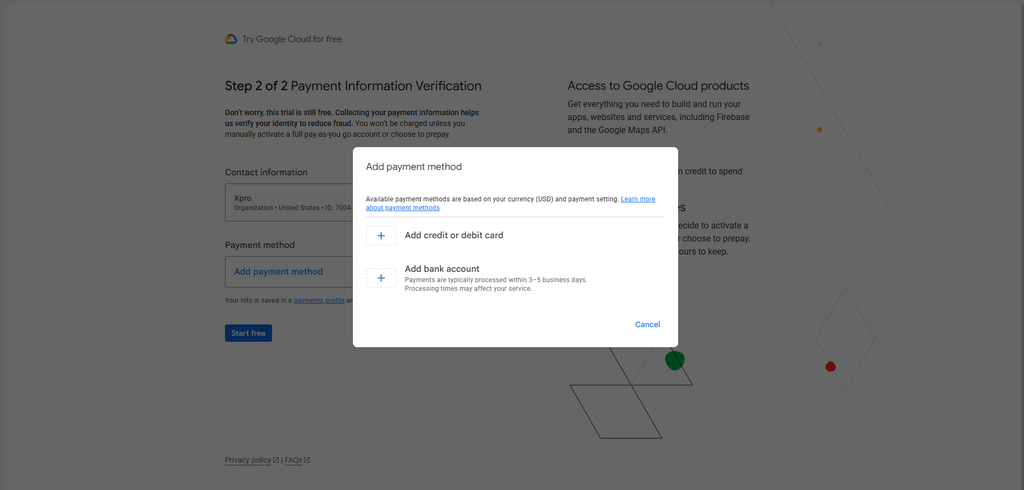
- Here you’ll see two options, credit/debit card or bank account.
- After adding card/bank account information, you’ll see this screen.
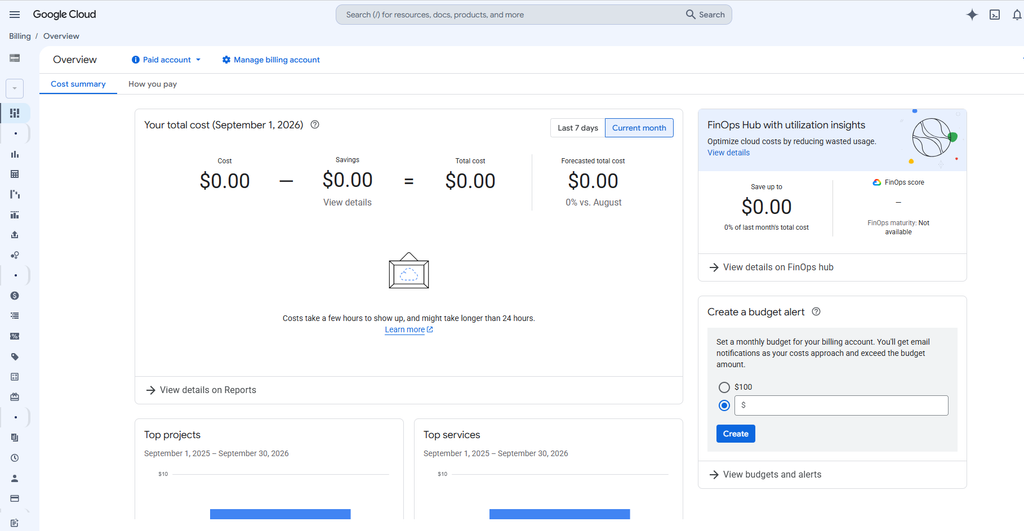
Don’t worry — the Weather API is currently in Preview, which means Google isn’t charging for usage yet, and there’s a free tier of 10,000 calls per month once billing does kick in. You still need billing enabled on the account, but that’s different from being charged.
Step 3: Enable the Weather API
- From the left-hand menu, go to APIs & Services > Library.
- Search for “Weather API”.
- Click on it, then click Enable.
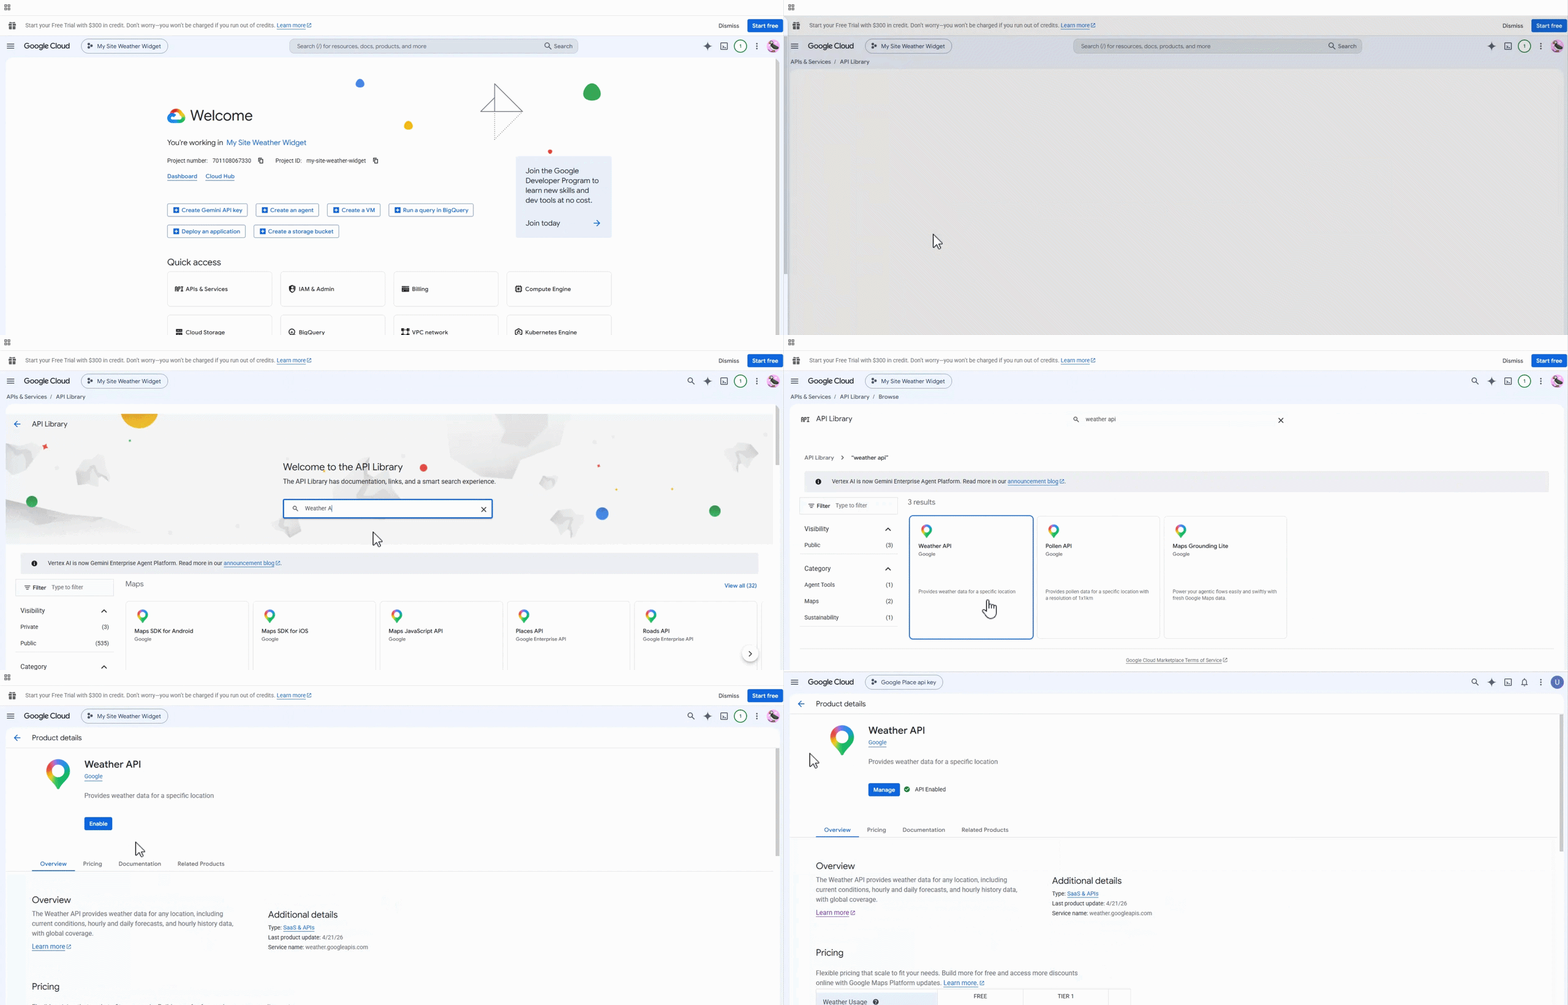
That’s it — the API is now switched on for your project.
Step 4: Create Your API Key
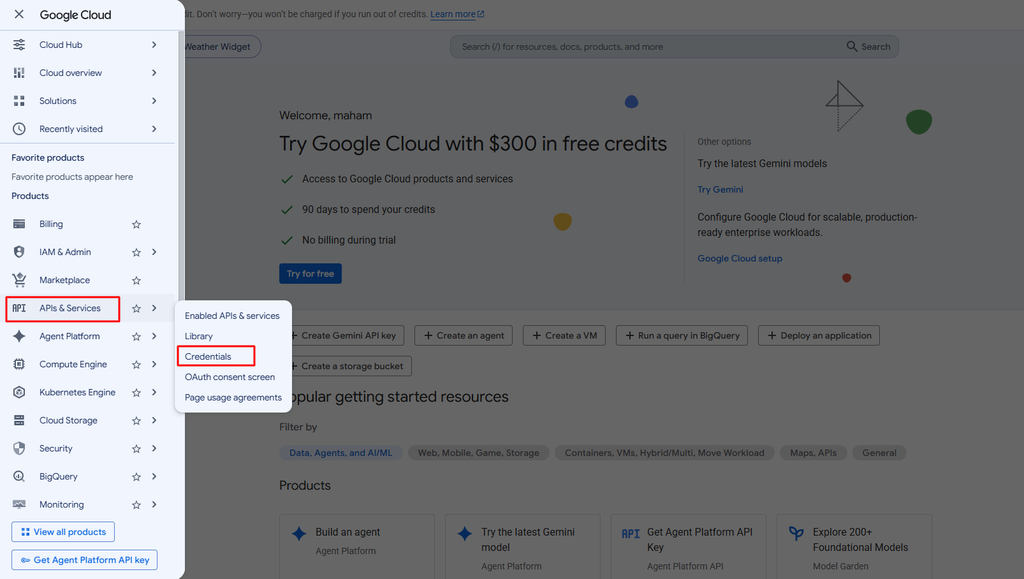
- Still under APIs & Services, click Credentials.
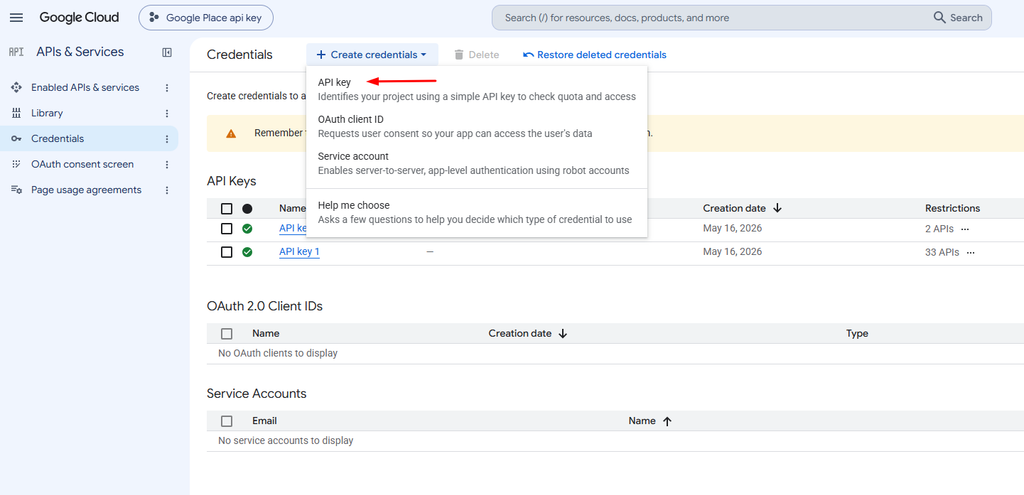
- Click + Create Credentials, then choose API Key.
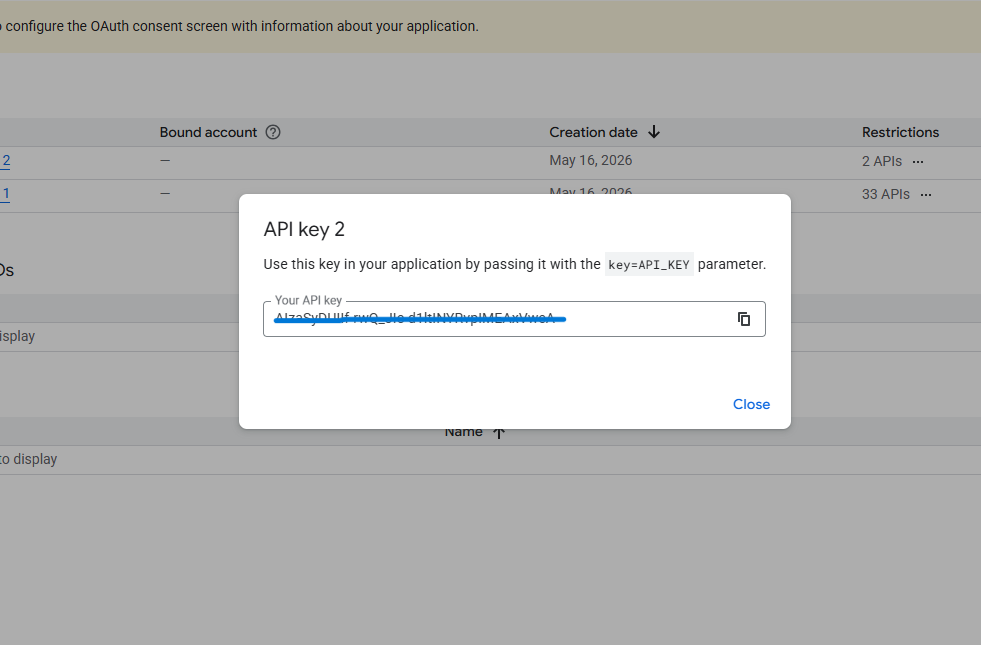
- Google will generate a key immediately and show it in a popup.
- Copy it somewhere safe — you’ll paste it into the XPro widget in a moment.
Step 5: Restrict Your API Key (Strongly Recommended)
An unrestricted API key can be used by anyone who gets hold of it, so lock it down before you put it live on your site.
- On the Credentials page, click the key you just created.
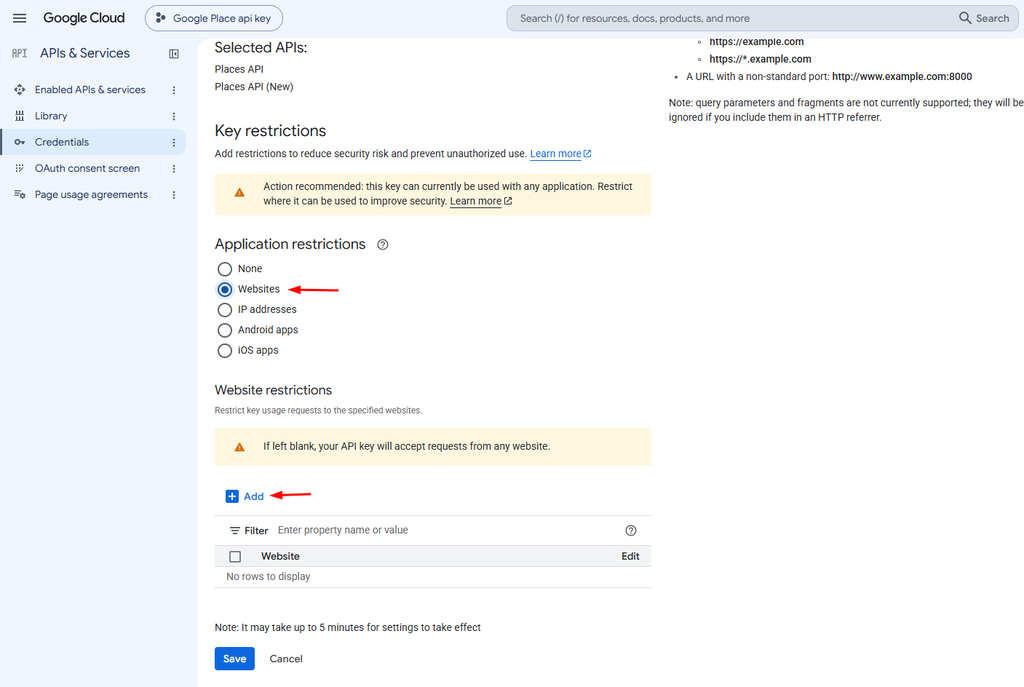
- Under API restrictions, select Restrict key and choose Weather API from the list — this stops the key from being used for any other Google service.
- Under Application restrictions, choose Websites and add your site’s domain (e.g. yourdomain.com/*). This stops the key from working if it’s copied and used somewhere else.
- Click Save.
Step 6: Add the API Key to XPro Weather Widget
Back in WordPress:
- Edit the page with Elementor and drag in the XPro Weather Widget.
- In the widget panel, open Weather Setting.
- Paste your API key into the Google Weather API Key field.
- Set your Latitude and Longitude, add a display location name, and choose how many forecast hours to show.
- Pick a layout under Layout Selection, then update the page.
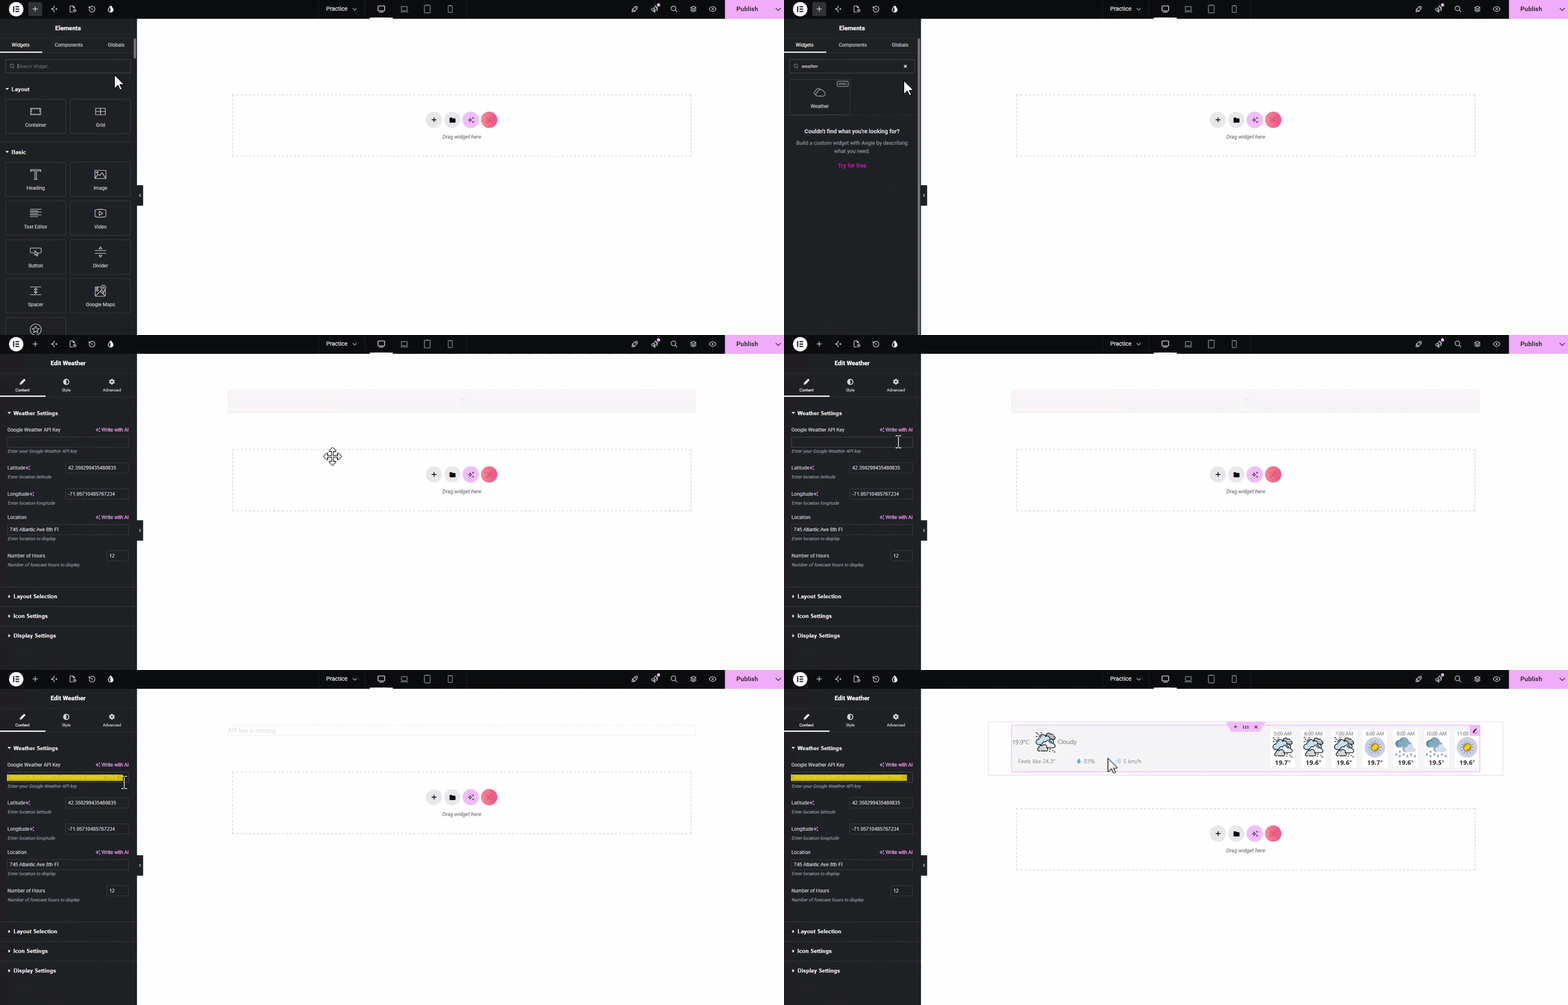
Your widget should now pull live data. If the card shows a loading state that never resolves, that’s almost always an API-side issue rather than a widget issue — see below.
Troubleshooting
Widget shows no data or an error state
- Double check the API key was pasted in full, with no extra spaces.
- Confirm billing is actually enabled on the project (not just started) — the Weather API won’t return data without it.
- Give it a few minutes. Newly enabled APIs can take up to 30 minutes to fully activate.
Works locally but not on the live site
- If you added a website restriction to the key in Step 5, make sure the domain listed matches your live domain exactly, including www. if that’s how your site resolves.
Hit your monthly quota
- The free tier covers 10,000 calls a month. XPro’s server-side caching means one API call can serve many visitors, so most sites stay well under this — but if you’re running the widget across a high-traffic site, keep an eye on usage under APIs & Services > Dashboard in the Cloud Console.
Wrap-Up
Once the key is in place, that’s the entire setup — no ongoing maintenance required. From here, it’s just a matter of picking a layout and deciding which stats (humidity, wind, UV index, feels-like) to surface for your visitors, for that you can read our complete documentation guide: How to Setup FREE Elementor Weather Widget by XPro.

