Introduction
Table widget by Xpro Elementor Addons is another amazing offering that let you easily create a table in no time. The functionality and flexibility of the Xpro widget allow you to style and personalize the display according to your need.
Xpro Table widget for Elementor makes it easy to add and display information on your website. Display data in a much more attractive way which is also easy for the reader to understand. This advanced widget can be customized and managed with a wide range of styling options.
How to Install Xpro Table widget for Elementor
Requirement
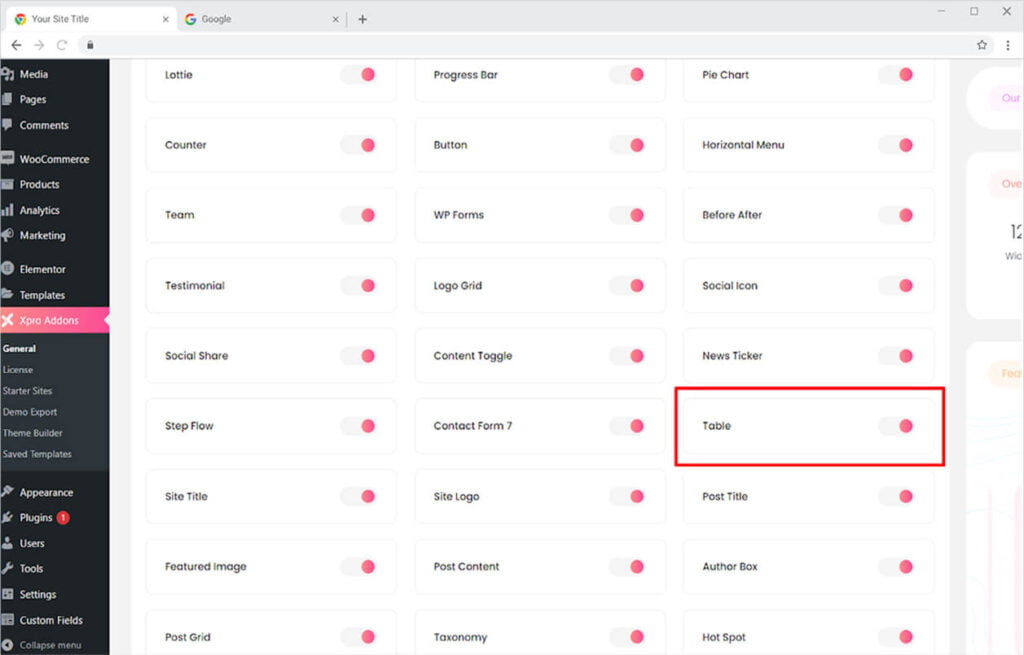
You need to install and activate the free version of Xpro Elementor Addons. If you already have the plugin installed, just make sure the Table Widget is ‘Enabled’, so you can find it in the Elementor editor.
To enable the widget, simply follow these steps:
Step 1
Click on the Xpro Addons option available on the WordPress Dashboard Menu.

Step 2
From the Xpro Addons Dashboard, click on the Widgets Tab, find the Table widget, and finally, toggle the button ON to enable it.
How to Use Xpro Table Widget for Elementor
Create and manage an attractive table that is appealing to the reader and makes them understand the information. Customize the layout with Xpro large styling options. Add visuals to enhance the display of the layout. Let’s go over how to make a stunning table using our free Table widget for Elementor.
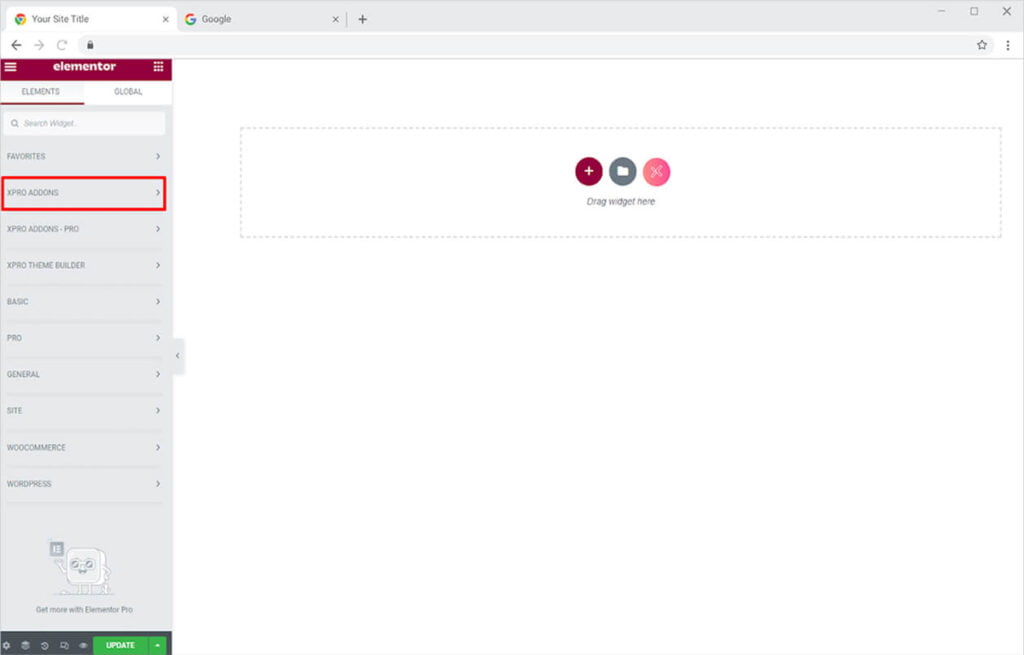
Step 1
Click on the Xpro Addons section available in the Elementor Editor.
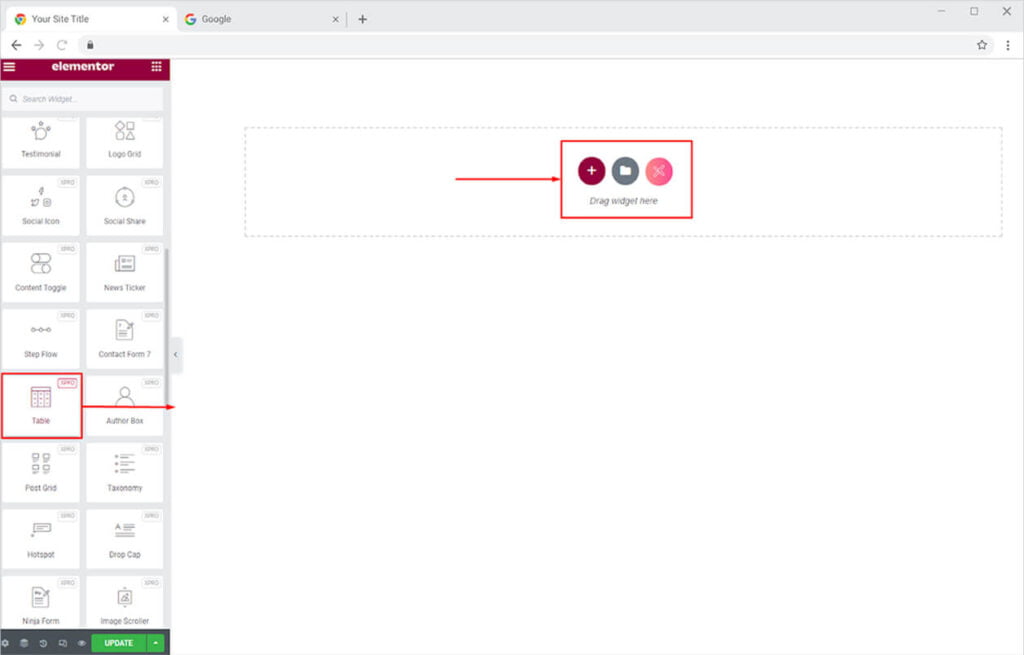
Step 2
From the Xpro Addons section, simply drag’n’drop the Table widget on your desired page location.
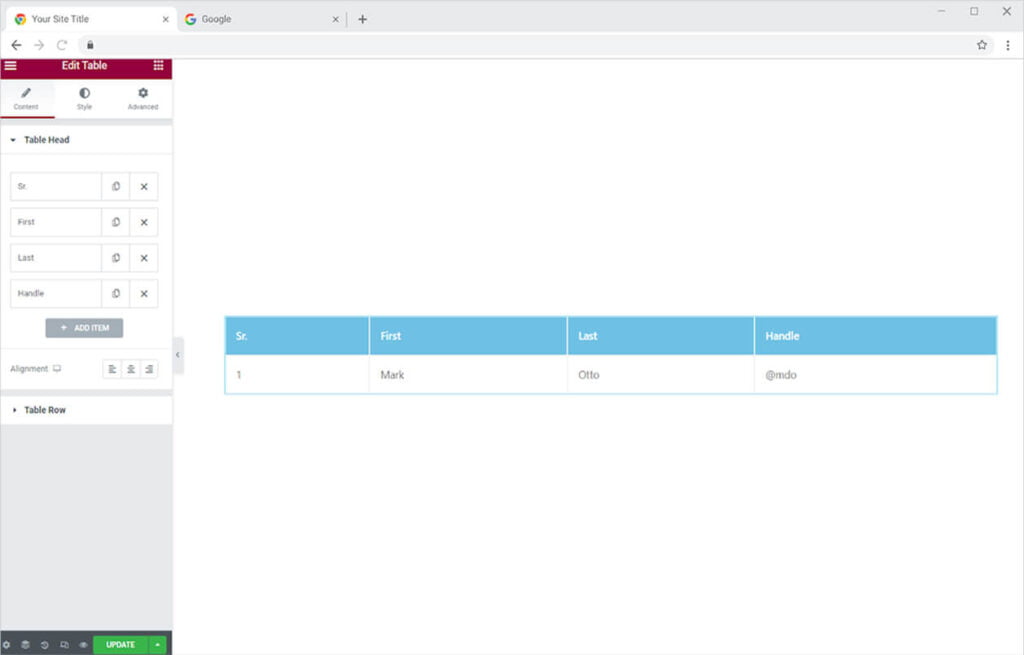
The default view of the widget looks something like this after you drag and drop it to the desired location on the page.
How to Add Content in the Xpro Table widget for Elementor
From the content section at the left, you can add data to the table. First, add the header from the table head. You can add text and an image or icon. Click on each bar to edit their content and style them separately. First, you will be displayed with a content menu from where you can add text, an image, or an icon.
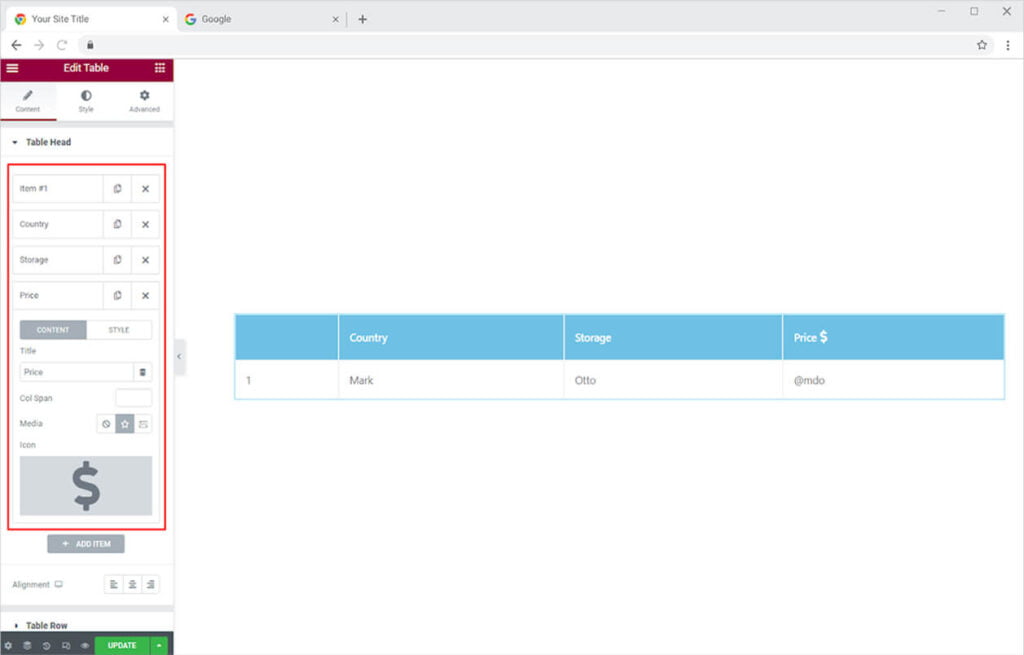
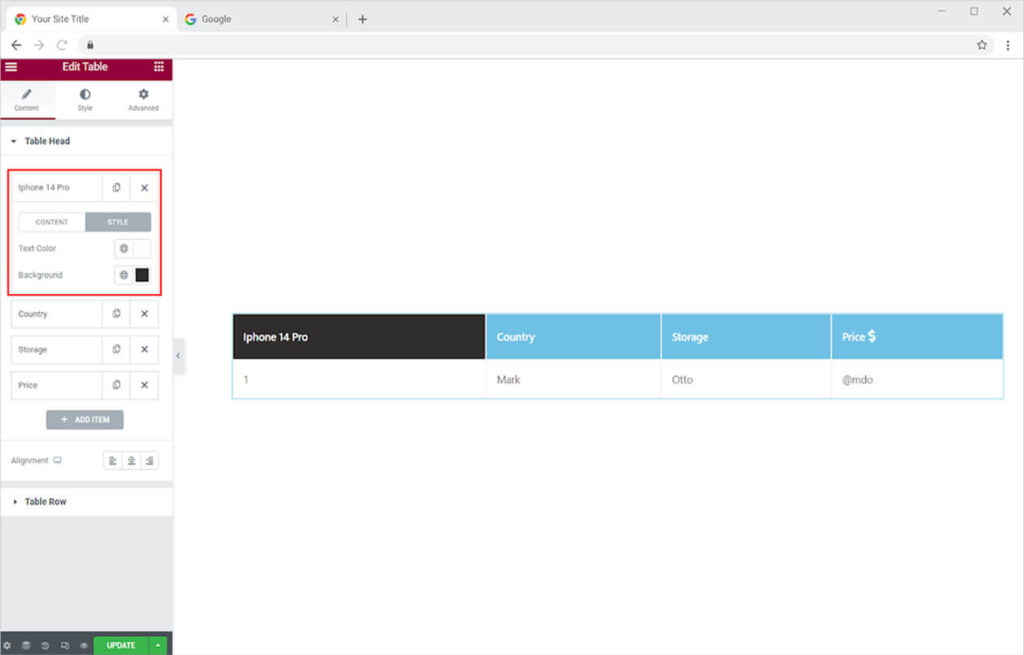
Click on the style option to change the color of the text and background for that section in the table.
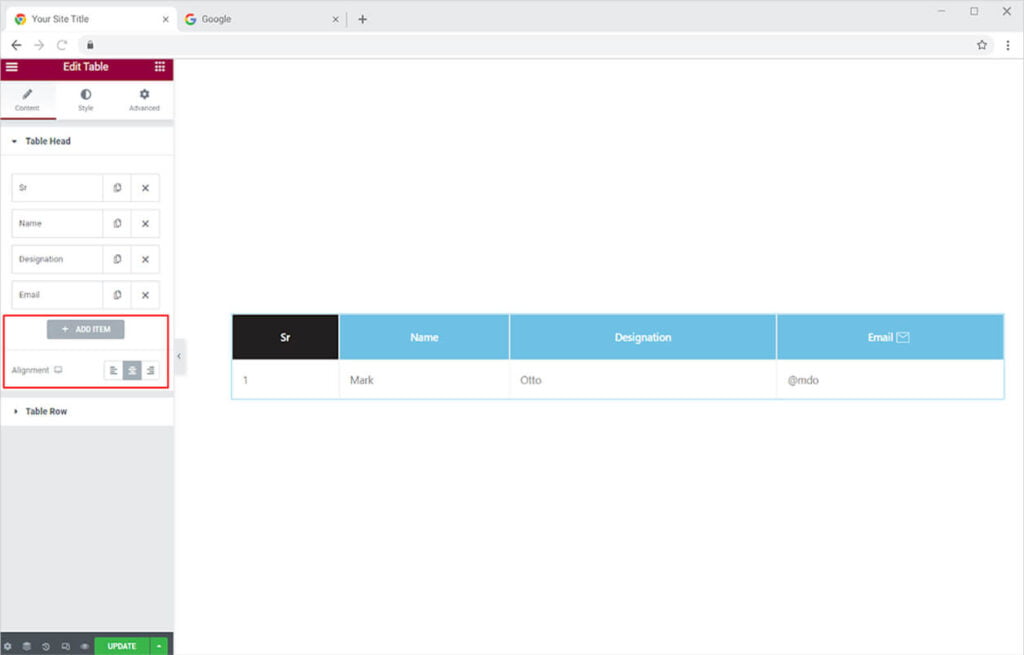
For Adding more columns, click on the Add Item option at the end. Set the position of the text to left, right, or center of the box.
How to Add Content in the Body of Xpro Table
Click on the Table Row menu to open up the drag-down menu from where you can add content.
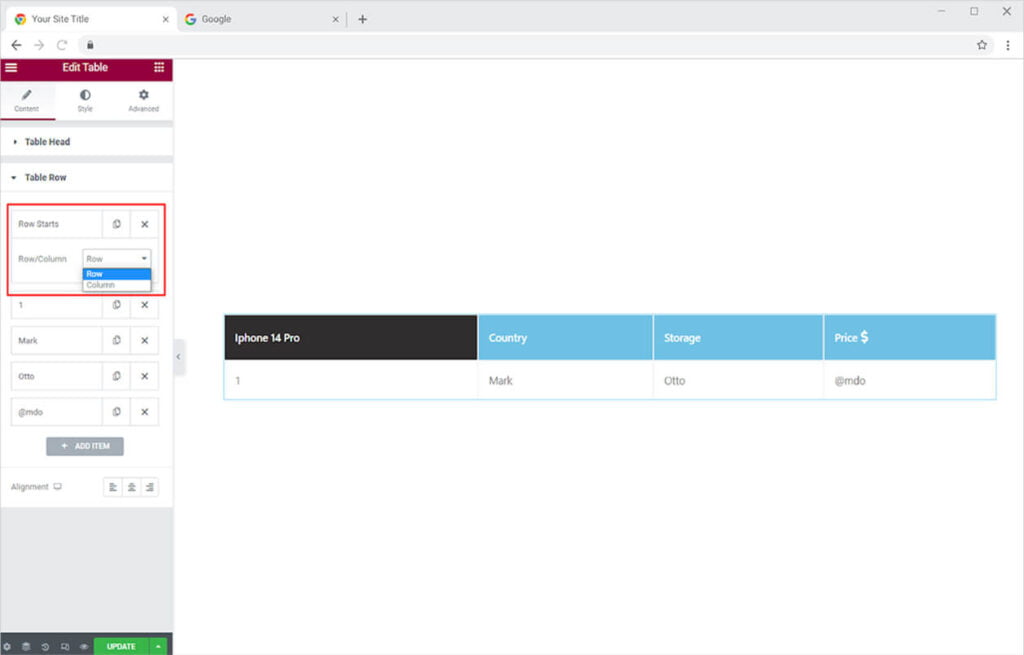
First, select a row from the row start option to start a row. The first row is set by default so you can add content just by clicking on each cell and adding text and an image or an icon.

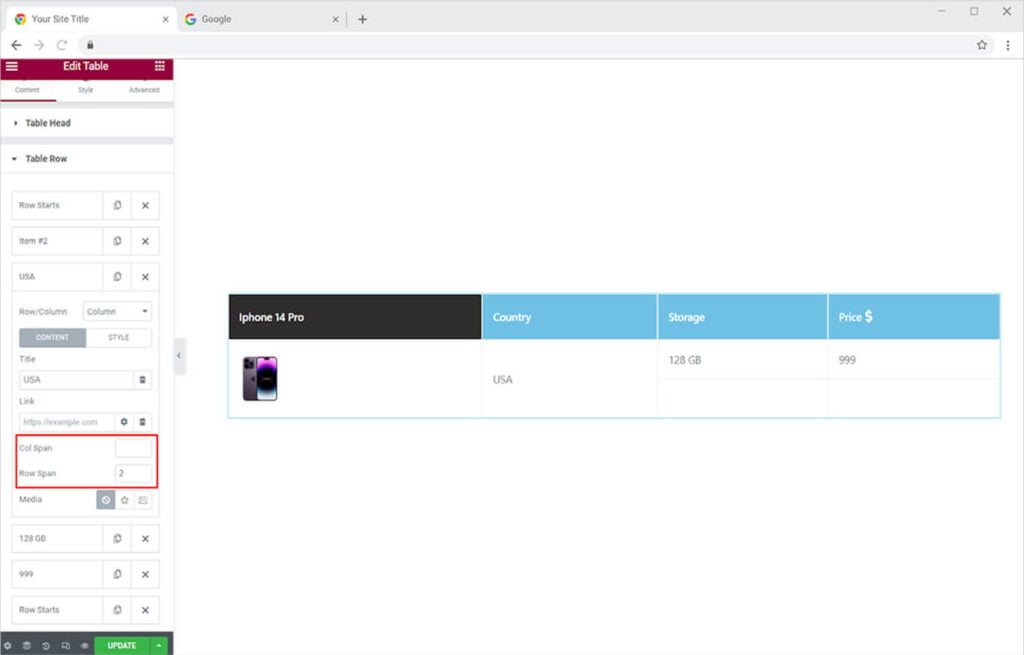
The advanced functionality of Col Span and Row Span allows you to adjust the table layout. The column span is for the column, so increasing the column span results in increasing the cell column space, and vice versa for the row.
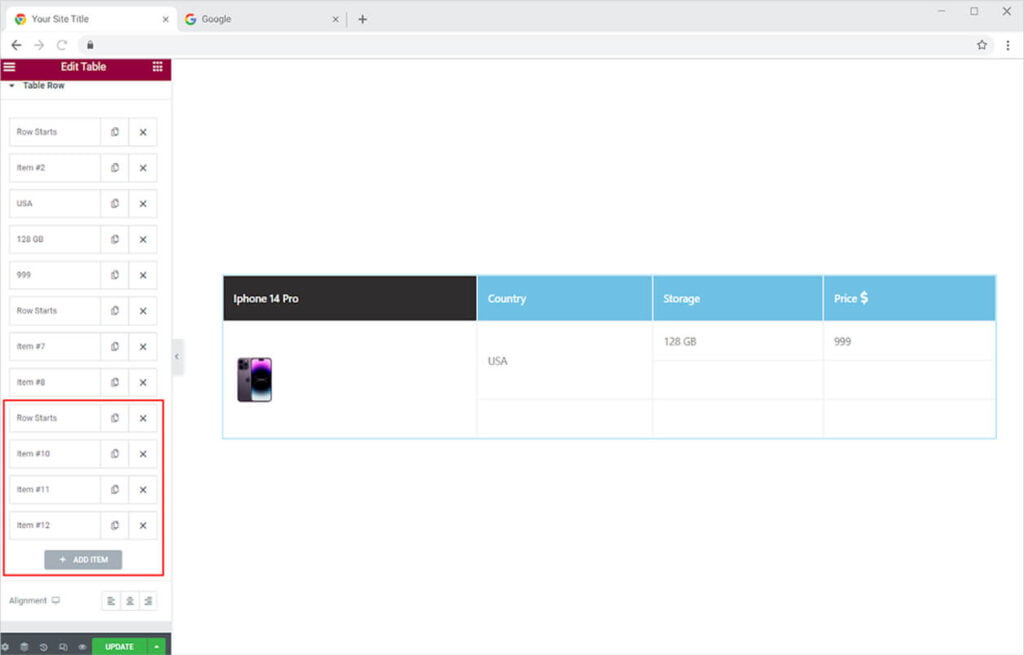
In order to add a new row, click on the Add Item and then select the row. Then add a new item and select a column. Add as many items as you want.
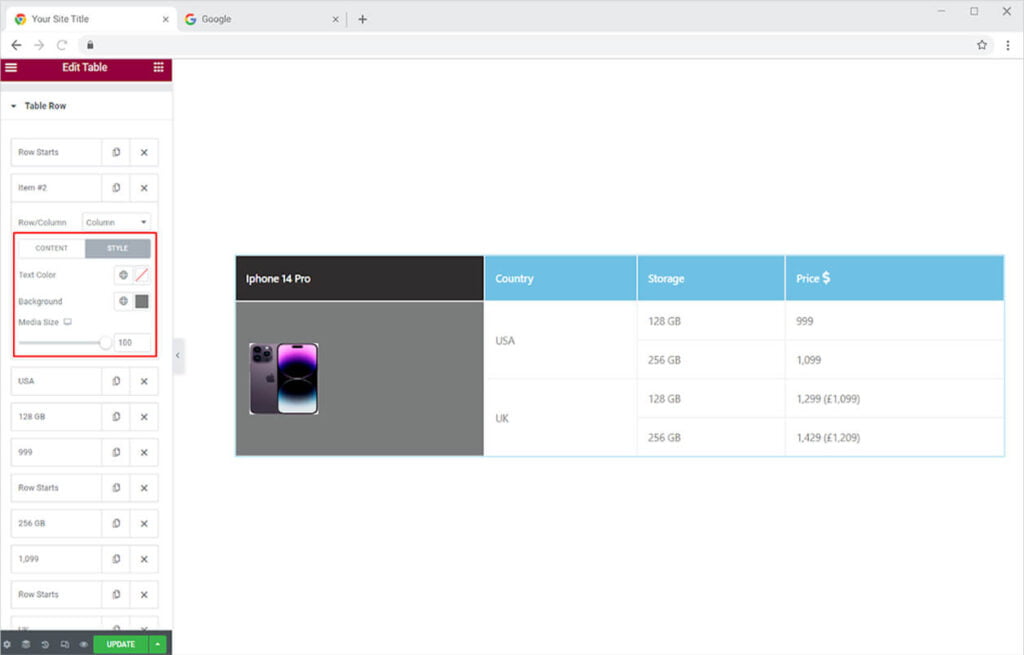
Each cell option in the content section allows you to customize the cell individually. You can alter the color of the text and background using the styling menu. If you’ve uploaded media to the table, you can change its size.
How to Style the Xpro Table widget for Elementor
The first element of the Style menu is the Table header, which allows you to customize the first row. Change the font, size, word spacing, and other aspects of the text from typography. Colorize both the text and the background from their respective options.
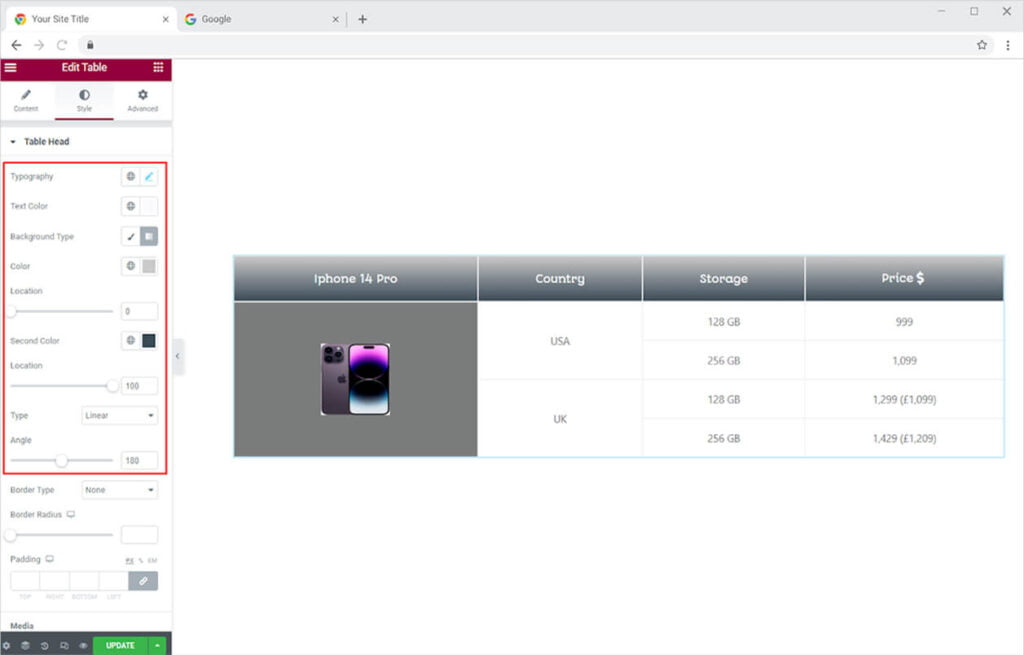
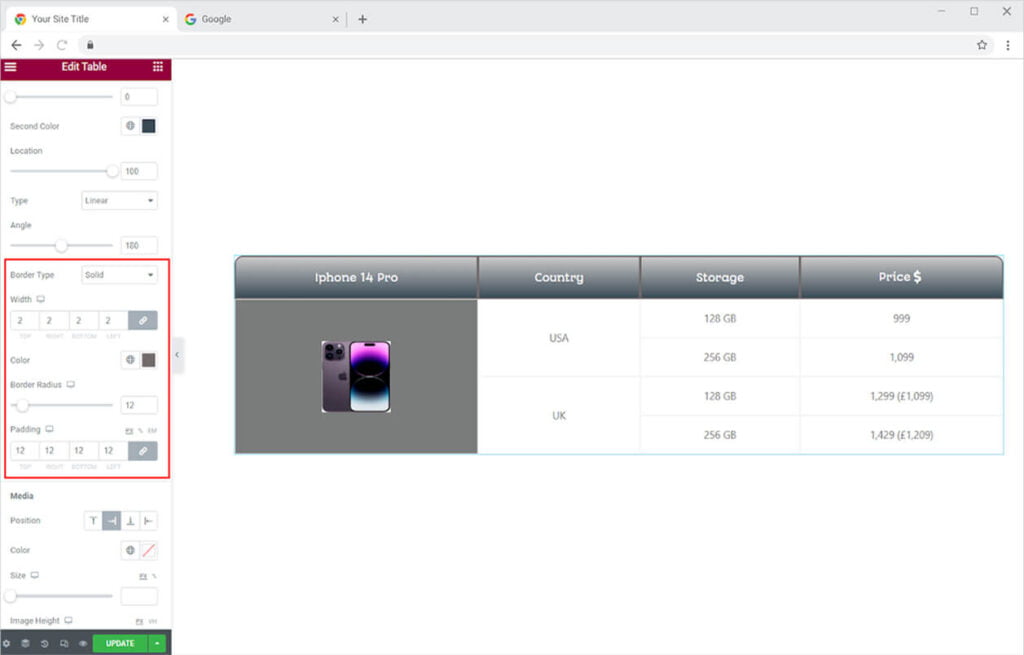
Select the border type if you want to add a border to the box. You can select any of five different borders including solid, double, dashed, groove, and dotted. You can further set the border radius and width according to your requirement. Set the display by setting the padding to the content.
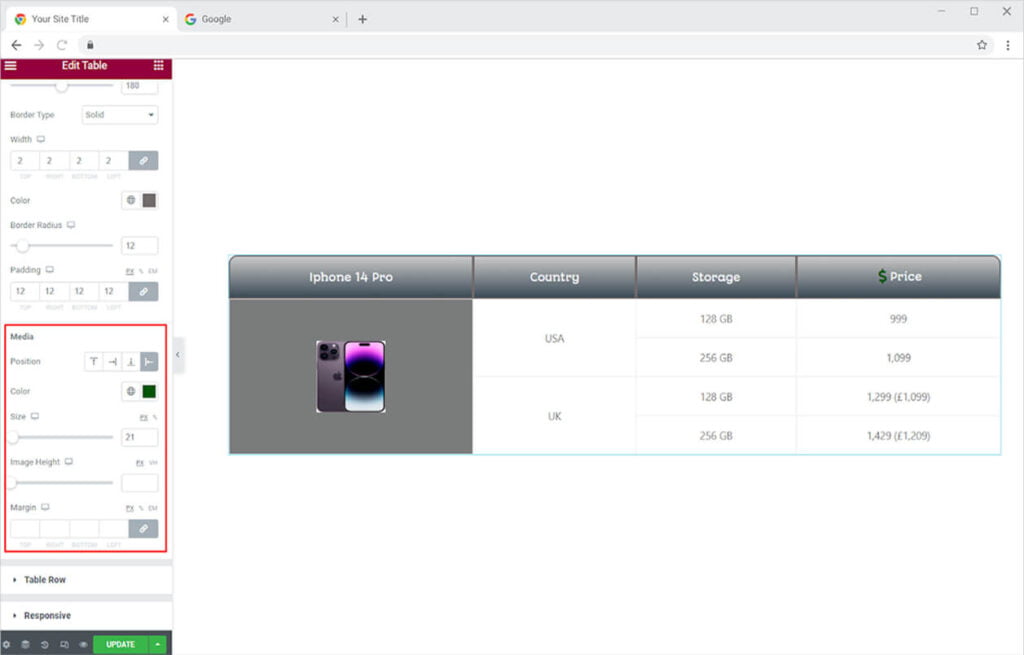
If you’ve included media in the header, you can customize it as well. You can position the media anywhere in the cell using the media section in the Table header. Colorize and resize the icon using the options provided.
How to Style the Body of Xpro Table Widget
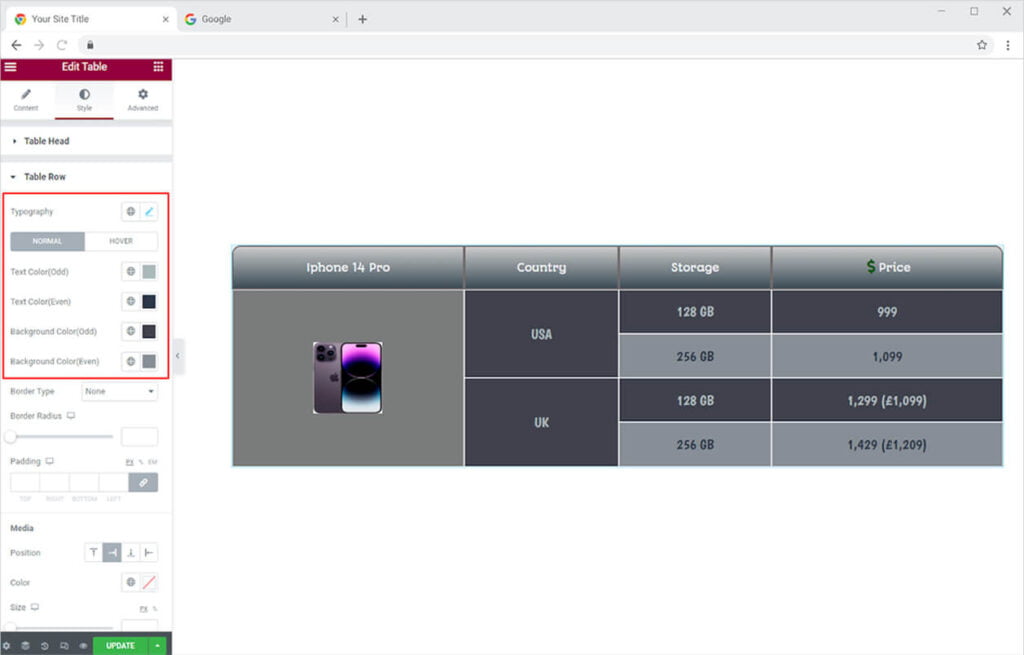
By clicking on the table row, you can change the style of the table’s body. As previously said, you can style the text using typography by changing its font, size, and other attributes. For normal display and hover, you can color the text and background. The hover effect changes the appearance as the user moves the mouse over it. Xpro lets you add different colors to odd and even rows to make the layout more visually appealing.
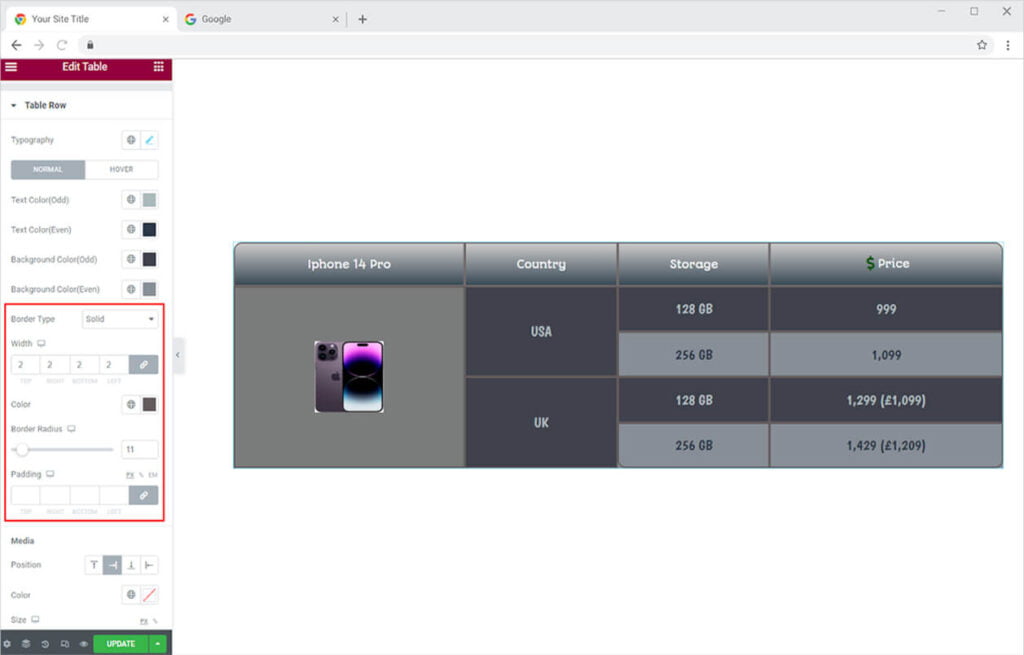
Just like we add a border to the header previously, we can add a border to the body of the table with the same styling options.
How to Style Table Widget for Mobile View
Open the Responsive menu and select “Responsive on Mobile.” This enables the table widget to be displayed when a person accesses your website using a mobile device. Click on the Responsive Mode button at the left bottom and select the mobile symbol to see how the widget display will look on mobile.
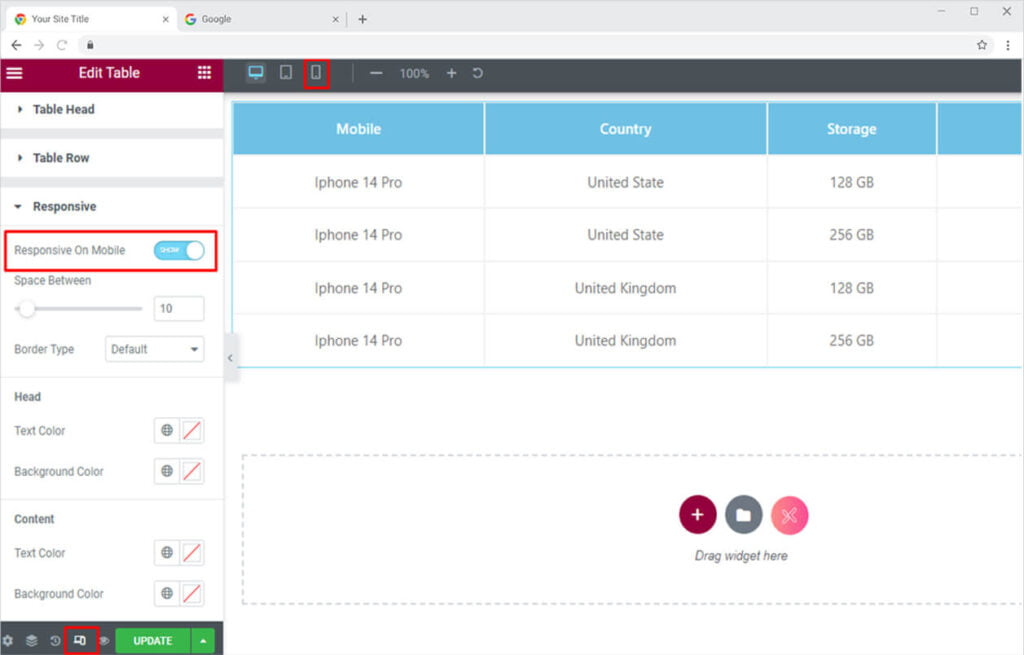
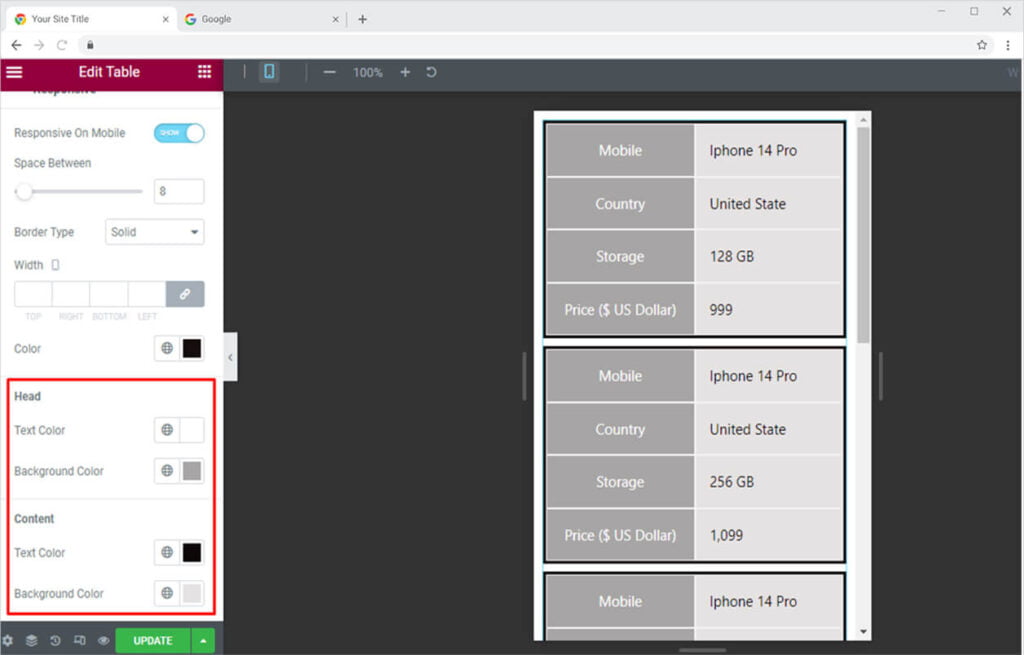
Adjust the space between each section of the table. Select a border type if you want to add a border to the table. Further, adjust the width and color of the table.

Color the text and background for the content in the heading as well as in the body of the table.
Best Table widget for Elementor
This is all from the Xpro Table widget for Elementor. We hope that you fully understand the uses and functionality of this powerful free widget.
If you want to explore and add more attractive Elementor widgets then check our complete list of free Elementor widgets and download our free Elementor addons now. Moreover, check out our other promising widgets like Featured Image for Elementor, Elementor 360 Product Viewer, and free Elementor extensions. You will be surprised how easily you can customize your WordPress website using Xpro Elementor Addons.