How to use Elementor Image Gallery Widget
Xpro Simple Gallery widget for Elementor is a powerful FREE widget that is perfect for showcasing your images in a presentable manner. You can do customized styling and add amazing animations like hover effects and filter animation. The animations made using our Simple Gallery widget are fully responsive on all display devices. You can also add pop-up features to make your gallery more appealing and attractive for your website users.
Simple Gallery Widget is an easy-to-use, however, powerful widget by Xpro Elementor Addon. Easily create gallery images in filters and customize the overall layout with a huge range of customization.
Requirement
You need to install and activate the free version of Xpro Elementor Addons. If you already have the plugin installed, just make sure the Simple Gallery Widget is ‘Enabled’, so you can find it in the Elementor editor.
To enable the widget, simply follow these steps:
Step 1
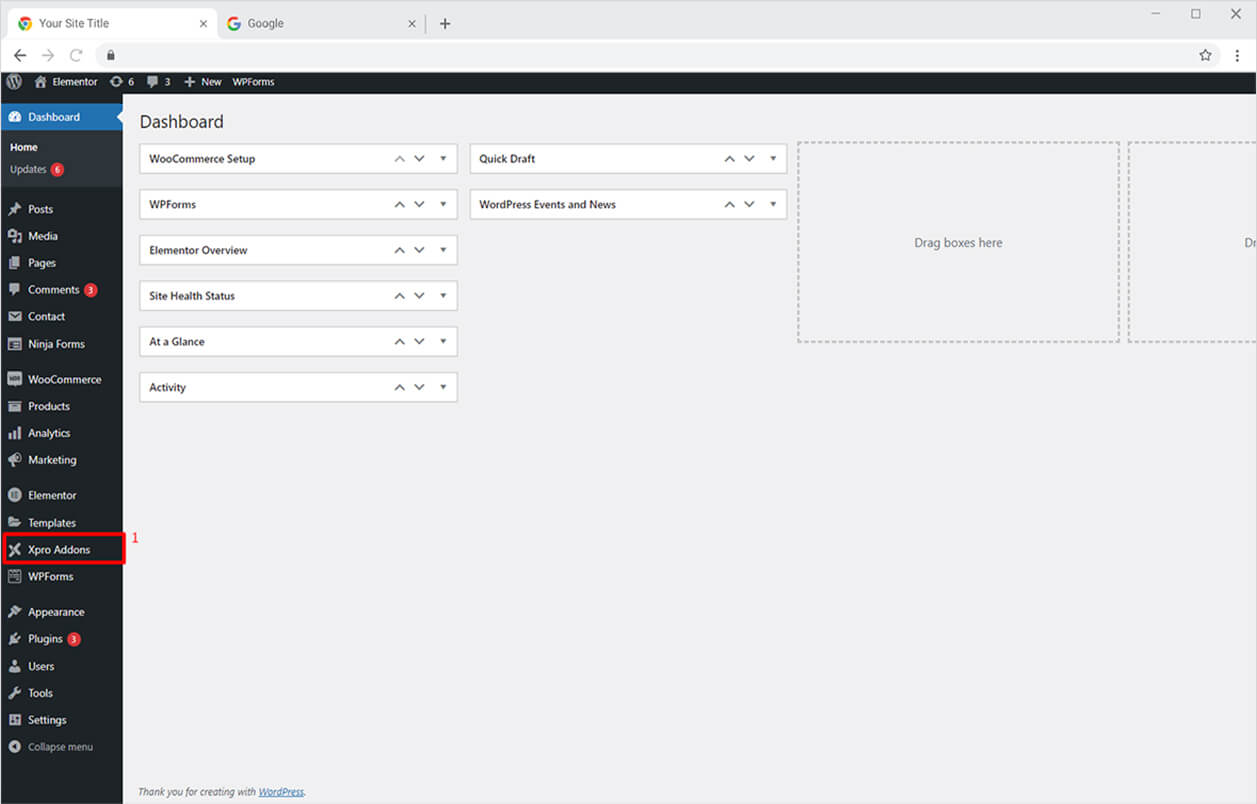
Click on the Xpro Addons option available on the WordPress Dashboard Menu.
Step 2
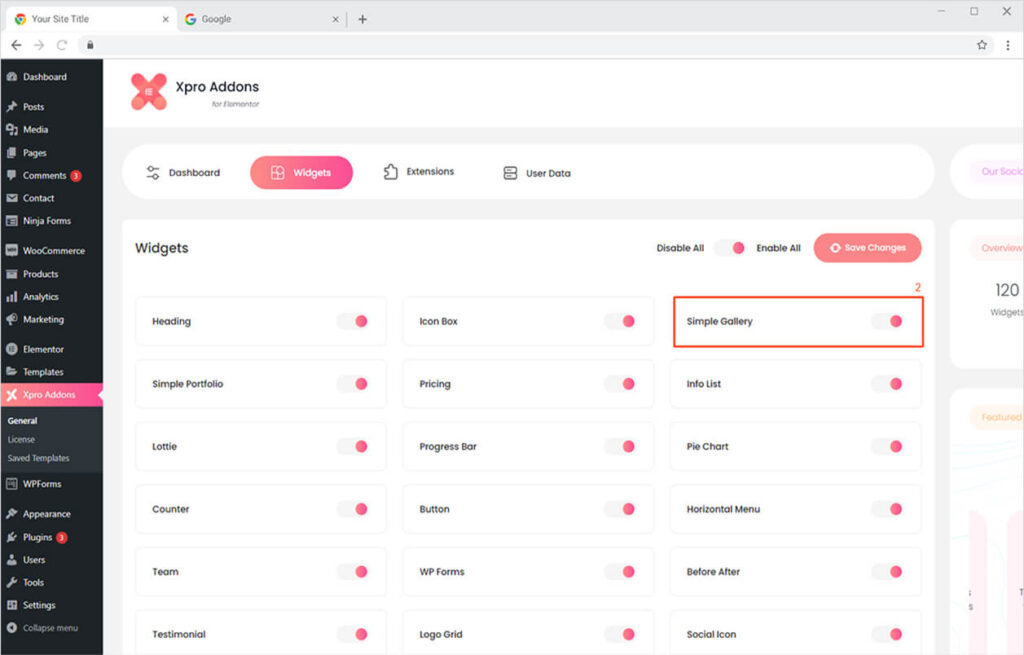
From the Xpro Addons Dashboard, click on the Widgets Tab, find the Simple Gallery Widget, and then toggle the button ON to enable it.
How to Use Xpro Simple Gallery Widget for Elementor
Simple Gallery is the best widget to instantly grab your site visitor’s attention and make them focus on every attractive detail you have added to your website. You can represent your images in a captivating gallery within minutes using our modern widget. It’s simple, FREE, fun, and time-saving! Here’s how to use this amazing Elementor Simple Gallery widget.
Step 1
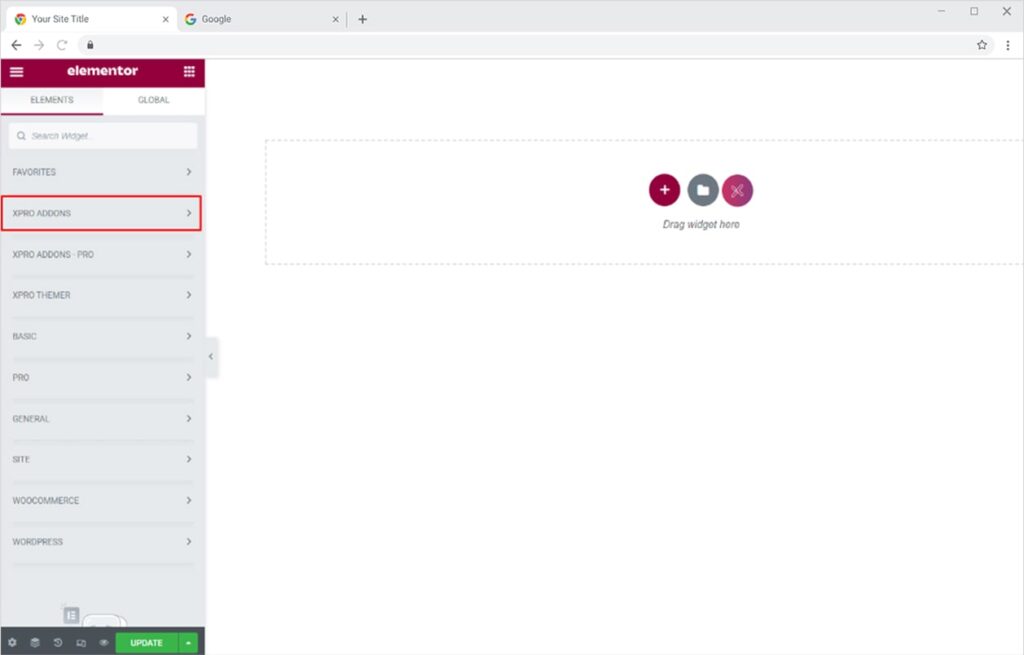
Click on the Xpro Addons section available in the Elementor Editor.
Step 2
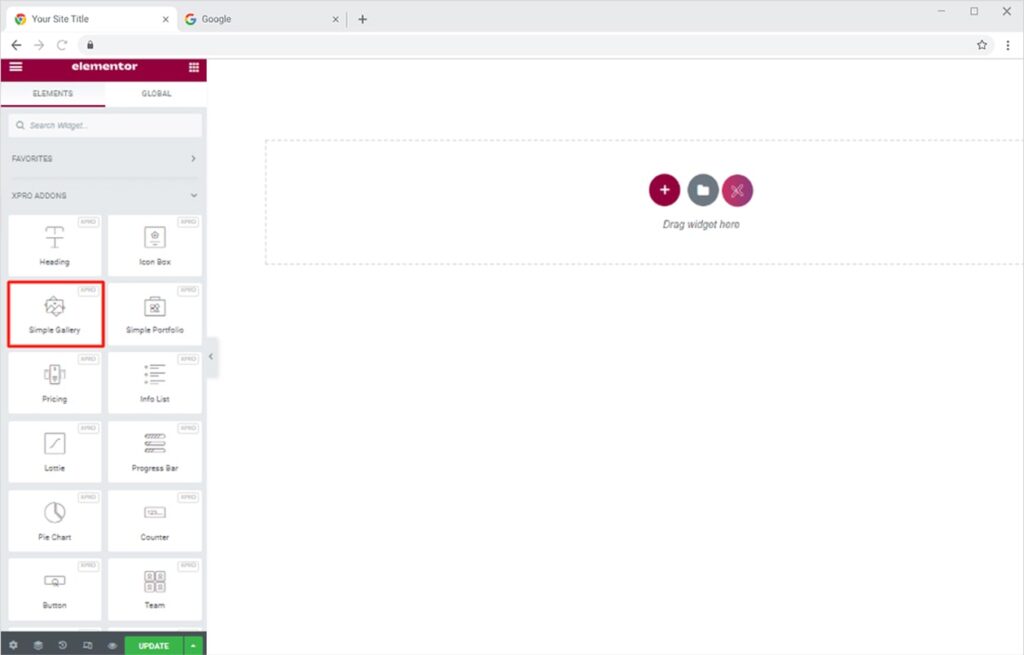
From the Xpro Addons section, simply drag’n’drop the Simple Gallery widget on your desired page location.
This is the default view of the Xpro Simple Gallery widget once you drop it at your desired location.
How to Add Gallery Items and Filters using Xpro Simple Gallery Widget
You can add multiple images and filters to make your gallery stand out. Let’s get started.
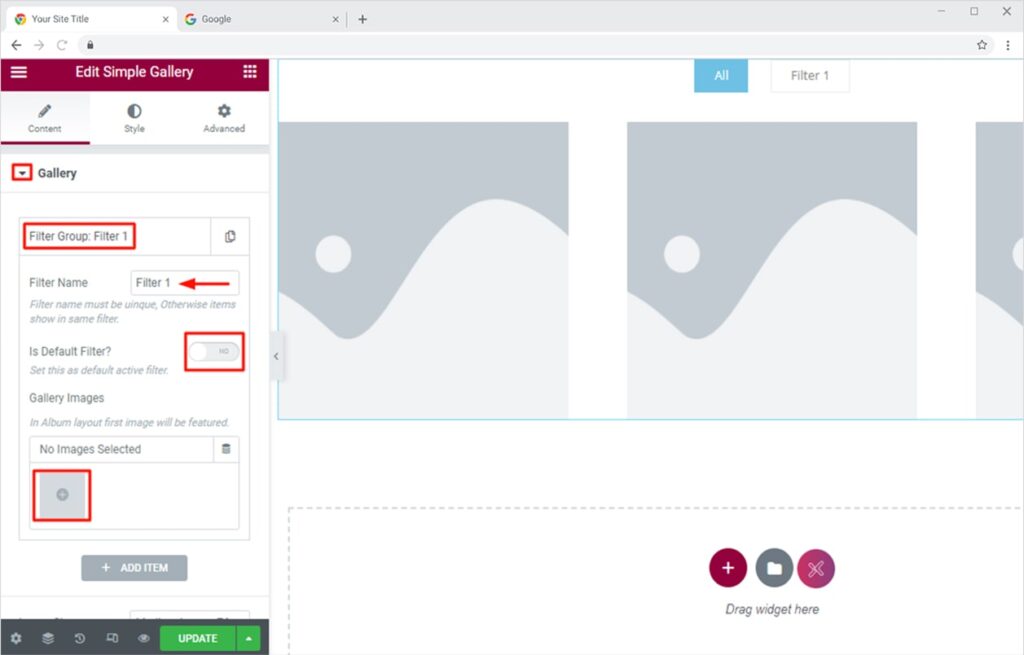
Just click on the Gallery Section in the Content Tab and click on Filter Group: Filter 1. You can rename the filter or make it your default filter if you are going to add multiple Filters.
Click on add Image section under Gallery Images to insert the images, you can either choose from the Media Library or upload directly from your desktop. After selecting your desired images you can even add different Icons, Captions & Descriptions to each image you have inserted.
The Final Preview will look like this:
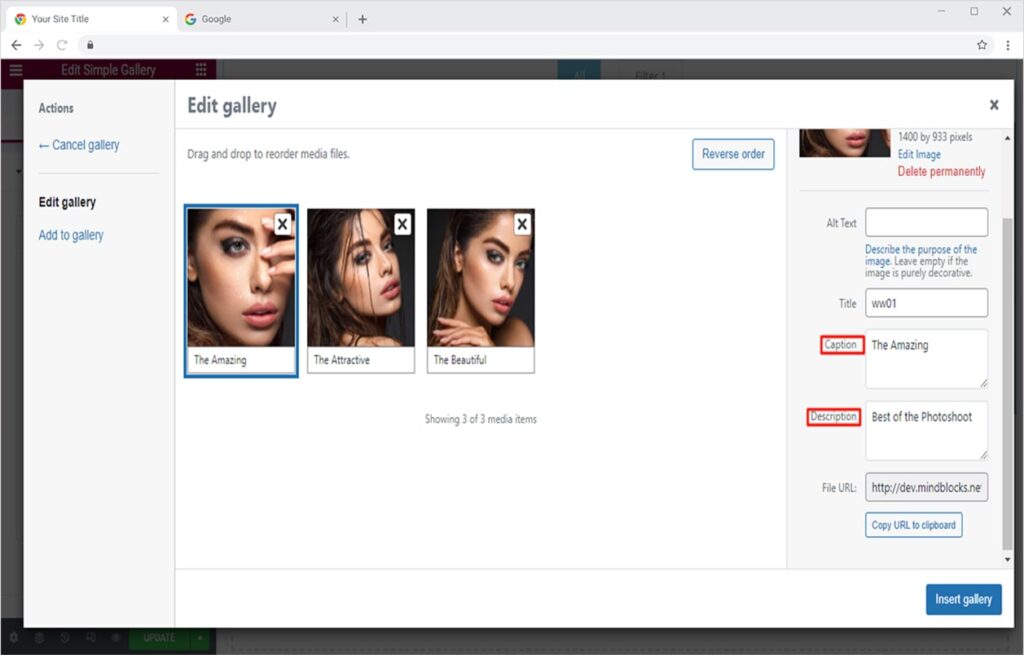
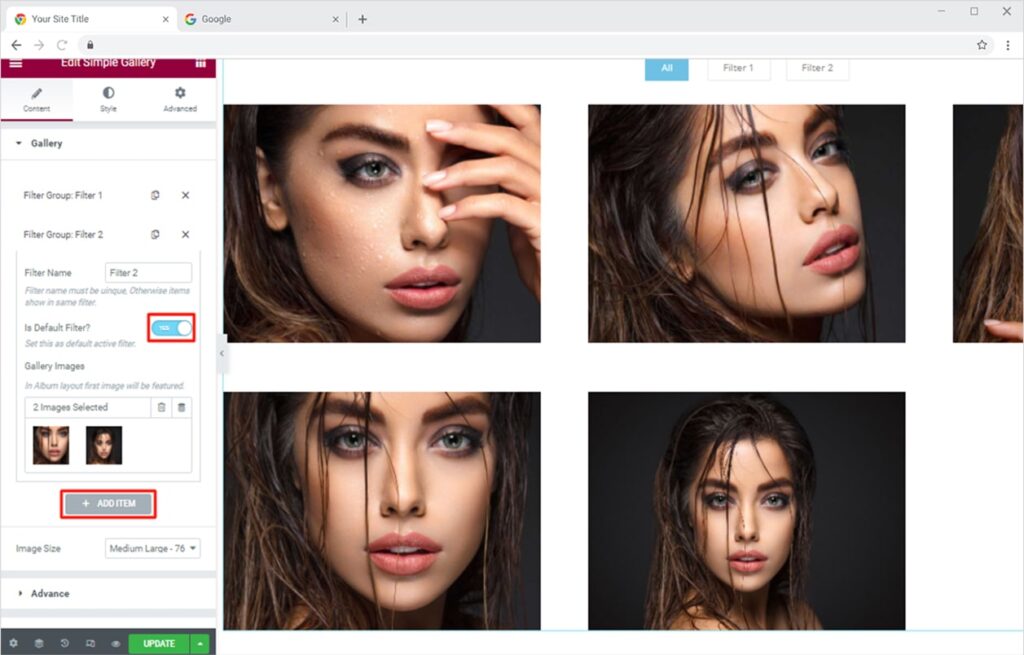
Now by clicking on the Add Item option, you can add multiple filters and add another set of images just like we did above. You can also make this filter your Default Filter By sliding the option to Yes.
How to Adjust the Layout of your Gallery
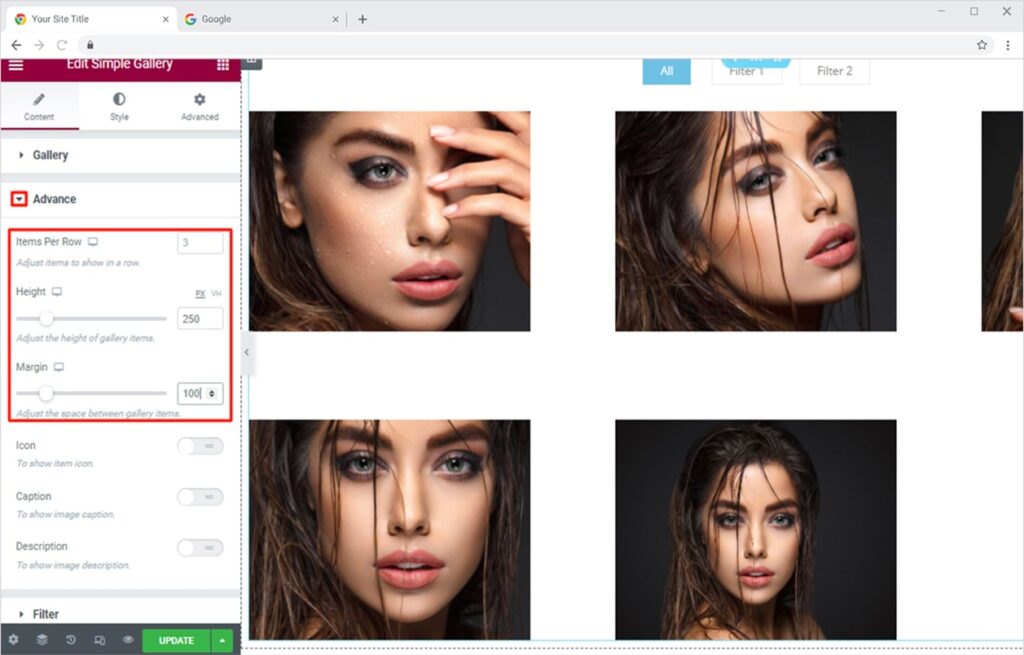
Start by clicking the Advance Section in the Content Tab. Here you can adjust the layout of your gallery according to your desired design. You can adjust the number of images per row. Moreover, you can scroll the Height & Margin sliders to adjust the height of images and the margin among them.
Use our free Elementor theme builder to customize the default theme parts of your Elementor website.
By Xpro Elementor Addons
How to Add and Style Captions, Icon for your Gallery Images
Add Caption & Icons to your images in the gallery. This is another amazing feature you can use while using our Free Xpro Simple Gallery Widget. Adding captions to your images will surely make them more appealing and engaging for the visitors of the site. Moreover, you can add a Description that will help you to give a brief statement about your image.
Click on the sliders in front of the Icon, Caption, and Descriptions sections, this will make them active and they will appear on your images. The final result will look something like this:

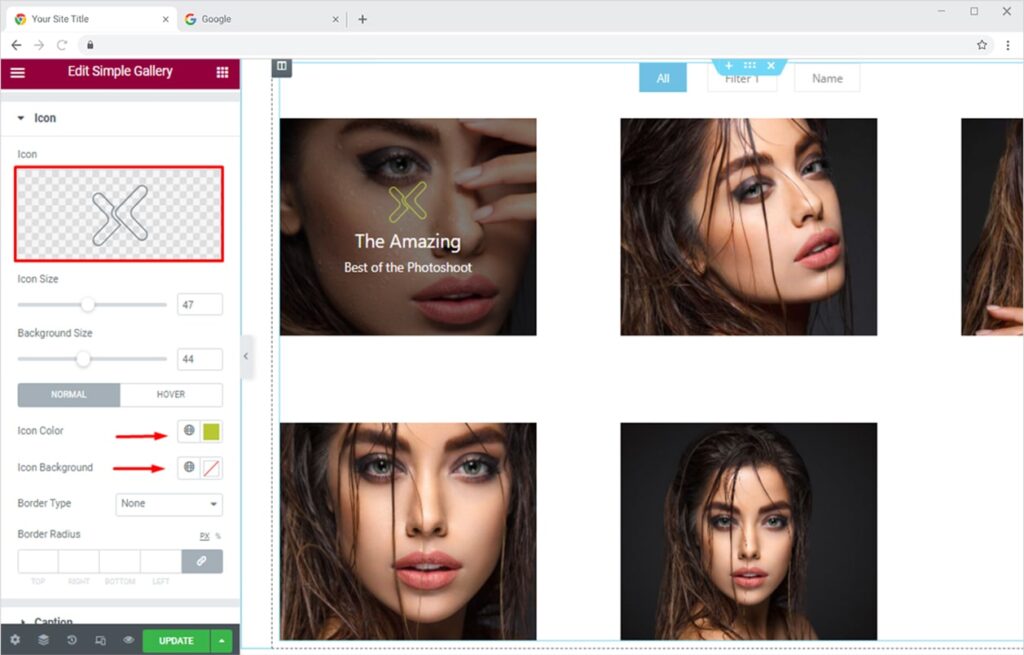
Once you are done with adding text, you can click on the Style Tab to add or change icons on your images. You can use the Icon Sections to add icons from the icon gallery and can also upload a custom SVG from your Pc. This feature also allows you to change the size, background, and color of an icon.
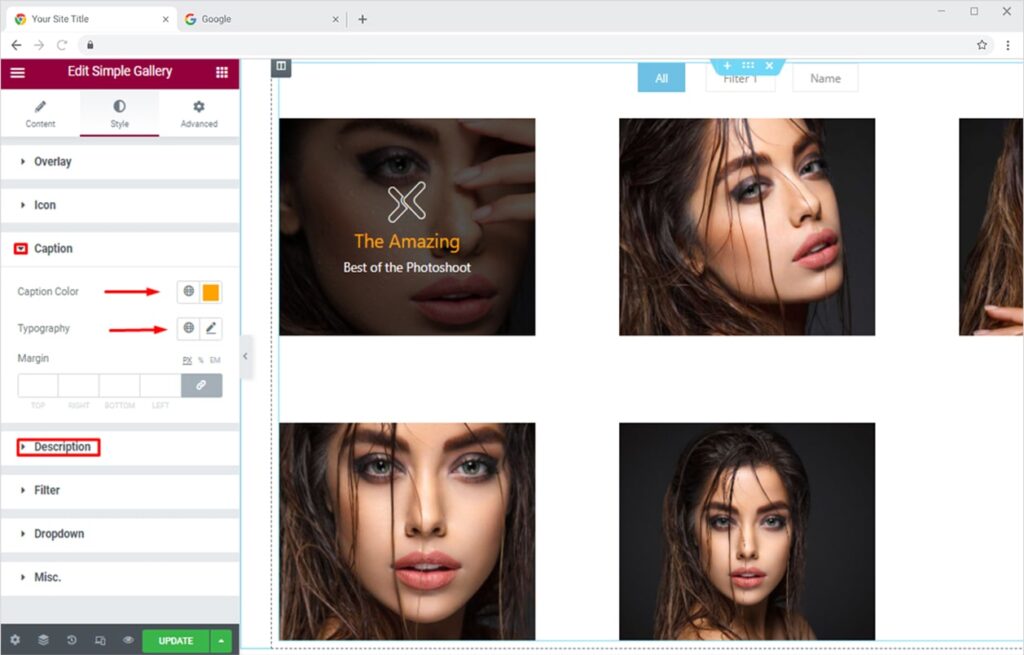
Staying i nthe Style Tab, you can use the Caption & Description sections to add attractive colors to the text. This feature also allows you to change the typography of the text of your captions and descriptions.
How to Add Filter In Elementor Gallery
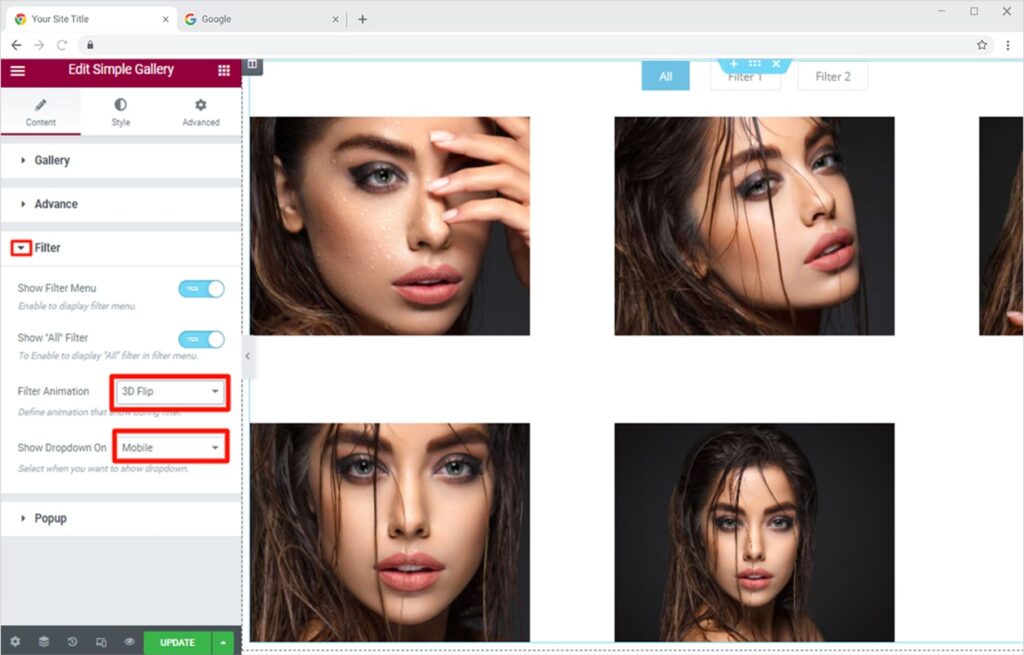
To add Filters to your images click the Filter Section. Here you can select 3 animations: 3D Flip, Quick Sand or Fade out. You can also make these compatible according to the devices where you think you will get most of the target audience, Mobile & Tablet.
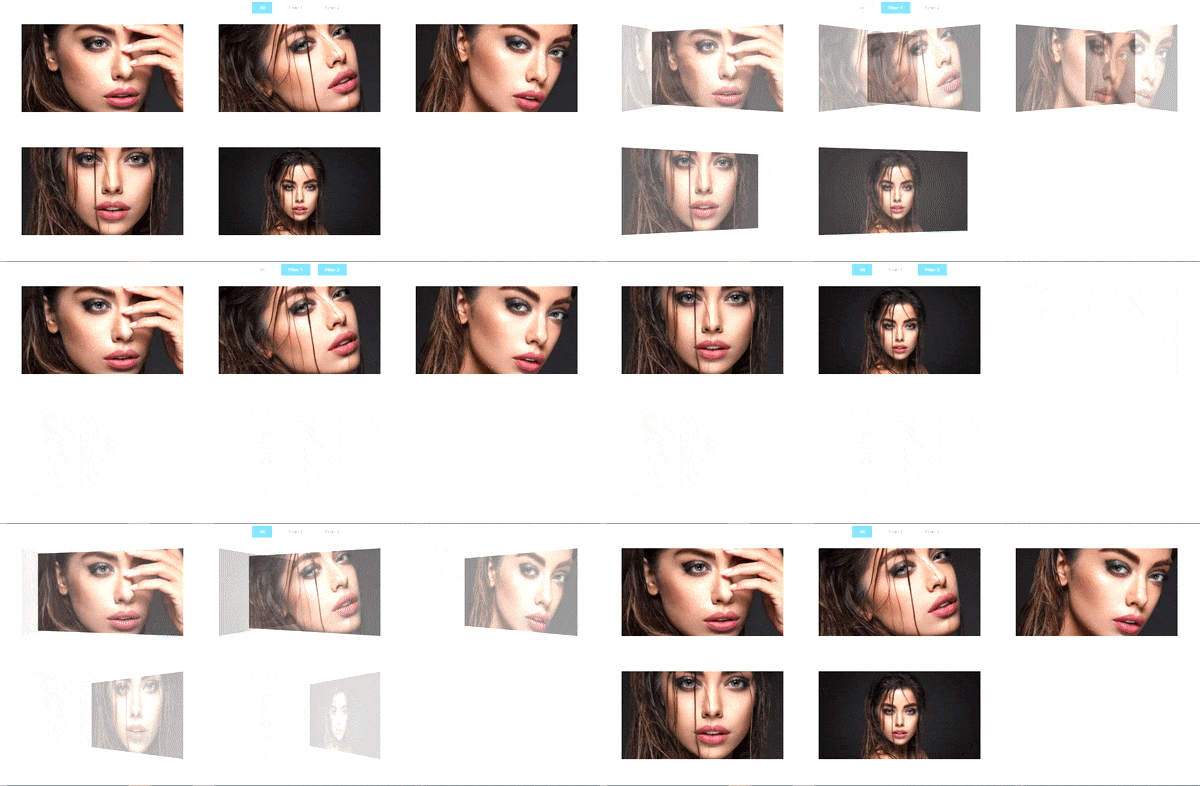
I have used the 3D Flip animation, the result will look something like this:
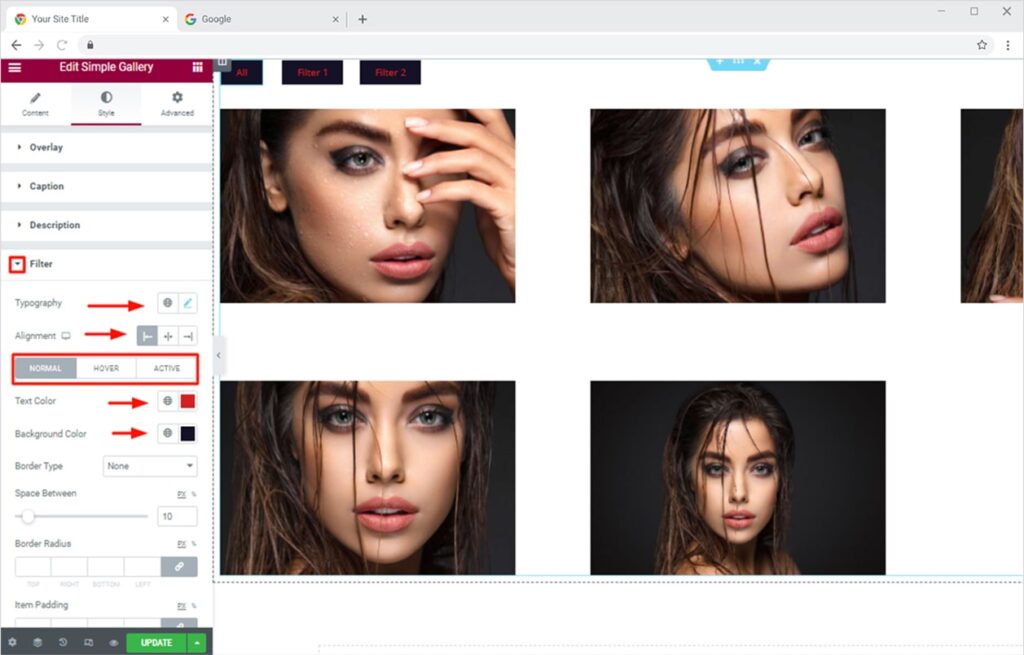
Once you have added your selected filter you can jump to the Style Tab. Select Filter Section, here you can change the Typography to make them more attractive and visible. You can even change the alignment that suits best according to your design. This widget also allows you to add Hover and Active Effect to the Filter. You can style your filter with your favorite color according to the theme of your site. It also allows you to change the Background to make your text color more prominent.
How to Add Lightbox Effects to Elementor Image Gallery
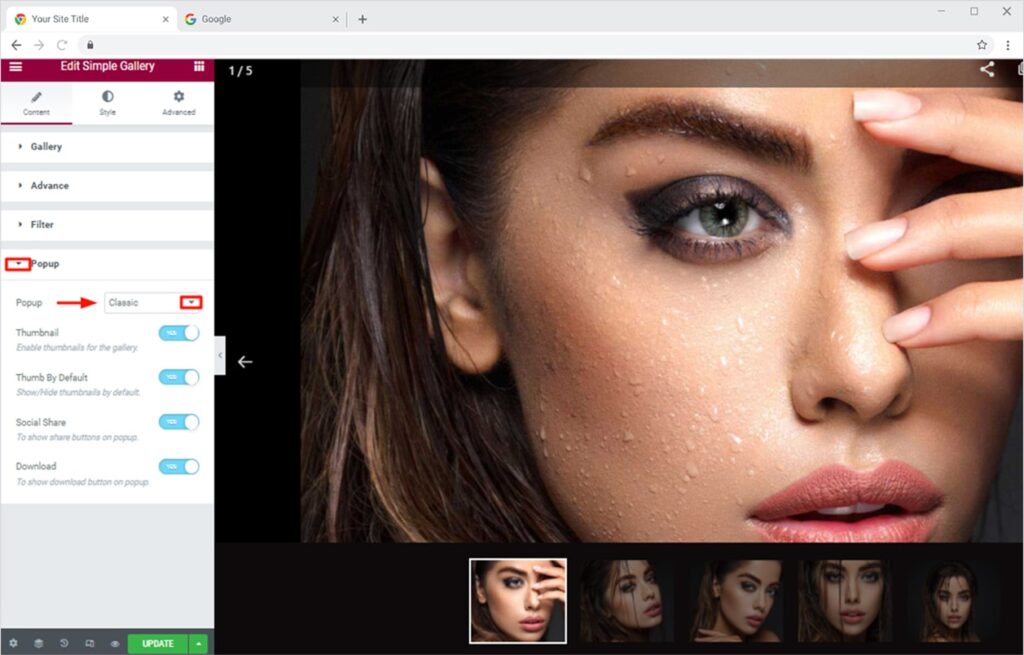
Just move towards the Pop-up Section in the Content Tab change the options in front of the pop-up menu from none to Classic and click any of your images in the gallery.
This will activate the Pop-up feature and can attract a lot of potential users by showing them every single detail about your Product/Service. Enabling this feature will help you highlight all the details of the images. Eventually, transforming your image into a heroic image.
How to Add & Style Hover Effects for your Gallery in Elementor
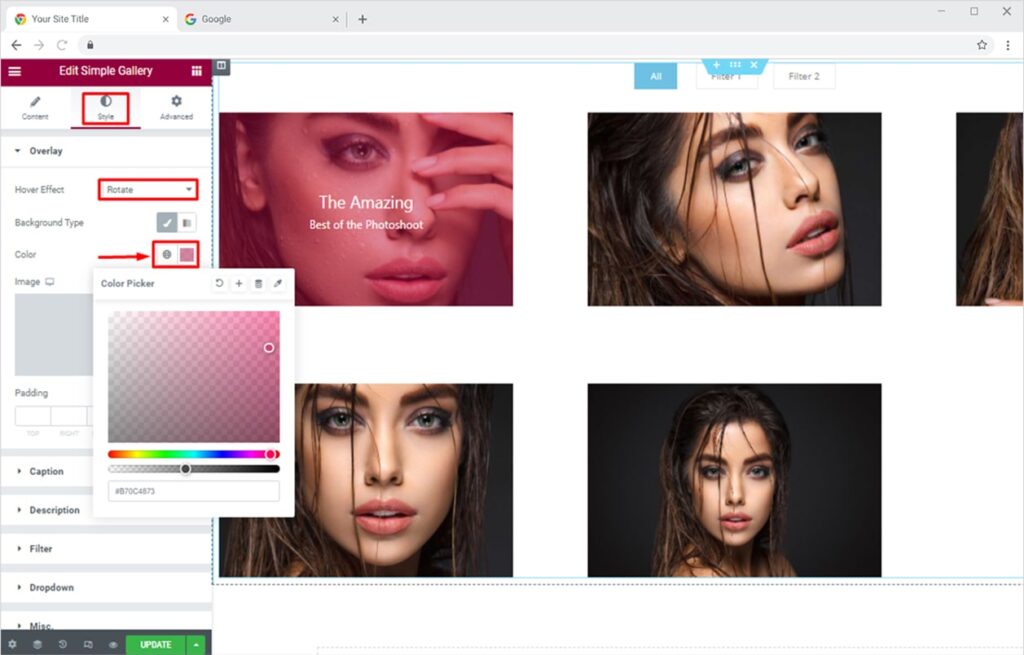
Just go to the Style Section of Xpro Simple Gallery Widget. Here you can design your gallery styles, fonts, or color all according to the theme and nature of your website. Styling your website in a presentable way not only attracts visitors but can also convert them into your Potential Customers.
Click the Overlay Section, here you can add different hover effects to the images of the Gallery. You can select from Zoom, Fade In, and Rotate. You can also change the color of your image’s background effect. Either select from the default colors options or you can also select the color of your choice.
How to Style Your Gallery for Mobile Devices in Elementor
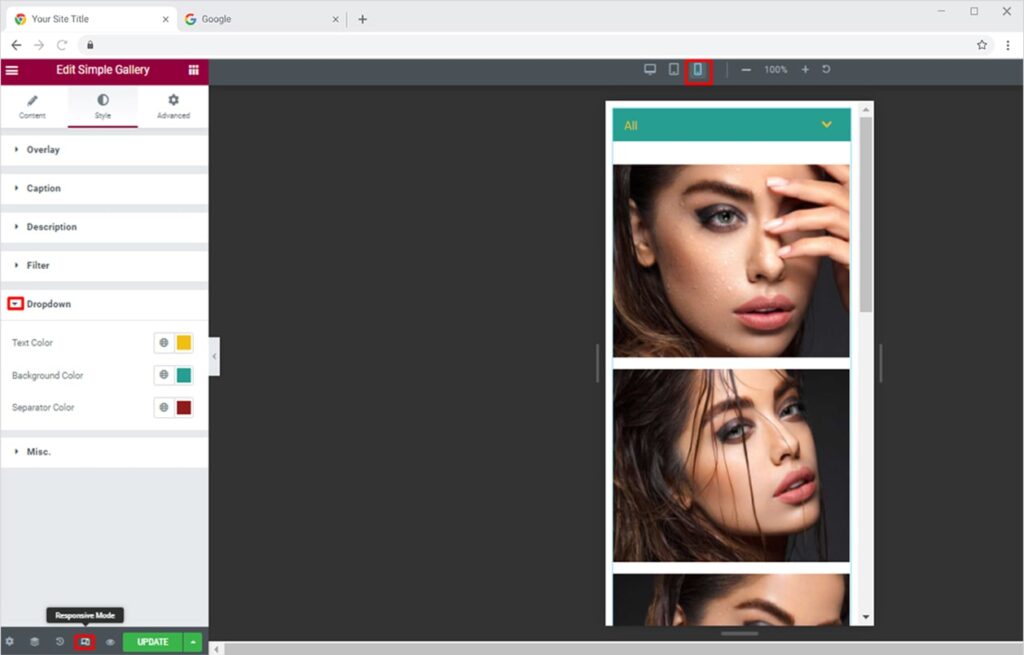
Just after spending all your efforts on making the best Gallery Design for the representation of your images. The Biggest task is to make these designs user-Friendly. You should also have to make sure the design is compatible with all devices. As most of the designing is done on Desktop, somehow most of the internet users are on mobile. This quick feature allows you to make your design instantly compatible with all types of devices.
Click the Drop Down Section in the Style Section. Toggle to Responsive mode and changed it to your most targeted devices like mobile. Now adjust the colors the way you want or according to your theme to make them more prominent attractive and user-friendly.
I hope now you have a better understanding of how to fully utilize our amazing Simple Gallery widget for Elementor. This widget helps to design an amazing gallery for your site. Moreover, if you want to add more attractive features, you can head over to the Xpro Elementor Advanced Gallery widget and Elementor Carousel Gallery widget to add supreme gallery designs to your website.
Xpro Elementor Addons offer a wide range of widgets, Elementor gallery templates, and features that help designers develop an attractive site. Check our 50+ free Elementor addons for Elementor which are enough to create a professional WordPress website. If you want to explore and add more attractive Elementor widgets then check our complete list of Pro Elementor widgets and download our Pro Elementor addons right now.