How to Install Elementor Heading Widget
Our free Heading widget for Elementor is the perfect companion for creating amazing headings for your website. It has a lot to offer other than being a heading widget. You can create headings with two different colors, fonts, gradients, strokes, and much more. The cherry on top is the floating and scroll effects that can be easily applied to your headings. The widget also gives you the ability to add images or gifs as text backgrounds to provide an eye-popping experience to your site visitors.
Xpro Elementor Addons is continuously on the hunt for the best widgets for web designers in order to make the web design process more effective and productive. The widget makes it easy for you to write and add a heading anywhere on the page and further customize it to your requirement.

Requirements
You need to install and activate the free plugin by Xpro Elementor Addons. If you already have the plugin installed, just make sure the Heading Widget is enabled so you can find it in the Elementor editor.
To enable the widget, simply follow these steps:
Step 1
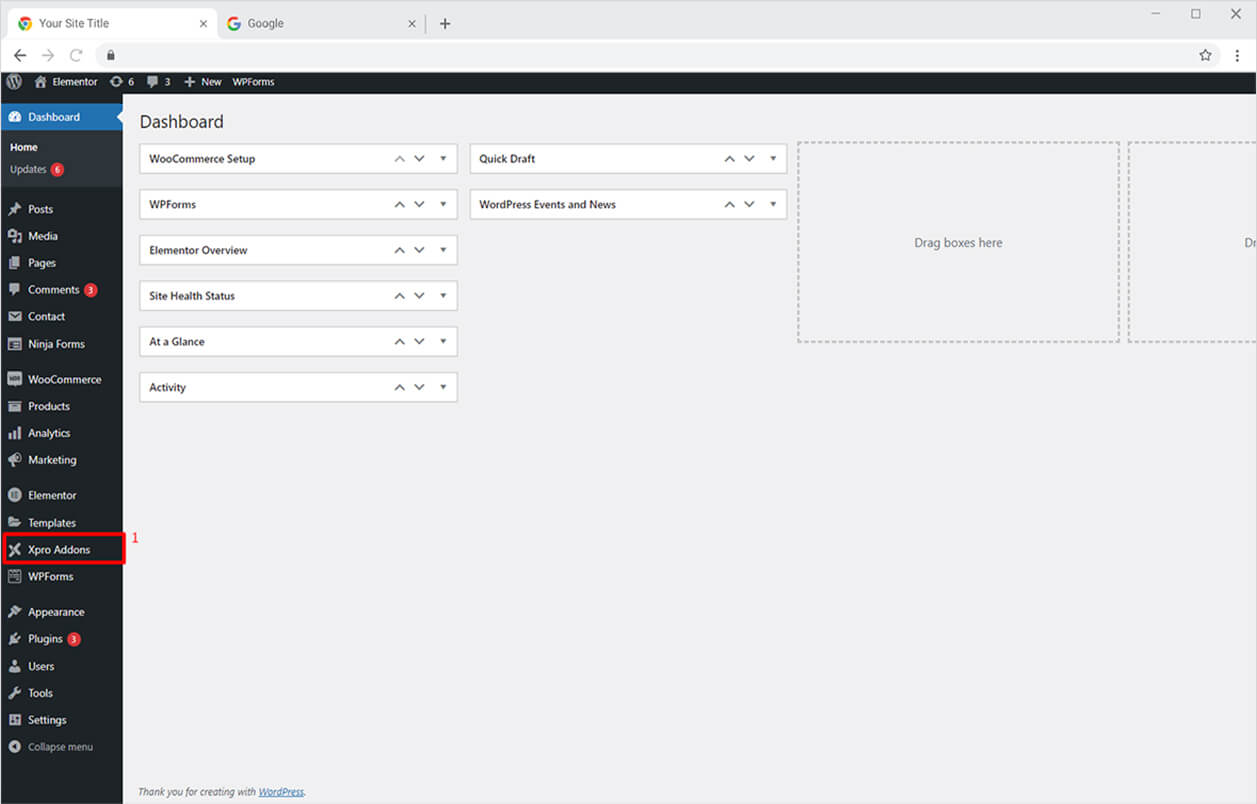
Click on the Xpro Addons option available on the WordPress Dashboard Menu.
Step 2
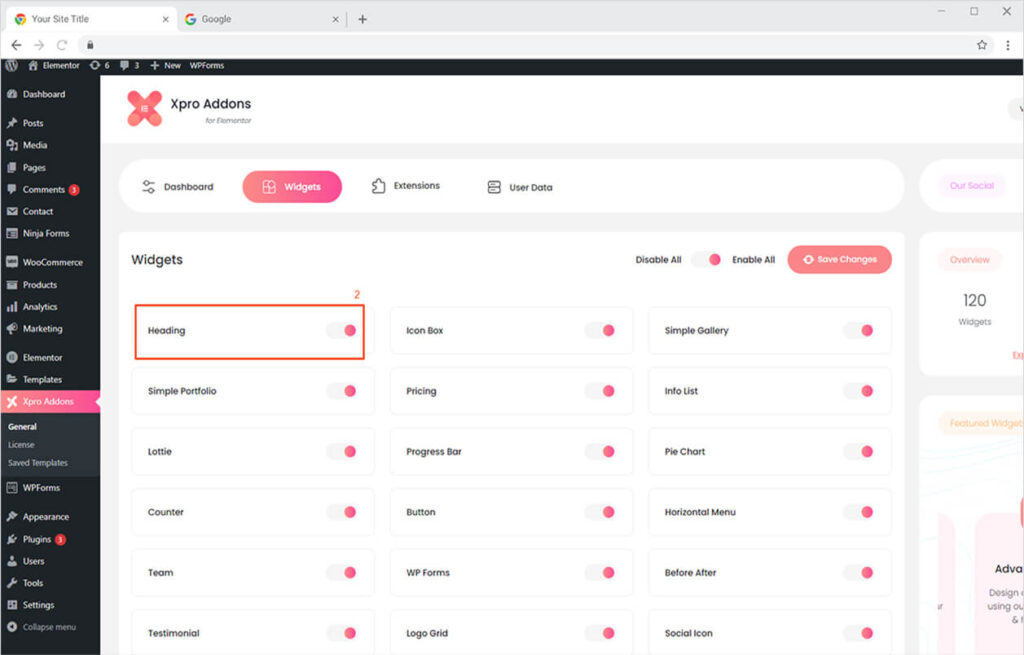
From the Xpro Addons Dashboard, click on the Widgets Tab, find the Heading widget, and finally, toggle the button ON to enable it.
How To Use Xpro Heading Widget for Elementor
You can create amazing headings for your websites using our Heading Widget. Get your site visitors’ attention by creating dual color headings, adding gradients, and much more. Firstly, we will explain all features turn by turn, and then we will practically see those features in action by creating a beautiful heading step by step. Let’s get started with this awesome Xpro Heading Widget.
Step 1
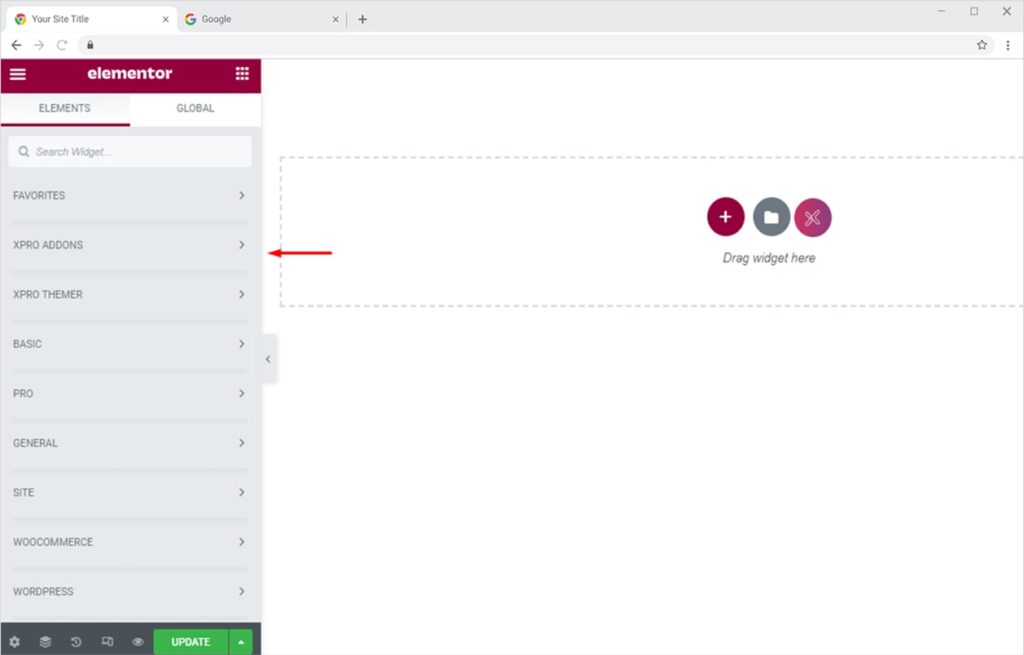
Click on the Xpro Addons section available on the Elementor Editor.
Step 2
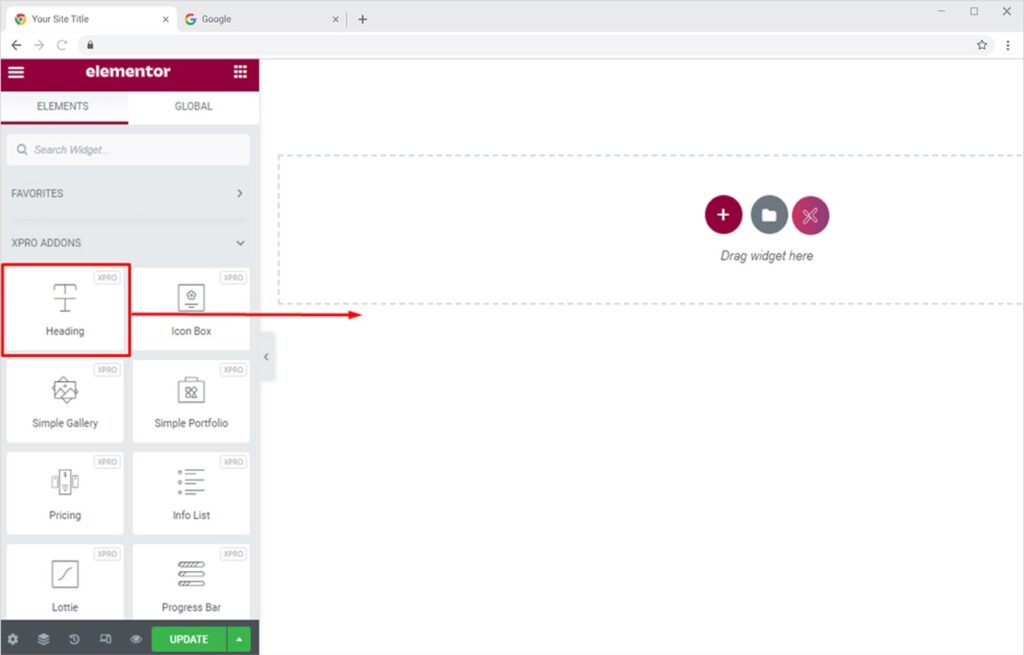
Select the Heading widget from the available list and drag’n’drop it on your desired page location.

How to Style Xpro Heading Widget
Our Heading widget for Elementor gives you the freedom to play around with your creativity. Here’s how you can put different typography styles, colors, and gradients to your website’s headings.
Step 1
Drag and drop the Heading widget on the desired page.
Step 2
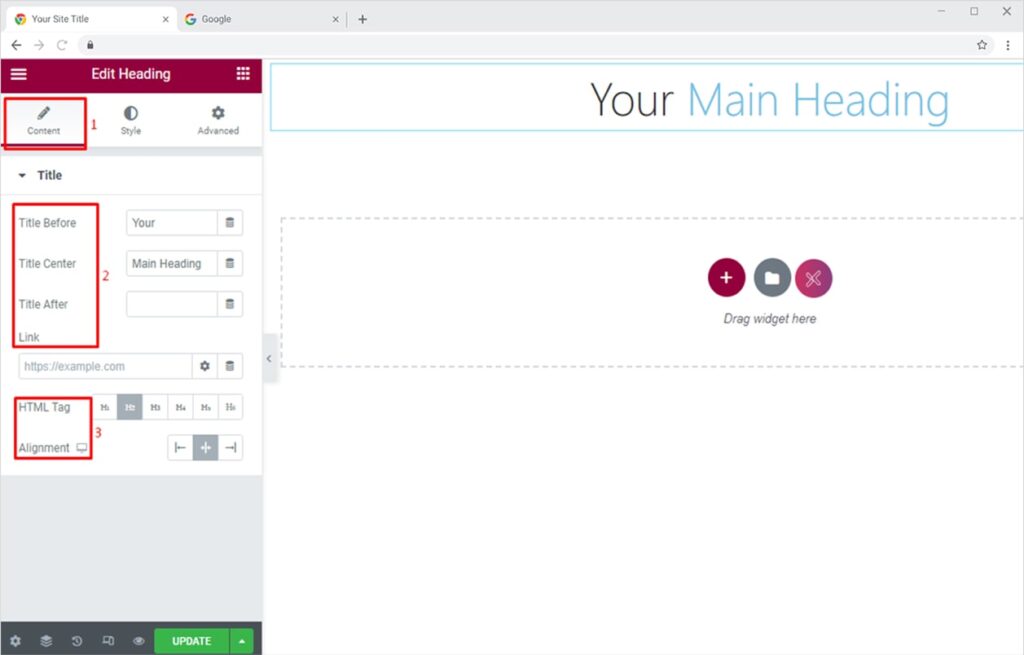
Go to the Content section and enter the text for your heading. You can set the Title text in three different fields (before, center, after). You can also add up a Link to your heading if you want the site visitors to head over to another offer/page once they click/tap on the heading. Set the desired HTML Tag for your heading and use the Alignment option to set your heading as left, center, or right-aligned.
Add Dual Typography to Elemenot Heading Widget
Now that your heading text is final, head over to the Style section to create a beautiful Dual Typography for your heading. You can assign different typography to the title and center title fields of your heading. Here we will do it for the center title field.
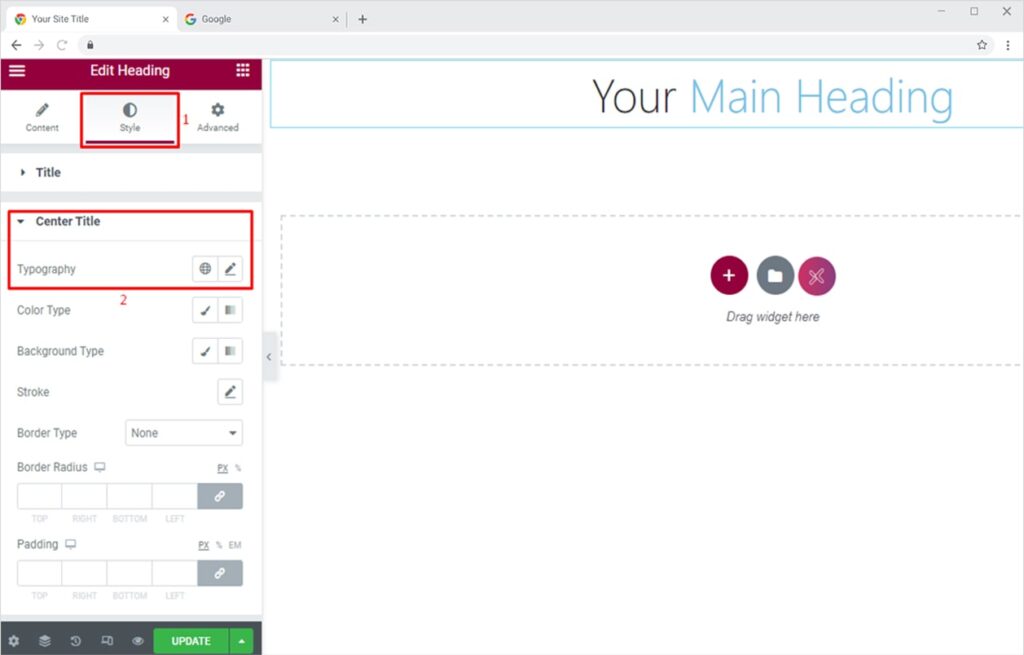
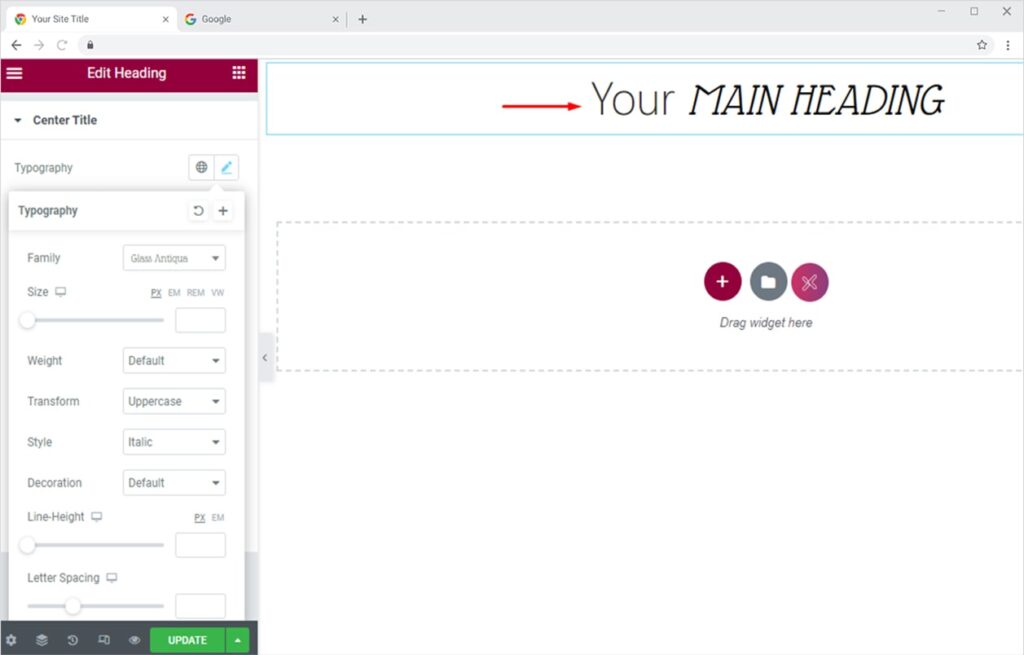
Click on the Edit icon to view all typography options. From here you can change the font family, transform, style, decoration, and more.
Add Dual Color to Elementor Heading Widget
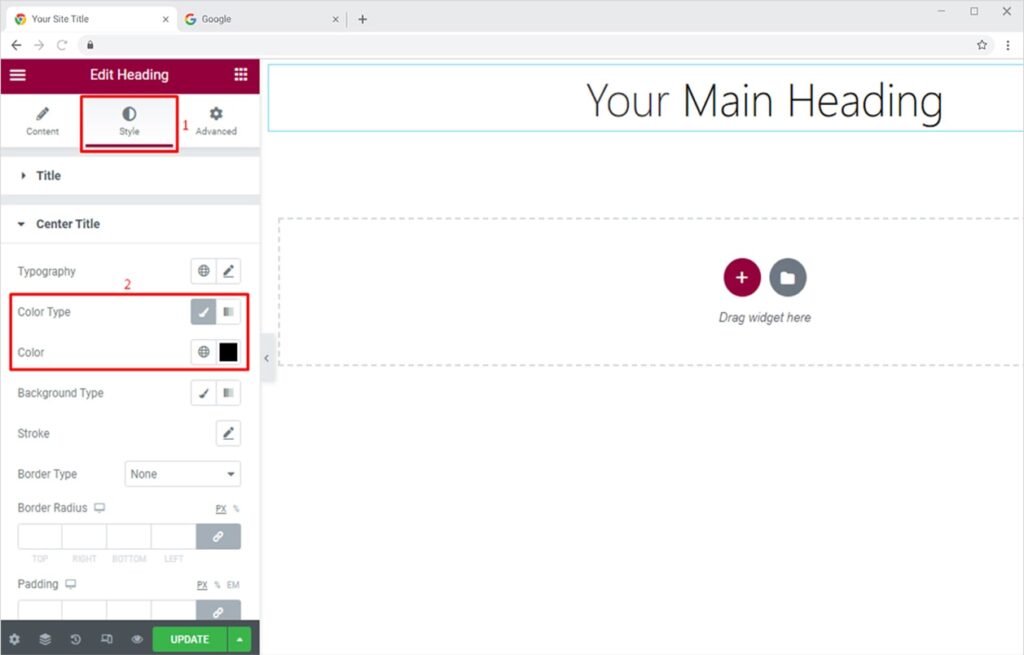
Attract your site visitors with compelling dual-color headings. You can easily style it using our Heading Widget for Elementor. Head over to the Style section to create an attractive Dual Color heading. You can assign different colors to the title and center title fields of your heading and much more.
Set the Color Type as Classic then from the Color option select your desired color. You can also add up a custom color code of your choice.
Add Gradient to Your Elementor Heading Widget
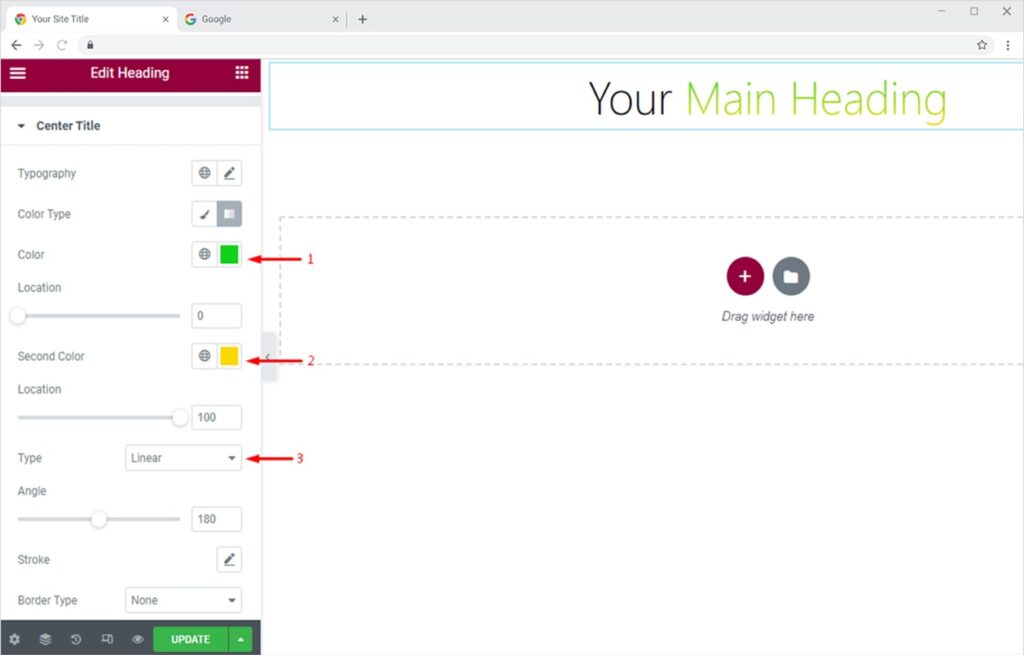
Entice your site visitors with elegant Gradient Headings. Go to the Style section and select the Color Type as Gradient. Select the colors for your gradient, set its type as linear or radial, change gradient angle, and much more.
Add Stroke To Your Heading
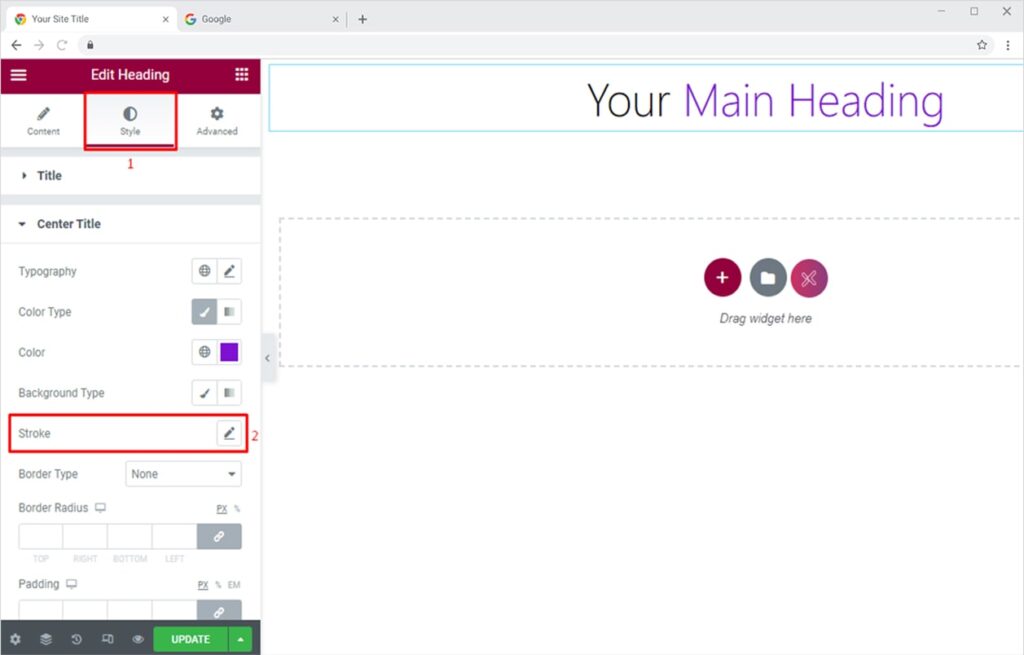
Excite your website visitors by adding a stroke to your headings. Go to the Style section and click on the Stroke option.
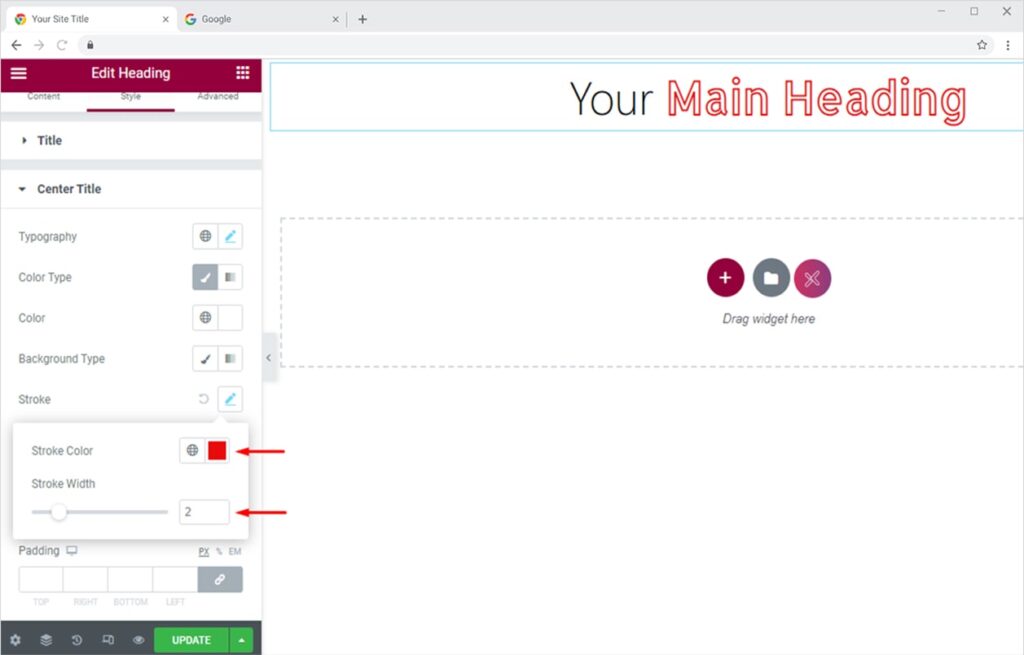
You can set any color for the Stroke and customize the Stroke width as per your liking. The final result would be something like this.
See how you can customize header footer templates using the free theme builder for Elementor.
By Xpro Elementor Addons
How to Add Background Color or Gradient to Your Headings
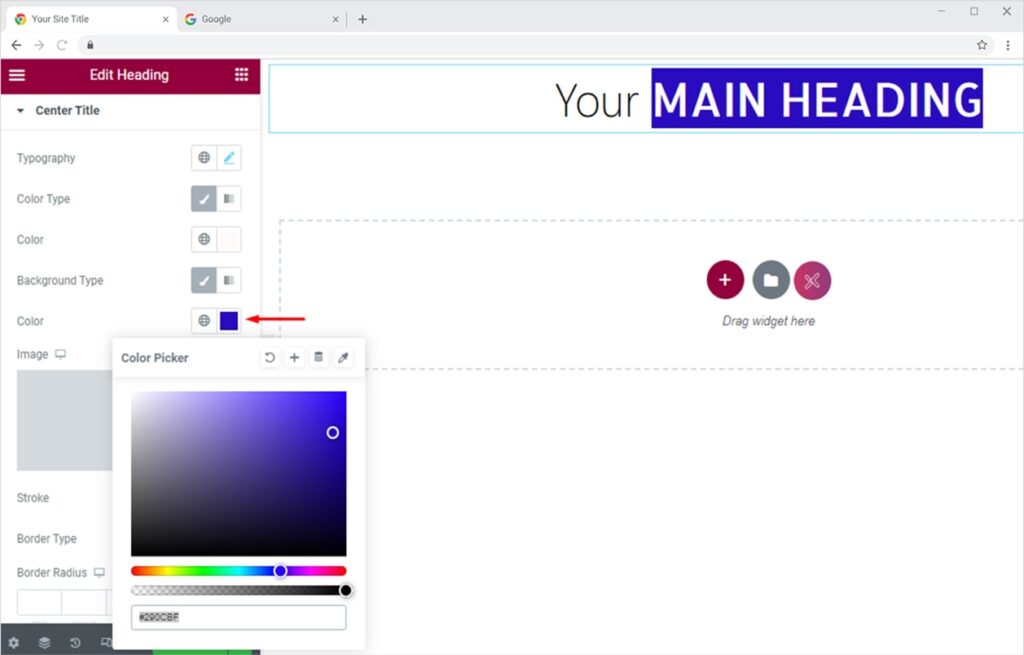
Create pleasant headings with color or gradient set as background. To set color as the background, go to the Style Section and click on the Classic Icon in front of the Background Type option.
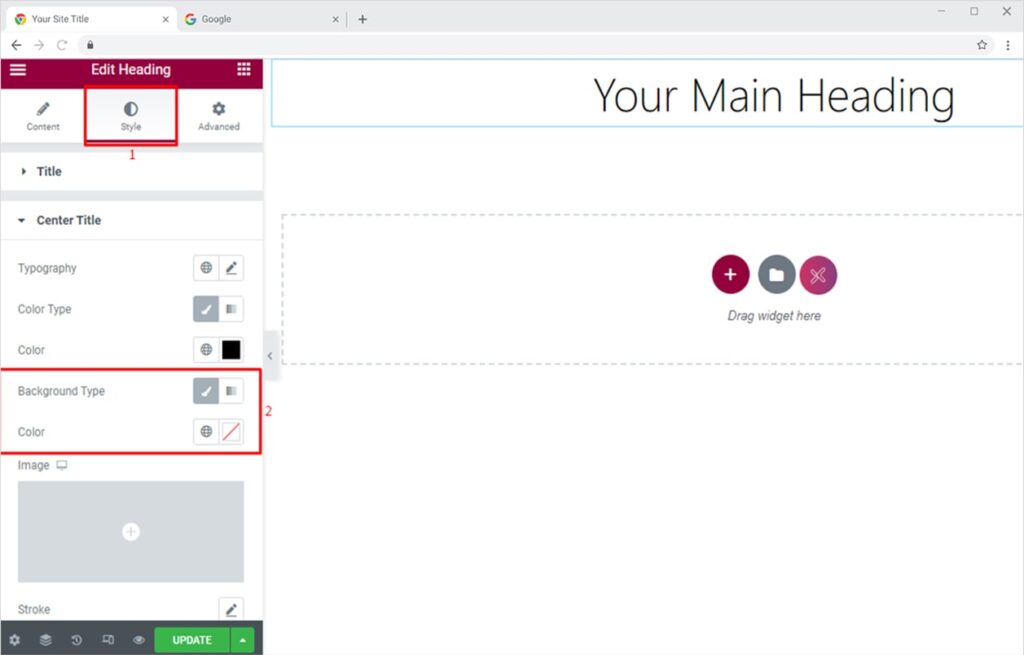
Select the color of your choice from the Color Option. The end result will be a beautiful heading like the following.
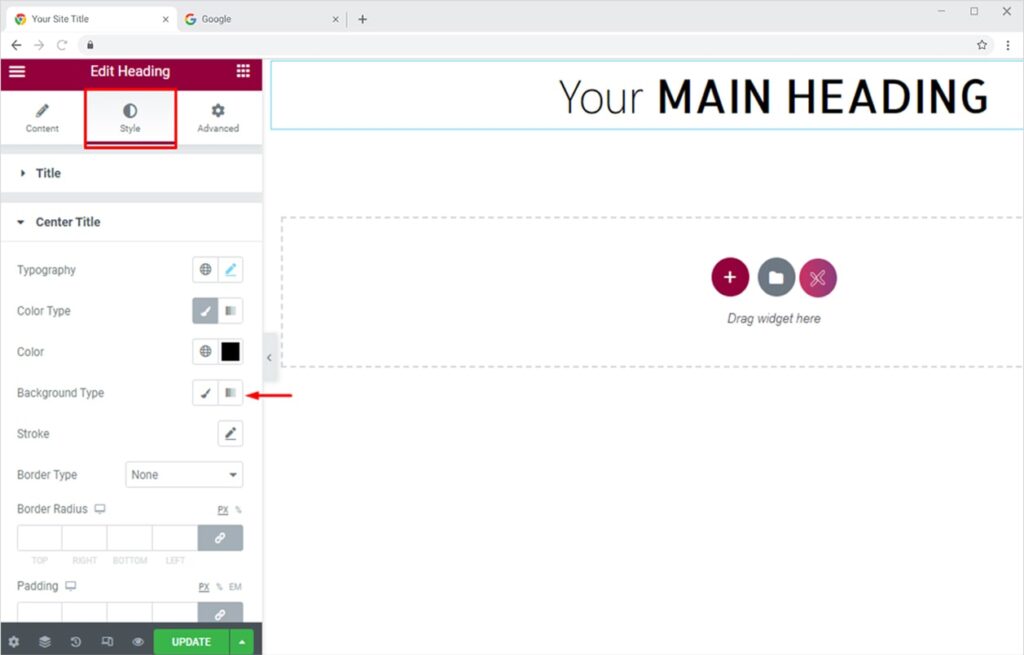
To set gradient as the background, go to the Style Section and click on the Gradient Icon present in front of the Background Type option.
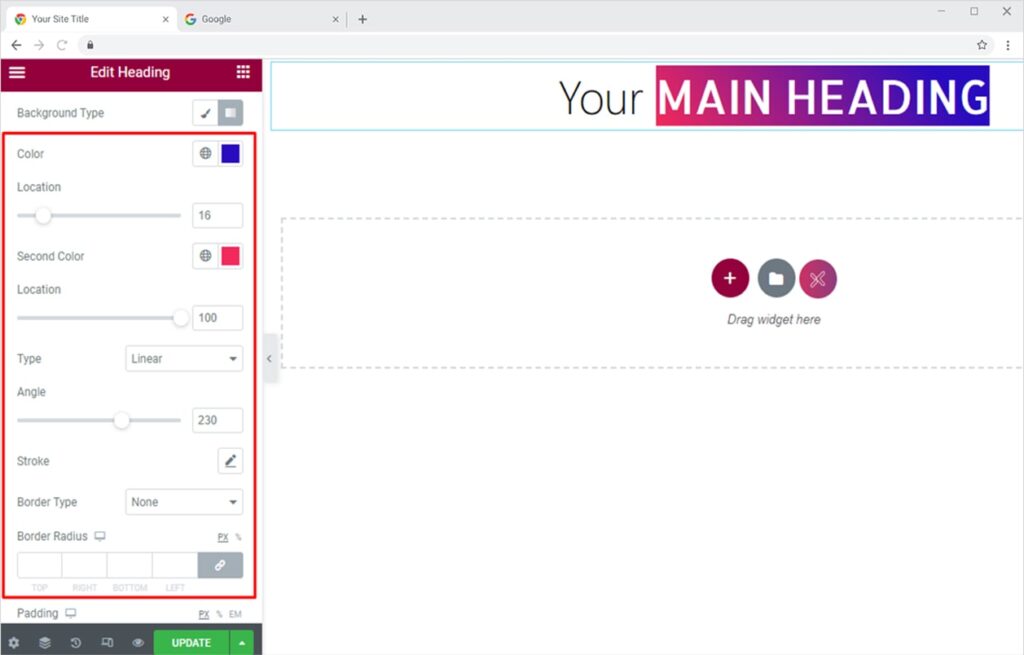
From here you can select two colors of your choice, set a custom location for colors, and set the angle for the gradient. You can also add a stroke to the heading.
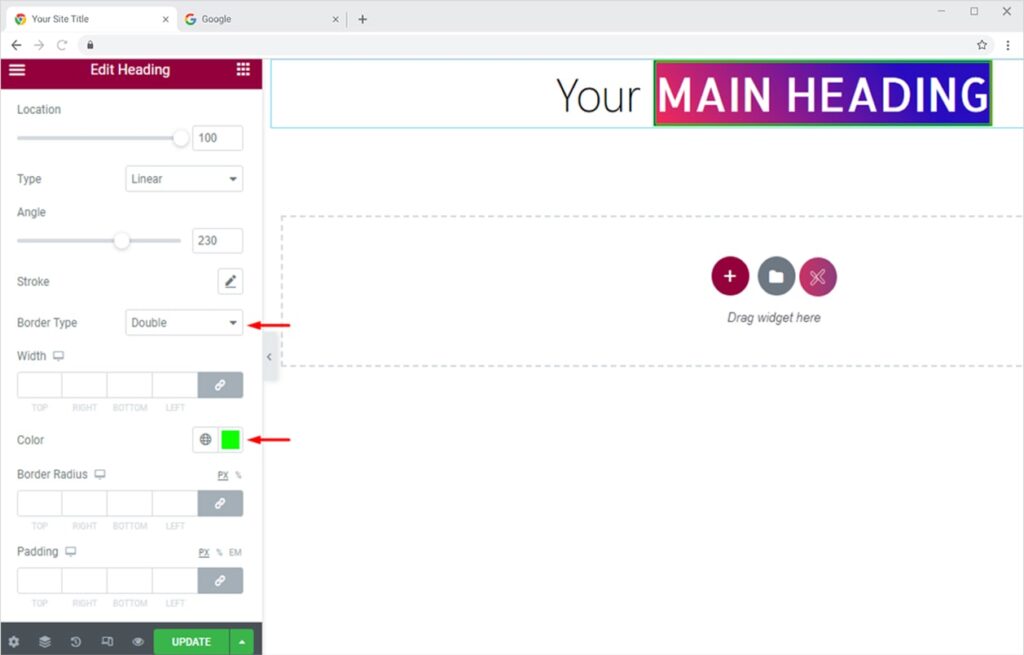
You can also add an elegant border to the gradient background by selecting a border type(solid, dotted, double, dashed, groove). Give color to your border and make it more eye-catchy.
How to Add Image As Text Background using Heading Widget Elementor
Create unique & eye-popping headings to stand out from the rest. Add an image as text background in your headings and provide a seamless user experience. This feature lets you add value to your site and explain more with less clutter.
To set an image as the background, go to the Style Section and click on the Classic Icon in front of the Background Type option. Finally, click on the image option and select the image you want to add as a background.
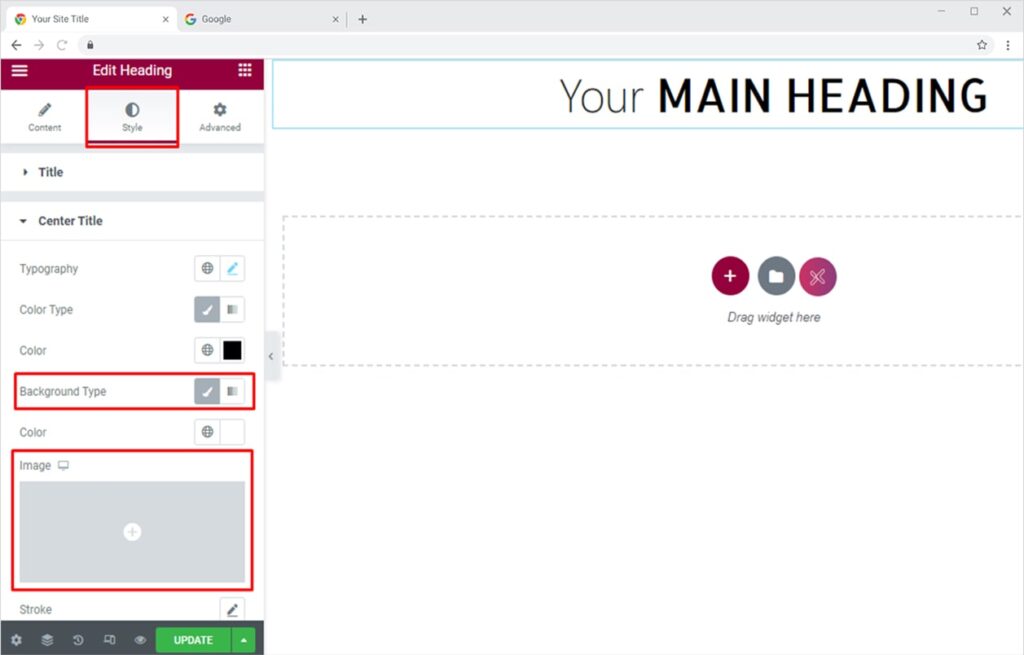
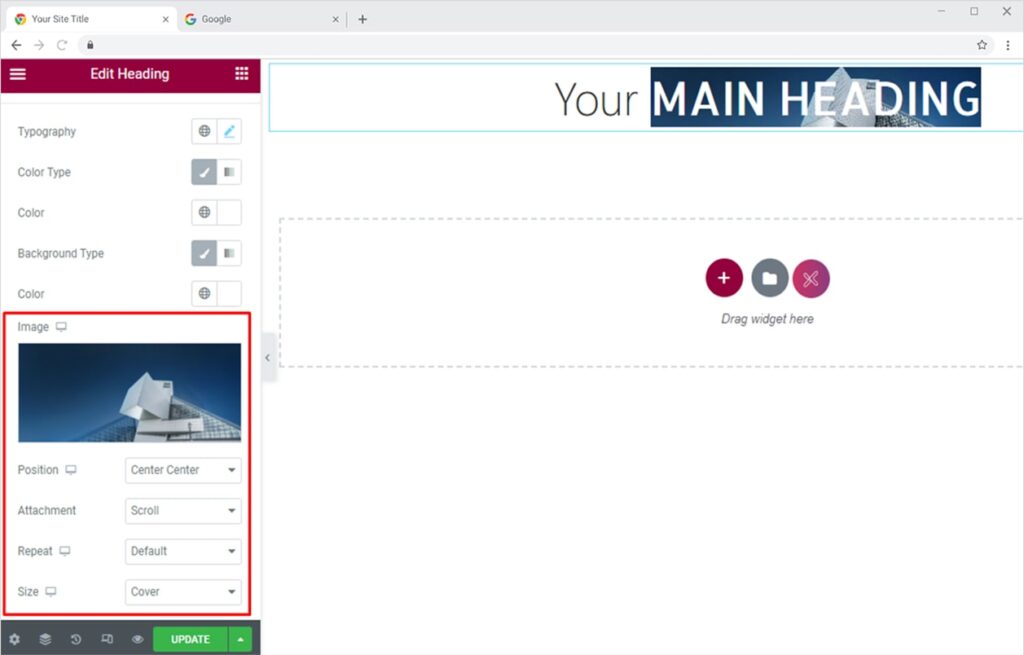
You can upload the image from your PC or Mac or the Media Library. After that, set the position of the background image from our 9 pre-defined positions or create your custom one. Set attachment as scroll or fixed (desktop only). You can also set the size of the image (default, auto, cover, contain, or custom). The final output will be something like this.
How to Add GIF as Text Background on Your Heading
Create modern GIF-based headings for your websites in minutes. Add GIF as text background in your headings and provide an exciting site experience to visitors. To set a GIF as the background, go to the Style Section and click on the Classic Icon in front of the Background Type option. Finally, click on the image option and select the GIF you want to add as a background.
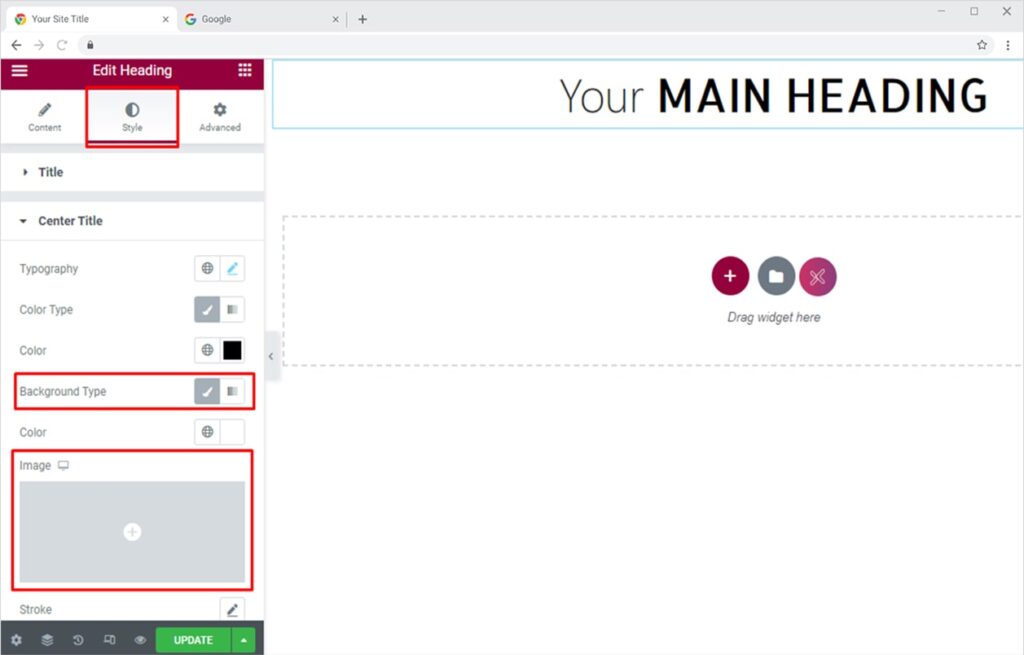
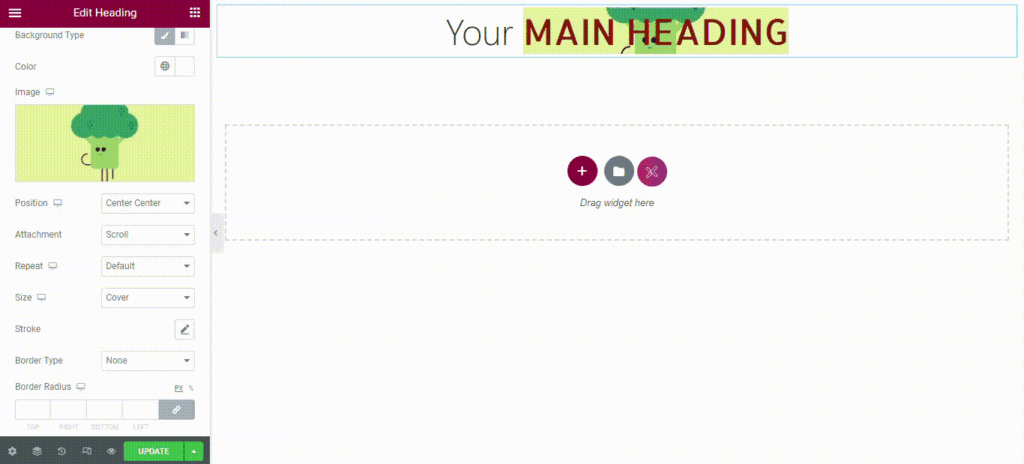
You can upload the GIF from your PC or Mac or the Media Library. After that, set the position of the GIF from our 9 pre-defined positions or create your custom one. Set attachment as scroll or fixed (desktop only). You can also set the size of the GIF (default, auto, cover, contain, or custom). The final output will be something like this.
How to Apply Floating Effect on Your Elementor Heading
Xpro Heading Widget Elementor Addons lets you add floating effects on almost all widgets. Head over to our detailed guide on How To Add a Floating Effect for your WordPress website.
If you want to explore and add more attractive Elementor widgets then check our complete list of free Elementor widgets and download our free Elementor addons now. Moreover, check our other promising widgets like the 360 product view widget for Elementor, Step Flow Elementor, Hotspot widget for Elementor, and Elementor Featured Image. You will be surprised how easily you can customize Xpro Elementor Addons for your WordPress websites.