Table of Contents
If you ever want to showcase your creative designs, templates, or portfolios in an image scroll, this blog is for you. Using the Xpro free Elementor image scroll widget, you can create a long portfolio image scroll within Mockup with just a few clicks.
Elementor Image scroll can allow you to showcase your long web design screenshots, templates, and portfolios within a mockup.
In this blog post, I’ll show you how to create a long image scrolling effect in Elementor without coding.
Let’s get started.
What is an Elementor image scroll widget?
Elementor Image scroll allows you to display a portion of an image while the rest is hidden and accessible through scrolling. It’s an amazing way to present large images within a limited space, often used on websites.
This widget allows users to add an image in different directions (horizontal/vertical) to see different parts of a large image. It works with two different trigger types: one when the user hovers over the image and the other when the user scrolls up or down with the mouse.
Moreover, this widget allows you to present long images, such as web page screenshots, panorama shots, and more, on your website. The image scroll widget is popular among various sectors, including fashion, businesses, and online stores.
How To Create a Scrolling Image Effect Within a Mockup Using Elementor?
To create an image scroll on website, make sure you have Elementor and the free Xpro Elementor Addons installed and activated.
Note: If these plugins are already installed, proceed to the next step. If not, let’s start with step 1.
Step 1: Install and Activate Plugins:
The first step is to download the Elementor page builder and Xpro elementor addons. You can easily download both of these plugins from the WordPress directory. Here’s a quick tutorial video to install and activate these plugins:
Step 2: Create or Edit a Page with Elementor:
After installing and activating the plugins, go to the page where you want to add a scrolling image or create a new page.
To create a new page, navigate to the WordPress dashboard and click on “Pages > Add New Page.” If you want to edit an existing page, then go to the pages section and click on “Edit with Elementor.”
Step 3: Add a Section and Choose Mockup Images:
In the Elementor editor, we’ll first add a new section where we want to create a scrolling image.
- To add a new section, navigate to ‘+” icon in the center of the Elementor editor page, as you can see in the screenshot below:

- Choose the appropriate column structure for your section according to your requirements. In my case, I’ll select the three-column section for image scrolling.

- First, I’ll modify the alignment of the columns, as you can see in the reference video.
- Once the section is in place, go to the Elementor widget panel and find the “Image widget.”
- Drag and drop the image widget into the selected columns of the newly created section.
- Add the mockup image of the desktop from the media library. You can add any mockup image according to your requirements.
Here you can see a tutorial video for a visual guide on how I’ve performed these steps effectively.
Done? Are you with me so far?
Ok, let’s move on to the image scroll widget.
Step 4: Configure the Image Scroll Widget
Now let’s move on to configuring the image scroll widget.
- First, drag and drop the Xpro Elementor image scroll widget from the widget panel into the same section where we placed the image widget.
- We’ll upload our long image to use in the mockup, within the image scroll widget.
- Once the image has been uploaded, you can customize it to set the image direction, trigger types, and scrolling speed.
- Moreover, you can apply the image masking, add a text badge, and overlay icon (Choose icon from the icon library). You can also insert a link to the complete image box.
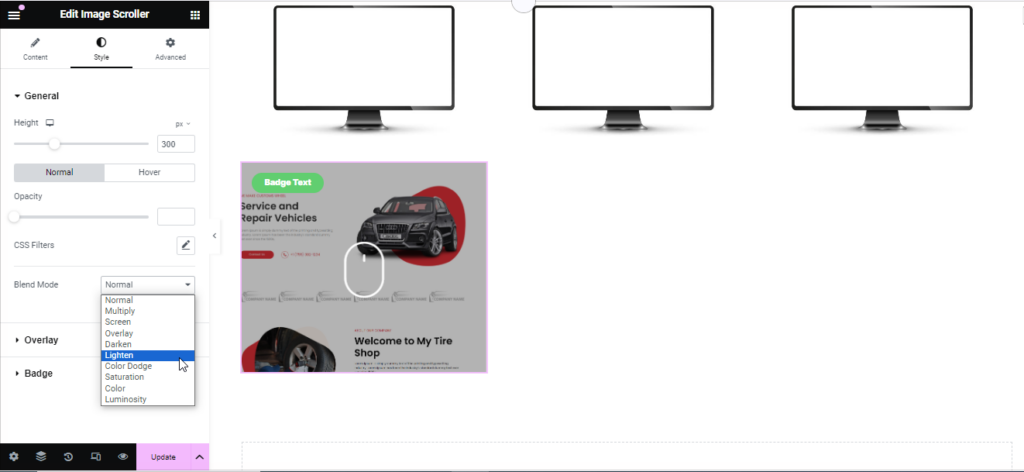
- Now, you can customize the styling (blend mode, CSS filters, height, opacity, and more) from the styling tab within the image scroll widget according to your web design.

- After configuring the image scroll widget, go to the advanced settings, where we’ll set the position of the image scroll widget to ‘absolute’ and adjust it further in the video tutorial.
Why use absolute position? Using an absolute position for a widget in web design gives you complete control over where it appears on a page. When a widget is set to absolute position, it is positioned relative to its nearest positioned widget, which means it can be easily placed on the page.
Here’s a quick tutorial on how to set the position and adjust the image scroll in a desktop mockup.
That’s it!
Have you completed the steps? Ok, now update your settings and preview the page.
There, we’ve got it!
In the same way as the first mockup adjustment, I have adjusted the other two mockups to see how they look.
Conclusion
The Elementor image scroll widget is a great plugin for your website. It is easy to use and has many features that you can adjust according to your website requirements. You can get the Image Scroll widget free from the free Xpro elementor addons. The addons include 50+ free Elementor widgets, 12+ free Elementor extensions, pre-designed themes, and templates for Elementor.
???? Apart from that, if you want to add advanced functionality or styling options, you can buy the Xpro elementor addons premium version, which includes 140+ elementor widgets, premium extensions, ready-to-use templates, and themes for elementor.
Thank you for reading this blog till the end. I hope you got all the information about creating a long-scrolling image effect within the mockup.
If you have any questions about the image scroll widget, let us know in the comment section. We’ll be happy to assist you.
How does the Image Scroll Widget work?
The widget enables users to upload images and configure settings such as scrolling speed, direction, trigger type (mouse hover or mouse scroll), and many more. As visitors scroll down the page, the images move vertically or horizontally based on mouse hover or mouse scroll. It creates a dynamic visual effect.
Do I need Elementor Pro to use the Image Scroll Widget?
No, you don’t need to buy the Elementor Pro because the Xpro elementor addons offer a free image scroll widget for elementor. You can easily download its free version from WordPress.
Where can the Image Scroll Widget be used?
The Image Scroll Widget can be used on various websites, including e-commerce, real estate, portfolios, technology, and many other business websites, to showcase services and products.
Does the Image Scroll Widget have space-saving benefits?
Yes, it’s a wonderful, space-efficient way to present multiple images or designs to showcase on the web pages. You can display images in different directions (vertically or horizontally).
FAQs
How does the Image Scroll Widget work?
The widget enables users to upload images and configure settings such as scrolling speed, direction, trigger type (mouse hover or mouse scroll), and many more. As visitors scroll down the page, the images move vertically or horizontally based on mouse hover or mouse scroll. It creates a dynamic visual effect.
Do I need Elementor Pro to use the Image Scroll Widget?
No, you don’t need to buy the Elementor Pro because the Xpro elementor addons offer a free image scroll widget for elementor. You can easily download its free version from WordPress.
Where can the Image Scroll Widget be used?
The Image Scroll Widget can be used on various websites, including e-commerce, real estate, portfolios, technology, and many other business websites, to showcase services and products.
Does the Image Scroll Widget have space-saving benefits?
Yes, it’s a wonderful, space-efficient way to present multiple images or de
