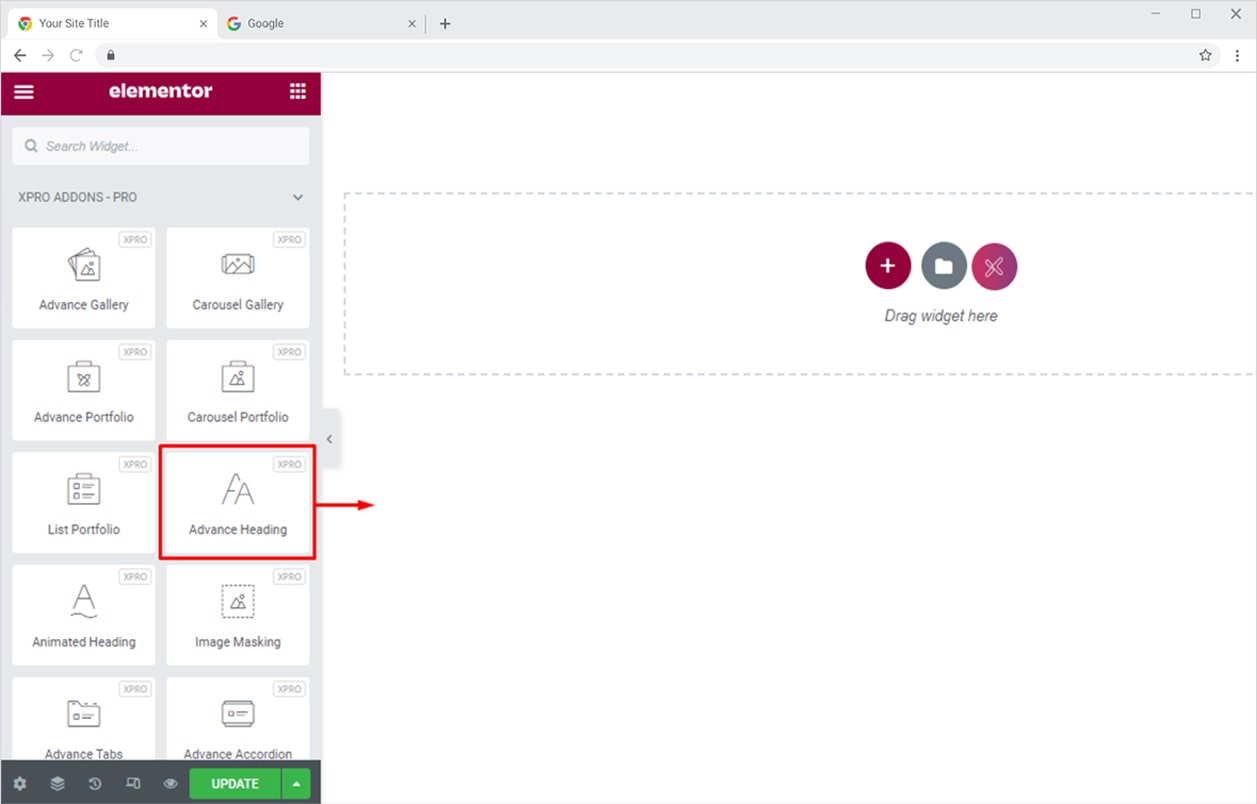
How to Install Elementor Advanced Heading Widget
Xpro Advanced Heading Widget for Elementor is an all-in-one powerhouse to create beautiful and eye-popping headings for your websites. The Elementor Advanced Heading Widget comes with 100s of options to create elegant headings in no time. You can add amazing effects to maximize the look and feel of your site’s headings. Add subtitles, description, icon, separator, shadow text, and much more to enhance the overall visibility of your headings. Play around with your creativity by applying Image/GIF masking to your headings.

Requirements
You need to install and activate the pro plugin by Xpro Elementor Addons. If you already have the plugin installed, just make sure the Advanced Heading Widget is enabled so you can find it in the Elementor editor.
To enable the widget, simply follow these steps:
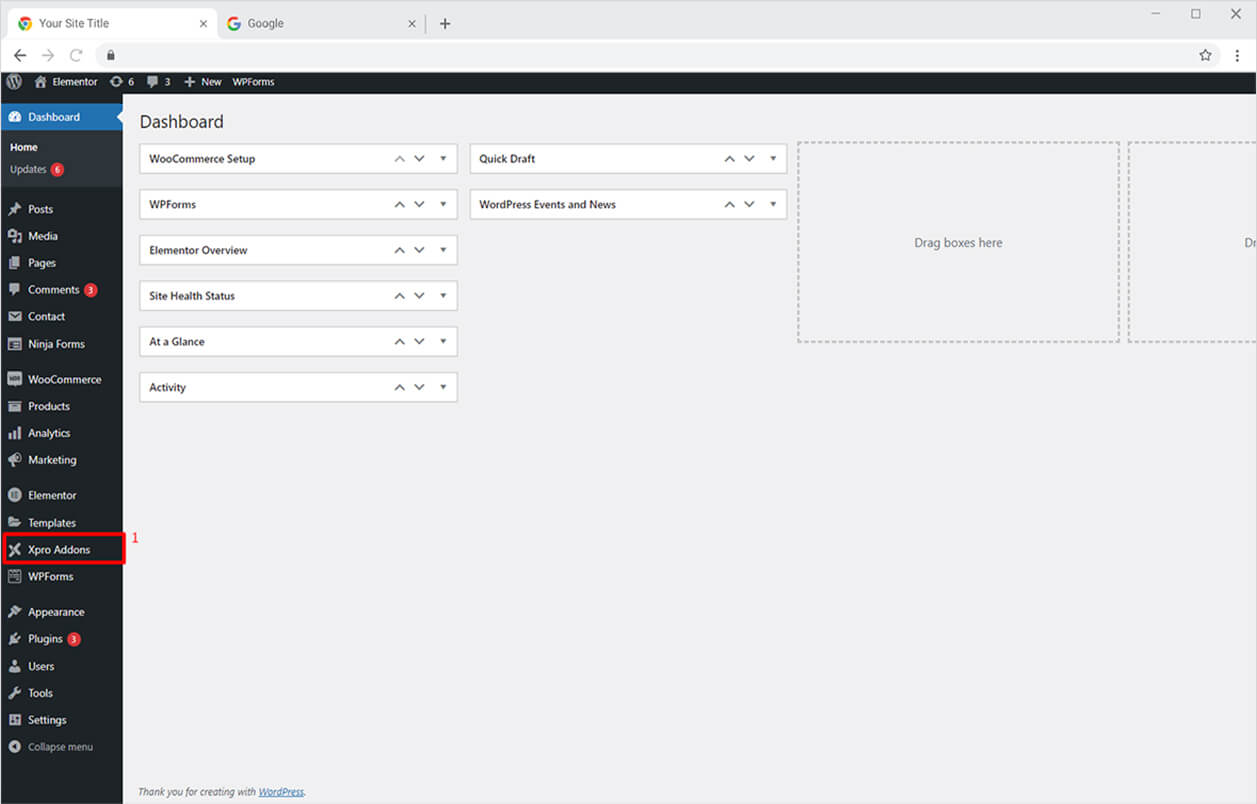
Step 1
Click on the Xpro Addons option available on the WordPress Dashboard Menu.
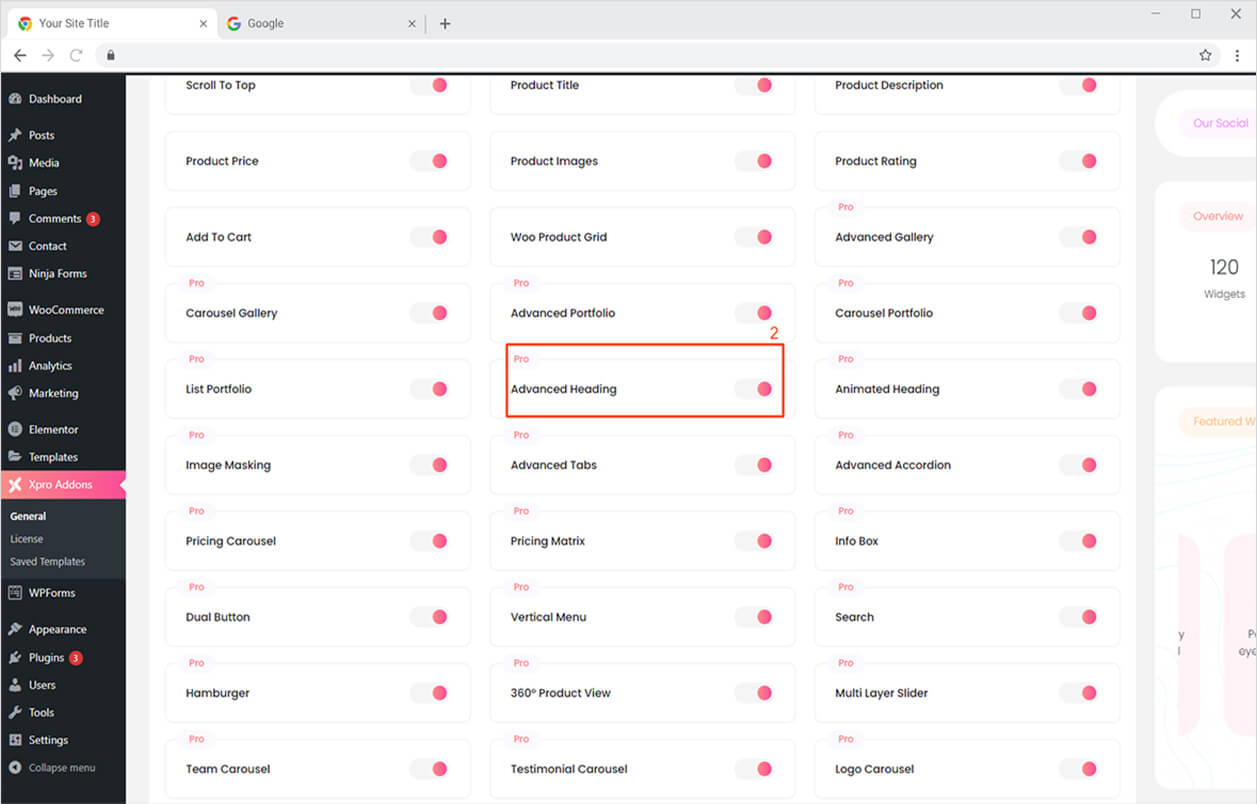
Step 2
From the Xpro Addons Dashboard, click on the Widgets Tab, find the Advanced Heading widget and finally toggle the button ON to enable it.
How to Use Xpro Advanced Heading Widget for Elementor
You can create wonderful headings for your websites in minutes with our Advanced Heading Widget. Get instant engagement on your website by grabbing the attention of your visitors. It’s simple, fun, and time-saving! Here’s how to use this amazing Elementor Advanced Heading Widget.
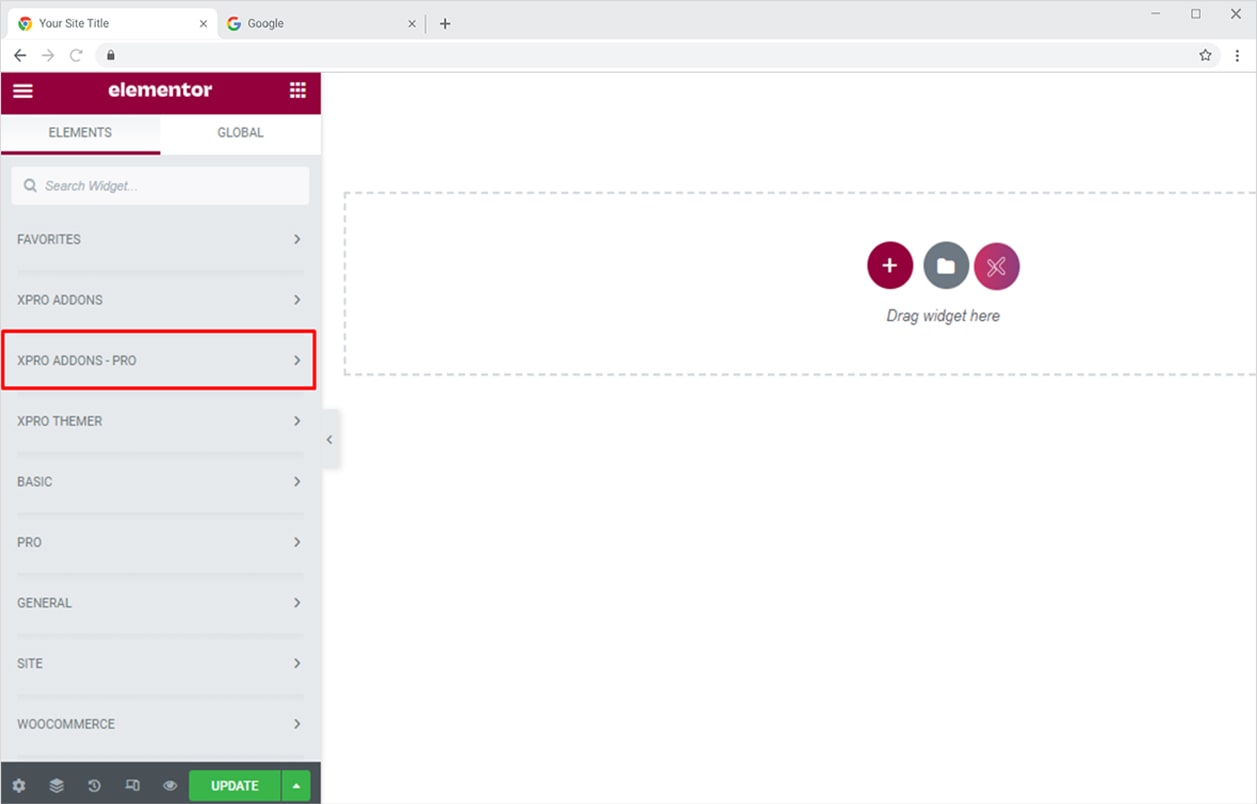
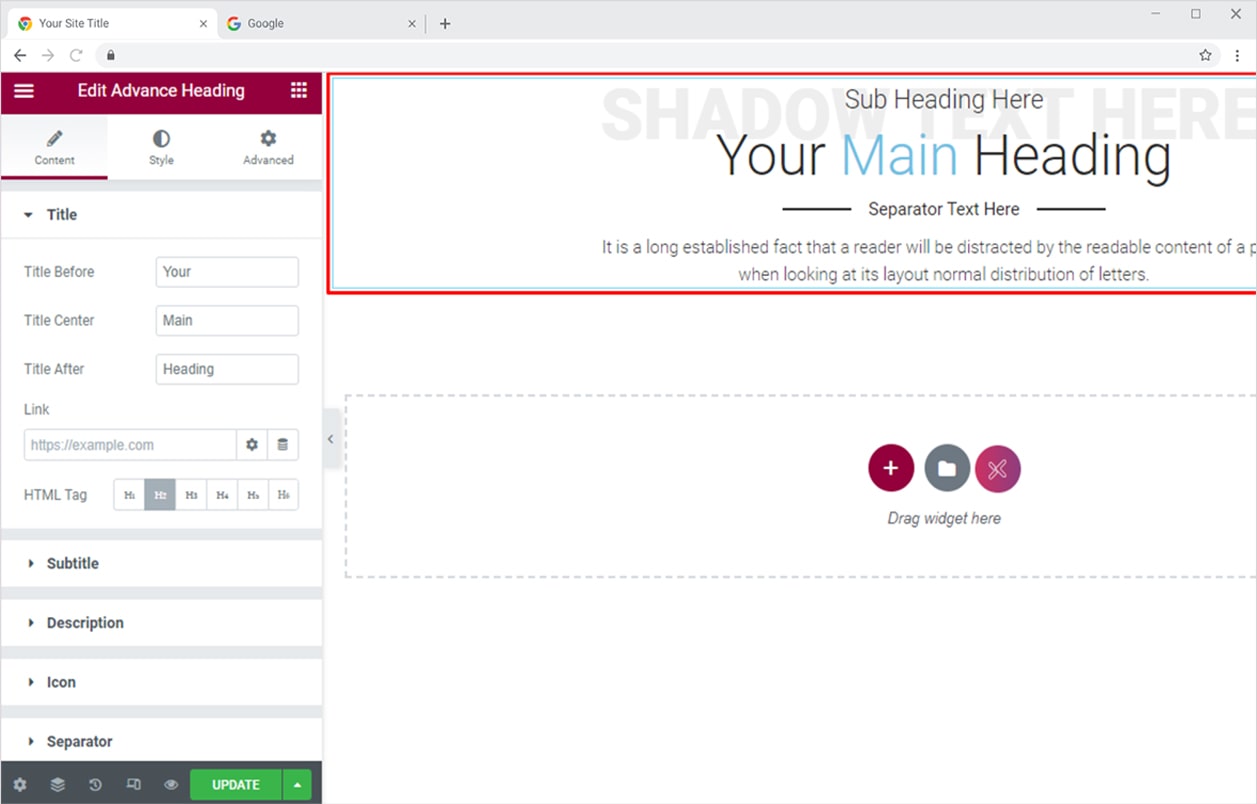
Step 1
Click on the Xpro Addons – Pro section available in the Elementor Editor.
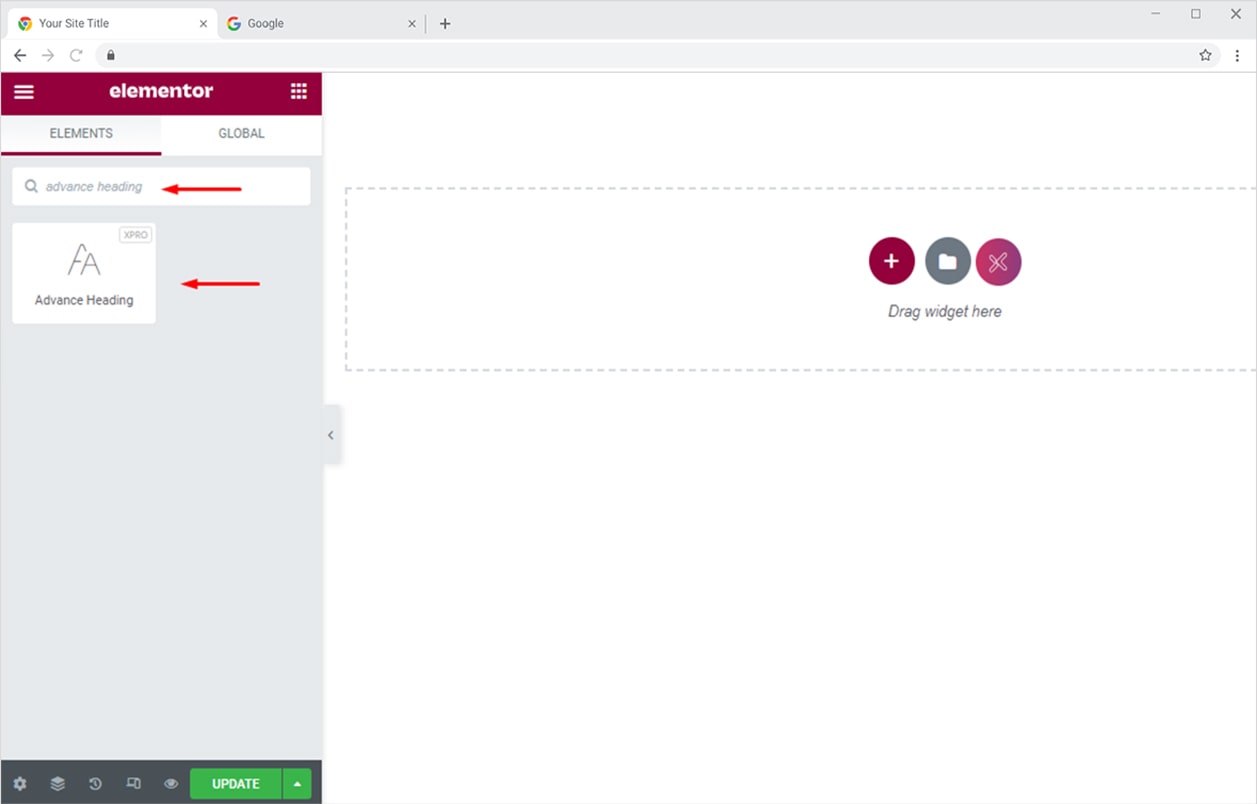
Step 2
Search for Advanced Heading in the search bar and drag’n’drop the widget on your desired page location.
How to Style Your Headings with Xpro Advanced Heading Widget
Our Advanced Heading widget for Elementor gives you the freedom to style your titles & site headings the way you want. You can create highly engaging headings by using advanced features of the module. Let’s try those features!
Step 1
Drag and drop the Advanced Heading widget on the desired page.
Sept 2
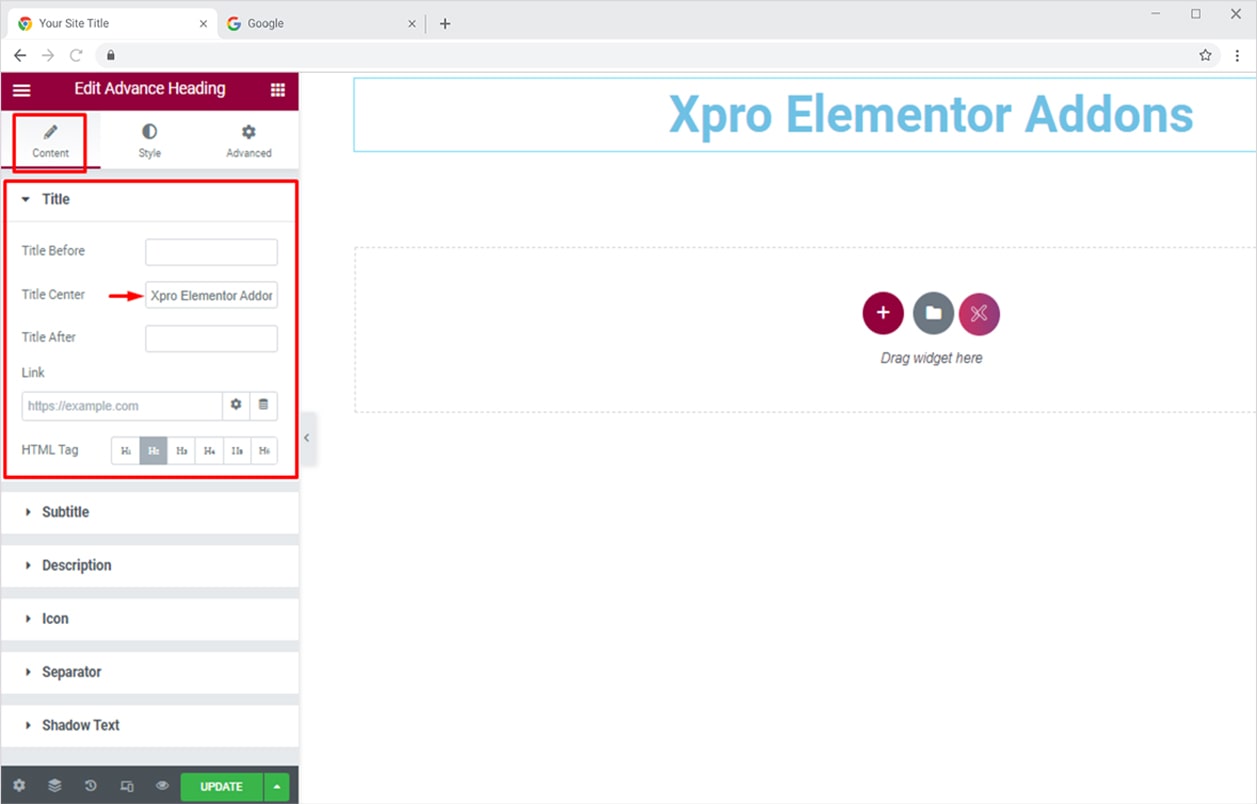
Go to the Content section and enter the text for your heading. You can set the Title text in three different fields (before, center, after). You can also add up a Link to your heading if you want the site visitors to head over to another offer/page. Set the desired HTML Tag for your heading, by default it is set as H2. The alignment option is available in the Style section.
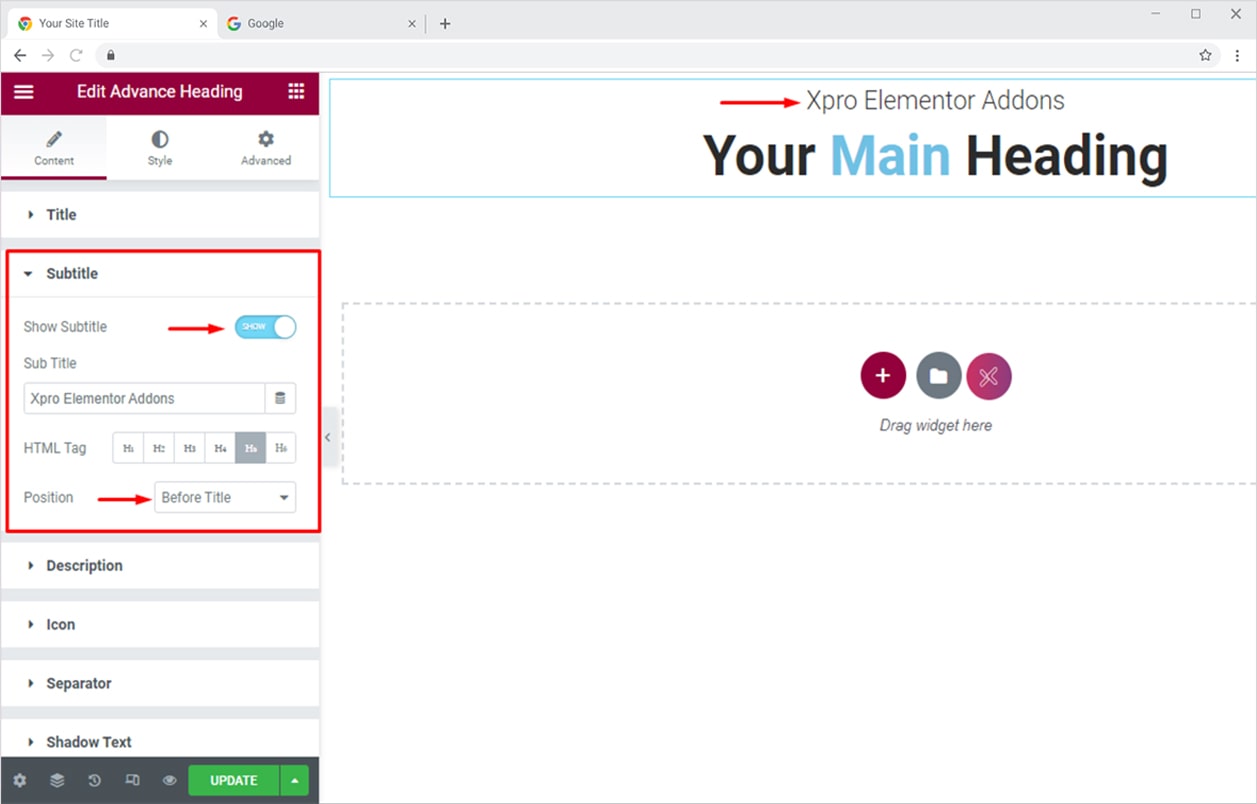
Add Subtitle in Your Heading
Add a subtitle in your heading by toggling the button to show subtitle (by default it is turned on). The subtitle option is just below the Title dropdown in the Content section. Add your desired text, set the HTML tag, and position the subtitle. There are two positions available, ‘Before Title’ and ‘After Title’. Here, we have set it as ‘Before Title’.
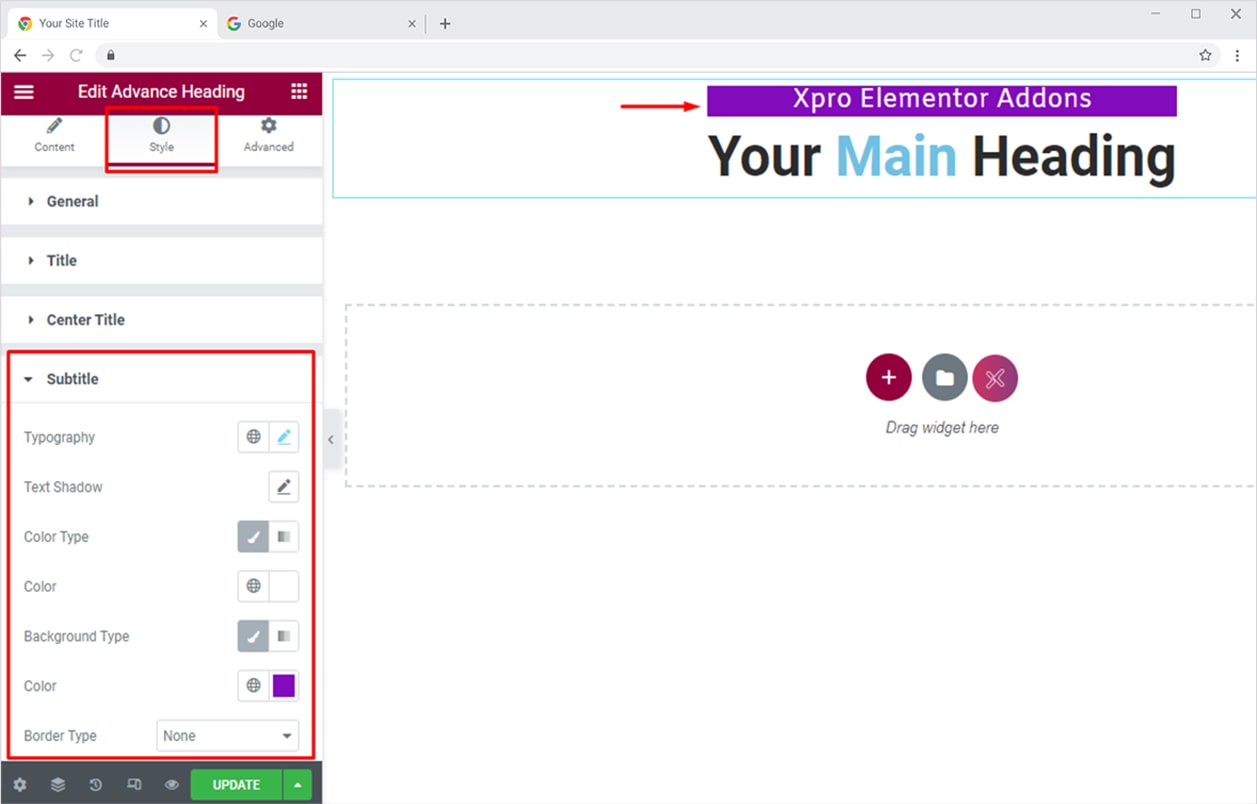
Now that your Subtitle is added up in your heading. You can design it from the Style section. Set typography, add text shadow, text color, background, and much more.
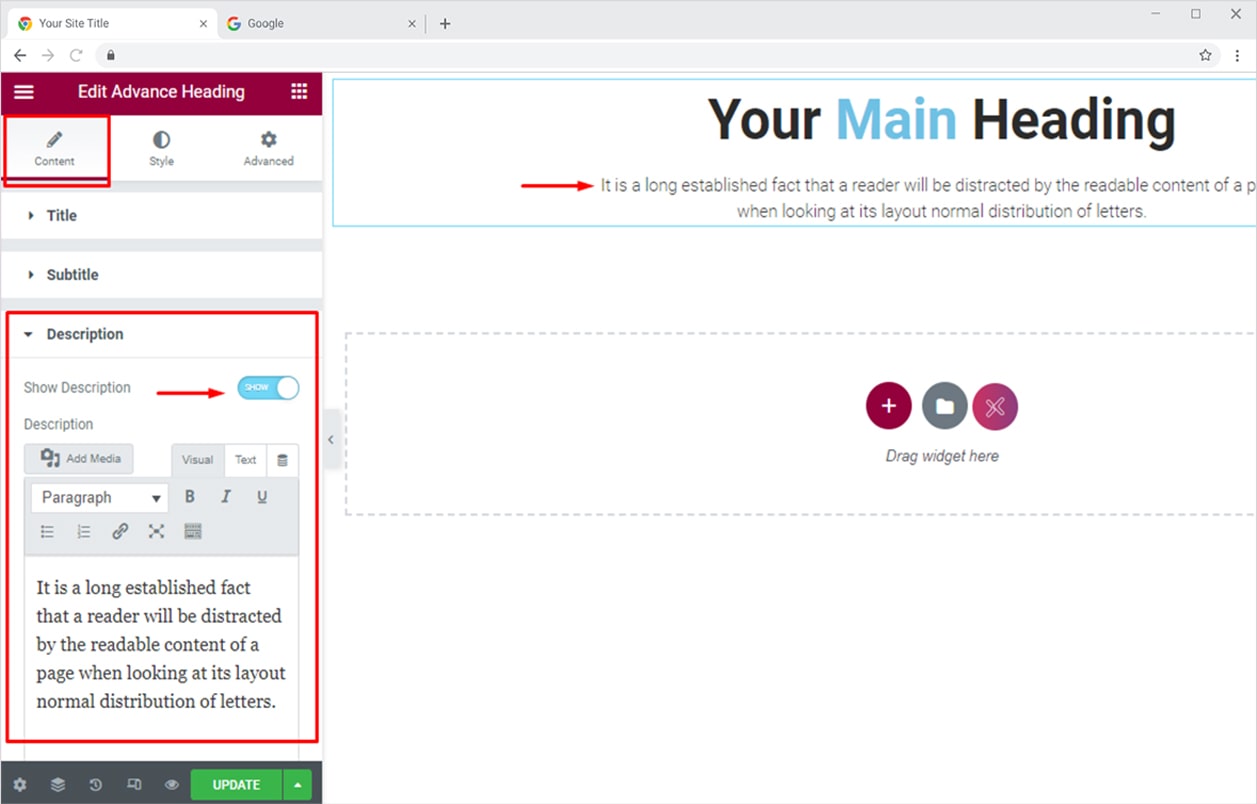
Add Description in Your Heading
Toggle the Description ON the same way we turned on the Subtitle option (by default it is turned on). The Description option is just below the Subtitle dropdown in the Content section. Add your desired text, add bullets, and set the text as bold, italic, or underlined. Add up a link if you want. You can also add media files like images in your description.
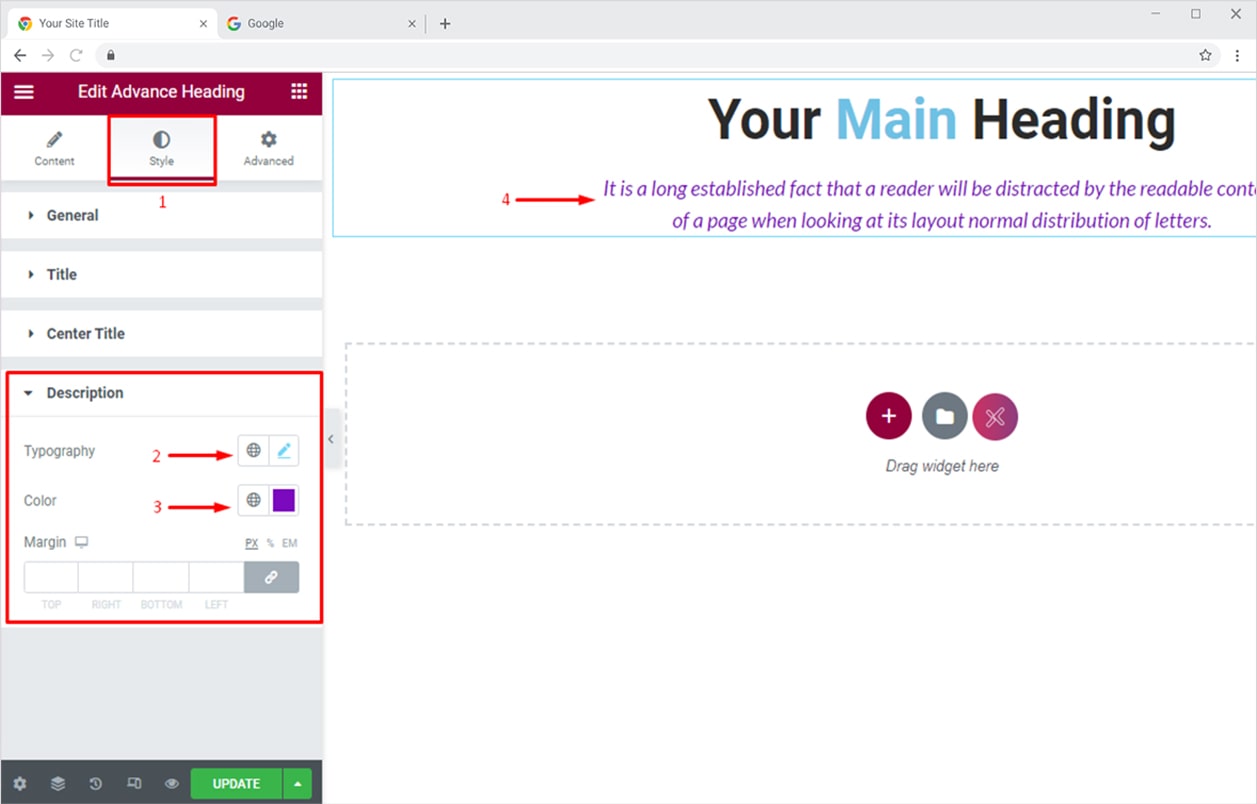
Once the description is added, you can style it the way you want, and add information to give your users a detailed experience on the go. Go to the Style section, set typography (font, font size, style, weight, decoration), and give a nice color to your description from the Color option. The final output will be something like this:
Try our free theme builder for Elementor and easily customize default theme templates for Astra, Xpro, Hello, and GeneratePress. Its free, super easy, and time saving!
By Xpro Elementor Addons
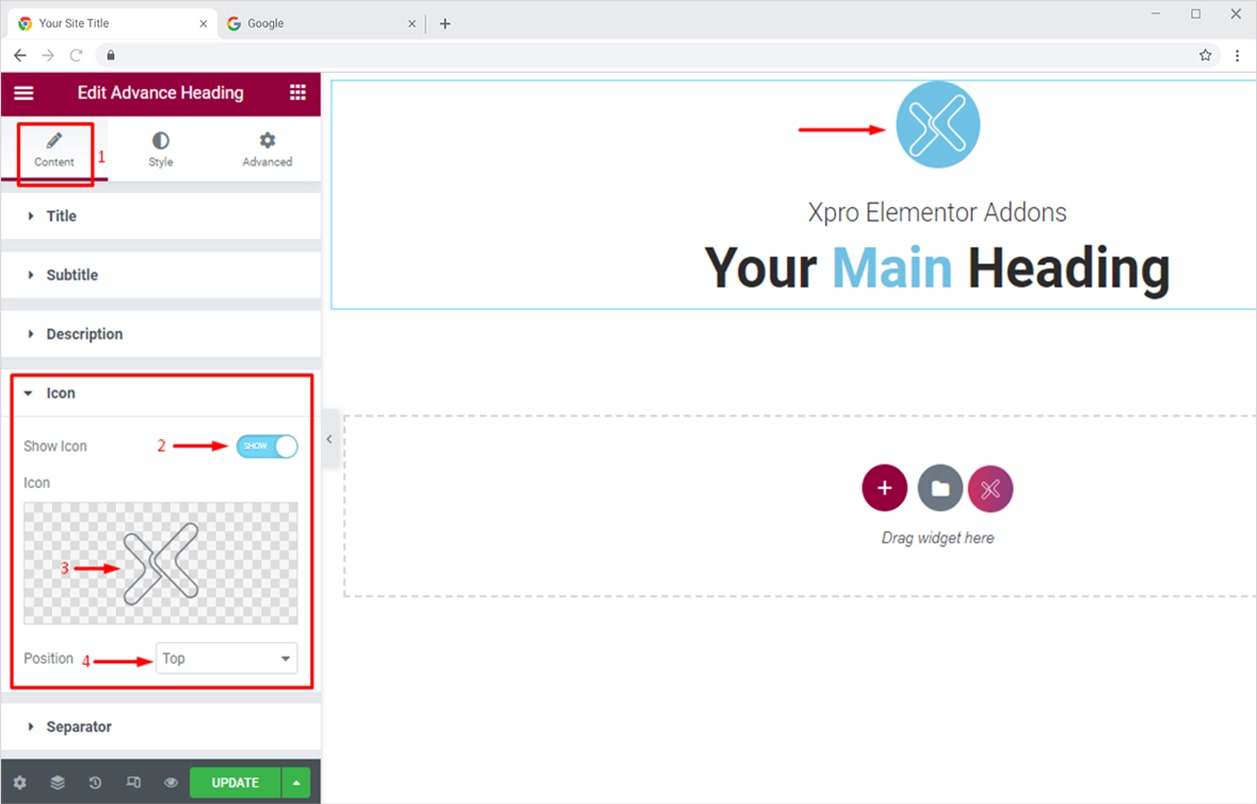
How to Add Icon & Set Alignment in Advanced Heading Widget
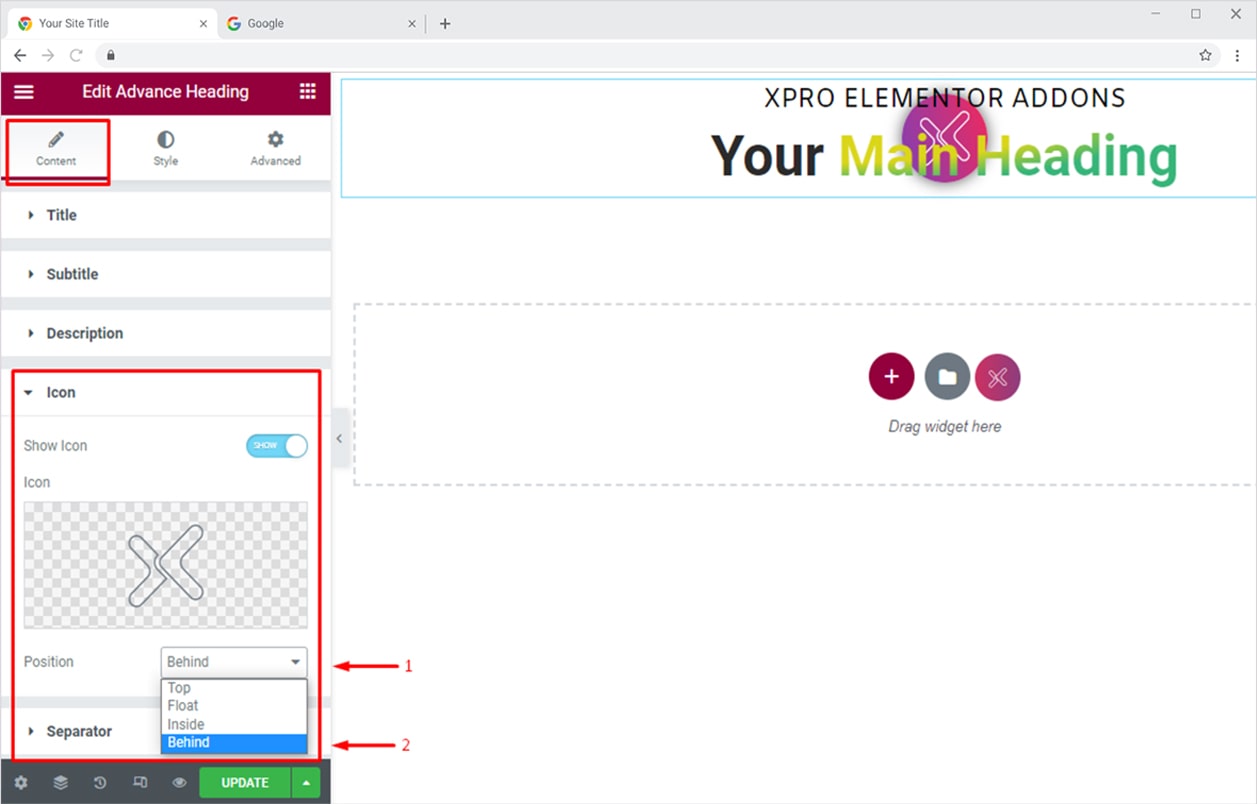
Add an interactive icon to your headings and explain more with fewer words. An icon can convey a meaningful message to your site visitors about your content. To do this, first, you need to toggle the icon option to Show.
- Go to the Content Section and find the Icon option in the dropdown menu.
- Turn the ‘Show Icon’ button ON
- Choose an icon from the default Elementor library or Xpro Icons. You can also upload your own SVG.
- Set icon position as top, float, inside, or behind.
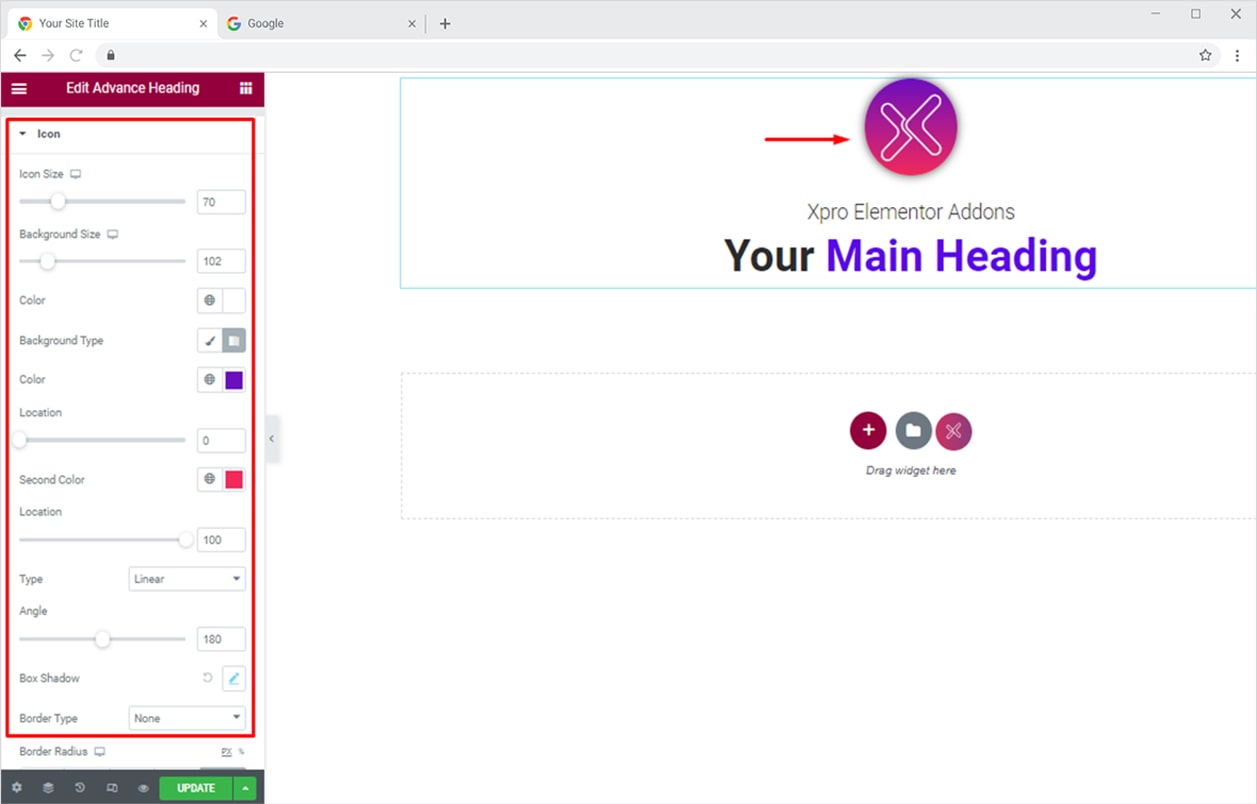
Once the icon is added, go to the Style Section to design your icon beautifully. Set the custom size and color for the icon and the icon background. You can also add gradient on the icon background and a box shadow too, just like we did here:
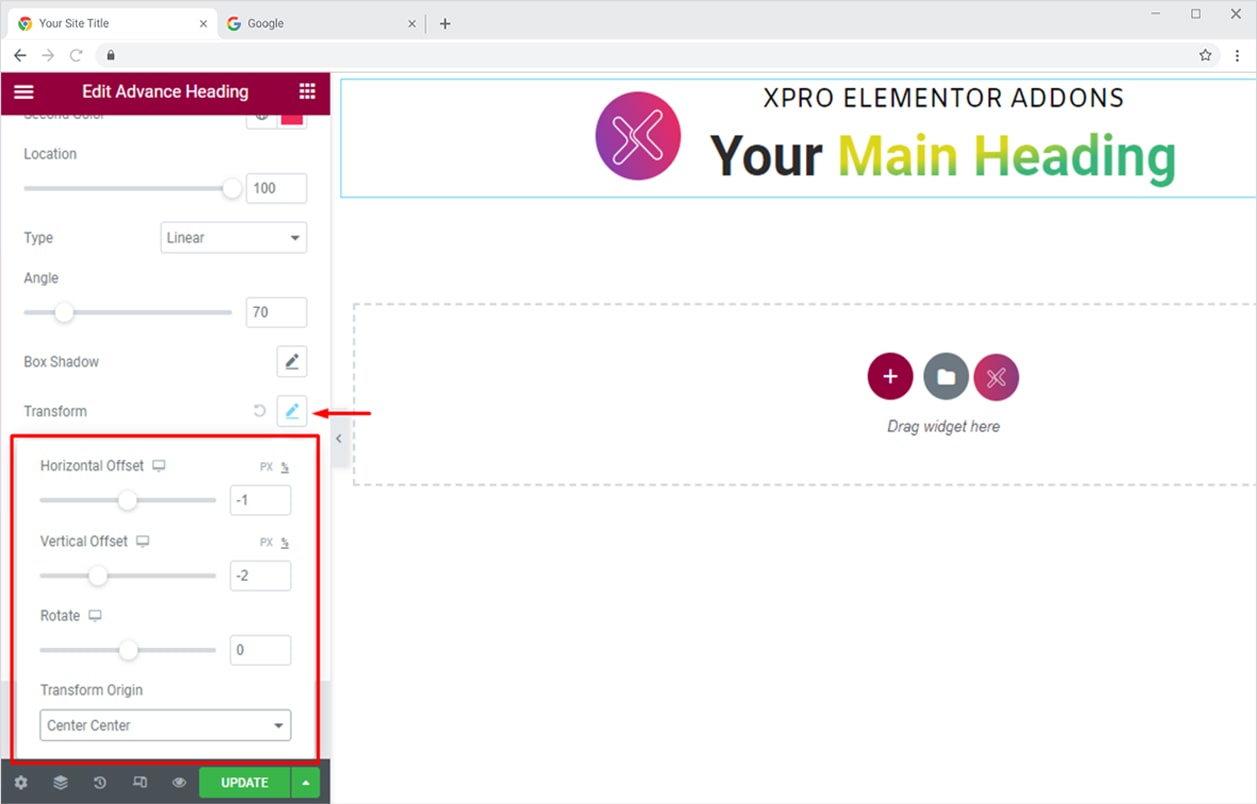
You can play around with your creativity by perfectly aligning the icon with your heading. To do this, first, you need to go back to the Content section and change the position of the icon to Behind.
Now go to the Style section and click on the edit icon in front of the Transform option. Here you can set transform-origin, rotate the icon, set horizontal & vertical offset to perfectly align your icon with your heading!
How to Add & Style Separator for Your Elementor Headings
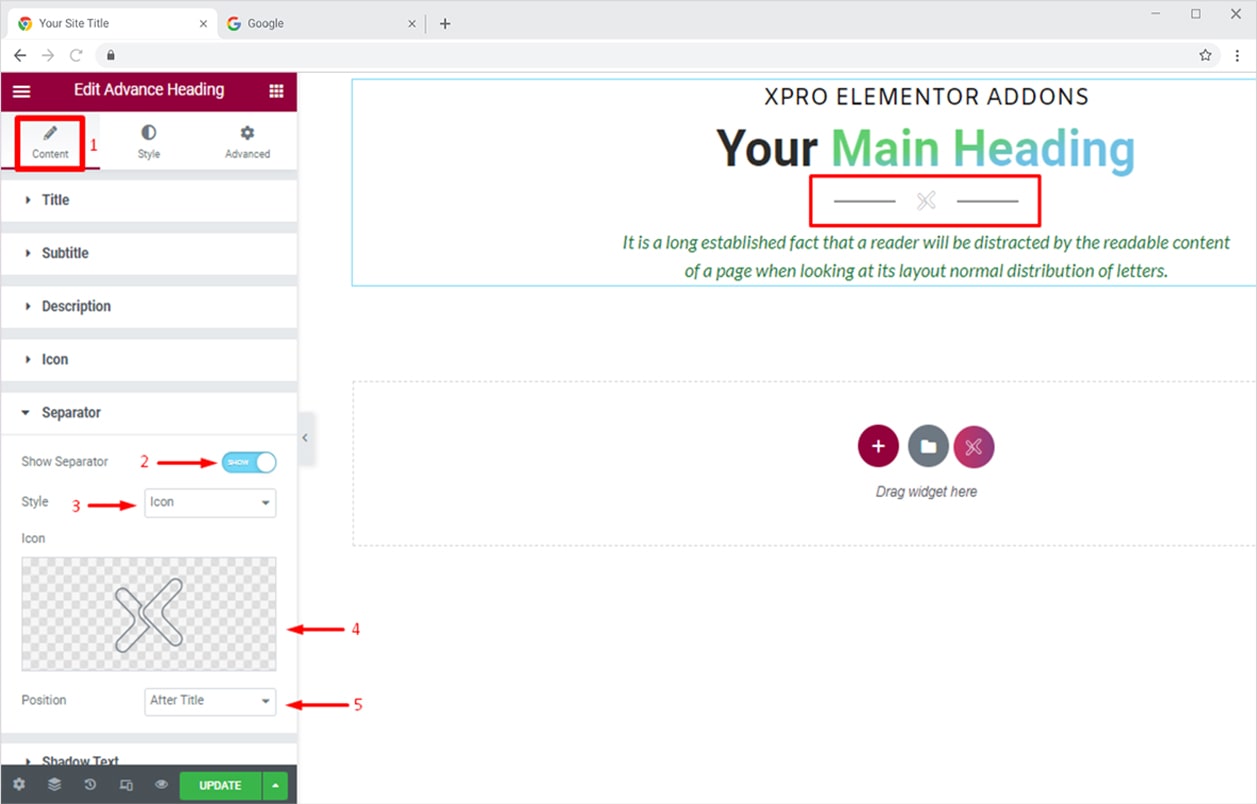
Give a sleek look to your headings by adding a Separator to them. Distinguish the content with an elegant separator, you can choose from 8 styles including our four pre-defined shapes and any icon from our library. You can also set a simple text or double-lined separator. First, you need to toggle the separator option to Show:
- Go to the Content Section and find the Separator option in the dropdown menu
- Turn the ‘Show Icon’ button ON
- Choose a separator of your choice from the Style option
- Position the separator as per your liking (before or after the title)
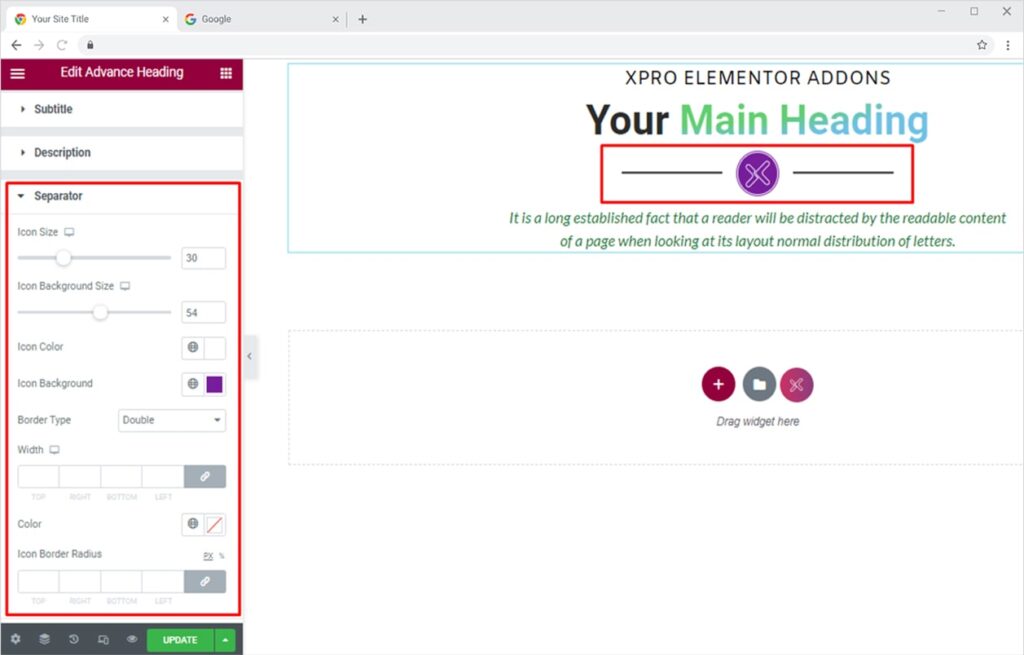
Once the separator is set from the Content section, you can then fully design it from the Style section. Under the separator dropdown, set the size and color for the icon and the icon background. Add an elegant border (solid, double, dotted, dashed, groove) to give a premium look to your heading. You can also add the color of your choice to the border, just like we did here.
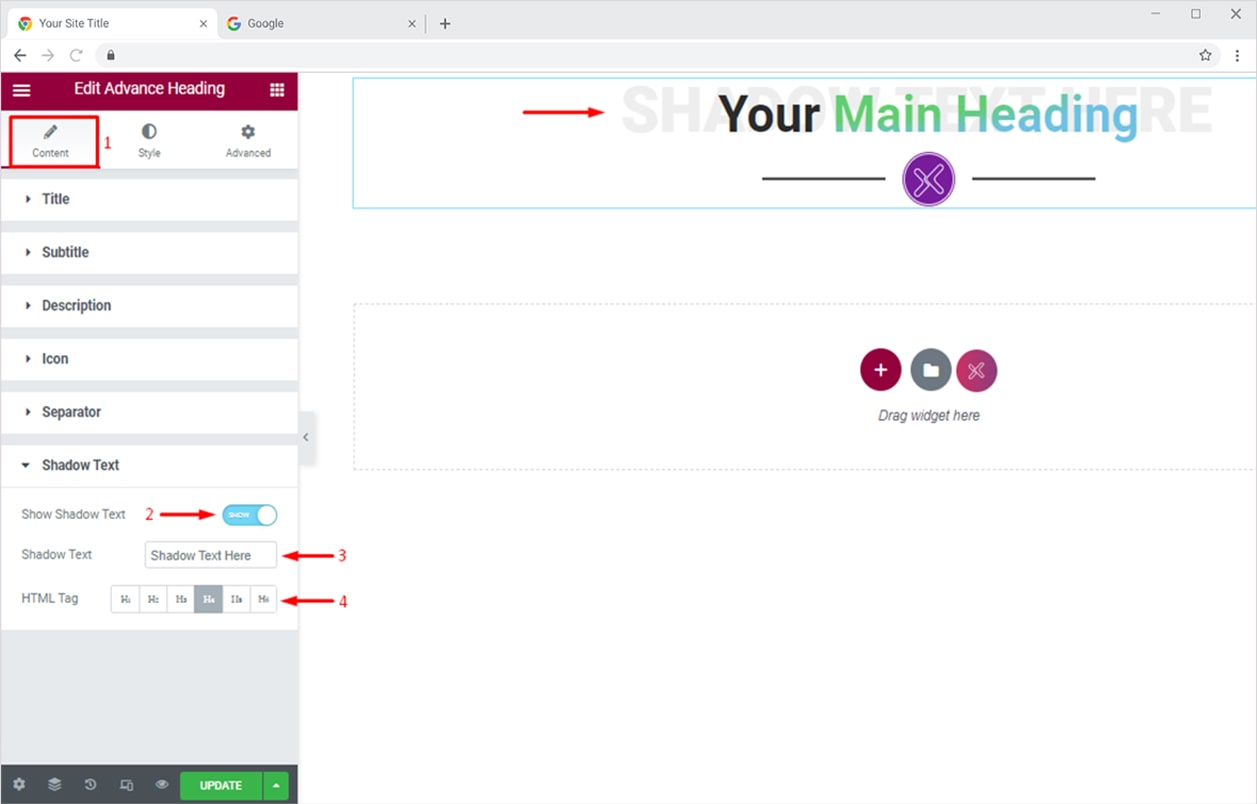
How to Apply Shadow Text to Your Headings
Give your headings a unique look and feel by adding shadow text. This is a really helpful feature if your background shade is similar to your heading, the result might be a headline that is hard to read. By adding a shadow text, your headings will get nice visibility makes it more popping for readers. To do this, first, you need to toggle the shadow text option to Show.
- Go to the Content Section and find the Shadow Text option in the dropdown menu
- Turn the ‘Show Icon’ button ON
- Enter the desired text
- Set the HTML tag for it (default is H4)
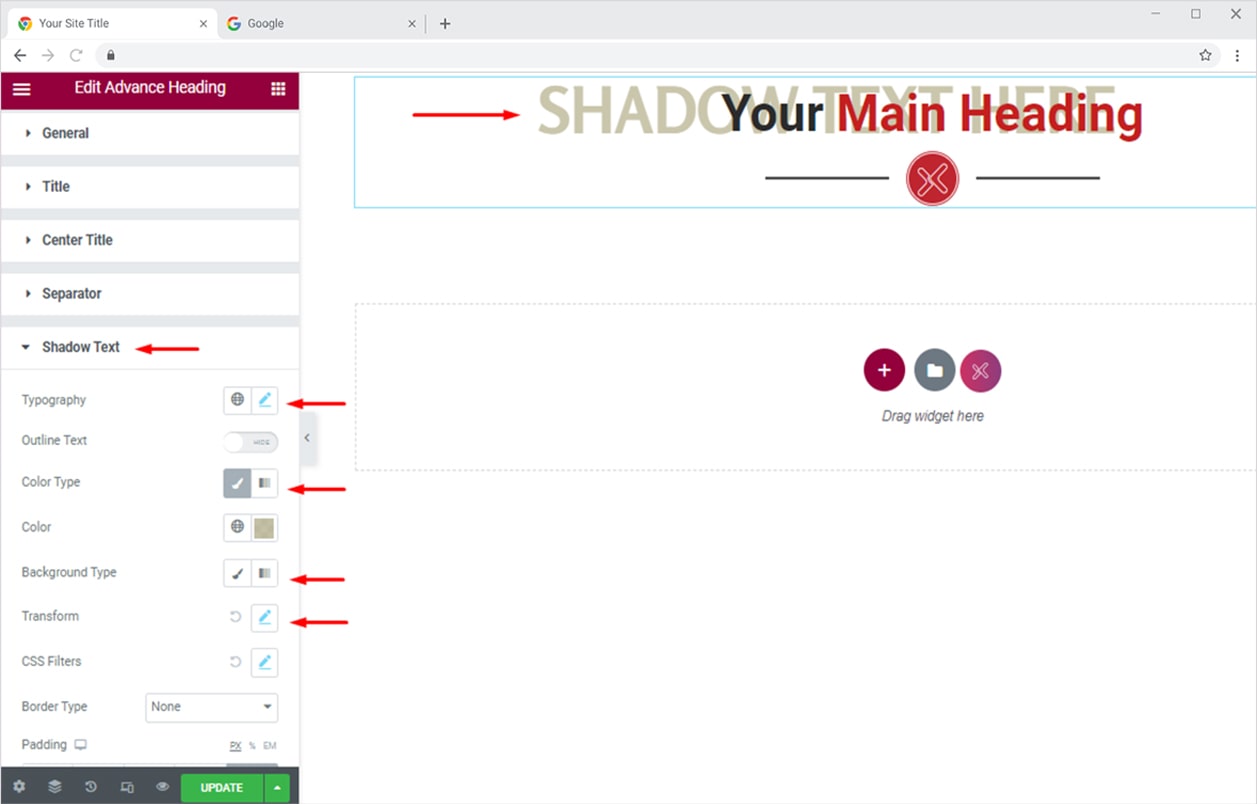
Once the shadow text is set up, you can now design it from the Style Section and make it more appealing to the visitors. Set typography (font, weight, style, transform, etc.), color (solid or gradient), add a nice background, and set a border too.
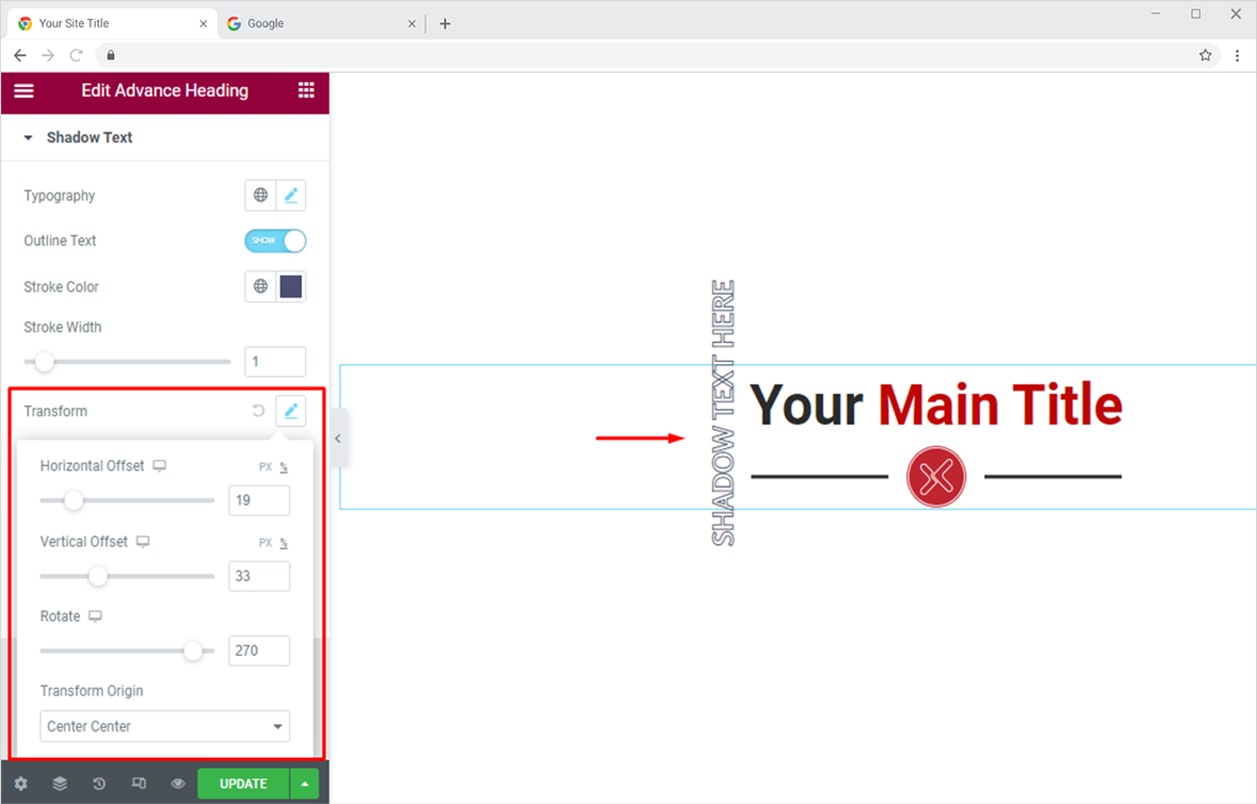
You can also set the shadow text position and rotation from the Transform option.
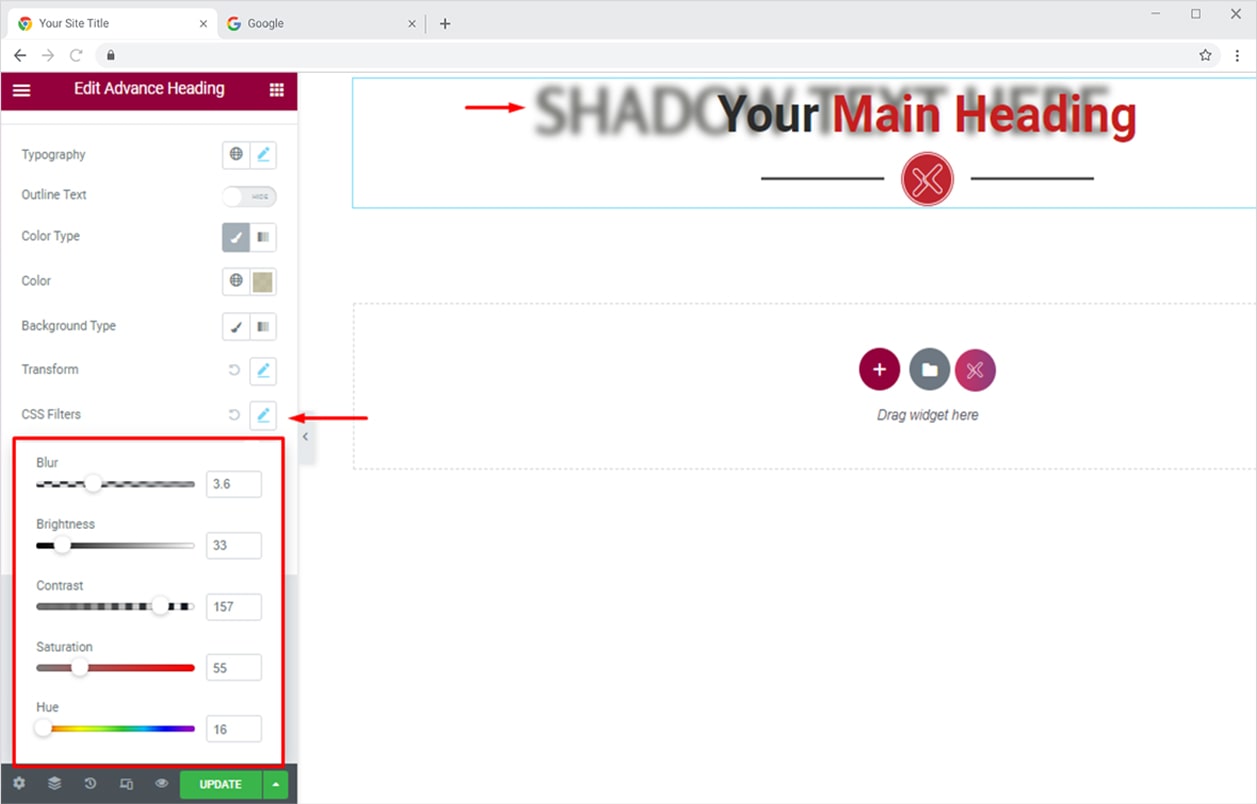
From the CSS Filters option, you can set the blur ratio, brightness, contrast, etc., for your shadow text.
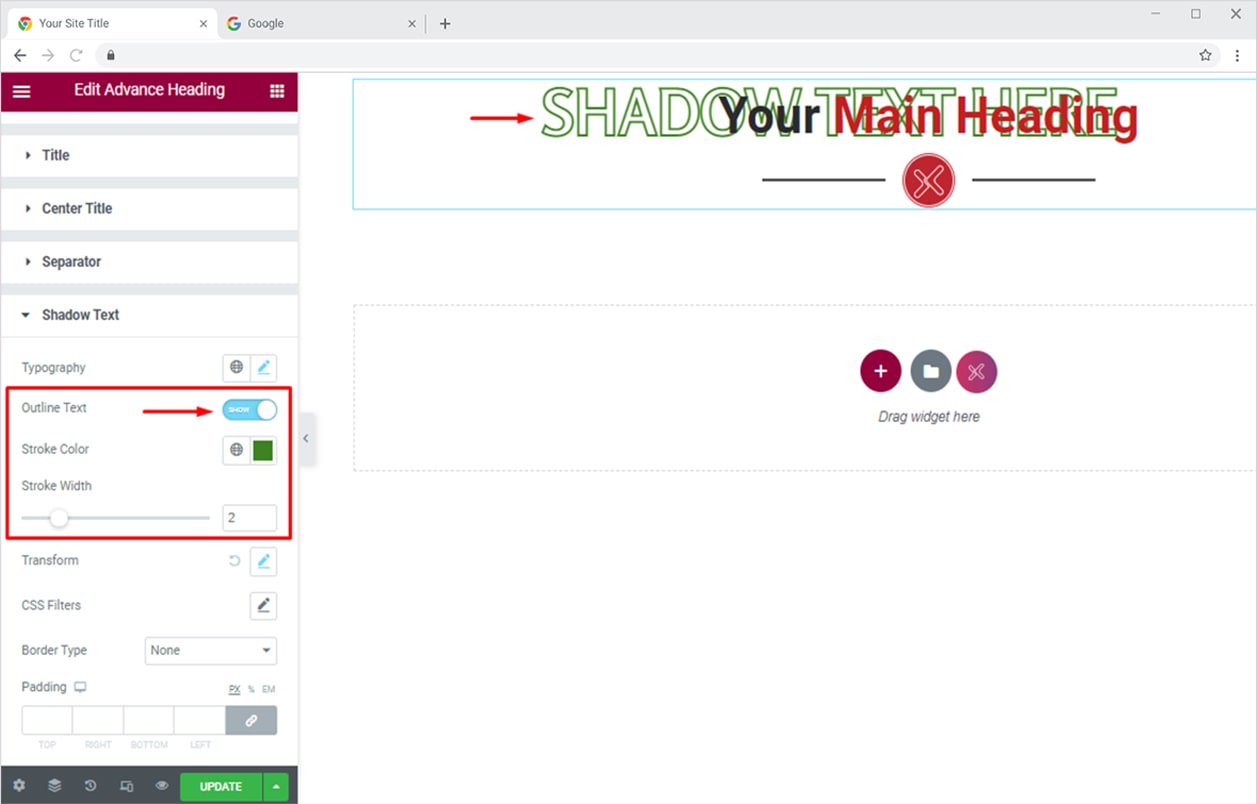
Make your shadow text more dashing by turning on the Outline Text option. Set the stroke color and stroke width to create a pleasing shadow text for your headings.
How to Apply Image / GIF Masking to Your Headings
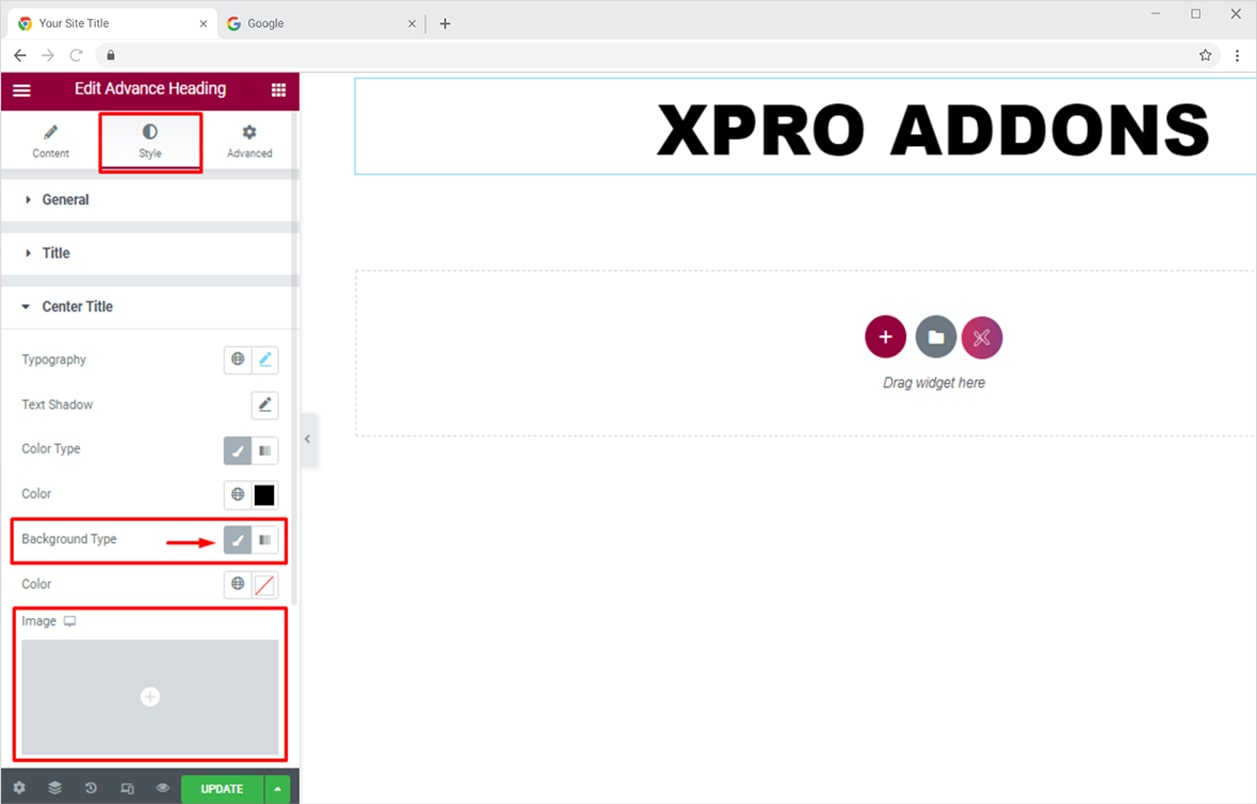
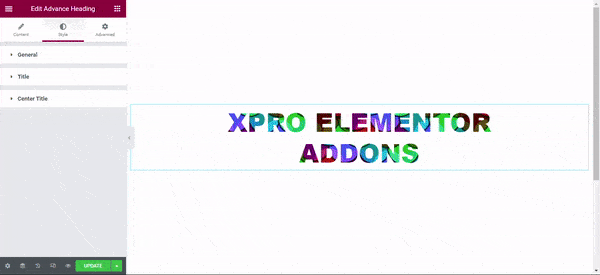
One of the coolest features of Xpro Advanced Heading Widget is the masking option. This awesome feature lets you add an interactive image or GIF to your heading as a mask. Let’s get to know how you can add image or GIF masking to your heading. Firstly, you need to go to the Content Section and enter your heading text in the Title or Center Title field.
Once the text is finalized, you can design it from the Style Section. From the Center Title dropdown, set the Background Type as classic and upload your desired image or GIF. In this demonstration, we are going to add a GIF for masking purposes.
Once the Image/GIF is uploaded, turn the Masking Option on, and set the position, attachment, and size of the image/GIF.
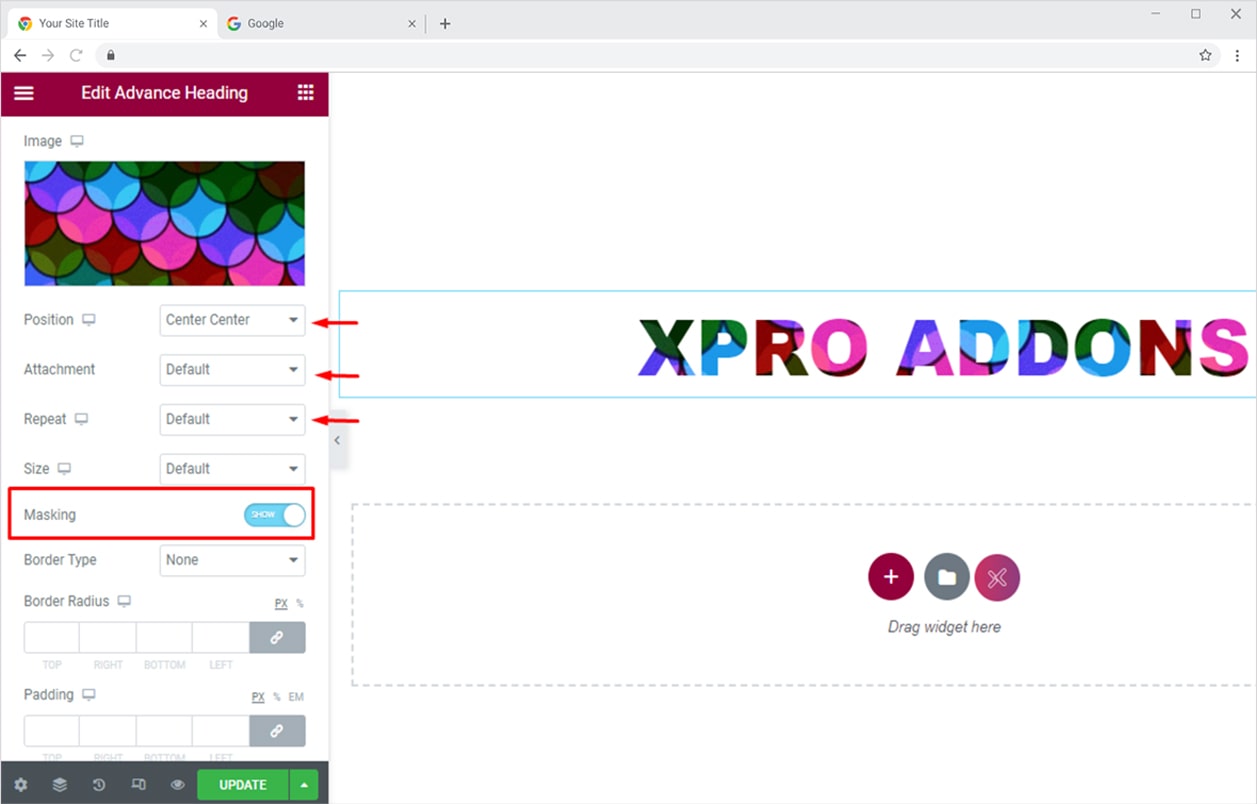
The final output will be an amazing heading like this:
How to Apply Scroll Effect to Your Advanced Headings
Add a beautiful scroll effect on any Xpro Elementor widget. Head over to our detailed guide on how to apply the scroll effect on your WordPress websites.
How to Apply Mouse Effect to Your Advanced Headings
Xpro Elementor Addons lets you add mouse effects on almost all widgets. Head over to our detailed guide on how to add a mouse effect for your WordPress websites.
That’s it from the Advanced Heading widget. Head over to Xpro Elementor Animated Heading and explore more exciting features/effects for your website headings. Also, check out our free Elementor Heading widget.