How to Install Elementor Countdown Widget
The countdown is a wonderful Elementor widget tool offered by Xpro Elementor Addons that is a great showcase for your website. The countdown timer widget, as the name implies, allows you to add a timer to your page. The tool is ideal for business websites that are running a promotion or launching something new. This Pro Xpro widget allows for a multitude of customizations and styling options.
This plugin is perfect for offering a limited-time discount or any other offers to your customers. You can set a countdown to the end of the offer and inform your customers that there is a time limit to take advantage of the offer. Place the Widget on your home page to make your offer more visible to your customers.
The Elementor countdown widget is extremely easy to use and provides all of the necessary customizations to allow you to create the perfect widget for your Elementor webpage. You have complete control over the widget to make any changes and set a time. Let’s discuss in length, how to use this amazing widget.
Requirement
You need to install and activate the Pro version of Xpro Elementor Addons. If you already have the plugin installed, just make sure the countdown widget is ‘Enabled’ from the Xpro Elementor Addons dashboard. So, you can find it in the Elementor editor.
To enable the widget, simply follow these steps:
Step 1
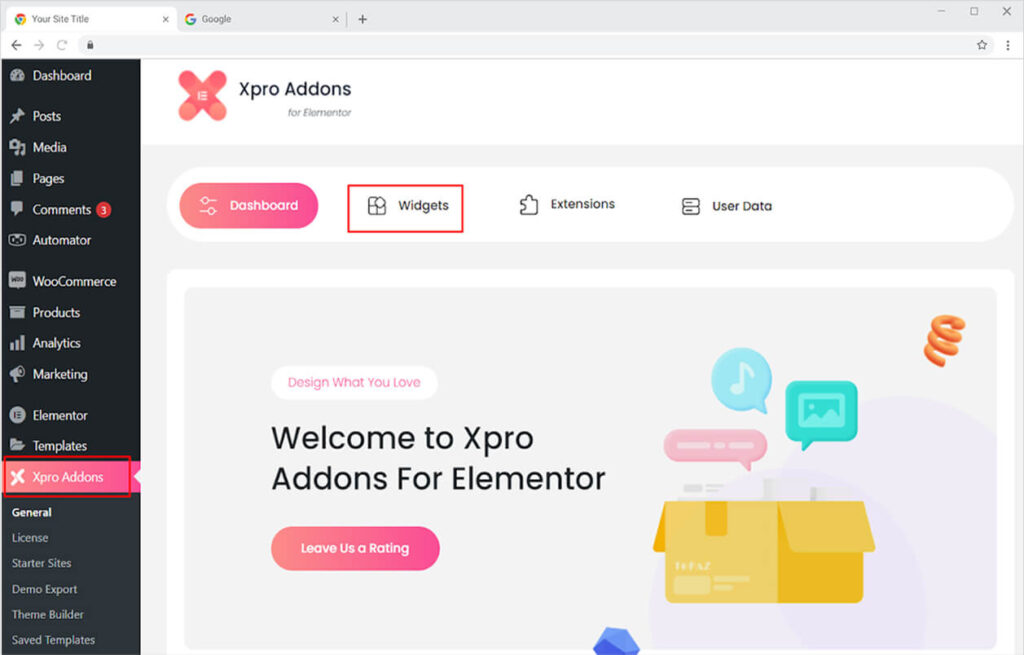
Click on the Xpro Addons option available on the WordPress Dashboard Menu.
Step 2
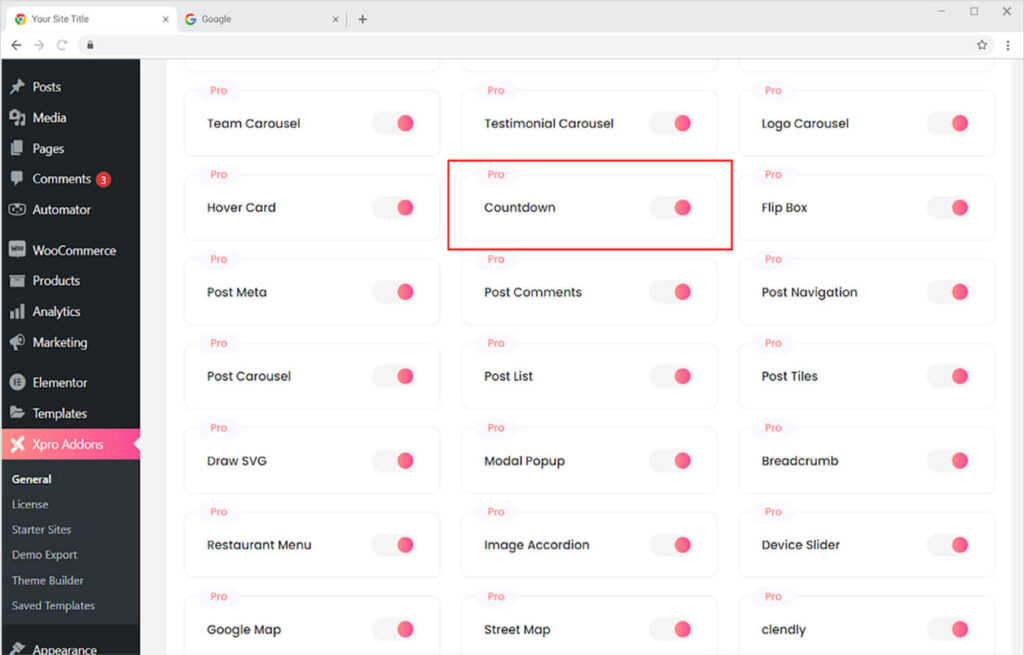
Scroll down the Xpro Addons Dashboard’s Widgets tab to find the “Countdown Widget”, and then toggle the button ‘ON’ to enable it.
How to Use Xpro Elementor Countdown Widget
This marvelous widget can be used for a variety of purposes and will provide multiple benefits to your business. When promoting discounts on your products or any event, it is absolutely essential to include a countdown timer on your website.
Display this widget beautifully to capture your customers’ attention right away. Encourage customers to take advantage of this limited-time offer to increase your conversion rate. Let’s see how you can use this widget.
Step 1
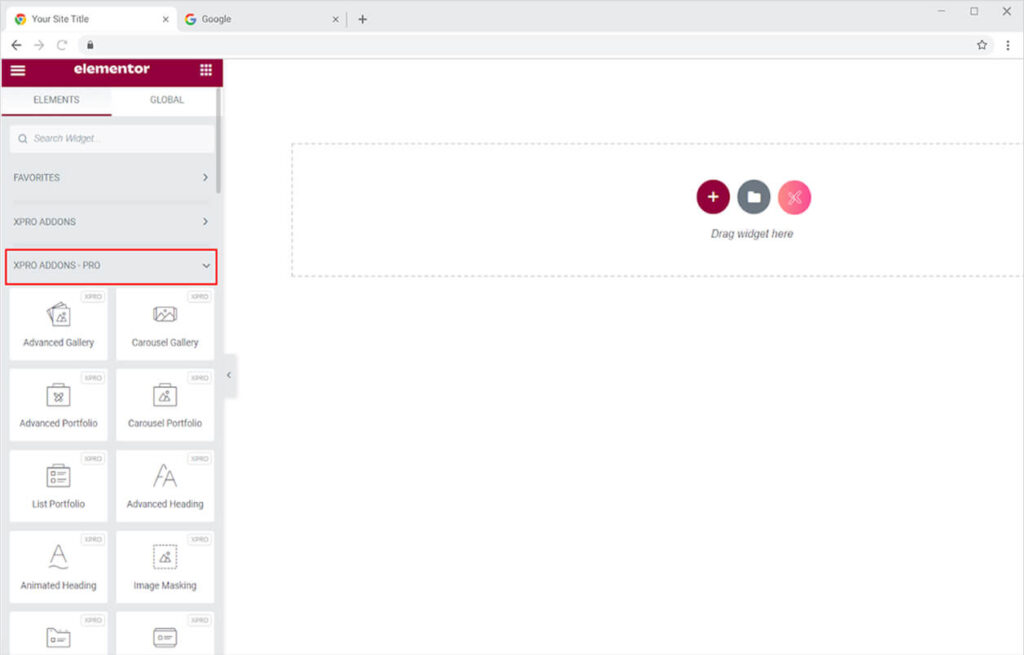
Click on the Xpro Addons-Pro section available in the Elementor Editor.
Step 2
Search for the Elementor countdown timer widget from the left top search bar and then simply drag the widget to desired page location and drop.
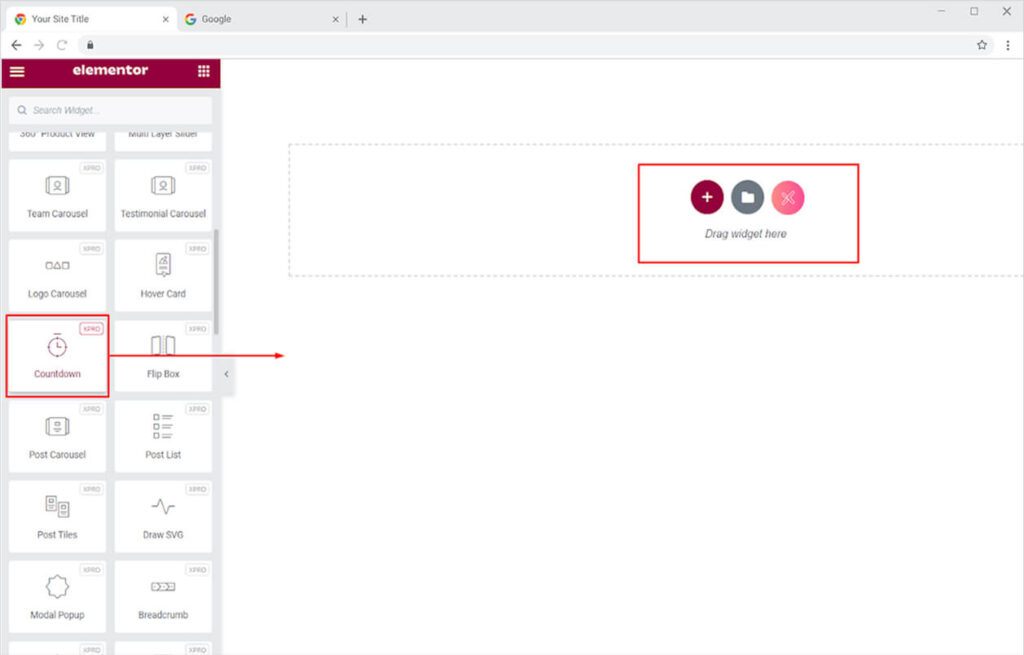
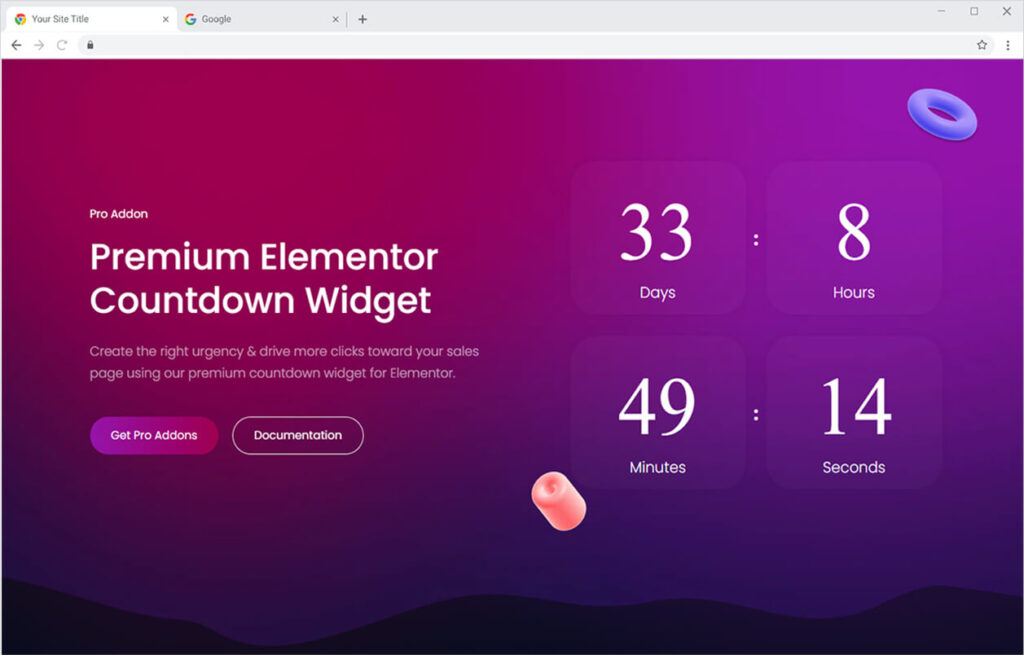
This is the default view of our Xpro Elementor countdown widget.
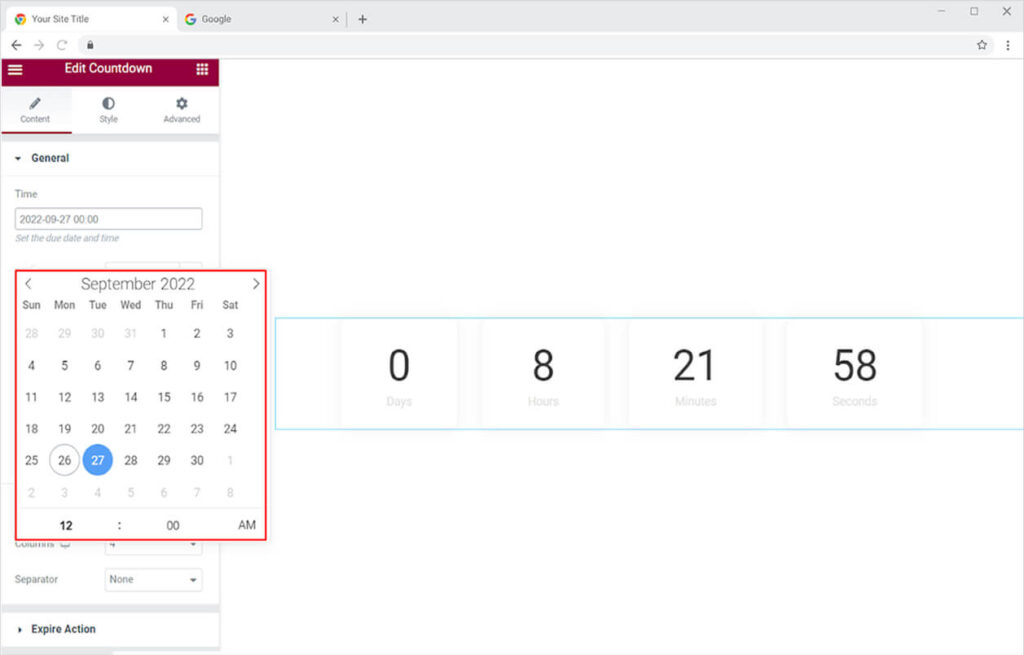
How to Set Timer
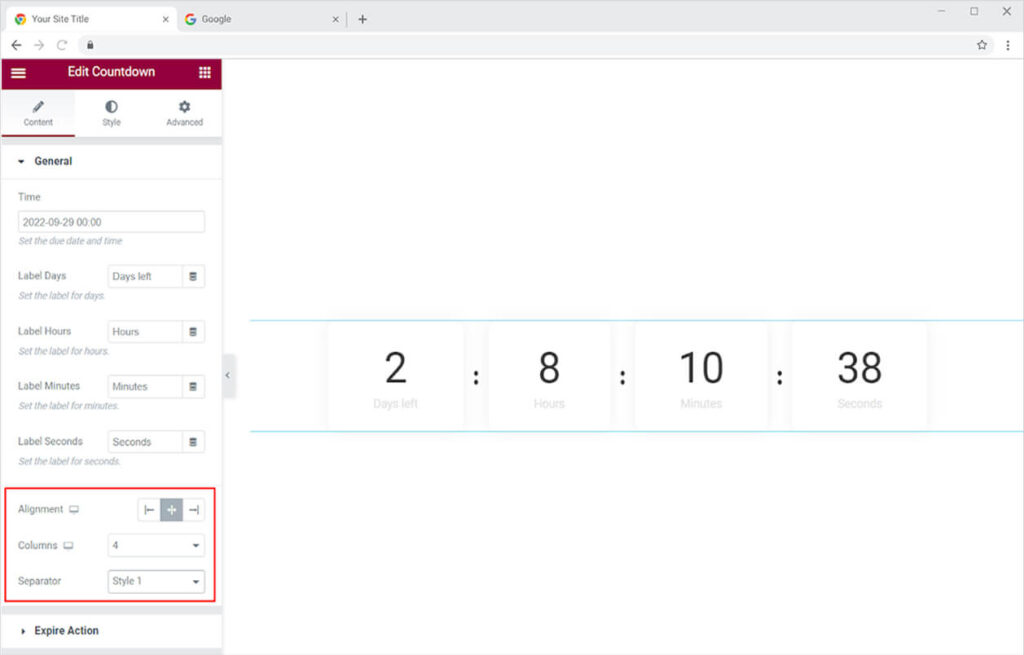
Navigate to the content section in the general settings. By simply clicking on the “time” column, you can change the time. Set the time as you want.
How to change the Content in the Label
You can also change the label’s content to say whatever you want. Go to the content section’s general settings and click on the label to type anything.
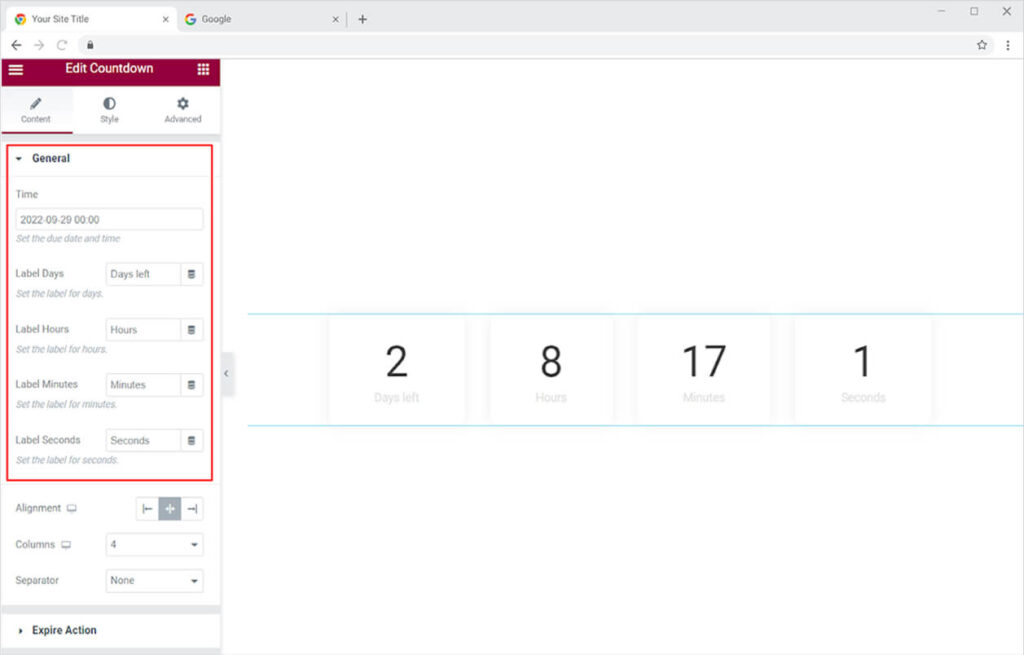
You can also change the alignment of the countdown timer to the left, right, or center of the screen. Add more columns if you want. Separate each box with a separator.
How to Add an Expiry Action
You’re probably wondering what happens when the timer reaches zero. We have a fantastic option that you can perform when the time gets to zero. You can include an action that will be displayed automatically when the timer hits zero. You can either show a message, direct a link, or add a template from the Expire Action in Content Section.
If you want to show a message after the countdown timer has finished, go to the expire action, then click on the action type option, and then choose the message. A countdown message option will appear, from which you can type whatever you want.

You can also change the font to make it more appropriate for your website. Change the font’s size, color, and style. You can also include an image. The possibilities are endless.
If you want to end this task by adding a redirection link so that your customer goes to that link then you can simply choose the option of a redirection link from the Action type. Then add the desired link.

You can also end the task by putting in any template that will automatically display when the timer will end. Create a section template by clicking “here” under the section template.

A different page will open from where you can add a new template.
If you don’t want to use any of the above-mentioned options then you can simply select “None” from the action type. In this way, nothing will happen after the timer reaches zero and it will only display the countdown widget.

Styling Section
After adding the content in the elementor countdown widget and managing the expiry task, move toward the most important task of styling. In the style section, you can design and customize the widget to make it suitable for your site.
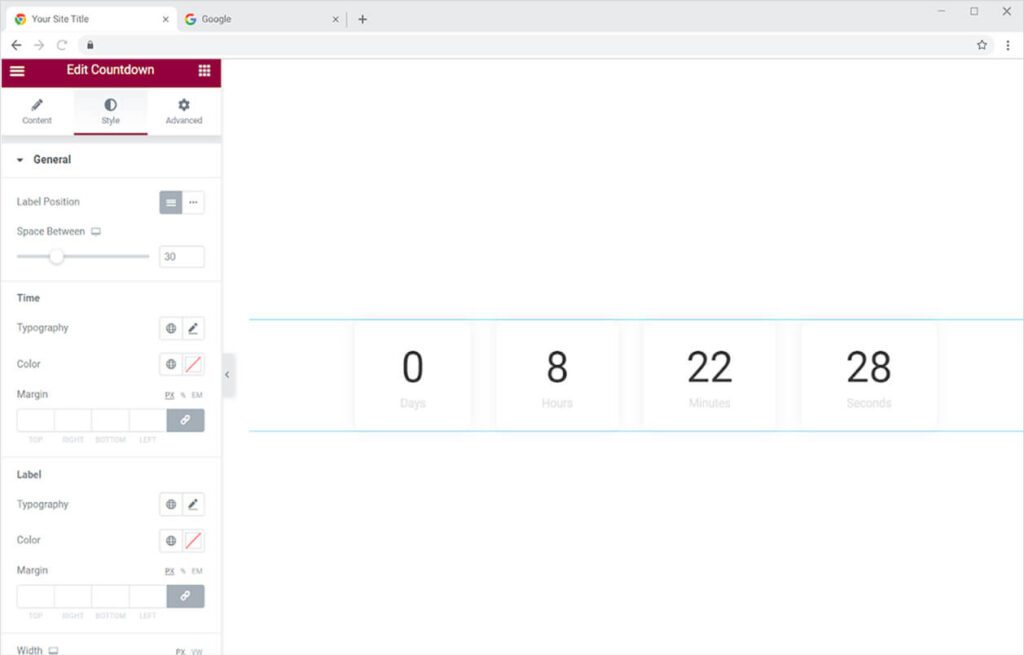
General
Here you can change the label position between blocks and inline and you also have the option to manage the space between timers.

After that, you can move to the time and label section to edit the style of the time display and the content label. Here you have endless options to design the typography any way you want. Change the color of the display content and also edit the margin between them.

You can change the size of the widget by editing the width and height.

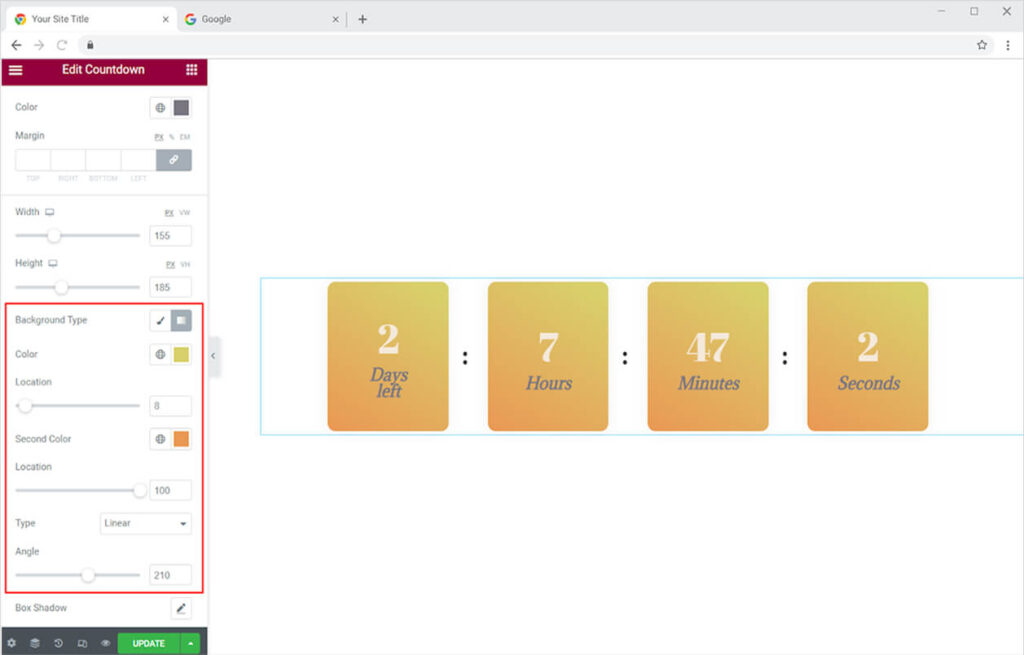
How to Style the Background of the Elementor countdown widget
Test your creativity by designing the background for the elementor countdown widget. The customization options are limitless. You can add any color or even an image to the background. Add a shadow and design it to look appropriate with the boxes.

Enhance the widget’s design by adding a box shadow to the boxes. This will make it appear extremely appealing to users.
Change the color of the shadow to match the color of the box. You can choose to show the shadow outside the box or the inside color effect. Make a shadow to the left or right, as well as up or down, by adjusting the horizontal and vertical bars. Adjust the blurriness of the shadow display.
Design the Border
Change the border of the boxes to make them more visually appealing. You can choose from five different types of borders.
- None
- Solid
- Double
- Dotted
- Dashed
- Groove
Change the width and radius of the border to match your preferences. You can also change the border color.

You can also edit these boxes individually using the same options. Drag down in the style section to see the labels for each box. You can edit each title individually from here.

Best Elementor Countdown Widget
All of the features provided by the Elementor Countdown widget will assist your website in displaying an appealing layout. This eye-catching widget will draw customers in and encourage them to take the desired action.
We hope you fully understand the functionality of this Xpro widget. Use your imagination to make your site look its best by utilizing this widget. Moreover, if you want to add more awesome and trending features to your websites. See the list of the best Pro Elementor Widgets by Xpro.
Xpro Elementor Addons offer a wide range of widgets, Elementor templates, and features that help you develop an attractive site. Check our 50+ free add-ons for Elementor which are enough to create a professional WordPress website. If you want to explore and add more attractive Elementor widgets then check our complete list of Pro Elementor widgets and download our Pro Elementor addons right now.